#EasterWeek: Peeps Cookie Bars

26685618_10155993373291948_4409902930968397778_o

Disclaimer: This post contains Amazon affiliate links.

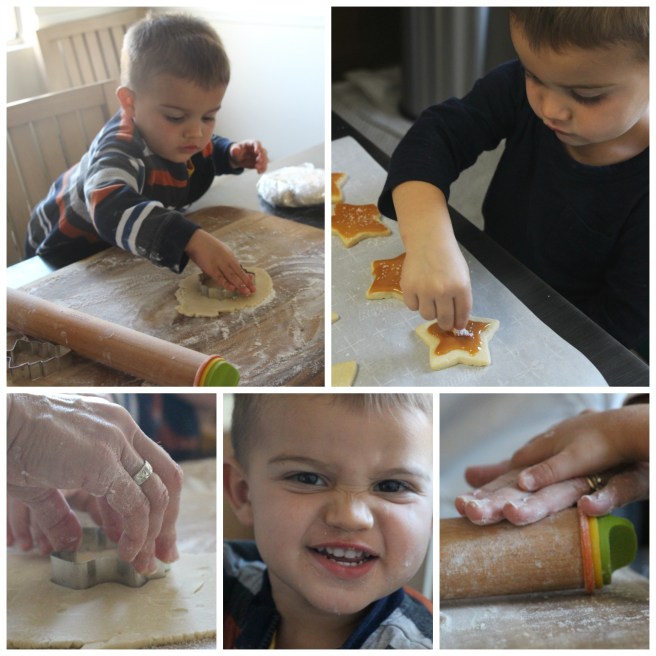
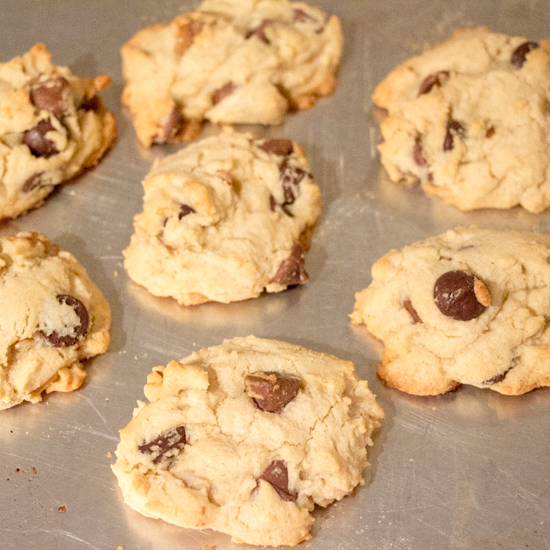
Earlier this year Firecracker wanted to make some cookies. My husband grabbed one of my cookie cookbooks (Cookies: Over 300 Step-By-Step Recipes For Home Made Baking). They selected more of a bar than a cookie, but we ran with it. Little tip for ya: Don’t try cutting out train shaped cookies from this bar, just let it be and cut it into rectangles.

The cookie bars were an almond cookie base, topped with jam, and marshmallows.

Now, my kids LOVE marshmallows. I’m talking bribery-status treat level here!

The cookies were quite fun and incredibly sweet. I had used a huckleberry jam from Knott’s Berry Farm.

I knew I had to try them again for Easter using Peeps!

I can’t recall having Peeps since making my famous (hey, the recipe was published in the Chicago Tribune last year!) Peeps Lemon Drop Martini FOUR years ago.

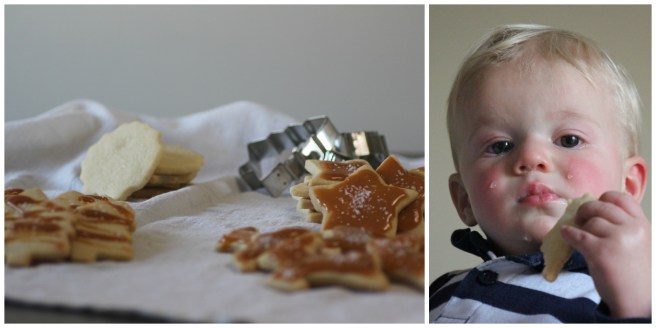
Peeps seem to get a bad rap (wrap?) these days. They’re one of those “love ’em or hate ’em” types of foods. Whatever. They’re delicious, and my kids, no surprise, quite enjoyed them. I’ll be sure to grab a small pack for their Easter baskets this year.

I used the bunny shaped Peeps because once cut in half, they’re thin enough to layer on the cookie bars. And to avoid any gruesome looking cookies, I used a pineapple and apricot jam instead of strawberry.

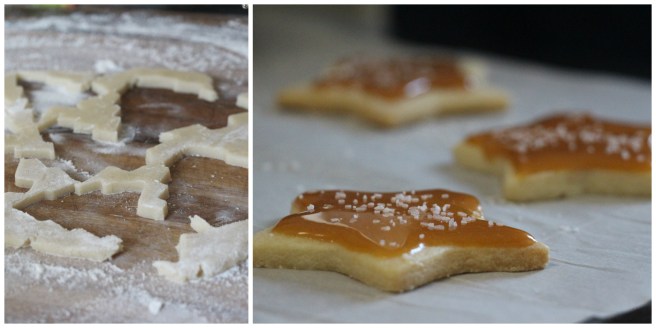
To make the cookies you first make the cookie base and let it cool. Then you top it with your jam before layering on sliced marshmallows. You need to cut them in half and place the cut side down to ensure they’ll stick. You then pop them back in the oven under the broiler.

Now, our oven has been busted pretty much since we moved into this home two years ago. The oven is older and runs into an “overheating” error that fails at a mere 350 degrees F. To work around the error we have to have the fan on the microwave running and the kitchen window open. Additionally, anything over 375 degrees F requires that nothing be on top of the stove, too. That means, I don’t get to use my broiler, so my marshmallows don’t get the toasty golden look to them (the Peep bunny faces did melt creating the allusion of toasted marshmallows). Ah well.

Peeps Cookie Bars for #EasterWeek from Sew You Think You Can Cook (1)

Peeps Cookie Bars

Ingredients:

  • 1 stick butter, at room temperature
  • 1/2 C superfine sugar
  • zest 1 lemon
  • 2 tsp vanilla extract
  • 3/4 C ground almonds
  • 1 egg
  • 1 C flour
  • 1 1/2 tsp baking powder
  • 1/4 tsp salt
  • approx. 1/2 C jam
  • 1 pkg (3 oz) bunny Peeps

Steps:

  1. Preheat oven to 350 degrees F. Grease a 9″x9″ cake pan (option to also line with parchment paper/foil).
  2. In a large bowl, beat together the butter, sugar, and lemon zest with an electric hand mixer. Add in the vanilla, almonds, and egg until combined. Mix in the flour, baking powder, and salt until a dough is formed. Spread dough evenly in prepared pan. Bake 20 minutes. Let cool.
  3. Spread jam over the baked cookie base.
  4. Cut Peeps in half horizontally and place, cut side down, on top of the jam. Return to oven and broil until marshmallows are golden.

Peeps Cookie Bars for #EasterWeek from Sew You Think You Can Cook

Be sure to check out these other Easter recipes:

Brussels Sprout Potato Cakes by Cindy’s Recipes and Writings

Candied Lemon Zest Jalapeño Deviled Eggs by Faith, Hope, Love, & Luck Survive Despite a Whiskered Accomplice

Carrot Cake Cookies by Daily Dish Recipes

Curried Deviled Eggs by A Kitchen Hoor’s Adventures

Dried Cherry and Almond Scones by Family Around the Table

Easter Egg Sugar Cookies by The Redhead Baker

Eggs Benedict Breakfast Bake by Cookaholic Wife

Greek Lamb Keftiko by Caroline’s Cooking

Ham and Cheese Breakfast Casserole by Karen’s Kitchen Stories

Roasted Pork Loin with White Wine Sauce by A Day in the Life on the Farm

Maple Apple Baked Oatmeal by Jolene’s Recipe Journal

Peeps Cookie Bars by Sew You Think You Can Cook

Easter Bread Cheesecake – Pasca by All that’s Jas

Spring Veggie Crudités with Fresh Pea Hummus by Culinary Adventures with Camilla

Vanilla Bean Mocha Biscotti by Amy’s Cooking Adventures

Vegetable Breakfast Casserole by Simple and Savory

M&M Cookies

I’ve been homeschooling Firecracker (and by proxy, Treat) this school year, which is why things have slowed down quite a bit around here in the blog-o-sphere.

But I’ve really been enjoying it!

I’ve been following a curriculum I purchased last summer, but mixing it up somewhat drastically to fit certain themes or occasions in our lives. For example: We actually started with units 9 and 16 instead of 1 and 2. We actually just did unit 2 in January!

And now that we have somewhat of a routine with how the units are organized, I’ve been venturing out and creating my own units, too! All of the units I’ve developed are centered around the holidays.

We’re currently on, you guessed it, Valentine’s Day!

And I’ve been getting really into this least favorite holiday of mine. I’ve been cutting their sandwiches and cheese slices into hearts for lunch and we’re crafting up a storm.

We even made Valentines for our long distance family members. (The photo below was sent from my beautiful sister-in-law and shared with her permission.)

img_2202

I found the idea for the Valentines on Pinterest. The boys loved having me paint their hands, saying it tickled. (Mega crafting milestone for my boys!) I cut the yarn to be the length of their arm span. The boys each picked the background color for each of their Valentines depending on who they were being sent to! It was fun to watch their little minds work in decision mode.

img_2158-2

Inside their Valentine boxes were a couple of appropriately colored M&M cookies. We sent so many cookies that there was only one cookie leftover for the 4 of us to share. (I ran out of brown sugar to make more – tragedy! Seriously. I have got to hit up a grocery store, like, ASAP, so I can make more of these cookies for us!)

M&M Cookies | Sew You Think You Can Cook | http://sewyouthinkyoucancook.com

I don’t think I’ve ever baked cookies that involved melted butter before, I was skeptical. But using melted butter made the mixing of these cookies insanely easy – no stand mixer required! I love the use of brown sugar in cookies, I think it gives the cookies a great depth of flavor. And of course, holiday colored M&Ms provide the perfect texture to these soft and chewy cookies.

This recipe makes approximately 21 cookies.

M&M Cookies

Ingredients:

  • 2 C flour
  • 1/2 tsp baking soda
  • 1/2 tsp salt
  • 1 1/2 sticks butter, melted
  • 1 C brown sugar
  • 1/2 C sugar
  • 1 egg
  • 1 egg yolk
  • 2 tsp vanilla extract
  • 1 C M&Ms

Steps:

  1. Preheat oven to 350 degrees F. Line two cookie sheets with silicone baking mats, parchment paper, or spray with cooking oil.
  2. In a bowl, whisk together the flour, baking soda, and salt.
  3. In another large bowl, whisk together the melted butter and sugars until combined. Add the eggs and vanilla, mixing until fully incorporated.
  4. Slowly add the flour mixture to the wet ingredients, switching to a spatula for easier mixing. Fold in the M&Ms.
  5. Spoon onto prepared baking sheets. Bake 10-12 minutes, until the edges are golden. Let cool on baking sheets.

*This recipe is adapted from Kristyn at https://lilluna.com/giant-chewy-mm-cookies/*

M&M Cookies perfect for Valentine's Day | Sew You Think You Can Cook | http://sewyouthinkyoucancook.com

Marshmallow Peanut Butter Cookies

A long time ago I made these peanut butter cookies studded with chocolate chips and marshmallows.

I took some photos.

Those photos stayed on my camera.

Those photos that stayed on my camera got deleted by my toddler. (You can read about that story here.)

I’d already signed up to share said cookies with my blogging friends in celebration of National Peanut Butter Day.

The real bummer silver lining here, is that I had to make these cookies again.

I remember wishing the cookies had more marshmallow and less chocolate, so I did just that.

These cookies are delicious.

I made them massive. No particular reason. Just because I could.

If you like peanut butter cookies, whip up a batch of these bad boys as soon as you have some marshmallows on hand. (Evidently not all grocery stores have marshmallows, but that’s a story for another day?)

Marshmallow Peanut Butter Cookies

Ingredients:

  • 1/2 stick butter, softened
  • 1 C creamy peanut butter
  • 1/2 C brown sugar
  • 1/2 C sugar
  • 2 eggs
  • 1 tsp vanilla extract
  • 1 1/2 C flour
  • 1 tsp baking soda
  • 2/3 C mini marshmallows

Steps:

  1. Preheat oven to 350 degrees. Line cookie sheet with parchment paper.
  2. In the bowl of a stand mixer fitted with the paddle attachment, cream together the butter, peanut butter, brown sugar, and sugar until fluffy. Add the eggs one at a time and vanilla until fully incorporated.
  3. Add in the flour and baking soda. Mix until combined and a cookie dough forms. Fold in the marshmallows with a wooden spoon or spatula.
  4. Roll cookie dough into balls and place onto the prepared cookie sheet. Bake 15 minutes, until cookies are browning and marshmallows melted. Let cool on the baking sheet 5 minutes before removing to a cooling rack to cool completely.

*This recipe is adapted from Julie at https://www.tablefortwoblog.com/fluffernutter-cookies/*

Marshmallow Peanut Butter Cookies for #NationalPeanutButterDay from Sew You Think You Can Cook | http://sewyouthinkyoucancook.com

Be sure to check out these other recipes for National Peanut Butter Day:

3 Healthy Peanut Butter Smoothies by Bear & Bug Eats

Chicken Satay with Spicy Peanut Dipping Sauce by Everyday Eileen

Marshmallow Peanut Butter Cookies by Sew You Think You Can Cook

Chocolate Peanut Butter Balls by The Freshman Cook

E.T. Cookies by Karen’s Kitchen Stories

Easy Peanut Butter & Chocolate Swirled Fudge by Cookaholic Wife

Easy Peanut Butter and Banana Croissants by Jonesin’ For Taste

Fluffernutter Macaron by A Kitchen Hoor’s Adventures

My Family’s Favorite Peanut Butter Cookie (recipe remake) by Family Around the Table

No Bake Peanut Butter Cup Pie by Soulfully Made

Nutter Butter Ice Cream Cone Cookies by Amy’s Cooking Adventures

Peanut Butter & Chocolate Chip Granola Squares by Faith, Hope, Love, & Luck Survive Despite a Whiskered Accomplice

Peanut Butter and Jelly Smoothie Bowl by Simple and Savory

Peanut Butter Banana Overnight Oatmeal by Frugal Pantry

Peanut Butter Chocolate Chip Sheet Pan Pancakes by Kate’s Recipe Box

Peanut Butter Cream Cheese Spread by Cindy’s Recipes and Writings

Peanut Butter Mocha Cupcakes by Strawberry Blondie Kitchen

Peanut Butter Mousse Parfaits by The Redhead Baker

Honey Peanut Butter Popcorn by The Gingered Whisk

Peanut Butter Snowballs by Culinary Adventures with Camilla

Peanut Ginger Pasta by Jolene’s Recipe Journal

Thai Inspired Noodles by A Day in the Life on the Farm


Hot Cocoa Cookies

I was going to take my sweet time in writing the blog post for these cookies, until last Thursday happened.

Last Thursday I attended a cookie swap mom’s night out with my MOPS group. <link>

There were prizes awarded for best decorated and best tasting.

Guess who brought the best tasting cookie?

If you’re thinking, “Well if it wasn’t you than this is a terrible story.” You’d be right. It was me!

I had shared a Facebook video of some chocolate cookies with marshmallows and chocolate icing and sprinkles on my Facebook page with the caption “I know what I’m making for this year’s cookie exchange!”

And I did! And they were fantastic! They literally taste like a rich cup of hot chocolate, the real stuff.

So now I’m typing this post up on my phone in the Whole Foods parking lot while the boys take a late afternoon nap.

This recipe makes 39 cookies.

Hot Cocoa Cookies

Ingredients for cookies:

  • 1 stick butter
  • 1 bag (12 oz) semi-sweet chocolate chips
  • 1 1/2 C flour
  • 1/4 C cocoa powder
  • 1 1/2 tsp baking powder
  • 1/4 tsp salt
  • 3 eggs
  • 1 1/4 C brown sugar
  • 1 1/2 tsp vanilla extract
  • Mini marshmallows (2-3 per cookie) or 20 large marshmallows

Ingredients for icing:

  • 2 C powdered sugar
  • 1/4 C cocoa powder
  • 1/2 stick butter, melted
  • 1/4 C hot water
  • 1/2 tsp vanilla extract
  • Sprinkles

Steps:

  1. In a small saucepan over medium-low heat melt the butter and chocolate. Let cool.
  2. In a large bowl, whisk together the flour, cocoa powder, baking powder, and salt.
  3. In the bowl of a stand mixer fitted with the paddle attachment beat together the eggs, sugar, and vanilla until combined. Add in the melted chocolate and mix well. Slowly incorporate the dry ingredients. Refrigerate an hour to over night.
  4. Preheat the oven to 325 degrees F. Line cookie sheets with silipat mats.
  5. Using a tablespoon measure scoop batter and roll into balls. Place on the prepared baking sheets and gently flatten. Bake 12-15 minutes, until they just start to set.
  6. Meanwhile, cut marshmallows in half.
  7. Remove cookies from the oven and press 4-6 mini marshmallow halves or 1 large marshmallow half on top of each cookie, cut side down. Return to oven for 2-3 minutes.
  8. Allow cookies too cool on the baking sheets.
  9. Make the icing: Combine ingredients and spoon over cooked cookies. Decorate cookies with sprinkles before the icing sets. Allow the finished cookies to cool 30 minutes before storing and serving.

*This recipe is adapted from Glory at http://www.glorioustreats.com/2013/12/hot-cocoa-cookies.html*

Hot Cocoa Cookies | Sew You Think You Can Cook | http://sewyouthinkyoucancook.com

Gingerbread Mummies


Halloween is next Tuesday, which means we’ve made it to the end of my themed Halloween week.

The true reason for choosing the theme of mummy this year was to make gingerbread mummies. I’ve seen these pop up on Pinterest every Halloween and it’s one of those “I wish I thought of that” moments. I think they’re completely adorable!

There’s nothing that says you have to use a gingerbread cookie recipe, but it is quite a fun way to transition into the holiday season everyone is really waiting for.

Gingerbread cookies aren’t my favorite, but after this recipe they very well might be! This particular recipe has a perfect balance of ginger and cinnamon, of sugar and spice.

The boys loved helping make these cookies – particularly touching the frosting of every single mummy, forcing us to keep (and eat) all of the decorated cookies for ourselves.

Halloween Gingerbread Cookies | Sew You Think You Can Cook

We made a sheet-full of small gingerbread men to turn into mummies with the leftover candy melts I had from the mummy caramel apples. By all means use your favorite recipe for royal icing or a store bought tube of decorating frosting.

We turned the rest of the dough into fun Halloween shapes -bats, cats, ghosts and pumpkins! I shared these non-child-contaminated cookies with my Bible study group.

This recipe makes approximately 4-5 dozen cookies.

Gingerbread Mummies

Ingredients:

  • 4 C flour
  • 2 tsp ginger
  • 1 1/2 tsp cinnamon
  • 1 1/2 tsp baking soda
  • 3/4 tsp cloves
  • 1/4 tsp salt
  • 1 1/2 sticks butter, at room temperature
  • 1 C brown sugar
  • 1 egg
  • 3/4 C molasses
  • white candy melts, or other white frosting

Steps:

  1. In a large bowl, whisk together the flour, ginger, cinnamon, baking soda, cloves, and salt.
  2. In the bowl of a stand mixer fitted with the paddle attachment, cream together the butter and brown sugar until fluffy. Add in the egg, mixing until incorporated. Add in the molasses, mixing until combined. Slowly add in the flour mixture, scraping down the sides of the bowl as needed.
  3. Cover and refrigerate a minimum of 4 hours.
  4. Preheat oven to 350 degrees F.
  5. Roll the dough to 1/6″ thickness. Cut out gingerbread men and place on an ungreased cookie sheet. Bake 8-10 minutes. Remove cookies to a cooling rack and let cool completely.
  6. Decorate mummies with frosting.

*This recipe is adapted from https://www.tasteofhome.com/recipes/gingerbread-cookie-cutouts*

Gingerbread Mummy Cookies | Sew You Think You Can Cook

Blackberry Chocolate Thumbprint Cookies #DarkRecipes #SolarEclipse

Are you in the path of totality for the solar eclipse today? If you are, I am so incredibly jealous!

The pastor of our church actually headed out of town back to her home state of Nebraska where her family farm will experience the magic and wonder. I’m kind of wondering why we didn’t think to make a vacation out of the once-in-a-lifetime event.

I’ve been nervous though about protecting my children.

the boys

I know the approved solar eclipse glasses are not exactly kid approved – definitely not toddler approved! My children don’t exactly keep things on their faces anyway.

My mom shared some great pinhole projector ideas, one of which involves making one of out a box large enough to stick your head into. That definitely seems like the safest bet for my rascals – just stuff their head in a box and that should protect their eyes!

The local library has an event going on and I was super pumped to go to it. But the more I thought about it, the more I figured it probably wouldn’t be the safest idea. Could I really keep an eye on my two high-energy boys amidst a sea of over 100 people and get a chance to view the eclipse through glasses? I have to go with the non-selfish vote of “no.”

Our balcony doesn’t get sunlight in the morning, when the partial eclipse is supposed to happen for us in SoCal, so using a colander to project the shadows onto the ground isn’t going to work well, either.

We might be able to go to the playground. It’s not like my children look up at the sun on a regular basis anyway. And they are so young that they’re not going to understand the beauty of the event. Only problem for me is that I won’t have glasses (I was counting on using those provided by the library!).

Watch it be cloudy anyway and all my fretting is for nothing.

If you haven’t caught the eclipse frenzy you can fake it with some dark recipes. Kind of like that big football game you pretend to care about just for the food. Thanks to Sue of Palatable Pastime for coming up with and hosting this event!

Blackberry Chocolate Thumbprint Cookies

Ingredients:

  • 1 stick butter, at room temperature
  • 1/2 C powdered sugar
  • 1 tsp chocolate extract
  • 1/4 tsp salt
  • 1 1/2 C flour
  • 1/2 C cocoa powder
  • milk, if needed
  • blackberry jam

Steps:

  1. Preheat oven to 350 degrees F. Line two baking sheets with silicone mats.
  2. In the bowl of a stand mixer fitted with the paddle attachment, cream together the butter, sugar, chocolate extract, and salt until smooth.
  3. Add in the flour and cocoa powder and beat until the dough comes together. If it is too dry, add in a tablespoon or two of milk.
  4. Roll 1 tablespoon of dough into a ball, place on a prepared baking sheet, flatten slightly, and press your thumb (or a small spoon) in the center.
  5. Bake 15-17 minutes, until set. Transfer cookies to a cooling rack. Once cool, fill thumbprints with blackberry jam.

*This recipe is adapted from Grishma and Vikas at http://www.feastie.com/recipe/zaika-zabardast/blackforest-thumbprints*

Blackberry Chocolate Thumbprint Cookies for #DarkRecipes #SolarEclipse

Be sure to check out these other Dark Recipes for the Solar Eclipse:

Chinese Mooncakes (Snow Skin Mooncakes) by Caroline’s Cooking

Deep Dark Chocolate Brownies by Palatable Pastime

Eclipse Pizza by Amy’s Cooking Adventures

Homemade Moon Pies by Family Around the Table

Ramen and a Martini from the Abyss by Culinary Adventures with Camilla

Sweet Dark Cherry Crepes by A Day in the Life on the Farm

Triple Chocolate Cookies by The Freshman Cook

Tuesday Tattles: 3rd Birthday

It’s time for another Tuesday Tattles.

A very long overdue Tuesday Tattles, at that!

Over a month ago, my Firecracker had his golden birthday and is now a three year old!

IMG_4338

It has been an absolute joy becoming a mother with my Firecracker. His turning 3 has been the most emotional, yet! 1 felt like a milestone and an accomplishment, but he was still a baby. 2 was a quiet birthday with a party a couple of weeks late. But 3! At 3 my little man has such a personality, with strong opinions, a sassy attitude, and a smart vocabulary, it’s hard to remember he’s still just a little kid. (<- Yes, I just plagiarized that from my personal Facebook status. You’re not experiencing dejavu, Mom.)

Because 3 was his golden birthday, I really wanted to throw a Quidditch party with emphasis on the Golden Stitch. And while he says he likes Harry Potter, he really doesn’t know much about it. I let go of my obsession and gave him the option between Harry Potter and Space. He chose space.

Okay, time to “vent.” WHY AREN’T THERE SPACE PARTY DECORATIONS?! Once again, I found myself creating my own birthday party.

To make his birthday banner, I went the easy route this year. I found large black letter stickers at Michael’s. I made sure they fit inside the star shape, which I then traced onto gold cardstock. Cut out the stars, stuck on the stickers, and taped the string to the back. Easy as pie!

IMG_4334

The most important decoration was the golden 3 balloon, and I got the last one from the party store! Phew! 3 gold stars were also on my decorating wish list; another mission accomplished. But even using blacks and yellows for the tablescape, the space theme only came to life with my food.

Space Themed Birthday Party (food) | Sew You Think You Can Cook

Planet Pizzas and Solar System Salad were delivered by a local, Chicago-style thin crust pizza joint. The Suns were a giant bowl of clementines. Carrots, cauliflower, broccoli, and yellow tomatoes were arranged to look like Rocket Veggies. Pineapple and green grapes were arranged to look like a Saturn Fruit Tray. We used a small star cookie cutter to cut cheese slices into stars which were served with round Ritz crackers for the Stars & Moons. We used my grandmother’s Christmas cut-out cookie recipe to make Golden Star Cookies. The trusty Walmart Bakery provided the chocolate cupcakes with yellow frosting, we added the star sprinkles to turn them into Cosmic Cupcakes.

birthday boy

My husband had one request for the party. The no-bake cookies from his childhood. I had him make them with Firecracker for the day. This recipe comes from his high school best friend’s mom. I’ve renamed them Asteroids for the purpose of this space themed party.

IMG_4303

Asteroids


Ingredients:

  • 1 stick butter
  • 2 C sugar
  • 3 tbsp cocoa powder
  • 1/2 C milk
  • 1/2 C creamy peanut butter
  • 1 tsp vanilla extract
  • 3 C quick oats

Steps:

  1. Bring butter, sugar, cocoa powder, and milk to a boil in a large pot over medium heat.
  2. Remove from the heat and stir in the peanut butter and vanilla until smooth. Mix in the oats.
  3. Form into balls, or asteroids, and place on a sheet of wax paper to cool completely.

No-Bake Cookies: renamed asteroids, they're perfect for a Space Themed Birthday Party

If you’re really intuitive, you might recognize the background of these pictures. We flew to Wisconsin to celebrate his birthday. And again, I need to give a HUGE thank you to my parents for allowing us to have his party at their summer home.

Thankfully the rain clouds parted the hour before the party and our outdoor gathering was a wonderful reunion with my cousins. If there’s anything my Firecracker loves, it’s making friends, and boy were there plenty of new friends to be had – we had a total of 16 (including my 2) kids running around the yard, playing baseball, and throwing 200 water balloons in a matter of minutes.

water balloons

Those kids went home with goodie bags filled with star shaped sunglasses, bubbles, lollipops, and glow bracelets.


Countdown to 2017: Most Popular

unnamedWe’re polishing off the year with the five best recipes of 2016.

I skipped yesterday’s Best Slow Cooker Recipes because, believe it or not, I didn’t blog a single one! I’ve used my Slow Cooker plenty but always remaking something or not finding the dish blog worthy. Ah well. There’s always next year.

This blogging countdown party is hosted by Sarah at Fantastical Sharing of Recipes.

2016 was an interesting blogging year for me. I’ve struggled to find my rhythm ever since our move in the spring. We’ve been in California 8 months now, I can’t keep using the move as an excuse! We are enjoying California living and are looking forward to the boys growing and the opportunities we have for exploring the West coast.

I’ve been contemplating whether or not I want to continue blogging. It’s hard not getting caught up in the numbers. I’m part of a lot of blogging groups and some support groups on Facebook. Comparing my little piece of the internet to all of these other “more successful” bloggers brings me down a little bit. I’ve taken a step back from those pages and am just enjoying being me.

It’ll be fun (hopefully?) to look at my annual stats from WordPress.

Well, it could have been fun, however the annual stats report hasn’t come in yet (as of 8:30pm PT on 12/30) and I’m hitting “schedule” on this post soon! If the report comes in and I’m available, I’ll edit this post as needed.

Sew You Think You Can Cook was viewed 40,349 times – that’s 2,535 more times than last year! Definitely not as big a jump as between 2014 and 2015, but my social media presence has been gaining great ground. My Facebook page has reached over 1,000 followers; if you’re one of them I thank you – keep clicking and please keep sharing!

Last year, the majority of my referrals came from Foodgawker. I’ve been quite proud of my photography skill advancement this year thanks to my new macro lens (sure, it’s still got ways to go), but the time and effort I’ve been able to expend towards submitting to Foodgawker and other similar “food porn” sites hasn’t been up to what it used to be. My acceptances have had a higher percentage, but I’m simply not submitting as often as I like or should. I’ll work on getting my images into more public spaces in the future.

This year, my most popular referrer were search engines (mostly Google and Bing), funnily enough though I don’t know what people are searching to reach me!

I’m fairly positive that my busiest day of the year was December 1st when I wrote about having lost our Christmas ornament box. Thanks to fellow military spouses who connected to my pain and shared my post on their own Facebook pages. It was my highest grossing Facebook post ever, reaching over 2,000 people alone! While I don’t think we’ll ever get our box of Christmas memories back, I’m blessed to have the people in my life who can help me make new memories and remind me that it’s still just “stuff.” I was touched when I received a surprise package from my mom’s step-sister with a kind note, a brand new Auburn ornament, and a sweet book for the boys.

And now for the top five recipes of 2016, these are in ranking order:

  1. BBQ Pulled Pork Pasta: A perfect way to use up leftovers!
  2. Carolina BBQ Pulled Pork: A tangy spin on slow cooker pork!
  3. Pot o’ Gold Cookies: Save these addicting cookies for St. Patrick’s Day!
  4. Chocolate Cherry Brownie Pie: This decadent pie was one of my favorite desserts this year, too!
  5. Cappuccino Crinkle Cookies: Save these caffeinated cookies for the adults!

Top 5 posts of 2016 | Sew You Think You Can Cook | http://sewyouthinkyoucancook.com

To see more popular recipes click here: An InLinkz Link-up

#FantasticalFoodFight: Shortbread Cookies

unnamed

Good morning, everyone.

I think I have a problem.

I’ve joined another blogging group! Sarah of Fantastical Sharing of Recipes decided to start up this new food party when The Secret Recipe Club came to a close. Maybe she has a problem too!

But it’s not a bad problem.

Who ever decided problem had to have a negative connotation?

Anywho.

The solution to our problem? Cook/bake, eat, and write. It’s always nice when problem has a simple solution.

This month everyone is baking shortbread cookies!

shortbread-cookies-sew-you-think-you-can-cook

My mom loves to bake cookies and I knew it’d be the perfect activity to do with Firecracker when she came to visit. We did a Salted Caramel Shortbread cookie and he loved to help cut out the fun Christmas shapes and sprinkle the salt on the caramel frosted buttery cookie.

shortbread-cookies-sew-you-think-you-can-cook-2

Don’t let the tears fool you, Treat enjoyed his cookie, too! Firecracker decided that he didn’t like the caramel on the cookie so we decorated them in a variety of methods. Stars and reindeer received full caramel treatment, trees got a drizzle, and the wreaths were left plain.

shortbread-cookies-sew-you-think-you-can-cook-3

This recipe makes approximately 4 dozen cookies, depending on cookie cutter size.

Salted Caramel Shortbread Cookies

Ingredients:

  • 3 sticks butter, softened
  • 3/4 C sugar
  • 1 tsp vanilla extract
  • 3 1/2 C flour
  • 1/2 tsp salt
  • 1 bag (14 oz) caramels, unwrapped
  • 2 tbsp milk

Steps:

  1. In the bowl of a stand mixer fitted with the paddle attachment, cream together the butter and sugar until fluffy. Mix in the vanilla until incorporated then add the flour in stages until a smooth dough is achieved.
  2. Wrap dough in plastic wrap and refrigerate at least 30 minutes.
  3. Preheat oven to 350 degrees F.
  4. Roll out dough to 1/4″ thickness on a floured surface. Cut out shapes using cookie cutters, place on a baking sheet an inch apart. Keep any unused dough in the refrigerator while working.
  5. Bake cookies 14 minutes, until lightly golden. Place on cooling racks.
  6. Combine caramels and milk in a microwave safe bowl. Microwave 1-2 minutes, stirring every 30 seconds until smooth. Spoon caramel onto cookies, spreading to the edges. If caramel gets too hard, simply reheat.
  7. Sprinkle cookies with Kosher salt while the caramel is still warm. Return cookies to a cooling rack.
  8. Store cookies in an airtight container, use wax paper to divide the layers.

*This recipe is adapted from http://www.bettycrocker.com/recipes/salted-caramel-shortbread-cookies/9716f0d7-ce05-4740-b402-f80a95daeff5*

Salted Caramel Shortbread Cookies for #FantasticalFoodFight from Sew You Think You Can Cook

To see all of the other Fantastical Shortbread Cookies click here:  

If you would like to join our Fantastical Food Fight, you can learn more on our informational page.

Chocolate Chip Cookies

My husband occasionally gets the craving for cookies hot out of the oven. And when that happens he’ll typically run to the nearest store and pick up a break-apart refrigerated cookie dough and preheat the oven.

But what happens when he gets the idea to actually make the cookies?

Turns out he breaks open the Cookie cookbook and finds a recipe for us to bake. The cookie was supposed to be a Chocolate-Chip Hazelnut Cookie. Of course we didn’t actually have any hazelnuts. So… it’s just a chocolate chip cookie. But, since when was a chocolate chip cookie a bad thing?

Chocolate Chip Cookies

Ingredients:

  • 1 C flour
  • 1 tsp baking powder
  • pinch of salt
  • 1/3 C butter, softened
  • 1/2 C sugar
  • 1/4 C brown sugar
  • 1 egg
  • 1 tsp vanilla extract
  • 2/3 C chocolate chips

Steps:

  1. Preheat oven to 350 degrees F. Lightly grease two baking sheets.
  2. In a small bowl, sift the flour, baking powder, and salt.
  3. Cream together butter and sugars in a large mixing bowl with a hand mixer. Add in the egg and vanilla and mix to combine. Add the dry ingredients and mix until incorporated. Fold in the chocolate chips.
  4. Spoon cookie batter onto prepared baking sheets an inch or two apart.
  5. Bake 10-12 minutes. Remove from the baking sheet to a cooling rack.

*This recipe is adapted from The Cookie Book: Over 300 Step-by-Step Recipes for Home Baking*

Chocolate Chip Cookies | Sew You Think You Can Cook | http://sewyouthinkyoucancook.com