Strawberry Balsamic Pizza

Earlier this month a Publix opened up across from our neighborhood. I absolutely love Publix. Growing up in Southwest Florida it was pretty much the only grocery destination – sure we had Walmart, an Albertson’s, which I don’t even think exists anymore, and Sweet Bay. Every Sunday after church we’d go to the grocery store. (I am not looking forward to moving away from the land of the Publix.)

Grocery shopping is not my favorite thing. Despite my efforts to remain organized I always manage to miss something and have to back track throughout the store. But, now that I have a Publix within walking distance I use the Publix App on my phone. Not only can I browse the circular to find what’s on sale this week, but I can create my grocery list. Yes, Winn-Dixie and other grocery apps have the same ability, but Publix – the place “where shopping is a pleasure” – has surpassed customer service in the app alone. When you input your specific store, it’ll tell you what aisle that item is in. Not just “baking” but “aisle 9”. It might just be the best thing since sliced bread.

I apologize greatly for my Publix add, but there is a point! I used pre-made pizza dough from the Publix bakery instead of making my own. And it is delicious. Almost every grocery store does offer dough in their bakery, so don’t fret if you don’t live in the land of Publix. (Other alternatives include making your own, refrigerated pizza dough, or even the dry pizza dough usually hanging on an end cap in the store with pepperoni.)

Another benefit of living in Florida is that I can still find beautiful, ripe, Grown in Florida Strawberries at the store. I hadn’t thought strawberries to be in season, but Winter Strawberries are harvested between November and March. I swear, these are more beautiful than the ones I get in July. So, again, I apologize if you cannot find fresh strawberries in your local area – pin this recipe and save it for the summer. I promise you it’s worth it!

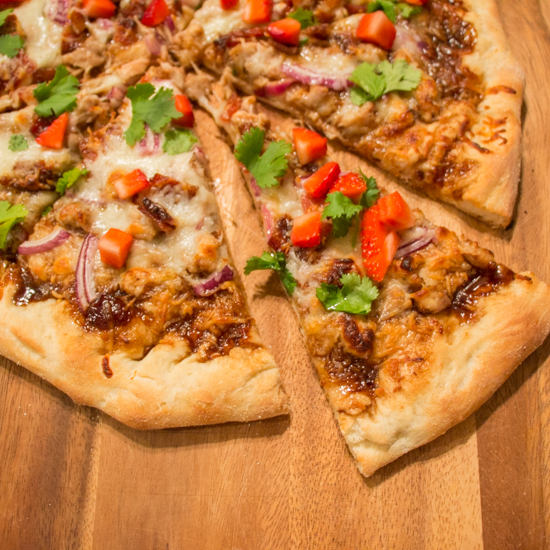
This pizza rivals any that you find at a gourmet pizza shop, and although you can roll your dough to your desired thickness, a thicker crust works beautiful with this masterpiece. Stuart questioned this dish – he thought strawberries on a pizza would be weird. But they complement the chicken and bacon and the cilantro provides a note of lightness. He pointed out, and I agree, that mint would also work well here (if you happened to have that instead).

Strawberry Balsamic Pizza

Ingredients:

  • 1/4 C balsamic vinegar
  • 1/4 C strawberry jam
  • 1 tsp sriracha
  • cornmeal, for pizza peal
  • 1 ball pizza dough, rolled out to approximately 14″
  • 1 C diced, cooked chicken
  • 3 strips, cooked thick-cut bacon, diced
  • 1/4 red onion, finely diced
  • 2 C shredded Italian blend cheese
  • 4 large fresh strawberries, diced
  • fresh cilantro (or mint), for garnish

Steps:

  1. Place pizza stone in oven and preheat to 475 degrees F.
  2. In a small saucepan bring balsamic vinegar to a boil, reduce to a simmer for 4 minutes. Add in jam and sriracha. Toss chicken with 2 tbsp of sauce and set the remainder aside.
  3. Sprinkle cornmeal onto a pizza peal, if you don’t have a a pizza peal an edge-less cookie sheet works well too.  Place dough on peal.
  4. Top dough with balsamic sauce, leaving a 1″ crust. Top with chicken, 3/4 of the cheese, then the bacon and onion. Top this layer with the remaining cheese.
  5. Bake for 10 minutes.
  6. Garnish with fresh strawberries and cilantro (or mint). Allow pizza to cool a few minutes before slicing.

*This recipe is adapted from Chris at http://www.thecafesucrefarine.com/2011/07/strawberry-balsamic-pizza-with-chicken.html*

Strawberry Balsamic Pizza 1 Strawberry Balsamic Pizza 2

Cilantro Lime Chicken

Today’s edition of Mexican Monday requires prep on Sunday, even though it’s a slow cooker dish! But that’s also what makes it perfect for your Monday, whether you follow my Mexican Monday Menu plan or not. The chicken needs to marinate over night, but in the morning all you have to do is drop it into the slow cooker – no chopping, no measuring!

I found this recipe on a Pinterest post of Paleo Slow Cooker Recipes. Although we don’t follow the Paleo diet trend in this house, I may have some readers who do. Or maybe I’ll get new readers from it! 😉 If you’re looking for new Paleo inspired recipes, check out Jason’s blog, Paleo Pot

But because we don’t follow Paleo, I served this chicken with Rice and Beans

Cilantro Lime Chicken

Ingredients:

  • 1 5-6 lb whole chicken
  • 1/2 tsp pepper
  • 3/4 tsp kosher salt
  • 1 tsp cumin
  • 1/4 tsp cayenne
  • 1 tbsp chili powder
  • 1 whole lime
  • juice of 2 limes
  • 3 cloves garlic
  • 1 bunch fresh cilantro
  • 1 tbsp olive oil

Steps:

  1. Mix together pepper, salt, cumin, cayenne, and chili powder. 
  2. Dry chicken and rub spice mixture over entire chicken.
  3. Poke holes in the whole lime and rub with spice mixture. Place in chicken cavity.
  4. In a food processor (I actually used the single serve unit for my Ninja blender, a Magic Bullet would work great too!) combine lime juice, garlic, cilantro, and olive oil.
  5. Place chicken in a large resealable plastic bag with the marinade. Marinate over night.
  6. Put chicken, breast side up, in slow cooker with the marinade. Cook on LOW 5-6 hours.

*This recipe is modified from Jason at http://paleopot.com/2013/01/chili-cilantro-lime-chicken/*

Image

Interfacing T-Shirts

If you plan on creating a T-Shirt quilt, it is highly recommended that you interface them prior to sewing.

Interfacing is a material that adds structure to flexible fabrics. Using interfacing is key when working with T-Shirts because of how flexible the cotton T-Shirt material is, it ensures that your seams will stay straight and your fabric won’t stretch.

Working with interfacing is very easy. I buy a bolt of Pellon Shape-Flex interfacing from Joann’s. (40% off coupons come in really handy for items like these!) One side of the interfacing is smooth, and the other bumpy. Those bumps you feel are the adhesive that will stick to the fabric once heated.

Although it does create a teensy bit of waste, you should cut your T-Shirt just slightly larger than your desired cut size (so desired block size + 1/2″) along with the interfacing. Iron the interfacing onto the back side of the T-Shirt and then trim the shirt to the proper size. Applying the adhesive in this way serves two purposes: 1) you won’t accidentally overlap the interfacing on your cut-to-size shirt and a) get glue all over your ironing board and b) won’t have to trim off any extra interfacing and risk damaging your shirt; and 2) it ensures that your interfacing will be at the edges of your shirt, and therefore in your seam allowance making sewing easy.

My father-in-law made me a set of T-Shirt Quilt Block Plexiglass Templates. These templates include the 1/2″ seam allowance and are marked with an X which tells me where the center is.

The example below is from my brother’s T-Shirt Quilt, Greek Eagle.

Here’s the How-To for Interfacing T-Shirts:

If you are using the method I do, the shirts need to be cut in increments of 4″. If you are not using pre-cut templates, do not forget your 1/2″ seam allowance!! Choose the size block that best fits the shirt you’re using.

Interfacing How-To

Trim your shirt slightly larger than the desired block size.  Cut interfacing to the same size (as best you can).

Interfacing How-To

Turn the shirt so that the pattern/logo is face down. Place the interfacing bumpy side down on top of the shirt. Iron on the interfacing until it adheres to the shirt.

Interfacing How-To

Now trim your shirt to the desired block size (with your 1/2″ seam allowance!).

Interfacing How-To


Note: Interfacing is not a requirement, however I would greatly encourage it.

CIC: Mustard & Strawberries

CIC-header

It’s that time of month for another Crazy Ingredient Challenge.  With the business of the holidays I sat out during December and January and I’m glad to be back this month.

This month we were assigned Mustard and Strawberries. The challenge is to combine sweet strawberries with vinegary mustard. I decided to be liberal with the mustard ingredient and use honey mustard. Stuart wondered if strawberries could be pickled in a way to compliment yellow mustard. But I liked my idea better.

I present to you Strawberry Pretzels with Sweetened Honey Mustard Dipping Sauce.

I chose to follow Hannah’s recipe for pretzels because I could completely connect with her blog post. The trick was adding in strawberries. I was really nervous about this part. You can’t just fold them at the end of the dough making process like you would pancakes or cookies, so I added them during the kneading process and hoped for the best. I tried researching how to add fruit to pretzels and found absolutely nothing. So I tried looking for adding chocolate chips to pretzels, again nothing. I think I’m starting a trend here!!

How to pretzel

Strawberry Pretzels with Sweetened Honey Mustard Dipping Sauce

Ingredients for Pretzels:

  • 1 (1 oz) packet  active dry yeast
  • 1 tsp sugar in the raw pure cane sugar
  • 1 1/4 C warm water
  • 2 1/2 C bread flour
  • 1/4 tsp kosher salt
  • 2/3 C finely chopped strawberries
  • 3 tbsp butter, melted, divided use

Ingredients for Sweetened Honey Mustard Dipping Sauce:

  • 1/4 C honey mustard
  • 1/2 tsp white sugar
  • heaping 1/4 tsp honey

Steps:

  1. In the bottom of a stand mixer gently stir together yeast, sugar, and warm water.  Let stand 5 minutes.
  2. Add 1 1/2 C of flour to the yeast begin to stir with the dough hook attachment on low speed. Add 1/3 C of strawberries and stir. Add salt, remaining flour and strawberries. Mix until the dough comes together around the hook.
  3. Cover and let dough rise for 1 hour, or until doubled in size.
  4. Preheat oven to 425 degrees F.
  5. Punch dough and transfer it onto a floured surface, divide into six equal parts. (I think you could even get 8 pretzels if you wanted!) Roll dough into a long snake and shape into a pretzel – do this by making a heart and twisting the ends. (see photos above)
  6. Place pretzels on parchment lined cookie sheet. Brush with 2 tbsp melted butter and bake 10 minutes.
  7. Turn on broiler and bake another 1-5 minutes until golden brown. Keep an eye on them, the timing will depend on your oven. Brush with remaining 1 tbsp butter and sprinkle with kosher salt.
  8. Make dipping sauce by whisking all three ingredients. Serve with pretzels.

Strawberry Pretzels

To see the other bloggers who participated in this month’s Crazy Ingredient Challenge click on the link below.

Lasagna Roll Ups

Lasagna is always a crowd-pleaser. It’s perfect for family dinners and gatherings among friends.

I developed a taste for lasagna in college. My roommate and I would whip up a lasagna for dinner and have leftovers to get us through the busy week. She introduced me to no-boil noodles and they’ve changed the lasagna world for the better!

My recipe for lasagna uses spinach, turkey, onions, and bell peppers. And a combination of mozzarella and ricotta cheeses.

Lasagna Roll Ups 2If you want to elevate your lasagna to fancy presentation status, try these lasagna rolls! Instead of taking advantage of the no-boil noodles, these need to be boiled until they are pliable, a little harder than al dente so as to prevent them from breaking when you roll them.  Because the noodles still get baked they’ll be cooked through by the time you break into them.

We had friends over for dinner when I made these, and their youngest announced that it’s better than pizza. It’s his favorite thing that’s like pizza. (aka we have cheese and tomato sauce) I will take that as a very big compliment.

I took Judy’s suggestion and mixed two different pasta sauces – vodka and marinara. The result? A tastes-like-homemade pasta sauce.

Lasagna Roll Ups

Lasagna Roll Ups

Ingredients:

  • 8 lasagna noodles
  • 2 tbsp olive oil
  • 1 lb ground turkey
  • 1/2 onion, chopped
  • 1 clove garlic, minced
  • 1 (10 oz) package frozen spinach, thawed and squeezed dry
  • 1 (15 oz) container ricotta cheese
  • 1 1/2 C shredded Italian blend cheese
  • 1 egg, beaten
  • 1 jar, 26 oz pasta sauce
  • 1/2 C shredded mozzarella

Steps:

  1. Bring a large pot of salted water to a boil. Cook noodles 7-8 minutes, drain and set aside.
  2. In a large, non-stick skillet over medium-high heat saute onion in olive oil. When onions are translucent add garlic, cook for 30 seconds. Add the ground turkey, season with S+P, and cook, breaking up with a wooden spoon, 10 minutes or until cooked through. Drain any fat and set aside
  3. Preheat oven to 375 degrees F.
  4. In a large bowl combine spinach, ricotta, Italian blend cheese. Season to taste with S+P.  Mix in ground turkey. Add the egg and mix.
  5. Pour about 1/2 of the pasta sauce in the bottom of a 9×13″ casserole dish.
  6.  Place 1/3 – 1/2 C of lasagna filling onto each noodle and roll. Place lasagna roll ups seam side down in prepared casserole dish. Top with remaining pasta sauce and mozzarella.
  7. Bake covered for 35 minutes, or until hot and bubbly. A knife should go through a roll without resistance.

*This recipe is modified from Judy at http://www.bakeatmidnite.com/2013/11/cheesy-lasagna-rolls.html*

Lasagna Roll Ups

Protein Packed Southwestern Salad

I am keeping with my healthy kick of Mexican Monday (previous weeks included Quinoa Stuffed Bell Peppers and Turkey Lettuce Wraps) with a double duty Mexican Monday & Salad Night.

It’s been way too long since my last salad post – and unfortunately that also indicates it’s been way too long since our last salad night! Stuart has been looking for healthier meals lately, and after eating this Southwestern Salad he was completely satisfied.

The dressing for the salad is made with Greek yogurt. If you’ve paid attention, or know me, you realize that I have a great dislike for Greek yogurt. But I do try and give it another chance every now and then. I was prepared to revert to bottled salad dressing, but I’m happy to state that I loved the creamy cilantro vinaigrette!

I added chicken to the salad so we’re getting 3 sources of protein: the Greek yogurt in the dressing, chicken, and black beans! I promise this is no rabbit food.

Protein Packed Southwestern Salad

Ingredients for the chicken:

  • 4 boneless, skinless chicken tenders (you can also cut up 1 breast into strips)
  • 3/4 tsp Adobo seasoning
  • 1 tsp Ancho chili powder
  • 1/4 tsp black pepper
  • 1/4 tsp Kosher salt
  • 1 tbsp olive oil, divided use
  • 1 head iceberg lettuce
  • 1/2 C canned corn, drained
  • 1/2 C canned black beans, drained and rinsed
  • 1 on-the-vine tomato, chopped and seeds removed
  • 1 avocado, chopped
  • crispy tortilla strips, for topping

Ingredients for the dressing:

  • 1/2 C Greek yogurt
  • juice of 1 lime
  • 1 C fresh cilantro
  • 2 cloves garlic
  • 2 tbsp apple cider vinegar
  • 1/4 C extra virgin olive oil
  • salt, to taste

Steps:

  1. In a small bowl combine adobo seasoning, chili powder, salt, and pepper. Season both sides of chicken with spice mixture (you will have some left over).
  2. In a medium skillet heat olive oil over medium-high heat. Cook chicken 4-5 minutes on each side, until cooked through.
  3. In a food processor combine all dressing ingredients.
  4. Assemble salad with lettuce, corn, beans, tomato, avocado, and chicken. Toss with as much dressing as you like. Top with tortilla strips.

*This recipe is adapted from Chung-Ah at http://damndelicious.net/2014/01/10/southwestern-chopped-salad-cilantro-lime-dressing/*

Protein Packed Southwestern Salad 1 Protein Packed Southwestern Salad  2 Protein Packed Southwestern Salad 3

Chocolate Chip Cookies

On Tuesday nights I partake in a bowling league. Collectively, we are not the best team, but we do know how to have fun! Our team “uniform” are Hawaiian shirts, last year we made tie-dye shirts!

If you’re at all familiar with bowling, you may have heard the term “beer frame” thrown around. A beer frame is when all members except one bowl a strike in the same frame. That singleton is then responsible for buying a pitcher of beer for the group.

Instead of beer frames, we do cookie frames. And I fell on the sword, so the next week I was charged with bringing in cookies. My evening for cookie bringing was the same evening of the ice storm so I actually got an extra week to prepare. It’s a good thing too because the cookies I tried making that Monday night were a complete fail. I was following a recipe for heart cookies out of a massive cookie cookbook. Something about this recipe was off – the “dough” ended up as more “sand”. So I scrapped the idea and made Rice Krispie Treats instead. Much to my husband’s dismay those treats never left the house.

So this week I had to try again. I opted instead to follow a supposedly fool proof recipe for Chocolate Chip Cookies. This recipe actually comes from the sonographer at my doctor’s office. She has it memorized and jotted it down for me when my husband informed her of my previous cookie fail. She says she’s put many variations on the recipe using nuts, coconut, etc.

When it comes to cookies, chocolate chips are not my favorite. I lean towards thin crispy cookies, like my Busia’s oatmeal lace cookies that I haven’t even attempted and my mom has mastered. These cookies were enjoyably addicting – I think it’s the salt in the batter! By the time I got around to photographing these there were only 5 left!

Chocolate Chip Cookies

Ingredients:

  • 2 sticks butter, room temperature
  • 1 C sugar
  • 1 C brown sugar
  • 2 eggs
  • 1 tsp vanilla extract
  • 2 1/2 C flour
  • 1 tsp salt
  • 1 tsp baking soda
  • 1 bag chocolate chips

Steps:

  1. Preheat oven to 350 degrees F.
  2. In the bottom of a stand mixer cream together butter and sugars. Add eggs and vanilla. Beat until combined.
  3. In a separate bowl, whisk together flour, salt, and baking soda. Add the dry ingredients to the butter and sugar mixture in 3 batches.
  4. Fold in chocolate chips.
  5. Drop tablespoon-sized dollops of batter onto a greased cookie sheet. This recipe made 3 dozen cookies.
  6. Bake 10-14 minutes.

Chocolate Chip Cookies

Spinach and Ricotta Ravioli

For my first Valentine’s Day as a blogger I bring you the first dish I ever made for Stuart.

On our 1 year anniversary back in college I made him dinner. I was living in the dorms and my roommate with a car helped me get to the grocery store and to his apartment so that I could surprise him with dinner. I made ravioli, Caesar salad, and an apple crisp for dessert.

Everything turned out great – except the apple crisp. The salad was one of the prepackaged options from the store, so I couldn’t go wrong there. The ravioli came from a book, Teens Cook: How to Cook What You Want to Eat, that I was gifted before attending college. I think the apple crisp recipe came from that book as well, but I don’t remember. Oh, everything turned out fine and Stuart and his roommates ate it. But I was “forced” to use I Can’t Believe It’s Not Butter in place of real butter because apparently I was wrong to assume boys kept real butter in the fridge. Let me tell you, I could believe it wasn’t real butter and that not-real butter taste was only accented once baked in the crumble topping.

But I digress. This post is supposed to be about ravioli, not my abhorrence to fake butter.

For the blog I decided to try making heart shaped ravioli. And it worked!

Won ton wrappers are used in place of fresh pasta which makes it a super simple meal. Typically I’d use one sheet of won ton wrapper and fold it over, but when you’re cutting hearts out of it you need to use two sheets per raviolo. (I think that’s the singular to ravioli… eh, it sounds fun anyway!) The amount of filling you place inside each heart will depend on the size of your cookie cutter – you need to make sure you can seal the ravioli so the filling doesn’t escape while boiling.

Spinach and Ricotta Ravioli

Ingredients:

  • 15 oz ricotta cheese
  • 1 C julienned fresh spinach
  • 1/2 C shredded Italian blend cheese (or Parmesan)
  • salt and pepper, to taste
  • 1 pkg (12 oz) won ton wrappers (these can be found in the refrigerated area of the produce section)*
  • your favorite pasta sauce

*You will need two packages if making heart shaped ravioli

Steps:

  1. In a bowl combine cheeses and spinach. Season with salt and pepper to taste.
  2. Bring a pot of salted water to a boil while assembling the ravioli.
  3. If making heart shaped ravioli, use a cookie cutter to cut hearts out of each won ton wrapper. Place about 1/4 tsp of filling in the center of the heart. Dip your finger in water and run along the edge of the heart. Place a second heart on top and seal shut.
  4. If not making heart shaped ravioli, place about 1/2-1 tsp of filling in the center of each wrapper. Dip your finger in water and run along all four sides of the wrapper. Fold into a triangle and seal.
  5. Boil the ravioli in batches of 8-10 to avoid them breaking apart. Boil 3-4 minutes, or until they float. They will become slightly translucent.
  6. Heat your favorite pasta sauce and serve with ravioli. Garnish with freshly grated Parmesan or Asiago cheese if desired.

Hearts Ravioli 1 Heart Ravioli 2

Disclaimer: This post contains affiliate links. 

Red Velvet Puppy Chow

Red Velvet Puppy Chow 3

One of Stuart’s childhood (and college) favorite sweets at the holidays (or anytime) was puppy chow. There a many varieties of puppy chow – or monkey munch, or muddy buddies – but all involve chocolate and powdered sugar. I’ve never made puppy chow, and can’t remember ever having it growing up. I think my first introduction to this addicting sweet cereal mix was through Stuart when his mom brought him a gallon size bag full during a college visit.

Place the puppy chow in individual baggies and send them to school with your kids on Friday, February 14th!This Valentine’s Day version uses red velvet cake mix and Valentine colored M&Ms.

Red Velvet Puppy Chow

Ingredients:

  • 3/4 C white chocolate chips
  • 1/4 C semi-sweet chocolate chips
  • 5 C rice Chex® cereal
  • 1 C red velvet cake mix (use boxed mix or make your own!)
  • 1/2 C powdered sugar
  • 1 1/4 C Valentine colored M&Ms®

Steps:

  1. Melt together white and semi-sweet chocolate until smooth. (I did this in a double boiler, but you can do it in the microwave too – just keep an eye on it and stir often.)
  2. Place cereal in a large bowl. Gently fold melted chocolate over the cereal until coated.
  3. In a large plastic bag combine cake mix and powdered sugar. Place chocolate coated cereal in bag and shake until completely coated. Spread out onto a baking sheet and let cool.

*This recipe is modified from Lizzy Mae at http://www.yourcupofcake.com/2013/01/red-velvet-puppy-chow.html*

Red Velvet Puppy Chow 2

Red Velvet Puppy Chow 1

Greek Eagle, a T-shirt quilt

Today my Mom’s little Valentine, my brother, turns 24! As it’s the 12th it’s like his double golden birthday!

Louie and I are 18 months apart and have always gotten along with each other. Sure, there was a stretch there when I was 2-3 yrs old and very bossy. We have home videos of me stealing all the bath toys telling him, “These are mine.”, of me pushing him off a lawn toy so I could ride it, and my absolute favorite – replacing his Looney Toons umbrella with a strap for my girly, pink strapless one. But he never seemed to mind, he always wanted to do what I did.

When Harry Pottercame out Mom would read us a chapter on the couch before bed each night. When we were old enough to read the series on our own, I’d actually read aloud to Louie. I have memories of reading with him after school and reading on vacations.

At middle school and high school age, on nights when one of us couldn’t sleep we’d sneak into each other’s rooms and play board games – Chinese Checkers, Sequenceor Harry Potter Mystery At Hogwarts. (I know, watch out, we were bad kids!)

Louie even followed me to Auburn to pursue his degree! He now has a Bachelor of Sciences in Business Administration and a Masters of Accountancy. My senior year, his sophomore, we actually lived together. My only regret is that we’d lived together sooner. It was absolutely my favorite living situation. We both had busy schedules and different circles of friends, so were never on top of each other, but were still able to enjoy childhood nights playing Monopoly Dealand watching movies. We got along perfectly, and he loves to vacuum!

I am one proud big sister of the hardworking man he’s become.

Image

For this blog post honoring my brother I present to you his t-shirt quilt! This weekend it will be sent to the quilter’s and I hope to get it back in April or May. Again, this quilt followed the method by Andrea T. Funk.

Quilt from College T-Shirts

Disclaimer: This post contains affiliate links.