I knew I wanted to do something savory to share during #ChoctoberFest. I thought about making a chili and could’ve sworn I had something saved on my Pinterest account. While searching I came up empty handed (looks like I’ll have to develop a new recipe this winter!). However, while I was searching I discovered baby back ribs with a cocoa spice rub. Conveniently, I had a rack of ribs in my freezer. Winner!
What wasn’t a winner – making these ribs in a small kitchen on a hundred degree day without air conditioning. I guess I should’ve looked at the forecast of the week before thawing my baby back ribs.
These ribs didn’t need a barbecue sauce, but I did have some extra rub which could maybe be used in a sauce. I’ll need to remake these ribs for my husband and might explore with developing a savory chocolate barbecue sauce. (Or, who knows, maybe someone will be doing the hard work for me during this two week event?)
Yes, I made these ribs while I was home “alone.” Alone being a term that doesn’t ever apply to me anymore. Or at least, not for quite some time. And while, sure, I’d love just a couple of hours alone, I wouldn’t trade my ability to stay home with my two young boys for anything!
The boys wouldn’t touch the ribs the day I made them. But, we ate off of the rack the entire week, using the meat in quesadillas, in sandwiches, and on nachos. I was a little skeptical on how the flavors of the cocoa would mesh with cheese, but it was delicious! And the kids had zero problems eating the ribs in a more comfortable medium.
The cocoa rub has an earthy, warm, comforting quality. Using unsweetened cocoa powder means you’re not getting a sweet flavor – the sugar in the rub is what creates a crust to the meat. With chili powder you get a hint of the flavors you’re accostomed to with barbecue, but the cocoa gives it that something unique yet familiar. I highly encourage you to branch out and give this rub a try.
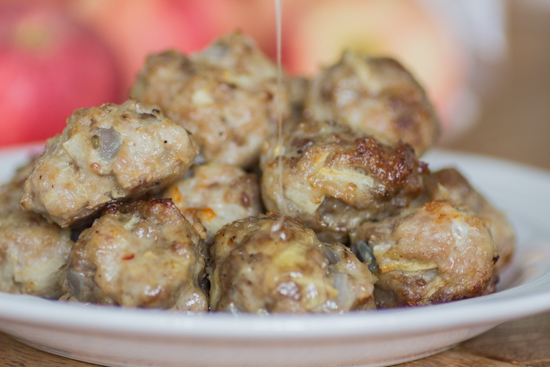
Cocoa Crusted Baby Back Ribs
Ingredients:
- 1/2 C brown sugar
- 1/3 C unsweetened cocoa powder
- 3 tbsp chili powder
- 2 tbsp kosher salt
- 2 tbsp onion powder
- 1 tbsp garlic powder
- 1 tbsp dried oregano
- 1 tbsp ground mustard
- 2 tsp ground ginger
- 2 tsp cinnamon
- 1 tsp allspice
- 3 lb baby back ribs
Steps:
- Whisk together sugar, cocoa powder, and spices in a bowl. Generously rub the ribs all over with the cocoa spice rub. Cover and refrigerate overnight.
- Remove ribs from the fridge 2 hours before cooking.
- Preheat oven to 375 degrees F.
- Bake ribs in a casserole dish 40-50 minutes, until tender. Remove.
- Increase oven temperature to 450 degrees F. Transfer ribs to a wire rack on a rimmed baking sheet. Bake another 20 minutes, flipping halfway.
*This recipe is adapted from Saveur at http://www.saveur.com/article/Recipes/Cocoa-Rubbed-Baby-Back-Ribs*

Don’t forget to enter our giveaway and be sure to check out the other bloggers who posted more chocolate recipes today: