#EVOOChallenge: Olive Oil Poached Eggs with Tomato Relish

It’s day 4 of the #EVOOChallenge. This challenge, in which we make foods with the only cooking fat being olive oil, was issued by Spartan Olive Oil. The goal is to highlight the benefits of using olive oil over its less healthy counterparts, I’m looking at you butter and vegetable oil. Search the hashtag on social media to see more great recipes!

While both olive oil and vegetable oil have 120 Calories and 14 grams of fat per tbsp, olive oil has 10 grams of monounsaturated fat (the good fat) whereas vegetable oil has only 3 grams of monounsaturated fat. Monounsaturated fat is actually good for your health; it reduces bad cholesterol and provides vitamin E. (Source: American Heart Association)

This unfiltered extra-virgin olive oil is made from the olives of 700 year old trees in Sparta, Greece. The flavorful oil has a rich golden color and smooth texture. I wanted to highlight the nutty, fruity flavor of the oil in my recipes this week.

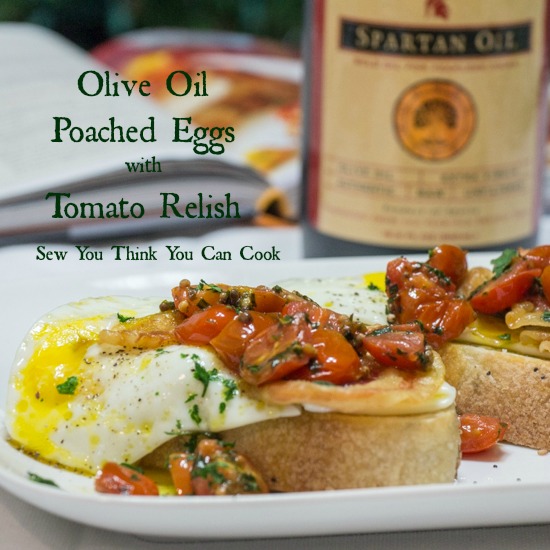
Today’s recipe comes from Brunch at Bobby’s. This brunch is the 4th recipe we’ve made from this book and we’ve only had it since Christmas. (Remember that incredible Croissant French Toast? I feel like a spokesperson for this incredible cookbook. I should be getting paid!) How could I pass up the opportunity to stretch my culinary muscles by poaching eggs in olive oil?! I even went ahead and experimented with mustard seeds for the tomato relish recommended. I don’t even like eggs and I devoured two open faced sandwiches for lunch! As if the texture combinations between crispy pancetta and silky eggs isn’t enough, there’s a boost of flavor from the relish.

Olive Oil Poached Eggs with Tomato Relish

Ingredients:

  • 8 thin slices of pancetta
  • 4 thick slices of sourdough bread, toasted
  • 1 C plus 3 tbsp olive oil, divided use
  • 1 tsp yellow mustard seeds
  • 1/2 pt cherry tomatoes, quartered
  • pinch of sugar
  • splash of red wine vinegar
  • 2 tbsp chopped flat-leaf parsley (I used Gourmet Garden lightly dried herbs)
  • 2 tbsp chopped chives (I used Gourmet Garden lightly dried herbs)
  • 4 eggs

Steps:

  1. Preheat oven to 375 degrees F. Place pancetta on a rimmed baking sheet. Bake 8-10 minutes until crispy, flipping halfway through.
  2. Make the relish: Heat 3 tbsp olive oil in a pan over medium heat, add the mustard seeds and cook until they start to pop. Add the tomatoes, sugar, and vinegar. Mix in the parsley and chives. Transfer to a bowl.
  3. Heat the remaining 1 C of olive oil in a small skillet over medium heat, until it reaches 140 degrees F. Crack each egg into a ramekin and slide them into the oil, one at a time. Poach until the yolks are almost set, 3-5 minutes.
  4. Assemble: Place each egg on a slice of toasted sourdough, sprinkle with S+P. Top with 2 pieces of crispy pancetta and some of the tomato relish. Garnish with fresh parsley.

*This recipe is adapted from Brunch at Bobby’s*

Olive Oil Poached Eggs with Tomato Relish for the #EVOOChallenge from Sew You Think You Can Cook

Disclaimer 1: By participating in this 5 day challenge I received a bottle and pouch of Spartan Olive Oil. 

Disclaimer 2: This post contains affiliate links. 

#MuffinMonday: Lemon Ricotta Muffins

Muffin Monday

#MuffinMonday is a group of muffin loving bakers who get together once a month to bake muffins to brighten their Mondays. And I’ve decided to join in the fun! I’ve been a part of this group for a couple of months now but today is the first day I am able to post with the gang. There isn’t a theme to #MuffinMonday posts so anything goes, as long as it’s a muffin!

We went through a spell with Firecracker where the only thing he’d eat was a waffle. I became creative in adding some extra nutrition to the breakfast item through apples, sweet potatoes, and Greek yogurt. The waffle obsession has slowed if not died and I’m happy to report the adventurous eater is slowly reemerging. I’m looking forward to continuing to post with this group once a month as it seems muffins offer another food medium to sneak in some good nutrition.

Today’s muffins are filled with ricotta cheese and lemon. The ricotta cheese provides extra protein and calcium and yields perfectly light and fluffy muffins.

I’ve had this recipe on my radar for 11 months and finally had some leftover ricotta (from Thanksgiving) to make it! (I’ve been using my leftover ricotta for pasta instead.) Tara’s muffins are much prettier than mine because she put coarse sugar over the top.

This recipe makes 1 dozen kid-approved muffins.

Lemon Ricotta Muffins

Ingredients:

  • 1 C flour
  • 3/4 C cake flour
  • 3/4 C sugar
  • 2 1/2 tsp baking powder
  • 1/4 tsp salt
  • 1 egg, beaten
  • 3/4 C ricotta cheese
  • 1/2 C water
  • 1/4 C canola oil
  • 2 tbsp lemon juice
  • 1 tbsp lemon zest
  • 1 tsp vanilla bean paste (I used Nielsen-Massey)

Steps:

  1. Preheat oven to 375 degrees F. Line a muffin tin with liners.
  2. In a large bowl whisk together the flours, sugar, baking powder, and salt.
  3. In an other bowl fold together the egg, ricotta, water, oil, lemon juice, lemon zest, and vanilla.
  4. Mix wet ingredients into dry ingredients. DO NOT OVER MIX.
  5. Divide batter into prepared muffin tin. Bake 16 minutes, or until a toothpick inserted comes out cleanly. Allow muffins to cool in the pan for 5 minutes before transferring to a cooling rack.

*This recipe is adapted from Tara at http://tarasmulticulturaltable.com/lemon-ricotta-muffins/*

lemon ricotta muffins for #MuffinMonday from Sew You Think You Can Cook

And don’t forget to check out these other muffin recipes:

Bacon Cheddar Corn Muffins from Making Miracles

Banana Cranberry Muffins from A Day in the Life on the Farm

Banana Streusel Muffins from All Roads from Lead to the Kitchen

Healthy Morning Glory Muffins from Farm Fresh Feasts

Lemon Ricotta Muffins from Sew You Think You Can Cook

Savory Corn Bread Muffins from Karen’s Kitchen Stories

Sticky Toffee Bran Muffins from Food Lust People Love

You can see all our of lovely muffins by following our Pinterest board. Updated links for all of our past events and more information about Muffin Monday can be found on our home page

Cinnamon Roll Pancakes

If a Sunday morning rolls around and I don’t have a roll of cinnamon rolls in the fridge I end up scrounging around the kitchen to find another way to get that fix. I’ve created cinnamon rolls from crescent rolls before, and that’s always a good solution, but I don’t buy crescent dough very often anymore. I’ve done cinnamon roll oatmeal which was fantastic; I should probably do it again and photograph it to generate a blog post.

I’ve seen these cinnamon roll pancakes floating around Pinterest and never thought I’d have the time to whip them up on a Sunday morning before church. Surprisingly, I was wrong! These are actually quite quick to make and so worth it. I did opt out of the cream cheese glaze because I didn’t have cream cheese (shocking!). The photos of these pancakes are pretty sad, so I will absolutely need a re-do.

You can use your favorite pancake recipe or a store bought mix. The magic is in the swirl. If desired, serve with a cream cheese glaze (4 tbsp butter, 2 oz cream cheese, 1 1/4 C powdered sugar, 1 tsp vanilla extract). I didn’t even use syrup.

Cinnamon Roll Pancakes

Ingredients:

  • 1/2 C butter, melted
  • 3/4 C brown sugar
  • 1 tbsp cinnamon
  • 1 C flour
  • 2 tsp baking powder
  • 1/4 tsp salt
  • 1 egg
  • 1 C milk
  • 1 tbsp canola oil

Steps:

  1. In a small bowl, whisk together the melted butter, brown sugar, and cinnamon. When slightly cool transfer to a piping bag (or resealable bag) and let rest until thickened.
  2. In a bowl, whisk together the flour, baking powder, and salt.
  3. In another bowl, beat the egg with the milk and canola oil. Add the wet ingredients to the dry ingredients and mix until combined.
  4. On a hot buttered griddle drop 1/4 C of batter into pancakes. Pipe the cinnamon filling in a swirl (or any shape you want!). Flip pancakes when batter starts to set and bubbles form in the center of the pancake. Cook until both sides are golden brown.
  5. If desired, serve with a cream cheese glaze (4 tbsp butter, 2 oz cream cheese, 1 1/4 C powdered sugar, 1 tsp vanilla extract).

*This recipe is adapted from Holly at http://life-in-the-lofthouse.com/cinnamon-roll-pancakes/*

cinnamon roll pancakes - sew you think you can cook

Thankful for Friends and Bloggers

Last month my wonderful friend Tara of Tara’s Multicultural Table threw me a surprise virtual baby shower for my baby boy. The theme behind this blogging event was Thanksgiving.

Lauren-Shower

With a Fall baby, I couldn’t have picked a more perfect theme. Especially when Thanksgiving is my favorite holiday. I definitely have so much to be thankful for this year.

12187851_10103327191159111_6314454968916339502_n

Tara gathered together a wonderful group of bloggers willing to share a Thanksgiving recipe in honor of my baby boy.

Thank you again to all of the bloggers who came to my shower and a huge thank you to Tara for hosting. I hope you all have a fantastic Thanksgiving surrounded by those you love.

Applesauce Waffles

Another waffle recipe? Yep! Can you believe how many batter recipes there are that get poured into that wonderful checkered iron!? While I’d be content eating regular waffles every week there’s something intriguing about trying something new. Thank you Pinterest for opening my eyes to the wonder that is waffle creativity.

Today’s waffles are made with whole wheat and applesauce, but they still have a lot of butter to make them that much better! And a decent amount of delicious cinnamon.

Applesauce Waffles

Ingredients:

  • 3 1/2 C whole wheat flour
  • 2 tbsp baking powder
  • 1 tbsp cinnamon
  • 3 1/2 C milk
  • 1 stick butter
  • 1/2 C unsweetened applesauce
  • 4 eggs
  • 2 tbsp maple syrup
  • 1 tsp vanilla

Steps:

  1. In a large bowl whisk together flour, baking powder, and cinnamon.
  2. In large microwave safe measuring cup microwave the milk and butter until the butter is melted, about 2-3 minutes.
  3. In another bowl beat the applesauce, eggs, syrup and vanilla. Stir in the warm milk.
  4. Combine wet ingredients into dry.
  5. Into a hot greased waffle iron, drop 1/3 C of batter and cook until golden.

*This recipe is adapted from Jennifer at http://www.mykitchenaddiction.com/2012/10/cinnamon-scented-whole-wheat-waffles/*

applesauce waffles | sew you think you can cook

#handcraftededibles: Delicious Jams & Jellies

#handcraftedediblesIn an effort to make all of her holiday gifts this year, Camilla at Culinary Adventures with Camilla invited some of her favorite foodie bloggers to share recipes for hand-crated edibles. Over the course of twelve weeks, we’ll be sharing recipes for all your homemade holiday gifts. Hope you’ll follow along for inspiration. You can find out more information, including the schedule here.

Today’s theme is jams and jellies. Homemade jam or jelly makes for a great gift that lasts the whole year – except odds are it won’t.

I am re-sharing the recipe for Concord Grape Jelly that my mom and I made last year. This jelly was the best jelly I’ve ever had! It definitely didn’t last a year – it only last a couple of months. And this year there weren’t grapes to be plucked from the vine. Are grapes an every-other-year type of crop?

I promise you, if you give someone a jar of homemade jelly they’ll say a big “thank you” every morning.

This recipe made 12 4oz Jars and 4 8oz jars.

Grape Jelly

Ingredients:

  • 5 lb concord grapes
  • 7 C sugar, divided use
  • 1 pkt pectin(or 8 tbsp)

Equipment:

  • blender or juicer
  • cheesecloth
  • jelly jars with lids and rings
  • jar funnel
  • jar grabber
  • magnetic lid grabber
  • large stock pot(s)

Steps:

  1. Sanitize your jelly jars. I did this by running my dishwasher on a very hot cycle. Keep jars warm until ready to fill to prevent the glass cracking. If you do this in a dishwasher, simply don’t open the door until you’re ready to fill the jars. If you sanitize jars by washing with soapy water and boiling in water for 10 minutes,keep the jars in warm water until you’re ready to fill them.
  2. Place jar lids in a shallow skillet over low heat (do not boil) to get the seal gummy, remove lids from water.
  3. Place grapes in a blender (this will need to be done in batches) and pulse until juiced. Pour and press the juice through a cheesecloth lined strainer and strain into a large measuring cup. Squeeze cheesecloth to extract all the juice. Do this until you have 5 C of juice. (Any extra juice is a delicious tart treat for you to enjoy!)
  4. In a small bowl, combine the pectin with 1/4 C of the sugar.
  5. Warm the juice, but do not boil (yet). Stir in the pectin. Bring to a full boil.
  6. Add the rest of the sugar and return to a boil. Boil for 1 minute.
  7. Fill jars with jelly, cover with lids and rings. Seal by placing the filled jars in a boiling water bath for 5 minutes. Remove and allow to cool in a dry place over night. (I did this in my oven.)

*This recipe is adapted from http://www.pickyourown.org/grapejelly.htm#.VELDzfl4ofg*

Homemade Grape Jelly

To give homemade jelly as a gift, place it in a nice basket with a loaf of fresh bread.

Here are some other jam and jelly treats:

Next week, check back for our recipes for pickles. Or check out our #handcraftededibles pinterest board.

Disclaimer: This post contains affiliate links.

Apple Pie Waffles

It seems there’s been an influx of apple recipes on the blog lately. But what can I say, that happens when you go apple picking! Do you know how many apples fit in a half bushel!? (And I only kept half of them!)

On the first day of Fall my mom and I took the little man to a local orchard to do some apple picking. We picked some Fuji, Winesap, and Johnathan apples and had a great time doing so. My little guy who only likes apple in sauce form even took some bites of a freshly plucked apple. I guess it’s true what they say, “Allowing kids to be involved in the food encourages them to eat it.” (The same rang true for raspberries we picked at the end of summer.)

Two of those apples, 1 Winesap and 1 Fuji, were shredded and added to waffle batter for some Apple Pie Waffles. With my son being in an “I only eat bread” phase, waffles have become a great way to sneak in some extra nutrition. (Half of a baked sweet potato that he wouldn’t even touch was turned into sweet potato waffles.) These apple pie waffles are packed with apple and Greek yogurt for that extra bit of protein and dairy.

Apple Pie Waffles (1) for #MadewithChobani from Sew You Think You Can Cook

There’s a good chance this is my new favorite waffle recipe! It probably doesn’t hurt that I ate them with vanilla ice cream… only the two I photographed, I promise. Actually, the rest of them were enjoyed solo – no butter, no syrup needed. I tried a little bit with honey and cinnamon sugar and that was quite delightful, but not necessary. My husband still ate them with maple syrup.

Apple Pie Waffles (3) for #MadewithChobani from Sew You Think You Can Cook

Apple Pie Waffles

Ingredients:

  • 2 C flour
  • 2 tbsp sugar
  • 2 tsp baking powder
  • 1 tsp baking soda
  • 1 3/4 tsp cinnamon
  • 1 tsp ground allspice
  • 1/4 tsp ground nutmeg
  • 3/4 tsp salt
  • 2 eggs
  • 1 1/4 C milk
  • 1/4 C vegetable oil
  • 1/2 C vanilla Greek yogurt (I used Chobani)
  • 1 C shredded peeled apple (1 large or 2 small)

Steps:

  1. In a large bowl whisk together flour, sugar, baking powder, baking soda, spices, and salt.
  2. In another bowl beat eggs with milk, oil, and yogurt.
  3. Combine wet ingredients into dry ingredients. Fold in the shredded apple.
  4. Into a hot greased waffle iron, drop 1/3 C of batter and cook until golden.

*This recipe is adapted from David at http://spicedblog.com/apple-pie-waffles.html*

Apple Pie Waffles (2) for #MadewithChobani from Sew You Think You Can Cook

Disclaimer: I was reached out to by Chobani to create a post for their #MadewithChobani series. Check out Chobani’s recipe page and search the hashtag (#MadewithChobani) on social media for other great fall recipes made healthier with Greek yogurt. 

Apple Chicken Chorizo Meatloaf

Confused?

Don’t worry, we are too.

This meatloaf started out with all intentions of being hamburgers. The original recipe called for ground pork, but my grocery store didn’t have any so I went with chicken instead. And then I messed with the ratios because I didn’t need 2 lb + worth of burger meat. The result? A mixture so sticky that there was no way it’d become burgers. So, we threw in some bread crumbs. And then I decided to just stick it in a loaf pan and hope for the best because even still, there was no way this meat mixture would survive a grilling.

While I was trying to imagine what this would taste like, I couldn’t get breakfast off my mind – probably because of the apple. If the burgers had worked out I wanted to figure out some sort of maple-mustard or maple-mayo concoction. Now that it’s a meatloaf I could’ve tried some sort of maple-barbecue-ketchup mixture to put over top but I simply didn’t have the energy to try making something up.

We ended up eating this meatloaf with syrup instead of kethcup. Quite tasty! The meatloaf reminded me of a gourmet sausage from a fancy butcher or deli. This meatloaf is one that could actually work as a breakfast option, just add a fried egg!

Apple Chicken Chorizo Meatloaf

Ingredients:

  • 1 lb ground chicken
  • 1 link Mexican chorizo, casing removed
  • 1 Fuji apple, shredded
  • 1/4 tsp minced garlic
  • 1/4 tsp grated fresh ginger
  • 1/2 tsp dried thyme
  • 1/2 C panko bread crumbs

Steps:

  1. Preheat oven to 375 degrees F. Lightly spray a loaf pan with non-stick cooking spray.
  2. In a large bowl combine all ingredients with your hands until incorporated. Place in prepared loaf pan.
  3. Bake 35-40 minutes, or an internal temperature of 165 degrees F is reached.

Apple Chicken Chorizo Meatloaf | Sew You Think You Can Cook

Greek Yogurt Pancakes

Every weekend I find myself standing in the kitchen, usually on Saturday morning, making either pancakes or waffles and if we have company I’ll leave it up to our guests to choose between the two.

When my mother-in-law and brother’s girlfriend we here earlier this month “pancakes” was the resounding answer. The reasoning was that you can make more pancakes at a time – sounds like I need an army of waffle irons!

While I often use my go-to recipes for pancakes or waffles, I do quite like to mix it up – as you can tell from my breakfast recipe index. With two tubs of Greek yogurt in my fridge I decided to try this recipe from She Wears Many Hats. I made a big batch at my husband’s request and it’s a good thing I did! While these pancakes are quite filling, feeding 4 adults and a 1-year-old we needed a little extra batter. There were two pancakes leftover that my son had for breakfast the next morning, too.

Greek Yogurt Pancakes

Ingredients:

  • 3 C flour
  • 2 tbsp baking powder
  • 1 1/2 tsp salt
  • 4 tbsp honey
  • 1 1/2 C milk
  • 1 1/2 C vanilla Greek yogurt
  • 3 eggs

Steps:

  1. In a large bowl whisk together the flour, baking powder, and salt.
  2. In another bowl whisk the eggs and stir in the honey, yogurt, and milk. Add the wet ingredients to the dry.
  3. On a hot buttered griddle drop 1/4 C of batter into pancakes. Flip pancakes when batter starts to set and bubbles form in the center of the pancake. Cook until both sides are golden brown.

*This recipe is adapted from Amy at http://shewearsmanyhats.com/yogurt-pancakes-recipe/*

Greek Yogurt Pancakes | Sew You Think You Can Cook

P.S. – Check out my awesome personalized mug! I made it at my friend Emily‘s house, she provided the supplies and the know-how.

Blogger CLUE: Greek Yogurt Apple Loaf

blogger CLUE

Before you get all wrapped up in the pumpkin craze, let’s not forget about the other great fall fruits, like apples and pears! Yes, pumpkin is technically a fruit, and I have no doubt that some of the CLUE players will be sharing pumpkin recipe. Be sure to stop by their pages, too!

This month I was assigned the blog That Skinny Chick Can Bake written by Liz. Liz helps keep our group organized and is a member of a few other blogging groups I’m also a part of. I’m not sure how she keeps up with everything! Her blog is a beautiful array of sweets (with some great savory options, too).

I was tempted by a couple of her fall salads (Spinach Salad with Pears and Cranberries or Apple Cherry Walnut Salad) but hey, “That Skinny Chick Can Bake” so I settled on a baked item. I altered her Sour Cream Pear Bread to utilize what I had in my fridge – Greek Yogurt and Apples.

Greek Yogurt Apple Loaf

Ingredients:

  • 6 tbsp butter, softened
  • 2/3 C sugar
  • 2 eggs
  • 1 tsp vanilla extract
  • 1/2 C plain Greek yogurt
  • 1 3/4 C cake flour
  • 3/4 tsp baking powder
  • 3/4 tsp baking soda
  • 1/2 tsp ground cinnamon
  • 1/2 tsp ground ginger
  • 1 C peeled and diced apples
  • cinnamon sugar, for sprinkling

Steps:

  1. Preheat the oven to 350 degrees F. Grease a loaf pan and sprinkle with cinnamon sugar.
  2. In the bowl of a stand mixer fitted with the paddle attachment, beat together the butter and sugar until combined. Add the eggs one at a time. Mix in the vanilla extract and yogurt (or sour cream).
  3. In a large bowl, whisk together cake flour, baking powder, baking soda, cinnamon, ginger, and a pinch of salt. Add to the stand mixer in 2-3 installments.
  4. Fold in diced apples (or pears). Pour batter into prepared loaf pan.
  5. Bake 40-45 minutes or until a knife inserted comes out cleanly. Allow loaf to cool 15 minutes before removing from pan onto a cooling rack.
  6. This loaf is best served warm/toasted with a little butter.

Greek Yogurt Apple Loaf for #BloggerCLUE from Sew You Think You Can Cook

Here’s a list of the other players of Blogger CLUE this month: