#ChoctoberFest: Halloween White Chocolate Raisin Bars

#Choctoberfest

I’m opening up my #ChoctoberFest offerings with the chocolate that’s questionably chocolate. I know, I’m a rebel. I’m talking, of course, about white chocolate.

Upon making these bars I came to the conclusion that, to me, white chocolate tastes like Christmas. I’m not sure why, but there it is. Therefore, I decided to up the Halloween factor because, folks, it’s way too soon for Christmas things.

I took a cranberry white chocolate bar and swapped some raisins. For that spooky black and orange combo I dyed the frosting. Bingo bango. Happy Halloween and happy #ChoctoberFest!

Halloween White Chocolate Raisin Bars

Ingredients for bars:

  • 1 1/2 C flour
  • 1 tsp baking powder
  • 1/4 tsp salt
  • 1 egg
  • 1 C brown sugar
  • 1 stick butter, melted
  • 3/4 tsp vanilla extract
  • 1/2 C white chocolate chips
  • 1/2 C raisins

Ingredients for frosting:

  • 2 tbsp butter, softened
  • 2 tbsp cream cheese, softened
  • 1 – 1/3 C powdered sugar
  • 2-3 tsp heavy cream, as needed
  • food coloring (optional)
  • raisins and white chocolate chips for garnish

Steps:

  1. Preheat oven to 350 degrees F. Line a 9×9″ cake pan with foil and lightly grease.
  2. In a bowl, whisk together flour, baking powder, and salt.
  3. In another bowl, whisk the egg, brown sugar, butter, and vanilla until combined.
  4. Combine dry ingredients into wet ingredients and stir until combined. Fold in the white chocolate and raisins. Spread into prepared cake pan and bake 20 minutes, or until a toothpick inserted comes out cleanly.
  5. Make frosting: Using a hand mixer, combine the butter and cream cheese. Add the powdered sugar 1/3 C at a time until desired sweetness is reached. Add heavy cream a teaspoon at a time as needed to bring the frosting together. If using, mix in the food coloring.
  6. Spread frosting onto cooled bars. Garnish with white chocolate chips and raisins.

*This recipe is modified from Allison at http://celebratingsweets.com/cranberry-white-chocolate-bars-copycat-starbucks-cranberry-bliss-bars/*

Halloween White Chocolate Raisin Bars for #ChoctoberFest from Sew You Think You Can Cook

Don’t forget to enter our giveaway and be sure to check out the other bloggers who posted more chocolate recipes today: 

recreatedbysrc

Apple Oat Crisp

When we were on our family vacation earlier this month, my husband decided he wanted to go apple picking. We crossed the WI-IL border and picked some apples in Harvard, IL at The Royal Oak Farm Orchard.

We had a great time picking a peck and a half of the three varieties that were available at the time of our visit: Jonamac, Macintosh, and Gala.

When my mom and I went apple picking last year, Firecracker was about 15 months old. He had just as much fun this year, but with a little (okay, a lot) of extra confidence on his feet for running around.

Firecracker has always struggled with eating raw apples, yet he loves the flavor of them. Unless an apple slice is covered in Nutella, he’ll simply gnaw away at the fruit and never swallow it. There’s always a pile of apple bits on the coffee table.

Treat, on the other hand, has never struggled with apples and they’re one of his absolute favorite foods. He happily ate close to an entire apple while we were picking. And with only two bottom teeth! I was surprised, though I guess I should’ve have been, that he managed to hold on to the apple the entire time!

apple-picking-2016

With our fall bounty in tow we headed to the kitchen. I put some apple in my Choco-flower Bundt Cake and into some meatballs we enjoyed on game day (recipe to come later this week). Our big apple feature dish, though, was a crisp.

My mom and I combined a few different recipes and methodologies to develop the resulting addicting dessert (/breakfast).

There aren’t a lot of pie recipes here on Sew You Think You Can Cook because I really don’t care for warm fruits. As I’m in the minority there I had no problem lending some apples to the cause of a crisp.

Um. Yeah. This crisp is one of my new all time favorites! I could have eaten the entire dish on my own. But, I had to share. A dollop of whipped cream, sprinkle of cinnamon, and drizzle of honey made this dessert a home run. Naturally, we bought some honey from the orchard and it’s beautiful apple-y floral quality was a perfect complement to the crisp.

crisp-closeup-2

Of course, you could serve it with ice cream. I’m contemplating making a honey ice cream to serve alongside this Apple Oat Crisp for Thanksgiving this year.

Apple Oat Crisp

Ingredients:

  • 4-5 apples, peeled, cored, sliced
  • 2 tbsp apple cider
  • 2 tbsp sugar
  • 1 C + 1 tbsp flour, divided use
  • 1 1/2 tsp cinnamon, divided use
  • 1 C oats
  • 1 C brown sugar
  • 1/2 tsp baking powder
  • 1 stick butter, melted

Steps:

  1. Preheat oven to 350 degrees F.
  2. Toss apples with cider, sugar, 1 tbsp flour, 1/2 tsp cinnamon, and a pinch of salt. Place in a small casserole dish.
  3. In a bowl, whisk together 1 C flour, 1 tsp cinnamon, the oats, brown sugar, and baking powder. Mix in the melted butter until combined and crumbly. Top the apples.
  4. Bake 30 – 35 minutes until golden, bubbly, and the apples are tender.

Apple Oat Crisp | Sew You Think You Can Cook | http://sewyouthinkyoucancook.com

#BundtBakers: Healthy Sneak, Cheat, or Substitute

4ae7b-bundtbakerspostThis month’s bundt theme is quite fun! Andrea of  Adventures in All Things Food challenged us to “healthify” our cakes in a sneaky way. She inspired us to stealthily add in some veggies, find a healthy way to eliminate oils or sugars, or even experiment with an arguably more wholesome flour option.

#BundtBakers is a group of bundt loving bakers who get together once a month to bake bundts with a common ingredient or theme. We take turns hosting each month and choosing the theme or ingredient.

I wasn’t sure I’d get a chance to participate this month. We’ve had a lot of travel recently, going to Northern California for a wedding followed almost immediately by a trip to Lake Geneva.

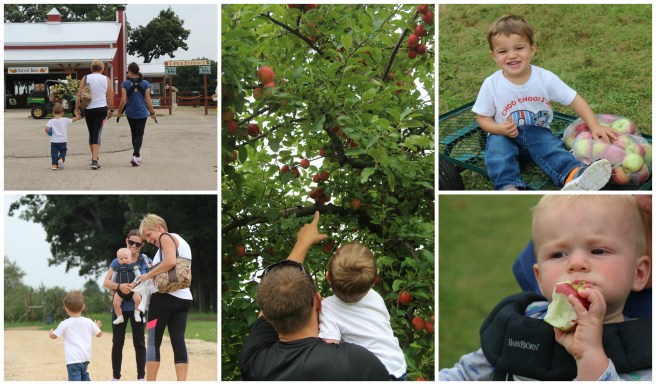
I’ve mentioned the lake house before, but in case you’re new to Sew You Think You Can Cook, I spent my childhood summers at my grandparents’ summer home at the lake. When my parents purchased the home before my grandma passed away, I looked forward to getting to continue the tradition with my children. We even had Firecracker’s first birthday there! I didn’t think we’d get a chance to go this year having to travel from California, but we made it happen. And I’m so glad we did. Firecracker is old enough to truly enjoy the lake and just as I did, jumped off the pier into his grandfather’s arms.

I hadn’t baked my bundt before these vacations and was going to have to simply sit this event out. Fortunately there was a bundt pan tucked away in a cupboard, here! A beautiful, old Nordic Ware original.

With plans to make my buffalo cauliflower for game day, we had the vegetable on the mind. Off to Pinterest I went to uncover a chocolate cake. We added some freshly picked (a story for a future post!) apples to the cake, too.

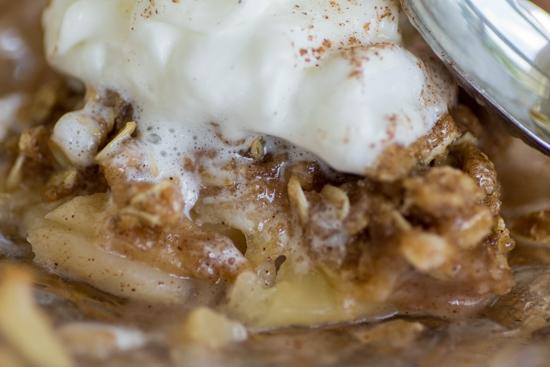
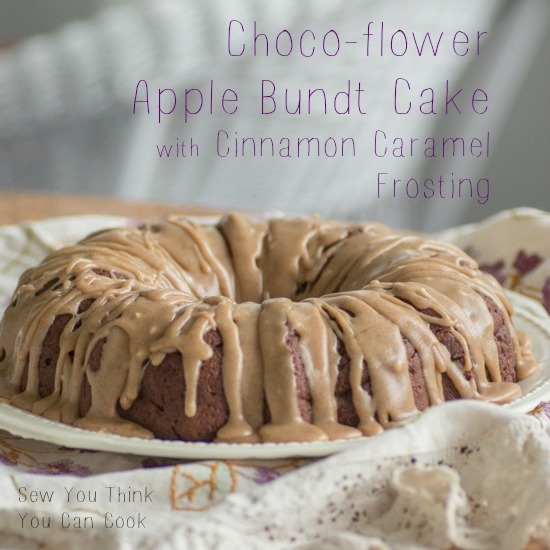
The resulting cake is a dense, almost fudgy, cake. Funnily enough, the presence of cauliflower was apparent only if eaten cold. It wasn’t abrassive enough to say, “Hey, there’s cauliflower in here.” but just enough to know there’s “something different” about this cake. 15 seconds in the microwave and no one would be any the wiser. Not even a 2 year old.

img_0713-2

You might wonder why we even ate the cake cold in the first place.

The answer is one that every food blogger can relate to. Needing to take a picture! The cake was completed and frosted after sunset. My dad told me I had to include this part of the story in my blog post. The fact that he couldn’t dig in to chocolate cake the day it was made! Yes, I received a lot of heat for having to wait until morning.

It’s okay though, the boys had me up way before anyone else so I snapped some photos in the early morning sunlight.

Choco-flower and Apple Bundt Cake

Ingredients:

  • 2 C cauliflower florets
  • 1/2 C vanilla yogurt
  • 3/4 C sugar
  • 1/2 C vegetable oil
  • 2 eggs
  • 2 tsp vanilla extract
  • 2 C flour
  • 1/2 C cocoa powder
  • 2 tsp baking powder
  • 2 tsp cinnamon
  • 1/4 tsp salt
  • 3/4 C buttermilk
  • 1-2 apples, peeled, cored, and diced

Steps:

  1. Boil cauliflower until fork tender. Puree in a food processor until smooth.
  2. Preheat oven to 350 degrees F. Grease a bundt pan.
  3. In a bowl, whisk together the flour, cocoa powder, baking powder, cinnamon, and salt.
  4. In a large bowl, beat together the yogurt, sugar, and oil. Add the eggs one at a time, mixing until incorporated. Add in the vanilla and pureed cauliflower.
  5. Mix 1/3 of the dry ingredients into the wet ingredients until combined. Add 1/4 C of buttermilk, stir until combined. Repeat with remaining dry ingredints and buttermilk. Fold in the chopped apple.
  6. Pour batter into prepared bundt pan. Bake 50-60 minutes, or until a knife inserted comes out cleanly. Allow cake to cool before turning out of the pan.

Cinnamon Caramel Frosting

Ingredients:

  • 1 stick butter
  • 1 C brown sugar
  • 3-4 tbsp milk
  • 2 tsp vanilla extract
  • 1 tsp cinnamon
  • 1 C powdered sugar

Steps:

  1. Melt butter in a small saucepan over medium heat. Add the brown sugar, milk, vanilla, and cinnamon. Stir for 3 minutes. Remove from heat and whisk in the powdered sugar until smooth. Pour over cooled cake.

*These recipes are adapted from Kate at http://veggiedesserts.co.uk/chocolate-cauliflower-cake-with-salted-cinnamon-caramel-icing-the-blogs-2nd-birthday/*

choco-flower-apple-bundt-cake-with-cinnamon-caramel-frosting-for-bundtbakers-from-sew-you-think-you-can-cook

You can see all our of lovely Bundts by following our Pinterest board. Updated links for all of our past events and more information about #BundtBakers, can be found on our home page.

And don’t forget to take a peek at what other talented bakers have baked this month:

Almond Bundtlettes by Bea and Mara at I Love Bundt Cakes

Avocado Mini Bundts by Kelly at Passion Kneaded

Black Forest Tomato Bundt Cake by Shilpi at Simplyveggies

Chocolate Beet Bundt Cake by Wendy at A Day in the Life on the Farm

Easy Orange Bundt Cake by Nichole at Cookaholic Wife

Fall Fruits Bundt Cake by Rebekah at Making Miracles

Flourless Chocolate Bundt Cake by Colleen at Faith, Hope, Love, & Luck Survive Despite a Whiskered Accomplice

Secret Spice Yoghurt Cake by Jane at Jane’s Adventure in Dinner

Tunnel of Fudge Cake by Bee at The Queen of Scones

Vanilla Bean Malt Bundt Cake by Felice at All That’s Left Are The Crumbs

Whole Wheat Banana Bundt Cake byAnshie>at Spiceroots

Almond Peach Loaf

Once upon a time I was a very organized person.

I created schedules for everything. Very much like Hermione during O.W.L.S. studying when she made study schedules for the trio. I did that when I was studying for finals in high school, dividing out how much time I’d take to spend on each subject.

That trend continued in college. Signing up for classes and creating schedules was my favorite part of the year! I happily volunteered to help coordinate and organize class offerings for my roommates and brother, too. Every course I took had its own designated color with which I coordinated folders, binders, notebooks, and even highlighters!

When I was working, I still managed to keep a fairly organized desk. Each program I worked on had its own folder, notebook, and even pen. (The day someone took my blue pen off my desk is one that still haunts me.) My email box was broken up into multiple folders to help me keep my different correspondence structured.

And then I had kids and my “study” habits flew out the window. My attempts to keep things in certain places were thwarted by sheer exhaustion.

Having 4 homes in the last 6 years hasn’t helped me much either.

I have visions for how to keep this blog on track, but I simply haven’t had the time to set aside for setting up a “desk.” I don’t actually have a desk here. My computer lives in the kitchen and my planner and pen collection live on the wet bar (that we don’t use for entertaining purposes in the slightest) in the living room. I have two different notebooks for writing down recipes. Then there’s both Foodgawker and Pinterest. And my collection of cookbooks.

Sometimes I can’t remember where I got the recipe when it comes time for me to blog about it. Sounds like I need to add more notes to my planner!

Such was the case with today’s loaf recipe. I was all set to write the post and then couldn’t find the original recipe! I was cutting it close to the deadline and decided to just forget about it. A couple of days later, it came back to me in the shower. As all good ideas do. I came across this recipe during a Secret Recipe Club reveal! I’d commented saying I’d be making it that weekend – and I actually had! Phew!

Almond Peach Loaf

Ingredients:

  • 2 C flour
  • 1 1/2 tsp baking powder
  • 1/2 tsp salt
  • 1 stick butter, softened
  • 3/4 C sugar
  • 2 eggs
  • 1/2 tsp almond extract
  • 3 tbsp milk
  • 2 peaches, diced
  • 1/3 C sliced almonds

Steps:

  1. Preheat oven to 350 degrees F. Grease a loaf pan.
  2. In a bowl, whisk together the flour, baking powder, and salt. Set aside.
  3. In the bowl of a stand mixer fitted with the paddle attachment, cream together the butter and sugar. Add the eggs one at a time, mixing until combined. Add the almond extract.
  4. Alternately, add in the dry ingredients and the milk, beginning and ending with dry ingredients.
  5. Gently fold in the peaches and almonds. Pour batter into prepared loaf pan. Bake 50-60 minutes, or until a butter knife inserted comes out cleanly.

*This recipe is adapted from Sara at http://cookwithsara.blogspot.com/2016/07/peach-and-almond-loaf-cake.html*

Almond Peach Loaf | Sew You Think You Can Cook | http://sewyouthinkyoucancook.com

#BundtBakers: Apples

4ae7b-bundtbakerspostCan you believe we haven’t had an apple themed #BundtBakers yet?! I can’t. I love using apples in baking, often using applesauce in lieu of oil. My very first post shared with this great group of bakers was my grandmother’s Fresh Apple Bundt Cake. I’ve used apple cider and even filled a bundt cake moat with apples.

#BundtBakers is a group of bundt loving bakers who get together once a month to bake bundts with a common ingredient or theme. We take turns hosting each month and choosing the theme or ingredient. So who do I have to thank this month for picking a perfect theme? My blogging buddy Wendy of A Day in the Life on the Farm!

I thought about the ingredient. Apples. And I thought about one of my favorite afternoon snacks – apples and peanut butter! There are countless peanut butter cakes out there on Pinterest. I decided on this particular peanut butter cake and added some apple-ness to it. I used apple juice instead of coffee in the cake batter and folded in diced apples. For the glaze, I again used apple juice, this time instead of milk. The overall apple flavor is quite subtle, but the bites with apple in them are sublime.

I baked this cake while my husband was on a work trip. The consequence being that it never made it to his office to share with coworkers. I definitely started my mornings that week with a slice of Apple & Peanut Butter Bundt Cake! And I’m not even sorry about it.

Apple & Peanut Butter Bundt Cake for #BundtBakers from Sew You Think You Can Cook (3)


I stored this cake in the fridge, simply to keep it away from the fruit flies that keep frequenting my abode. Turns out a downside to no air conditioning combined with healthy (cake excluding) eating means there’s always a fruit fly or twelve finding their way back in through the screens on the open windows.

I quite enjoyed the cake eaten cold, but my husband preferred it heated in the microwave. Yes, I did save some cake for him. Though he likes to pretend that I didn’t. Not having told him what was hiding underneath the aluminum foil in the fridge. With all his complaining he sure enjoyed his fair share after the boys fell asleep!

Apple & Peanut Butter Bundt Cake

Ingredients:

  • 1 stick butter, melted
  • 1 C sugar-free apple juice
  • 1/2 C creamy peanut butter
  • 1 C sugar
  • 1 C brown sugar
  • 2 eggs
  • 1 tsp vanilla extract
  • 2 C flour
  • 1 tsp baking soda
  • 1 tsp salt
  • 1/2 C buttermilk
  • 1 -2 Granny Smith apples, chopped

Ingredients for glaze:

  • 2 tbsp creamy peanut butter
  • 1 C powdered sugar
  • 3-4 tbsp apple juice

Steps:

  1. Preheat oven to 350 degrees F. Heavily grease a bundt pan.
  2. In the bowl of a stand mixer fitted with the handle attachment, beat together the melted butter, peanut butter, and apple juice until combined. Add in the sugars, eggs, and vanilla. Mix until incorporated. Add the flour, baking soda, salt, and buttermilk until well combined. Fold in the apples.
  3. Pour batter into prepared bundt pan. Bake 50 – 60 minutes, or until a cake tester inserted comes out cleanly. Allow cake to cool before unmolding.
  4. Make the glaze: Using a hand mixer, beat the peanut butter in a large bowl. Once softened, add the powdered sugar and half of the apple juice. Continue adding apple juice 1 tsp at a time until glaze is smooth and reaches desired consistency. Pour glaze over cooled cake. Note: Any leftover glaze goes very nicely with freshly sliced apples!

*This recipe is adapted from Monique at http://divascancook.com/peanut-butter-cake-recipe-peanut-butter-frosting-easy/

Apple & Peanut Butter Bundt Cake for #BundtBakers from Sew You Think You Can Cook (2)

You can see all our of lovely Bundts by following our Pinterest board. Updated links for all of our past events and more information about #BundtBakers, can be found on our home page.

And don’t forget to take a peek at what other talented bakers have baked this month:

Apple Almond Coffee Cake with Honey Glaze by A Day in the Life on the Farm

Apple and Toasted Pecan Bundt Cake with Rum Syrup by Patty’s Cake

Apple Crumble Bundt by Jane’s Adventure in Dinner

Apple French Cruller Bundt Cake by All That’s Left Are The Crumbs

Apple Honey Blossom Bundt by Living the Gourmet

Apple Sharlotka Bundt Cake by Spiceroots

Apple Spice Bundt with Salted Caramel Sauce by kidsandchic

Apple Streusel Bundt Cake by The Freshman Cook

Apple~Cream Cheese Bundt Cake by The Queen of Scones

Chocolate Chip Apple Cake by Making Miracles

Cinnamon Apple Streusel Cake by Tea and Scones

Cinnamon Pecan Applesauce Bundt Cake by Magnolia Days

Clotted Cream & Apple Spice Bundt by Baking in Pyjamas

Double Caramel Apple Bundt by The Crumby Cupcake

Easy Peasy Lemon Squeezy Apple Bundt by Food Lust People Love

Jewish Apple Cake by I love Bundt Cakes

Jewish Praline Pecan Apple Cake by Faith, Hope, Love, & Luck Survive Despite a Whiskered Accomplice

Lighter Jewish Apple Cake by Cookaholic Wife

#SundaySupper: Recipes with Bacon

I often find myself sitting on recipes waiting for the perfect time to share them. I simply leave un-blogged dishes on my camera and look through my pictures when I plan out my schedule. It’s very rare that I’ll have something raring and ready to go for a blogging event before the event is announced. Such is not the case with today’s Sunday Supper! As soon as I saw the theme of Bacon announced I was prepared! Gasp! Feeling prepared is something that comes very infrequently now that I’m mothering two small boys – the youngest of whom just started solo standing and trying desperately to take those first steps and the oldest who is embracing those terrible twos at least three days a week.

I find it fitting that the bacon theme follows closely behind the corn themed Sunday Supper. Was it coincidental or planned? I don’t know, you’d have to ask the masterminds behind Sunday Supper to find out. But did you notice how many glorious corn recipes included bacon? I know mine did! And I’ve paired bacon and corn together before, too in stuffed shells. Double yum. I wonder how many of today’s recipes feature corn! You’ll have to scroll past my recipe to find out. Thanks to Erica of The Crumby Cupcake for hosting this weekend.

The cinnamon rolls I’m sharing today are a play off my favorite recipe that we make every Christmas. Instead of cranberries… bacon! And for the frosting, I used leftover glaze from my 3rd anniversary cupcakes.

Bacon Cinnamon Rolls with Maple Glaze

Ingredients for rolls:

  • 1 C warm water (105-110 deg F)
  • 2 1/4 tsp active dry yeast
  • 3 tbsp butter, at room temperature
  • 1/2 C sugar
  • 1 1/2 tsp salt
  • 1 egg
  • 3 1/2 C flour

Ingredients for filling:

  • 6 slices center cut bacon, chopped and cooked
  • 1/2 stick softened butter
  • 3/4 C brown sugar
  • 1 tbsp cinnamon

Ingredients for glaze:

  • 1 1/2 C powdered sugar
  • 1/2 C milk
  • 1/2 C canola oil
  • 1 tbsp maple syrup
  • 1/2 tsp vanilla extract

Steps:

  1. Stir yeast into the warm water. Let bloom for 5-10 minutes.
  2. Using a stand mixer fitted with the paddle, beat butter, sugar, and salt. Add the egg, beating until combined. Slowly pour in the yeast and water. Beat until combined. Add the flour about one cup at a time, beating until combined after each addition. Once the dough starts to form switch to the dough hook attachment. After all the flour has been added knead the dough for 3 minutes.
  3. Turn dough out onto a floured surface and knead by hand until smooth.
  4. Place dough in a greased bowl, cover, and let rise to double in size (about 30-60 minutes) in a warm place. (In the microwave or turned off oven)
  5. Roll dough out on a floured surface into a rectangle. Spread the dough evenly with the butter. Sprinkle with brown sugar, cinnamon, and cooked bacon. (Reserve some bacon for garnish, if desired.) Roll the dough into a log, lengthwise. Cut the dough into 2″ cinnamon rolls. Place cut side down in a 9×13 casserole dish.
  6. Cover dough with a towel and let rise for 30 minutes before baking. The rolls should have doubled in size again. (Other options: Freeze the rolls and after thawing let rise until doubled in size or place in refrigerator overnight after rising, bring to room temperature before baking.)
  7. Bake at 425 degrees for 10 minutes. Reduce heat to 350 and bake another 7 minutes, until golden brown. Let cool, slightly.
  8. Meanwhile, make glaze. Whisk together all of the ingredients for the frosting. Pour over the cinnamon rolls! Garnish with extra bacon.

Bacon Cinnamon Rolls with Maple Glaze for #SundaySupper from Sew You Think You Can Cook
Bacon in Appetizers

Bacon in Beverages

Bacon for Breakfast

Bacon for Lunch

Bacon for Dinner

Bacon as a Side Dish

Bacon for Dessert

Sunday Supper MovementJoin the #SundaySupper conversation on twitter on Sunday! We tweet throughout the day and share recipes from all over the world. Our weekly chat starts at 7:00 pm ET. Follow the #SundaySupper hashtag and remember to include it in your tweets to join in the chat. To get more great Sunday Supper Recipes, visit our website or check out our Pinterest board.

Would you like to join the Sunday Supper Movement? It’s easy. You can sign up by clicking here: Sunday Supper Movement.


S’more Cereal Bars

When I was sorting out my planner for the month of August I decided to start writing down food holidays, too. Just in case I manage to be on top of it enough to look at my planner early enough in the day to embrace the holidays on my social media platforms.

But when I saw that today is National S’mores Day I didn’t need any further excuse to make something. I had Rice Krispie Treats on my mind and thought it’d be a simply way to celebrate s’mores without the campfire. I decided to let the butter brown before adding the marshmallows, hoping it’d give it a little bit of a smokey quality. I mixed Rice Krispie cereal and Golden Graham cereal, and stirred in some chocolate chips.

My husband and I could hardly wait for the boys to finally go to bed so we could enjoy one of these s’more cereal bars.

I hope you all have a wonderful National S’mores Day!

S’more Cereal Bars

Ingredients:

  • 3 tbsp butter
  • 1 bag (10 oz) marshmallows
  • 4 C golden grahams
  • 2 C rice krispies
  • 1 1/2 C chocolate chips

Steps:

  1. Melt butter in a large pot over medium-low heat. Cook until butter is golden brown.
  2. Add marshmallows, cook until melted and smooth. Remove from heat. Stir in the cereal. Quickly mix in the chocolate chips.
  3. Lightly spray a casserole dish with cooking spray. Spread cereal bars into the prepared pan. Allow to cool before cutting.

S'more Cereal Bars  Sew You Think You Can Cook

#SundaySupper: Kids Favorite Recipes

I got pretty excited when I saw the theme for this weekend’s Sunday Supper announced a few weeks ago. Kids Favorites! As a relatively new mom, I can answer this prompt from the parental side of the equation.(If you were asking me as a child, my answer would have been Kraft mac and cheese…)

When I thought about what my 2 year old likes to eat, I immediately thought: chocolate. He will occasionally come up to me and straight up ask for chocolate. Now, when he asks for chocolate he really means Nutella. So really… I could just share a recipe for my kid’s favorite food… It’d look like this: Open jar of Nutella, provide a spoon, have a wet napkin handy.

I decided to expand upon that. Another of his favorites: ice cream. I could have done a Nutella ice cream, but when I had this planned on my menu my dad was here for Firecracker’s 2nd birthday. My dad, who is allergic to nuts, needs to have a little something sweet after dinner, so I stuck with plain chocolate. In all actuality, I kind of made the frozen custard more for my dad than for my son; not that Firecracker didn’t get excited for his small bowl of ice cream!

Chocolate Frozen Custard (toddler)  Sew You Think You Can Cook

I started out with one ice cream recipe in mind and then completely switched it up to make a frozen custard as I found myself with 5 egg yolks leftover from a crepe recipe that I’ll be sharing another day.

This ice cream or frozen custard, if you will, is incredibly rich and fully intended for those who adore chocolate. I found serving it with mint or raspberries helped cut the richness. My husband was out of town for work the week after I made this and he was quite bummed to discover that I’d only left him one serving when he returned! Sorry, I’m not sorry.

A big thank you to Ellen of Family Around the Table for hosting a great event. To discover more dishes loved by children, scroll past my recipe.

Chocolate Frozen Custard

Ingredients:

  • 3 C heavy cream, divided use
  • 1/4 C unsweetened cocoa powder
  • 1 C semi-sweet chocolate chips
  • 1 tsp vanilla extract
  • 5 egg yolks
  • 1/3 C sugar

Steps:

  1. Combine 1 1/2 C heavy cream with the cocoa powder in a medium saucepan over medium heat. Whisk continuously until the mixture is smooth. Remove from heat, add the chocolate chips, and stir until melted. Mix in the vanilla. Set aside. (Having only one medium saucepan, I simply scraped the mixture using a spatula into a glass bowl.)
  2. In a medium bowl, vigorously whisk the egg yolks with the sugar until pale yellow.
  3. In another (if you have it) saucepan, heat remaining 1 1/2 C heavy cream over medium heat. Bring to a simmer.
  4. Temper the egg yolks: Take about 1/4 C of the hot cream and whisk into eggs. Constantly whisking, add eggs to milk. Cook over low heat, stirring continuously with a wooden spoon, until the mixture thickens and reaches 170 degrees F. The custard should coat the back of a spoon so that your finger will leave a path.
  5. Strain the custard into a large bowl. Stir in the chocolate mixture from Step 1. Place the bowl of custard in a bowl of ice water to cool, stirring occasionally for 10-20 minutes. (Don’t let the water into the custard!)
  6. Cover the custard with plastic wrap, making sure to make contact with the custard. Place in the refrigerator a minimum of 3 hours.
  7. Follow ice cream maker instructions and freeze. Set frozen custard out at room temperature a few minutes prior to serving.

*This recipe is modified from Sara at http://www.thekitchn.com/recipe-mexican-chocolate-and-almond-ice-cream-dessert-recipes-from-the-kitchn-59333*

Chocolate Frozen Custard for #SundaySupper from Sew You Think You Can Cook

Appetizers

Snacks

Main Dish

Desserts

Sunday Supper MovementJoin the #SundaySupper conversation on twitter on Sunday! We tweet throughout the day and share recipes from all over the world. Our weekly chat starts at 7:00 pm ET. Follow the #SundaySupper hashtag and remember to include it in your tweets to join in the chat. To get more great Sunday Supper Recipes, visit our website or check out our Pinterest board.

Would you like to join the Sunday Supper Movement? It’s easy. You can sign up by clicking here: Sunday Supper Movement

#BundtBakers: Secret Garden

4ae7b-bundtbakerspostI have been sitting on this cake for months! And that is not an exaggeration. Sue of Palatable Pastime is hosting and announced the theme of “Secret Garden” earlier this year. She defined the task by making a cake with flowers, herbs or summer vegetables. #BundtBakers is a group of bundt loving bakers who get together once a month to bake bundts with a common ingredient or theme. We take turns hosting each month and choosing the theme or ingredient.

I opted for the “herbs” qualification and used up my massive amount of mint! I quickly decided on doing a mojito bundt. For Cinco de Mayo we met with some of my husband’s new coworkers at a local Mexican restaurant to celebrate their project kick-off. Neither of us are really big margarita fans and we figured we’d try the mojito instead. I had forgotten about that particular cocktail over the years. I remember first having one at my neighbors house some 6-odd years ago with some homegrown sugar cane and mint – delicious.

This recipe was the first that I photographed with my new macro lens. In addition to my obsession with photographing blood oranges, I’ve found zoomed-in photos of zest to be fascinating.

As you probably know by now, I am not a huge fan of frosting in general, but specifically on my bundt cakes. I hate covering up the intricate details of my bundt pans. This cake did need more than just powdered sugar, so I decided to create a simple lime glaze and toss in some finely chopped mint for extra measure to top these moist, boozy cakes.

I used my Bundt Duet Pan for these Mojito Bundt Cakes.

Mojito Bundt Cakes

Ingredients for the cake:

  • 2 C flour
  • 2 tsp baking powder
  • 1 tsp baking soda
  • 1/2 tsp salt
  • 2 stick butter, softened
  • 1 C sugar
  • 1 egg
  • 2 tsp vanilla
  • 2 tsp lime zest
  • 2 tsp finely chopped fresh mint
  • 1/2 C rum
  • 1 1/4 C applesauce

Ingredients for the glaze:

  • 2 C powdered sugar
  • juice 1/2 lime, or to taste
  • lime zest
  • fine chopped fresh mint

Steps:

  1. Preheat oven to 350 degrees F. Grease two 2.5 C bundts.
  2. In a large bowl, whisk together the flour, baking powder, baking soda, and salt.
  3. In the bowl of a stand mixer fitted with the paddle attachment, cream the butter and sugar. Add the egg and vanilla and mix until combined. Add in the lime zest, mint, and rum and mix until fully incorporated.
  4. Add 1/3 of the dry ingredients, mixing until combined. Add 1/2 of the apple sauce, mixing until combined. Repeat, ending with the dry ingredients.
  5. Divide batter between the bundt pans. Bake 45-50 minutes, or until a knife inserted comes out cleanly. Allow cakes to cool in the pan before removing to a cooling rack.
  6. Make the glaze: Whisk together powdered sugar and lime juice until smooth. Fold in the lime zest and mint. Top cooled cakes with the glaze. Garnish with extra lime zest and mint, if desired.

*This recipe is modified from Kat at http://www.gooseberrymooseberry.com/2012/03/mini-mojito-cupcakes.html*

Mojito Bundt Cakes for #BundtBakers from Sew You Think You Can Cook

You can see all our of lovely Bundts by following our Pinterest board. Updated links for all of our past events and more information about #BundtBakers, can be found on our home page.

And don’t forget to take a peek at what other talented bakers have baked this month:

Almond Lavender Bundt by The Queen of Scones

Carrot Bundt Cake with Chamomile Orange Icing by Patty’s Cake

Chocolate and Mint Cake by Baking Yummies

Ginger & Lemon Crackle Courgette Bundt Cake by Baking in Pyjamas

Elderflower and Lemon Bundt by Jane’s Adventure in Dinner

Lavender & Honey Bundt by Living the Gourmet

Lavender & Lemon Bundt Cake by I Love Bundt Cakes

Lavender Lemonade Bundt by All That’s Left Are The Crumbs

Lemon and Rosewater Cake by Palatable Pastime

Lemon Balm Bundt Cake by Magnolia Days

Lemon Zucchini Bundt with Sugared Pansies by A Day in the Life on the Farm

Roses & Lemon Bundt Cake by kidsandchic

Spiced Zucchini Bundt Cake by Making Miracles

Sweet Chocolate Feel the Beet Cake by Faith, Hope, Love, & Luck Survive Despite a Whiskered Accomplice

Vanilla Rose Bundt with Edible Flowers by Our Good Life

Yorkshire Parkin Mini Bundt by Food Lust People Love

Zucchini, Cheddar and Chive Bundt by Cookaholic Wife

SRC: Mini Pecan Pie Cupcakes

newsrcbanner

It’s Secret Recipe Club Reveal Day! In the Secret Recipe Club, each participating blogger is assigned a blog from another participating blogger and secretly searches their site for something to recreate. The accompanying blog post then goes live on reveal day! So while I was immersed in my assigned blog, someone else was picking through mine! I’m so excited to be part of this group, to see what on my blog peaks other’s interests and to stumble upon new blogs and new recipes.

I had to chuckle when I received my assignment in my email this month. You see, for the past two reveals April of Angels Home Sweet Homestead was assigned my blog! For our themed barbecue/picnic reveal she made Mexican Street Corn Salad and for our traditional Group C reveal she chose Cinnamon and Honey Roasted Chickpeas. I suppose it was only fitting that I took my turn diving more deeply into April’s blog.

April’s philosophy behind her blog is fantastic. She writes:

I want to bring back a simpler way of life, where families sit down together to a home cooked meal and talk every day, growing as much of that food as possible with our own hands, and the old-fashioned art of canning that food too.

I just love that! While I can’t grow my own food – partly due to lack of yard but mostly due to lack of green thumb – I can provide home cooked meals for my family. After our 18 months in Ohio without a dining table, it was a goal for our California home to have a space dedicated to eating family dinners. Our large table fits perfectly off the kitchen (and doubles as extra counter space) and is set with two booster/highchair seats for my boys. We have finally gotten into a rhythm of dinner between 6-6:30 and I love it! Firecracker is reaching an age where he can recount the day’s activities to Daddy and I know that as the boys continue to get older, the stress of eating will give way to pure enjoyment and nurturing our relationships and bodies.

Seven recipes made their way to my secret Pinterest board from April’s blog including Fruity Breakfast Burritos, Restaurant Style Salsa, and Greek Yogurt Tuna Salad. I was going to show the list to my husband and have him decide what I’d make. But then I didn’t. Though I’m pretty sure I picked the “right” answer anyway.

While I was updating my planner this month I decided to take a peek at the food holidays for July. I was slightly surprised to see that National Pecan Pie Day isn’t in the fall, but it’s July 12th! My decision was made. April had on her blog, and a recipe that I’d saved prior, Pecan Pie Muffins.

Now, I’m not sure these qualify as a muffin. That’s why you’ll notice I renamed them cupcakes. Though I’m not sure if that’s accurate either. Muffins imply a little bit of healthiness. There’s absolutely nothing healthy about these sweet bites.I could say that pecans are a source of protein, but that’s really stretching it. I almost just called them Mini Pecan Pie Cups but without a crust I don’t think they qualify as pie.

Whatever you want to call them, they’re pretty delicious. (And that’s coming from someone who doesn’t care for pecan pie!) I ate two within an hour of them coming out of the oven – one to taste test and one as a snack during their photo shoot.

April made hers in a regular size muffin cup and got 6 of them, but I thought mini would be the way to go. I can’t have my husband taking only 3 to work, because let’s be honest, there’s no way all 6 would be leaving the house untouched. I’m glad I made them mini, too, because I don’t think I’d be able to eat an entire muffin of this dessert before my sweet tooth had enough.

Firecracker helped bake these treats, but he won’t be getting to try them – they’re simply too sticky and sweet for my 2 year old. Now I just have to send them with Stuart to work so he doesn’t see them sitting on the counter.

This recipe makes 24 mini muffins/cupcakes. I recommend baking these without liners, no greasing of the pan necessary – there’s plenty of butter in the batter. I was 2 liners short of 24 and those two cups were our favorites because the sugar gets all crispy and crusty on the edges. If you do use liners, not that they’re much easier to peel back if you allow the cupcakes to cool completely before eating.

Mini Pecan Pie Cupcakes

Ingredients:

  • 1 C brown sugar
  • 1 C chopped pecans
  • 1/2 C flour
  • 2/3 C butter, melted
  • 2 eggs, beaten

Steps:

  1. Preheat oven to 350 degrees F.
  2. In a large bowl, whisk together the sugar, pecans, and flour. Mix in the butter and egg until combined.
  3. Divide batter evenly among 24 mini muffin tin cups.
  4. Bake 18 minutes. Transfer to a cooling rack.

*This recipe is adapted from April at http://www.angelshomesweethomestead.com/2011/01/pecan-pie-muffins.html*

Mini Pecan Pie Cupcakes for #SecretRecipeClub from Sew You Think You Can Cook

To see the other bloggers who participated in The Secret Recipe Club this month click here: