#Cookielicious Exchange Party

It’s that time of year

When the world falls in love

Every song you hear

Seems to say….

bake some cookies!

The opening lyrics are to The Christmas Waltz, a not as popular holiday song that was my first ever solo in middle school and a song that I hold dear.

But seriously, it’s that time of year for holiday parties and cookie exchanges and who better to have a cookie exchange than a wonderful group of food bloggers?! Today’s particular cookie exchange is with the Sunday Supper Movement. Be sure to scroll past my recipe for an incredible selection of cookie recipes to brighten your holiday season.

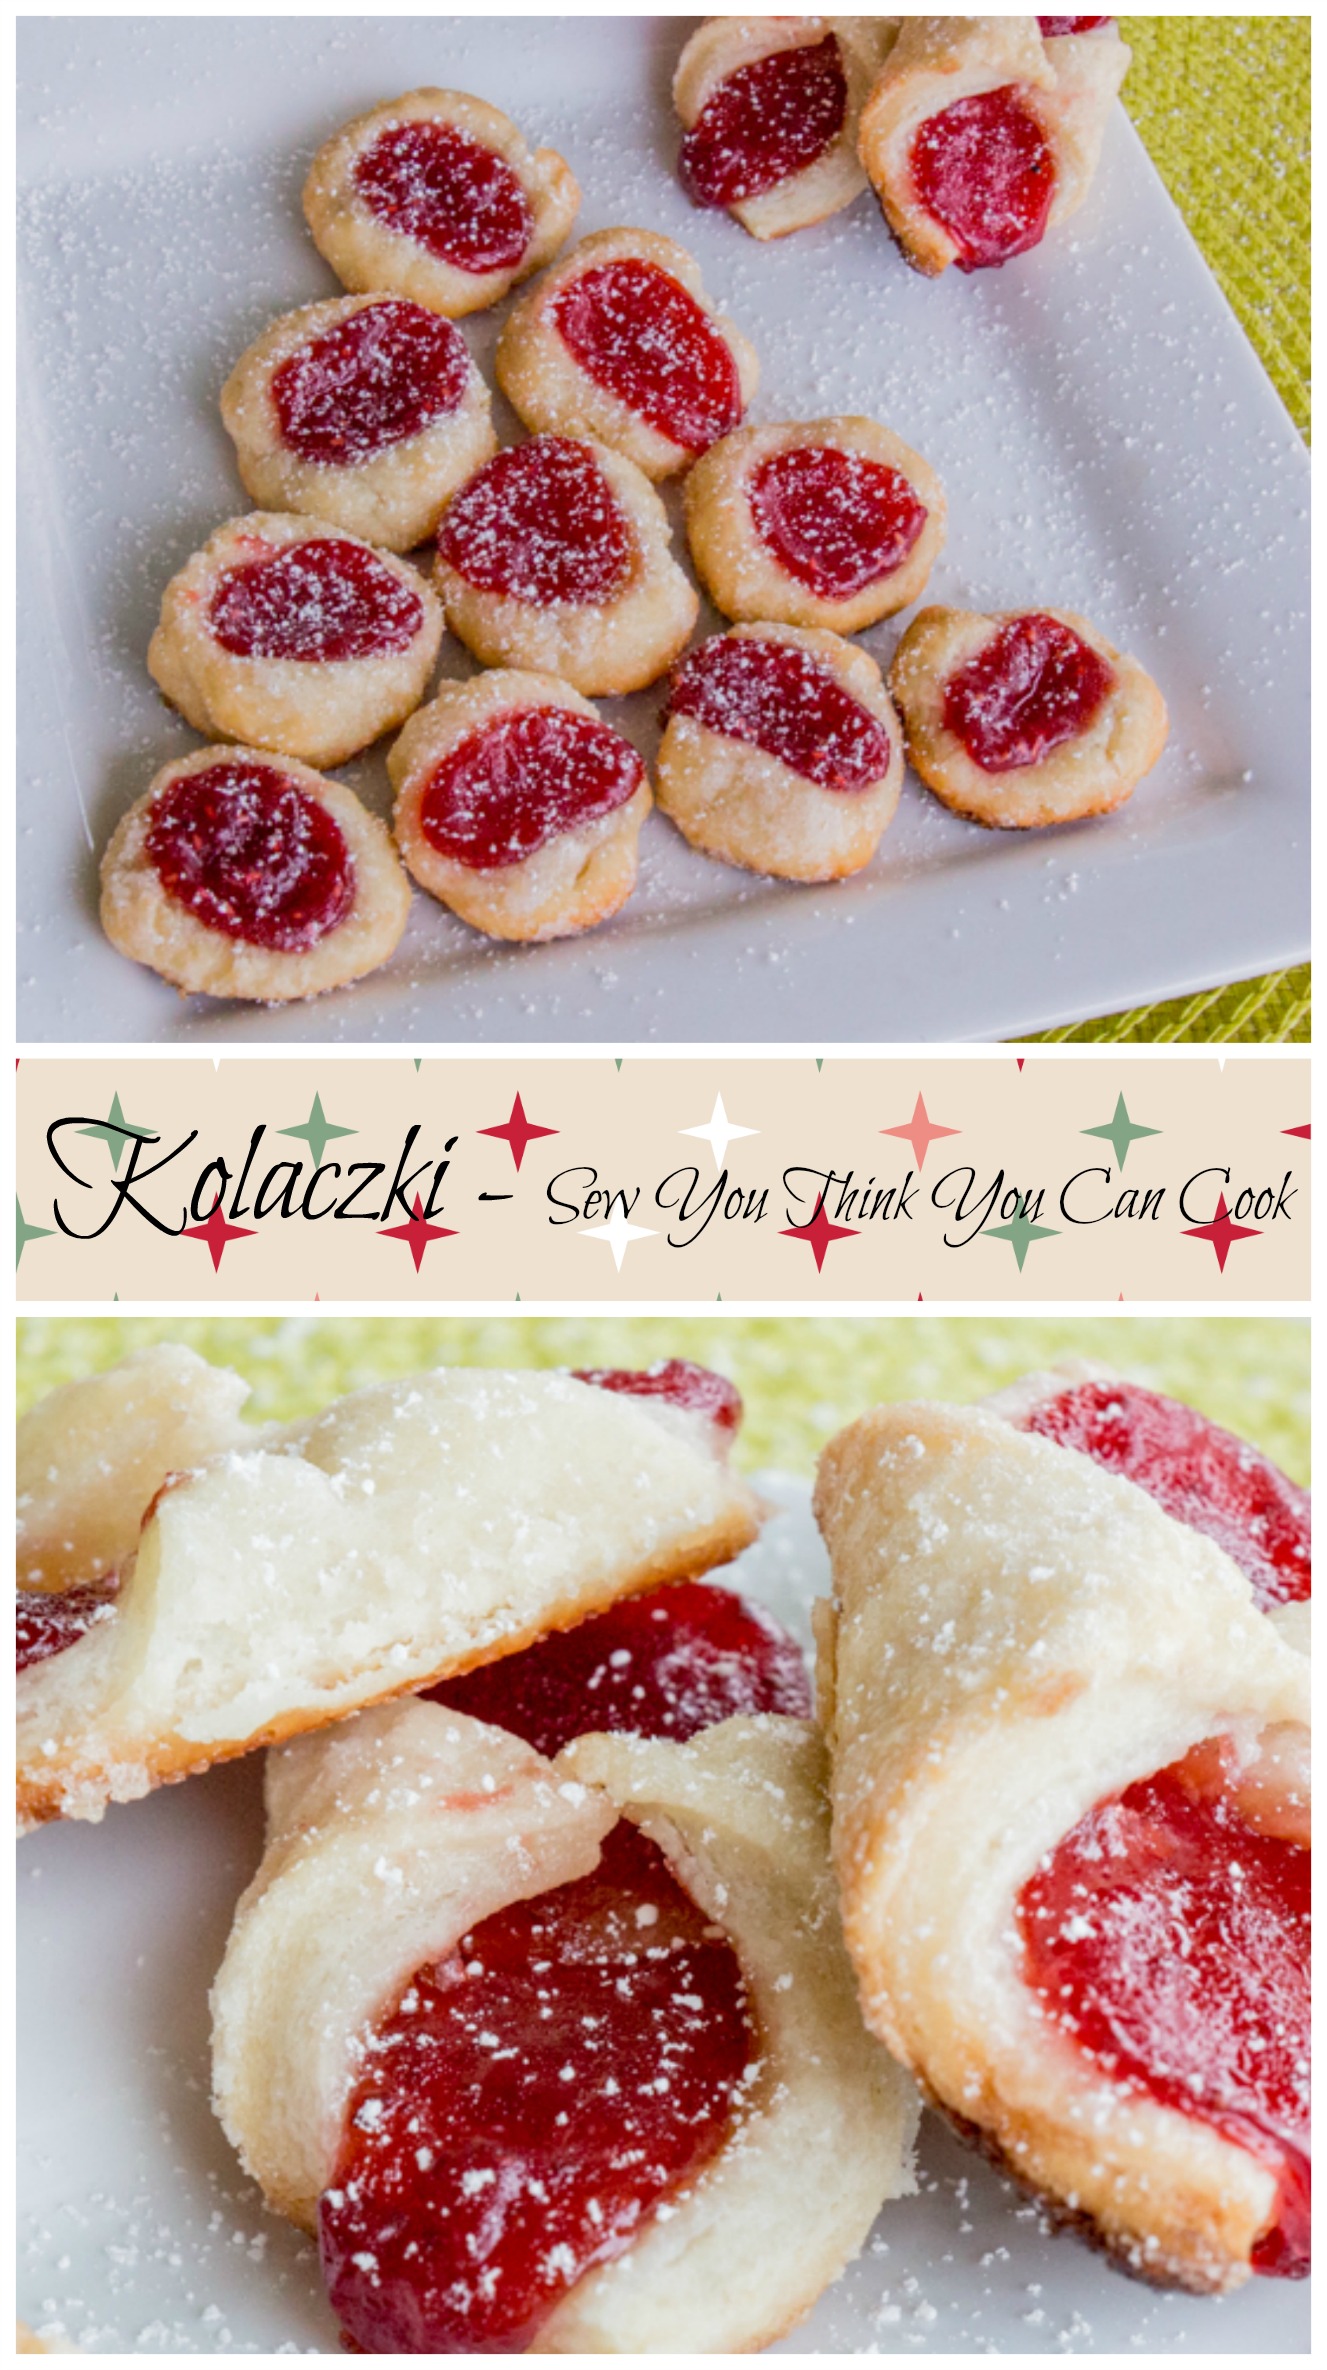
After the birth of my baby boy my mom was here for a couple weeks helping me adjust to life with two children. It was then that we decided to bake cookies, one of the culinary tasks my mom enjoys doing. We picked something of Polish origin – kolaczki. Mom remembers having these jam filled cookies as a kid. While the majority of the recipes online show a “rolled” cookie, Mom remembers having them as more of the typical “thumbprint” cookie. We decided to try the rolled cookie form – only 5 held their shape, so we made small circles from the remaining dough.

This recipe makes 4-5 dozen cookies.

Kolaczki

Ingredients:

  • 3 sticks butter, softened
  • 8oz cream cheese, softened
  • 3 C flour
  • jam for filling
  • powdered sugar for rolling
  • sugar for rolling

Steps:

  1. In the bowl of a stand mixer fitted with the paddle attachment cream together the butter and cream cheese. Add the flour, one cup at a time, and mix until incorporated. Refrigerate dough at least one hour.
  2. Preheat oven to 350 degrees F. Lightly grease baking sheets.
  3. Combine equal parts powdered sugar and sugar for rolling the cookie dough.
  4. For rolled form: Roll dough out to 1/6″ thickness, cut into 2×2″ squares, place jam diagonally down the center, fold two opposing corners over the filling. For thumbprint form: Make small balls from the dough and roll in the sugar mixture. Press flat and create a well for the jam.
  5. Place cookies on prepared baking sheets. Bake 15 – 20 minutes, or until the edges are lightly golden.
  6. Sprinkle with powdered sugar before serving.

*This recipe is adapted from Barbara at http://easteuropeanfood.about.com/od/polishdesserts/r/kolaczki.htm*

Kolaczki for #Cookielicious Exchange Party from Sew You Think You Can Cook #SundaySupper

Plus, 20 Cookie Baking Tips and Holiday Cookie recipes from Sunday Supper

8387592742_f6164fd5a8_oJoin the #SundaySupper #Cookielicious Exhange Party conversation on twitter on Tuesday December 1st! Our chat starts at 7:00 pm ET. Follow the #SundaySupper hashtag and remember to include it in your tweets to join in the chat. To get more great Sunday Supper Recipes, visit our website or check out our Pinterest board. Would you like to join the Sunday Supper Movement? It’s easy. You can sign up by clicking here: Sunday Supper Movement.

#handcraftededibles: Go Nuts

#handcraftedediblesIn an effort to make all of her holiday gifts this year, Camilla at Culinary Adventures with Camilla invited some of her favorite foodie bloggers to share recipes for hand-crated edibles. Over the course of twelve weeks, we’ll be sharing recipes for all your homemade holiday gifts. Hope you’ll follow along for inspiration. You can find out more information, including the schedule here.

Today’s theme is “Go Nuts”. Spiced and candied nuts or nut mixes make for perfect party food. Next time you’re invited to a holiday party, bring a pretty container full of flavored nuts to gift to the generous host.

I had a couple of recipes on the blog that would fit today’s theme, but I’ve decided to re-share my personal favorite, Orange Rosemary Roasted Almonds. These almonds are a great alternative to the popular traditional candied nuts and are guaranteed to wow your friends.

Orange Rosemary Roasted Almonds

Ingredients:

  • 4 C almonds
  • 6 tbsp sugar
  • 3 tbsp butter
  • 3 tbsp chopped fresh rosemary
  • 2 tbsp orange zest

Steps:

  1. Preheat oven to 400 degrees F. Line a baking sheet with aluminum foil.
  2. Place almonds on prepared baking sheet. Lightly spray with cooking spray and roast 10-15 minutes.
  3. In a small saucepan over medium heat melt together butter and sugar. Once the sugar is dissolved remove from  the heat and mix in the rosemary and orange zest.
  4. Toss roasted almonds and the butter mixture together in a large bowl. Spread nuts back out on baking sheet(s) to cool completely.

*This recipe is adapted from Christie at http://akitchenhoor.blogspot.com/2015/02/src-reveal-orange-and-rosemary-roasted.html*

Orange Rosemary Roasted Almonds | Sew You Think You Can Cook

To give nuts as a gift place them in a glass container and tie it with a bow along with the recipe! An entire gift basket of different nut flavors and varieties would be a great gift, too.

Here are some other options to fill your basket:

Next week – week 10 – check back for our recipes to inspire you as we let our confectioner’s skills shine. Think truffles, barks, anything
and everything with chocolate. Don’t forget to check out our #handcraftededibles pinterest board.

Sausage Macaroni and Cheese

Macaroni and Cheese is one of those comfort foods that everyone seems to have a soft spot for. I know it’s one of my guilty pleasures. I say that because I still (in my upper 2os) prefer the highly processed boxed macaroni to a homemade pasta. I think what I don’t care for is a baked casserole dish of mac and cheese. I don’t care for the extra cheese or breadcrumb crust on top and baked noodle dishes to me always seem dry.

But I do give a “fancy” mac and cheese a chance every now and then. And when one is a stove-top version of the comfort food I’m more inclined to give it a try. Especially when cream cheese is one of the ingredients!

And with sausage being a main ingredient I know that my husband would definitely approve. That makes this pasta a main dish and not a side.

Sausage Macaroni and Cheese

Ingredients:

  • 1/2 lb uncooked macaroni noodles
  • 2 links Italian sausage, casings removed
  • 1 1/4 C milk
  • 2 tbsp flour
  • 3/4 C shredded cheddar cheese
  • 1/3 C shredded Monterrey Jack cheese
  • 1/4 C cream cheese
  • 1/2 tsp onion powder
  • 1/4 tsp garlic powder

Steps:

  1. Cook pasta according to package directions.
  2. In a large, high-sided skillet over medium-high heat cook the sausage, breaking it up.
  3. In a measuring cup, whisk together the milk and flour. Add to the skillet and bring to a boil, whisking continuously. Reduce to a simmer and whisk in the cheeses, spices, and salt to taste. Stir until cheese is melted.
  4. Add cooked pasta to the skillet, coating it in the sauce.

*This recipe is adapted from Deborah at http://www.tasteandtellblog.com/cheesy-goodness/*

sausage macaroni and cheese | sew you think you can cook

#SundaySupper: Budget Friendly Meals

Today’s Sunday Supper theme is Budget Friendly Meals. It’s that time of year when budgets become tested and spending levels go off the charts, so why not save some green in the kitchen. A big thank you to Shelby Ruttan of Gumpy’s Honey Bunch and Caroline Williams of Caroline’s Cooking for hosting this week. Be sure to scroll past my recipe for an incredible selection of penny pinching recipes.

Twice baked potatoes have become my go-to mid-week I-don’t-want-to-cook dinner plan. I can re-purpose leftovers by adding them to the mashed potato mixture. Chili, taco meat, or shredded chicken make for fantastic twice baked potato fillings.

I must admit, I am a complete failure when it comes to a baked potato. I mean, how hard can it be?! Stick potato in oven. Wait. But for some strange reason I can never get the insides of the potato to be cooked. And then I discovered the “baked potato” button on the microwave. My whole world had been turned upside down and the amount of potatoes (and sweet potatoes) we’ve eaten has increased.

Today’s original recipe is inspired by French Onion Soup. I used deli roast beef in this recipe but leftover shredded roast would be perfect, too! Or, you could leave the beef out and use vegetable stock for a vegetarian friendly side dish. Swiss or Gruyere cheese would be a more authentic cheese to add to the mashed potato but I was using what I had available to me, and that was Parmesan.

This recipe is for two whole potatoes, which feeds 2 as a main dish or 4 as a side dish.

An Original Recipe

French Onion Soup Twice Baked Potatoes

Ingredients:

  • 1 sweet onion, thinly sliced
  • 3 tbsp butter, divided use
  • 1/4 tsp beef broth
  • 1/2 tsp Worcestershire sauce
  • 1/4 tsp dried thyme
  • 2 baked (or microwaved) potatoes
  • 1/4 C milk
  • 1/8 C sour cream
  • 1/4 C chopped deli roast beef
  • 1/4 C Parmesan cheese

Steps:

  1. In a skillet over medium-high heat, saute onions in 2 tbsp butter until caramelized. This will take approximately 10 minutes, stirring occasionally.
  2. Season onions with 1/4 tsp Kosher salt and 1/8 tsp pepper. Add the broth, Worcestershire, and thyme. Cook until saucy, about 1-2 minutes. Set onions aside. Note: These two steps can be done in advance and caramelized onions stored in the fridge.
  3. Preheat oven to 350 degrees F.
  4. Cut potatoes in half lengthwise and scoop out the insides.
  5. Mash the potatoes with 1 tbsp butter, milk, and sour cream until creamy. Fold in the onions and roast beef. Season to taste with S+P.
  6. Fill the potato skins with the mashed potato mixture. Top with Parmesan cheese. Bake 20 minutes, until the tops are lightly golden and potatoes are warmed through.

French Onion Soup Twice Baked Potatoes for #SundaySupper from Sew You Think You Can Cook

Save-Your-Pennies Soups:
Bean and Bacon Soup by Hezzi-D’s Books and Cooks
Mexican Turkey Bean Soup by What Smells So Good?
Pasta e Fagioli by The Food Hunter’s Guide to Cuisine
Turkey and Dumpling Soup by Palatable Pastime
Vegan Broccoli Cheese Soup by Pancake Warriors

Budget-Savvy Bread and Salads:
Mom’s Buttermilk Biscuits by Grumpy’s Honeybunch
Turkey Salad by Food Done Light

Money-Saving Mains:
Black Bean and Bell Pepper Quesadillas by My San Francisco Kitchen
Cajun Blackened Chicken Thighs by Feeding Big
Chicken Enchilada Casserole by Cosmopolitan Cornbread
Chicken Enchiladas by The Freshman Cook
Chicken Piccata by Monica’s Table
Chicken Tetrazzini by Renee’s Kitchen Adventures
Chimichurri Chicken Thighs by Life Tastes Good
Dutch Baby Pancakes by Brunch with Joy
Easy Cheesy Egg Breakfast Bake with Potatoes and Sausage by From Gate to Plate
Easy Crockpot Spaghetti Sauce by Fantastical Sharing of Recipes
Egyptian Rice and Lentils by Wholistic Woman
French Onion Soup Twice Baked Potato by Sew You Think You Can Cook
Gnocchi with Fennel and Pork by Caroline’s Cooking
Italian Baked Chicken by A Day in the Life on the Farm
Lasagna Stuffed Acorn Squash by Cupcakes & Kale Chips
One-Pot Creamy Chicken and Noodles by A Kitchen Hoor’s Adventures
Orzo with Leftover Turkey and Sweet Potatoes by Cooking Chat
Sauteed Vegetables by Party Food and Entertaining
Turkey Sausage and Pasta by Cindy’s Recipes and Writings
Twice Baked Sweet Potato Bar by Momma’s Meals
Yakisoba (Japanese Stir Fried Noodles) by Curious Cuisinere

Don’t-break-the-bank Desserts:
Apple Pecan Bread Pudding by That Skinny Chick Can Bake
Marshmallow Popcorn Balls by Pies and Plots
Slow Cooker Apple Gingerbread Crumble by The Crumby Cupcake

And more saving suggestions from the Sunday Supper Movement:
Budget-Friendly Meal Ideas for #SundaySupper
8387592742_f6164fd5a8_oJoin the #SundaySupper conversation on twitter on Sunday! We tweet throughout the day and share recipes from all over the world. Our weekly chat starts at 7:00 pm ET. Follow the#SundaySupper hashtag and remember to include it in your tweets to join in the chat. To get more great Sunday Supper Recipes, visit our website or check out our Pinterest board.

Would you like to join the Sunday Supper Movement? It’s easy. You can sign up by clicking here: Sunday Supper Movement.

Black & White Cookies

I have two cookbooks dedicated solely to cookies yet I never really think to make them! It’s not until an event pops up that requires cookies to be made that I remember I have these books.

There was a service event at church calling for homemade cookies. I searched through my Pinterest boards and found a couple of recipes that intrigued me, but when it came time to bake them I realized I didn’t have all of the ingredients as I’d thought, and then I continued reading and didn’t have time to chill the dough long enough either. So I opened up The Gourmet Cookie Book: The Single Best Recipe from Each Year 1941-2009 on a mission to find a recipe that would make at least 2 dozen cookies, could be made quickly, and with what I had on hand. The recipe I chose is from December 2005.

Black and White Cookies are, according to the cookbook, somewhat of a favorite in NYC. I’ve never had the classic half black half white cookie so I can’t confirm that these tasted like the real deal or not. I know they don’t look like the real deal though because I don’t have the talent or patience to frost 28 cookies, so I used piping bags and went wild.

Mini Black and White Cookies

Ingredients for cookies:

  • 7 tbsp butter, softened
  • 1/2 C sugar
  • 1 egg
  • 1 1/4 C flour
  • 1/2 tsp baking soda
  • 1/2 tsp salt
  • 1/3 C buttermilk
  • 1/2 tsp vanilla extract

Ingredients for icing:

  • 2 3/4 C powdered sugar
  • 2 tbsp corn syrup
  • 2 tsp lemon juice
  • 1/2 tsp vanilla extract
  • 4-6 tbsp water
  • 1/4 C cocoa powder

Steps:

  1. Preheat oven to 350 degrees F. Grease 2 baking sheets.
  2. In the bowl of a stand mixer, cream together butter and sugar until fluffy. Add the egg and beat until combined.
  3. In a bowl, whisk together the flour, baking soda, and salt.
  4. In another bowl or glass, whisk the buttermilk and vanilla.
  5. Alternately add the dry and wet ingredients to the butter, beginning and ending with the dry.
  6. Place spoonfuls of dough onto prepared baking sheet and bake 6-8 minutes, rotating pans halfway. The cookies are done when they’ve puffed and the edges are a pale gold. Allow cookies to cool on a cooling rack.
  7. Make the icings: Whisk together the powdered sugar, corn syrup, lemon juice, vanilla, and 2 tbsp water. Add more water if needed. Divide icing in half and stir the cocoa powder into one half.
  8. Frost the cooled cookies: Classically they are half white and half black. If you pipe like I did you can get away with a half batch of icings.

*This recipe is adapted from The Gourmet Cookie Book: The Single Best Recipe from Each Year 1941-2009*

Black and White Cookies | Sew You Think You Can Cook

Disclaimer: This post contains affiliate links.

Applesauce Waffles

Another waffle recipe? Yep! Can you believe how many batter recipes there are that get poured into that wonderful checkered iron!? While I’d be content eating regular waffles every week there’s something intriguing about trying something new. Thank you Pinterest for opening my eyes to the wonder that is waffle creativity.

Today’s waffles are made with whole wheat and applesauce, but they still have a lot of butter to make them that much better! And a decent amount of delicious cinnamon.

Applesauce Waffles

Ingredients:

  • 3 1/2 C whole wheat flour
  • 2 tbsp baking powder
  • 1 tbsp cinnamon
  • 3 1/2 C milk
  • 1 stick butter
  • 1/2 C unsweetened applesauce
  • 4 eggs
  • 2 tbsp maple syrup
  • 1 tsp vanilla

Steps:

  1. In a large bowl whisk together flour, baking powder, and cinnamon.
  2. In large microwave safe measuring cup microwave the milk and butter until the butter is melted, about 2-3 minutes.
  3. In another bowl beat the applesauce, eggs, syrup and vanilla. Stir in the warm milk.
  4. Combine wet ingredients into dry.
  5. Into a hot greased waffle iron, drop 1/3 C of batter and cook until golden.

*This recipe is adapted from Jennifer at http://www.mykitchenaddiction.com/2012/10/cinnamon-scented-whole-wheat-waffles/*

applesauce waffles | sew you think you can cook

Chicken Chorizo Meatballs

It’s Mexican Monday everybody! I’m too afraid to go back through and find out when my last Mexican Monday post was, I’m sure it’s so far back it’d be embarrassing. And a little sad. Our Mexican Monday endeavor has finally kicked the bucket. Not intentionally, mind you, and I can come up with all sorts of scheduling related excuses. And there’s always that feeling of getting caught in a rut.

But not today! (Or well, the day we made and ate these.) Today there’s a brand new Mexicany (it’s a word, don’t worry about it) recipe to share. Meatballs with chorizo! Aka meatballs with flavor! I used ground chicken instead of ground beef because that’s what I had, but I definitely want to try these with ground beef, too, I imagine they’d be even better!

I’m not quite sure what pasta/sauce pairing would work with these so I would suggest using these for some game day grub or party appetizer. Queso makes a great dipper, or salsa, sour cream, even guacamole. They’d probably even work over top a taco salad, too.

Chicken Chorizo Meatballs

Ingredients:

  • 1 tbsp olive oil
  • 1/4 onion, minced
  • 1 1/2 tsp minced garlic
  • 1 egg
  • 2 tbsp milk
  • 3/4 C panko breadcrumbs
  • 1/2 C grated cheese (I used a combo of Monterrey and Colby Jack)
  • 1 tbsp dried cilantro
  • 2 tsp cumin
  • 1 tsp chili powder
  • 1 tsp dried oregano
  • 1 lb ground chicken
  • 2 links Mexican chorizo, skins removed

Steps:

  1. Preheat oven to 450 degrees F. Lightly grease a rimmed baking sheet.
  2. In a small skillet over medium-high heat saute onion in olive oil until tender. Add the garlic and cook another minute, set aside.
  3. In a large bowl whisk together egg and milk. Add the panko, cooked onion and garlic, cheese, and spices. Mix in the meat; I found a fork worked well to incorporate the chorizo into the chicken. Season with S+P.
  4. Form into golf ball sized meatballs; I found wetting my hands helpful in preventing the mixture from sticking to me. Place on prepared baking sheet.
  5. Bake 12-15 minutes, until an internal temperature of 165 degrees F is reached.

*This recipe is adapted from Renee at http://leitesculinaria.com/101202/recipes-chorizo-meatballs.html*

Chicken Chorizo Meatballs | Sew You Think You Can Cook

#handcraftededibles: Delicious Jams & Jellies

#handcraftedediblesIn an effort to make all of her holiday gifts this year, Camilla at Culinary Adventures with Camilla invited some of her favorite foodie bloggers to share recipes for hand-crated edibles. Over the course of twelve weeks, we’ll be sharing recipes for all your homemade holiday gifts. Hope you’ll follow along for inspiration. You can find out more information, including the schedule here.

Today’s theme is jams and jellies. Homemade jam or jelly makes for a great gift that lasts the whole year – except odds are it won’t.

I am re-sharing the recipe for Concord Grape Jelly that my mom and I made last year. This jelly was the best jelly I’ve ever had! It definitely didn’t last a year – it only last a couple of months. And this year there weren’t grapes to be plucked from the vine. Are grapes an every-other-year type of crop?

I promise you, if you give someone a jar of homemade jelly they’ll say a big “thank you” every morning.

This recipe made 12 4oz Jars and 4 8oz jars.

Grape Jelly

Ingredients:

  • 5 lb concord grapes
  • 7 C sugar, divided use
  • 1 pkt pectin(or 8 tbsp)

Equipment:

  • blender or juicer
  • cheesecloth
  • jelly jars with lids and rings
  • jar funnel
  • jar grabber
  • magnetic lid grabber
  • large stock pot(s)

Steps:

  1. Sanitize your jelly jars. I did this by running my dishwasher on a very hot cycle. Keep jars warm until ready to fill to prevent the glass cracking. If you do this in a dishwasher, simply don’t open the door until you’re ready to fill the jars. If you sanitize jars by washing with soapy water and boiling in water for 10 minutes,keep the jars in warm water until you’re ready to fill them.
  2. Place jar lids in a shallow skillet over low heat (do not boil) to get the seal gummy, remove lids from water.
  3. Place grapes in a blender (this will need to be done in batches) and pulse until juiced. Pour and press the juice through a cheesecloth lined strainer and strain into a large measuring cup. Squeeze cheesecloth to extract all the juice. Do this until you have 5 C of juice. (Any extra juice is a delicious tart treat for you to enjoy!)
  4. In a small bowl, combine the pectin with 1/4 C of the sugar.
  5. Warm the juice, but do not boil (yet). Stir in the pectin. Bring to a full boil.
  6. Add the rest of the sugar and return to a boil. Boil for 1 minute.
  7. Fill jars with jelly, cover with lids and rings. Seal by placing the filled jars in a boiling water bath for 5 minutes. Remove and allow to cool in a dry place over night. (I did this in my oven.)

*This recipe is adapted from http://www.pickyourown.org/grapejelly.htm#.VELDzfl4ofg*

Homemade Grape Jelly

To give homemade jelly as a gift, place it in a nice basket with a loaf of fresh bread.

Here are some other jam and jelly treats:

Next week, check back for our recipes for pickles. Or check out our #handcraftededibles pinterest board.

Disclaimer: This post contains affiliate links.

Philly Cheesesteak Sloppy Joes

It’s Halloween and if you’ve been a faithful reader from the beginning you know that means it’s time for my annual Sloppy Joes!

Today I’m sharing Philly Cheesesteak Sloppy Joes.

I’m not here to start a debate on if these are “real”. I’ve never had the Cheese-Wiz version of a Philly and I quite enjoy the kind with thinly sliced steak, grilled onions, and provolone.

We had these sandwiches last year. (Let me say, I’m pretty excited to finally pull these pictures off my camera.) My parents came to town to witness the little man’s first Halloween and this twist on the classic was a huge hit enjoyed by all.

If I’m not in the hospital delivery baby boy #2 then I’ll be awaiting trick-or-treaters with one of my grandma’s sloppy joes in hand. (That’s a teaser for next year’s Halloween post!) At least, I hope to get trick-or-treaters. I was seriously disappointed last year! We got 7, that’s right, I counted, kids at our door. I’m going to pretend it was the freezing rain that yielded such poor results and keep up hope for this year.

Philly Cheesesteak Sloppy Joes

Ingredients:

  • 1 lb ground beef
  • 1 onion, diced
  • 1 green bell pepper, diced
  • 1 C beef broth
  • 3 tbsp steak sauce
  • 4 hamburger buns
  • 4 slices provolone cheese

Steps:

  1. Preheat broiler.
  2. In a large saucepan over medium-high heat, brown ground beef. Once cooked, add the onions and peppers and saute until tender. Strain excess fat.
  3. Add the broth and steak sauce and bring to a boil. Allow sauce to thicken to desired consistency.
  4. Place hamburger buns on a baking sheet. Top the bottom buns with sloppy joe mixture and a slice of cheese. Place under broiler for 30 seconds until cheese is melted and top buns are golden.

*This recipe is adapted from Emily at http://www.emilybites.com/2012/01/philly-cheesesteak-sloppy-joes.html*

Philly Cheesesteak Sloppy Joes | Sew You Think You Can Cook

recreatedbysrc

Homemade Candy Corn

I conclude my Halloween candy week with a non-chocolate holiday favorite: candy corn!

This candy endeavor is the first one that’s actually a candy – aka it involves boiling sugar. Yikes!

I had to make two attempts at this one, but I’m glad I didn’t give up because I feel quite accomplished having made homemade candy corn! In my opinion this candy tastes much better than the packaged kind. It lacks that “honey” flavor and artificial after taste. I’m not an expert in candy making but I’d imagine you could add a little honey to the corn syrup mixture if you want that taste? Maybe?

After attempt one I decided to do a little more research and found a post on The Kitchn that went into the chemistry of candy making and how to know what went wrong. (In my case, I over cooked the sugar/syrup mix.) The ingredient list was the same (but halved) so I was content to give it another go. Attempt two involved sifting the powdered sugar mixture – I do not recommend skipping this step as it mixed into the syrup mixture much easier. Attempt two also went off of sugar temperature and not time. I think that’s the real key to candy making – if you don’t have a candy thermometer, I wouldn’t recommend attempting this recipe. Another difference was spreading the candy mixture out onto a baking sheet to cool – doing this ensured even cooling of the candy and easy division into three batches.

To be a little “different” I decided to make purple and green candy corn instead of the classic orange and yellow. I just love the addition of
purple and green to the classic Halloween colors – it feels more “wicked.” But honestly, you could do any color combination you want – perfect for tailgates, birthdays, and other holidays.

IMG_6566I only made 3/4 of the batch of candy corn, sacrificing the remaining quarter to the little boy who climbed up into my lap while I was cutting my triangles. Even still, I managed to fill three 4.25 oz jars with homemade candy corn. (I knew I saved those baby food jars for something!)

Homemade Candy Corn

Ingredients:

  • 1 C powdered sugar
  • 2 tbsp + 1 1/2 tsp powdered milk
  • 1/8 tsp kosher salt
  • 2 tbsp unsalted butter
  • 1/3 C corn syrup
  • 1/2 C sugar
  • 1 1/2 tsp vanilla extract
  • food coloring

Steps:

  1. Sift together powdered sugar, powdered milk, and salt. Set aside.
  2. Place butter, corn syrup, and sugar in a medium sauce pan. Cook over medium heat until butter has melted, stirring gently a couple of times. Bring the mixture to a boil and cook, without stirring, until a candy thermometer measures 245 – 250 degrees F. Remove from heat and mix in the vanilla extract.
  3. Working quickly, mix the powdered sugar mixture into the syrup mixture (I found this easy to do in batches) until smooth and fully incorporated.
  4. Spread mixture onto a lightly greased baking sheet (or use a silipat mat if you have one). Allow mixture to cool enough to handle, about 10 minutes. Do not wait too long or the candy will become too hard to deal with, if this happens microwave the candy for 5 seconds to soften, if that doesn’t work you may need to start over. Note: For “trouble-shooting” please see the original recipe linked below.
  5. Cut the candy into thirds and knead desired food coloring into each batch. Like you would with Play-doh, create ropes from the candy. To make it easier to work with I created 4 ropes from each color. Again, microwave the candy as needed to work with easily.
  6. Line one of each color rope next to each other, press together, and flatten with a rolling pin. Cut triangles out of the trio-rope. Repeat until all candy is used up.
  7. Allow candy corn to harden at least one hour. Keep in an airtight container for several weeks – until the candy simply becomes too dry to enjoy.

*This recipe is adapted from Emma at http://www.thekitchn.com/how-to-make-homemade-candy-corn-cooking-lessons-from-the-kitchn-99717*

Homemade Candy Corn | Sew You Think You Can Cook