Mardi Gras Ice Cream

As a food blogger I feel obligated to present a dish on Fat Tuesday. I’ve never really celebrated Mardi Gras in all it’s glory and never had a King’s Cake until a few weeks ago when a coworker brought one into the office. As luck would have it I found the plastic baby – which means I’m responsible for bringing in next year’s cake. Unfortunately for them we’ll have moved to Ohio by then. So I thought I’d bake a treat and bring it in this year. And of course blog about it – two birds, one stone.

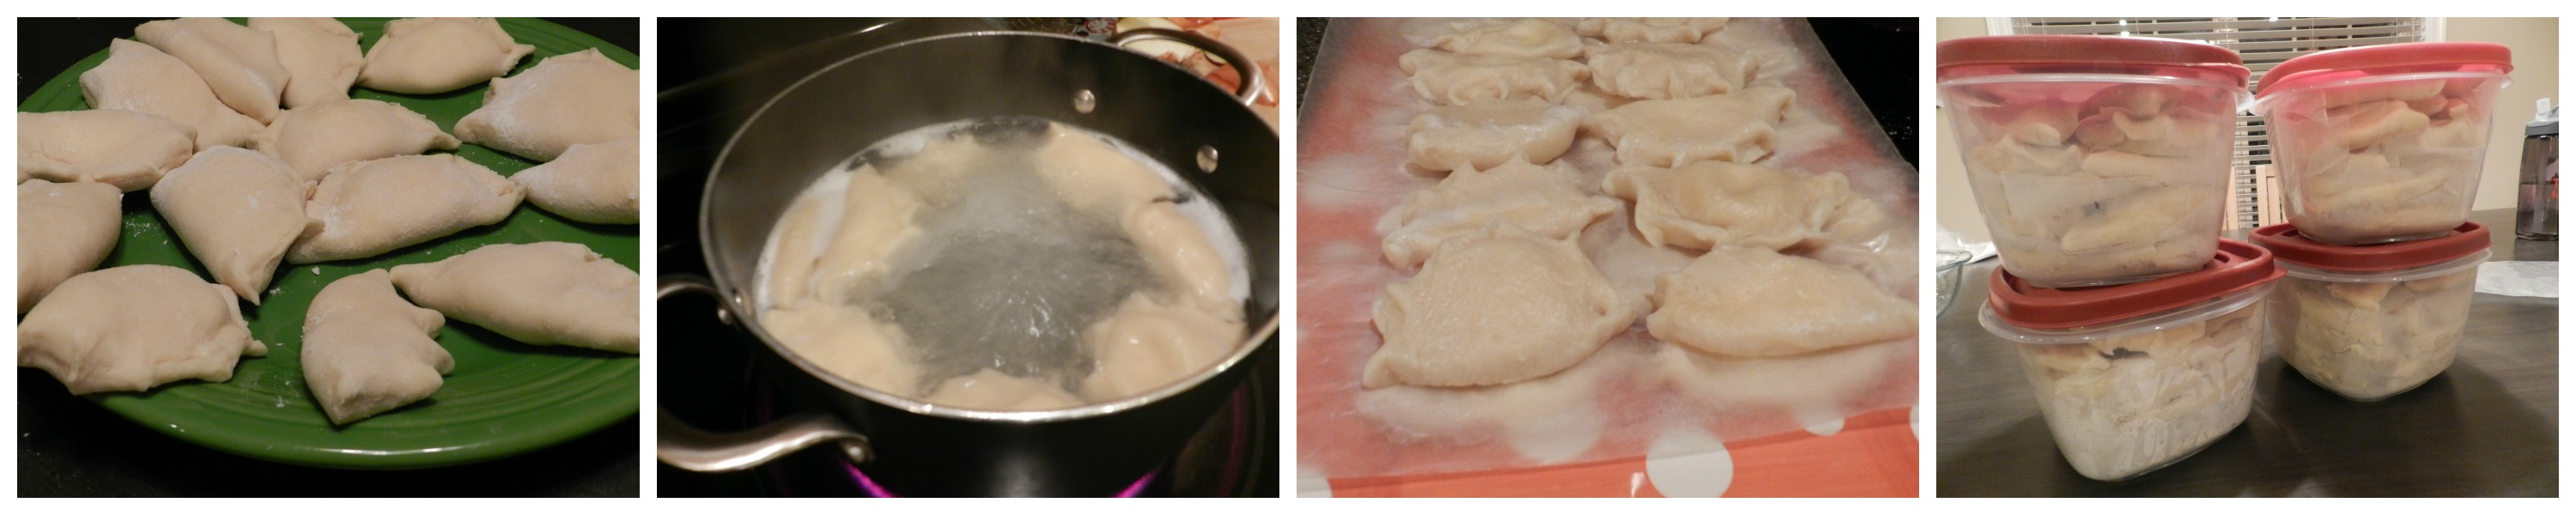
I was hoping to find something simple and these King’s Cake Bars caught my eye. Unfortunately my execution of said bars was abysmal. I think I over mixed the dough for the base and I managed to forget both the vanilla and cinnamon in the cream cheese filling. I used a smaller casserole dish than recommended so my baking time was considerably longer (2x as long!) and came out domed which caused the glaze to run down to the sides of the casserole dish. But, it did flatten out once it cooled. And even though I sprayed the pan and the dough is almost half butter it would not come up.

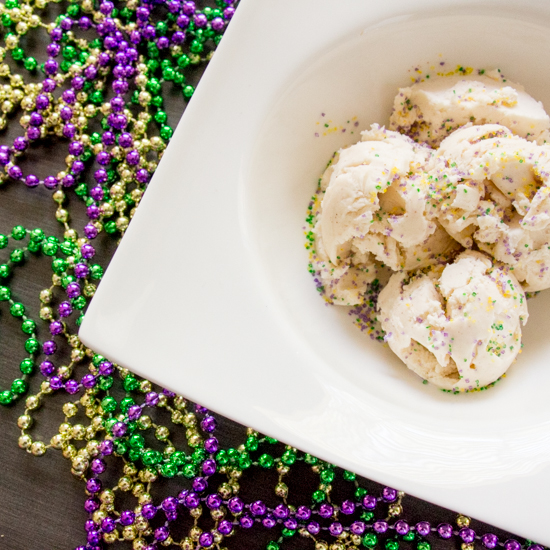
After the frustration subsided, I thought it’d be fun to make an ice cream. The cream cheese filling reminded me of cheese cake (cream cheese, egg, sugar) so I decided to try a cheese cake ice cream base with cinnamon. I garnished the ice cream with purple, green, and yellow sprinkles to play up the holiday. (I was too nervous to stir sprinkles into the ice cream machine for fear of resulting in streaky brown coloring.)

I have to admit, I was worried I messed up this recipe too. I used too small of a pot and didn’t temper the eggs enough so my custard had a few lumps. But, I decided to strain it and keep going. I’m glad I did because this ice cream is so delicious – it’s rich and creamy with great flavor from the cinnamon.

Cinnamon Cheese Cake Ice Cream

Ingredients:

  • 2 C half-and-half
  • 1/2 C heavy whipping cream
  • 1 C milk
  • 1 1/4 C sugar
  • 2 eggs
  • 8 oz cream cheese, at room temperature and cubed
  • 1 tsp vanilla extract
  • 1 tsp ground cinnamon

Steps:

  1. Heat the half-and-half, cream, and milk in a large saucepan over medium heat until it reaches 175 degrees F, but do not let boil. Whisk in sugar until dissolved.
  2. In a small bowl whisk eggs. Take about 1/4 C of the hot milk mixture and whisk into eggs to temper them. Constantly whisking, add eggs to milk. Cook over low heat, whisking, until the mixture thickens and reaches 160 degrees F.
  3. Pour custard through a fine strainer (I opted to line mine with a coffee filter, but I don’t think it was necessary) into a glass bowl. Whisk in the cream cheese until melted and smooth.
  4. Place the bowl of custard in a bowl of ice water to cool and stir for two minutes. (Don’t let the water into the custard.) Stir in vanilla and cinnamon. Remove from ice bath, cover, and place in fridge overnight.
  5. Follow ice cream maker instructions and freeze.

This recipe is modified from Taste of Home.

Mardi Gras Ice Cream Mardi Gras Ice Cream 2

Spinach and Ricotta Ravioli

For my first Valentine’s Day as a blogger I bring you the first dish I ever made for Stuart.

On our 1 year anniversary back in college I made him dinner. I was living in the dorms and my roommate with a car helped me get to the grocery store and to his apartment so that I could surprise him with dinner. I made ravioli, Caesar salad, and an apple crisp for dessert.

Everything turned out great – except the apple crisp. The salad was one of the prepackaged options from the store, so I couldn’t go wrong there. The ravioli came from a book, Teens Cook: How to Cook What You Want to Eat, that I was gifted before attending college. I think the apple crisp recipe came from that book as well, but I don’t remember. Oh, everything turned out fine and Stuart and his roommates ate it. But I was “forced” to use I Can’t Believe It’s Not Butter in place of real butter because apparently I was wrong to assume boys kept real butter in the fridge. Let me tell you, I could believe it wasn’t real butter and that not-real butter taste was only accented once baked in the crumble topping.

But I digress. This post is supposed to be about ravioli, not my abhorrence to fake butter.

For the blog I decided to try making heart shaped ravioli. And it worked!

Won ton wrappers are used in place of fresh pasta which makes it a super simple meal. Typically I’d use one sheet of won ton wrapper and fold it over, but when you’re cutting hearts out of it you need to use two sheets per raviolo. (I think that’s the singular to ravioli… eh, it sounds fun anyway!) The amount of filling you place inside each heart will depend on the size of your cookie cutter – you need to make sure you can seal the ravioli so the filling doesn’t escape while boiling.

Spinach and Ricotta Ravioli

Ingredients:

  • 15 oz ricotta cheese
  • 1 C julienned fresh spinach
  • 1/2 C shredded Italian blend cheese (or Parmesan)
  • salt and pepper, to taste
  • 1 pkg (12 oz) won ton wrappers (these can be found in the refrigerated area of the produce section)*
  • your favorite pasta sauce

*You will need two packages if making heart shaped ravioli

Steps:

  1. In a bowl combine cheeses and spinach. Season with salt and pepper to taste.
  2. Bring a pot of salted water to a boil while assembling the ravioli.
  3. If making heart shaped ravioli, use a cookie cutter to cut hearts out of each won ton wrapper. Place about 1/4 tsp of filling in the center of the heart. Dip your finger in water and run along the edge of the heart. Place a second heart on top and seal shut.
  4. If not making heart shaped ravioli, place about 1/2-1 tsp of filling in the center of each wrapper. Dip your finger in water and run along all four sides of the wrapper. Fold into a triangle and seal.
  5. Boil the ravioli in batches of 8-10 to avoid them breaking apart. Boil 3-4 minutes, or until they float. They will become slightly translucent.
  6. Heat your favorite pasta sauce and serve with ravioli. Garnish with freshly grated Parmesan or Asiago cheese if desired.

Hearts Ravioli 1 Heart Ravioli 2

Disclaimer: This post contains affiliate links. 

Red Velvet Puppy Chow

Red Velvet Puppy Chow 3

One of Stuart’s childhood (and college) favorite sweets at the holidays (or anytime) was puppy chow. There a many varieties of puppy chow – or monkey munch, or muddy buddies – but all involve chocolate and powdered sugar. I’ve never made puppy chow, and can’t remember ever having it growing up. I think my first introduction to this addicting sweet cereal mix was through Stuart when his mom brought him a gallon size bag full during a college visit.

Place the puppy chow in individual baggies and send them to school with your kids on Friday, February 14th!This Valentine’s Day version uses red velvet cake mix and Valentine colored M&Ms.

Red Velvet Puppy Chow

Ingredients:

  • 3/4 C white chocolate chips
  • 1/4 C semi-sweet chocolate chips
  • 5 C rice Chex® cereal
  • 1 C red velvet cake mix (use boxed mix or make your own!)
  • 1/2 C powdered sugar
  • 1 1/4 C Valentine colored M&Ms®

Steps:

  1. Melt together white and semi-sweet chocolate until smooth. (I did this in a double boiler, but you can do it in the microwave too – just keep an eye on it and stir often.)
  2. Place cereal in a large bowl. Gently fold melted chocolate over the cereal until coated.
  3. In a large plastic bag combine cake mix and powdered sugar. Place chocolate coated cereal in bag and shake until completely coated. Spread out onto a baking sheet and let cool.

*This recipe is modified from Lizzy Mae at http://www.yourcupofcake.com/2013/01/red-velvet-puppy-chow.html*

Red Velvet Puppy Chow 2

Red Velvet Puppy Chow 1

Pecan Pie

I had planned on providing you with a healthy shrimp and avocado pesto recipe to start your new year off right. But unfortunately the avocados at the grocery store weren’t anywhere near ripe and they were completely out of basil. So that recipe will have to wait for another day.

Instead I’m going to switch gears entirely and give you a sweet, rich dessert. Stuart’s holiday favorite. Pecan pie. My mom makes this pie just for him – and it amuses me greatly that the woman married to a man with nut allergies provides the only nutty dish of the holidays.

Pecan Pie Steps

Pecan Pie

Ingredients:

  • 1 C light corn syrup
  • 3 tbsp butter
  • 1/2 C brown sugar
  • 2 tbsp flour
  • 1/4 tsp salt
  • 3 eggs
  • 1 1/2 tsp vanilla
  • 1 1/2 C chopped pecans
  • 1 pie crust

Steps:

  1. Over medium heat combine corn syrup, butter, brown sugar, flour, and salt. Stir until the butter melts. DO NOT BRING TO A BOIL. Remove from heat.
  2. In a small bowl beat the eggs. While constantly stirring the syrup mixture, slowly add in the eggs. Stir until smooth. Add in the vanilla and chopped pecans.
  3. Pour pecan pie filling into a ready-to-bake, thawed pie crust. If desired, place 5 halved pecans in a small circle/star in the center of the pie.
  4. Bake 1 hour at 350 degrees until the filling no longer jiggles.

*This recipe is adapted from http://www.mrfood.com/Pie/Perfect-Pecan-Pie-685/*

Pecan Pie

Update December 2016: I’ve been dying to re-photograph this pecan pie and every Christmas I say I’m going to. It’s taken three years for that to happen, but hey! My parents remodeled their home in 2016 and all of the yellow tones of the kitchen were replaced by modern and timeless whites, greys, and deep cherry. Even with the new open concept I was surprised at how little natural light penetrated the bright space. I had to take mom’s pie out to the lanai to snap the new photo. It’s amazing what natural lighting can do to the beauty of a pie!

Classic Pecan Pie | Sew You Think You Can Cook | http://sewyouthinkyoucancook.com

Sausage Pinwheels

I want to provide you with another option for your New Year’s Eve party.

I know this doesn’t qualify as Mexican Monday – but it could if you decided to substitute Mexican chorizo in place of the breakfast sausage. In fact, that actually sounds delicious! My dad felt that the pinwheels were actually missing something, such as a dipping sauce. But we were all stumped as to what that could be. Red pepper jelly seemed to work, but still wasn’t just perfect. Using Mexican chorizo might give that needed something.

A friend of mine brought these sausage pinwheels to a party last year and they were gone in the blink of an eye. Even my cream-cheese-hating husband gobbled them up.

Sausage Pinwheels

Ingredients:

  • 1 roll breakfast sausage
  • 2 tubes refrigerated crescent rolls
  • 2 pkgs cream cheese, softened

Steps:

  1. Brown the sausage and drain any fat.
  2. Mix cream cheese and sausage.
  3. Roll out crescent dough and press together seams. Spread half of the cream cheese mixture. Roll the crescents lengthwise. Repeat with 2nd tube of crescents.
  4. Place rolled up pinwheels in the refrigerator for 20 minutes.
  5. Slice pinwheels into 1/2″ rolls. Place pinwheels cut side down on a greased baking sheet. Bake at 375 degrees for 13 minutes, or until crescents are cooked through.

*This recipe is adapted from Leah at http://abiteofmylife.blogspot.com/2009/02/cream-cheese-sausage-pinwheels.html*

Sausage Pinwheels

Bacon Wrapped Dates

It’s the time of year for cocktail parties. Saying goodbye to 2013 and hello to 2014.

Bacon-wrapped anything is always a safe appetizer to take with you to your New Year’s parties. And bacon wrapped dates are your best bet. The dates caramelize in the oven and turn into candy. The bacon crisps up. What you are left with is essentially a chewy centered candy.

I have a big lesson learned to tag along with this recipe. Bake your bacon wrapped anything on a cookie sheet with a rim! Why? Bacon releases fat/grease. This grease is not solid. This grease will most likely drip off of a flat cookie sheet. In a 450 degree oven this grease will catch fire. Now what?! Turn off the oven. According to dummies.com keep the oven door closed and the lack of oxygen will cause the fire to die. But if want to save your bacon wrapped anything quickly and carefully remove them from the oven and throw either baking soda or salt on the flame. DO NOT USE FLOUR. Apparently, flour will cause an explosion!

Bacon Wrapped Dates

Ingredients:

  • dried dates
  • bacon

Steps:

  1. Soak toothpicks in water, to prevent them from catching fire. Preheat oven to 450 deg.
  2. Cut bacon in half. On a plate, microwave bacon for 2 minutes (covered with a paper towel).
  3. Wrap each date with bacon and skewer with a toothpick.
  4. Bake 15-20 minutes, or until bacon is cooked and crispy.

*This recipe is adapted from Beau at http://oursavorylife.com/a-delicious-paleo-snack-recipe-bacon-wrapped-dates/*

Bacon Wrapped Dates

Cranberry Cinnamon Rolls

Christmas morning is the most magical time of the year. Kids wake up to the discovery that Santa arrived – cookies eaten and gifts under the tree. Parents are overjoyed by the wonder upon their kids’ faces. Families come together to celebrate. And breakfast is always perfect. I don’t know if it’s the same as the theory that “everything tastes better on vacation”, but on Christmas morning the breakfast is sweeter.

Cinnamon rolls have always been one of my favorite treats, and I can never pass up a Cinnabon at the airport. My favorite part isn’t the gooey, cinnamony center that everyone desires, I save that bite for someone else to savor. I love the dough and the frosting. To me the cinnamon simply adds a nice depth to the flavor profile.

Always wanting to make my own, I’ve gone through many trial-and-error attempts at baking cinnamon rolls from scratch. Either the yeast didn’t bloom properly or the flavor was just lacking. I couldn’t give up though, I kept searching for the perfect recipe. And a few years ago I found it with these Orange Cranberry Cinnamon Rolls by The Novice Chef.

Making the cinnamon rolls does take about an hour and a half so Mom and I would made them on Christmas Eve after church, covered them, kept them in the fridge, and then baked them in the morning while presents are being opened. Another option is to make them in advance, freeze them, and let them thaw Christmas Eve night. Let them rise and then bake in the morning.

Making Cinnamon Rolls

Cranberry Cinnamon Rolls

Cranberry Cinnamon Rolls

Ingredients for the dough:

  • 2 packets active dry yeast
  • 2 C warm water
  • 6 tbsp room temperature butter
  • 1 C sugar
  • 7 1/2 C flour, plus extra for rolling
  • 2 eggs
  • 1 tbsp salt

Ingredients for filling:

  • 8 tbsp room temperature butter
  • 1 1/2 C brown sugar
  • 8 oz fresh cranberries, chopped
  • 2 tbsp cinnamon

Ingredients for frosting:

  • 4 tbsp room temperature butter
  • 2 C powdered sugar
  • 2 tbsp milk

Steps:

  1. Stir yeast into the warm water. Let bloom for 5-10 minutes.
  2. Using a stand mixer fitted with the paddle, beat butter, sugar, and salt. Add eggs one at a time, beating until combined. Slowly pour in the yeast and water. Beat until combined. Add the flour about one cup at a time, beating until combined after each addition. Once the dough starts to form switch to the dough hook attachment. After all the flour has been added knead the dough for 3 minutes.
  3. Turn dough out onto a floured surface and knead by hand until smooth.
  4. Place dough in a greased bowl, cover, and let rise to double in size (about 30 minutes) in a warm place. (In the microwave or turned off oven)
  5. Divide dough in half and roll out onto a floured surface.
  6. Roll one half into a rectangle. Spread the dough evenly with 4 tbsp of softened butter. Sprinkle with 3/4 C brown sugar, half of the cranberries, and 1 tbsp of cinnamon. Roll the dough into a log, lengthwise. Cut the dough into 2″ cinnamon rolls. Place cut side down in a 9×13 casserole dish.
  7. Repeat step 6 for the other half of the dough.
  8. Cover dough with a towel and let rise for 30 minutes before baking. The rolls should have doubled in size again. (Or you can freeze the rolls and after thawing let rise until doubled in size.)
  9. Bake at 425 degrees for 10 minutes. Reduce heat to 350 and bake another 7 minutes, until golden brown. Let cool, slightly.
  10. Meanwhile, make frosting. Whisk together all of the ingredients for the frosting. Frost the cinnamon rolls!

Cinnamon Roll

Pierogi

Image

Every Christmas Eve we have the traditional Polish meal of Pierogi. I have so many memories of helping my mom and grandma (Busia) assemble the pierogis. Busia would always make the dough and together the three of us would fill, pinch, boil, and fry. Eventually my mom took over the intimidating process of making the dough. And last year, it was my turn.

I followed tradition and made the dumplings about a week or two early and stored them in the freezer. Doing so takes off the stress during Christmas week. Making pierogi is an all day job! Because they freeze well, you don’t have to limit these to Christmas Eve. Make a batch and you have a great homemade freezer meal throughout the year.

Last year I recruited the help of Kate. I turn to Kate whenever I have baking to do, and making a dough is close enough! It’s also great to have extra hands when it’s time to assemble. This year, family friends helped Mom make hers two weeks ago.

The most common pierogi filling known to Americans is potato. But honestly, I’ve never had a potato pierogi. We fill ours with different canned fruits, cheese, and sauerkraut. And we serve them with salt and melted butter. Stuart actually broke the mold and used maple syrup!

Pierogi Dough 1 Pierogi Dough 2Cooked Pierogi 2 Cooked Pierogi 2

Pierogi

Ingredients for dough:

  • 1 1/2 C skim milk
  • 3/4 C fat free half-and-half
  • 5 C flour, divided plus more for rolling
  • 1 tbsp butter
  • 1 tsp salt
  • 1 XL egg
  • 3 L egg yolks

Ingredients for filling:

  • Cheese: 8 oz soft farmers cheese, 3 oz cream cheese, 1/4 – 1/3 tsp salt
  • Fruit options: canned peaches, canned cherries (not pie filling), canned blueberries (not pie filling), canned strawberries (not pie filling), plums, figs
  • Sauerkraut: cook 1 can drained, chopped onion, chopped cooked bacon, caraway seeds, water, little bit of flour to thicken if needed, 1 tbsp brown sugar (This can be made ahead of time and frozen)

Steps:

  1. Spray the bottom of a large pot. (I used my dutch oven)
  2. Over medium heat, bring milk and half-and-half almost to boiling point.
  3. Whisk in 1 C flour. Switch to a flat bottomed wooden spoon and stir often for 20 minutes over low heat until almost smooth.
  4. Remove from heat and add butter and 1 tsp salt. Let stand, partially covered, for 1+ hour.
  5. In a small bowl, gently whisk egg and egg yolks.
  6. Add eggs to dough along with 1 C flour. Stir until combined. Add another 1 C flour. Stir until combined. Add another 1 C flour. Stir until combined.
  7. Turn dough out onto a clean table or cutting board and knead in the last 1 C of flour.
  8. Refrigerate dough for 1+ hour.
  9. In batches roll out dough to 1/4″ thickness. (Leave dough in fridge) Flour the board, dough, and rolling pin as needed.
  10. Place filling on dough and fold over. Cut pierogi with a round glass. Squeeze dough shut and pinch the rims. They’ll look like half suns!
  11. Cook pierogi in boiling salted water for 10-12 minutes. They will float to the top. Remove with a slotted spoon and set aside. Refrigerate. At this point you can freeze the pierogi once cooled.
  12. Fry pierogi in butter before serving.

Final Pierogi

 recreatedbysrc

Snowflake Block

Engineer Kate and I figured out how to create a Snowflake block for the back of Let it Sew. We tried surfing the web for tutorials to follow but were unsuccessful. We knew there had to be a way without resorting to paper piecing.

Playing off of a “square in a square” block and sashing we managed!

Let it Sew

Here is the how-to for a Snowflake Quilt Block:

Note: These measurements are for an 6″ snowflake block with 1″ wide snowflake lines. 

Cut fabric:

  • 4 squares 3 1/4″ white
  • 1 square 1 1/2″ white
  • 4 rectangles 1 1/2 x 3″ white
  • 8 squares 3 1/4″ blue

Layer one blue square atop a white square. Mark the center diagonal, 1/2″ off of the diagonal, and an optional another 1/4″ off of that. (A bonus half square triangle will result from the optional 1/4″ steps!)

Snowflake Block Tutorial Snowflake Block Tutorial Snowflake Block Tutorial

Sew on the 1/2″ line. Also sew on the 1/4″ if using. Cut in between the two stitches.

Snowflake Block Tutorial

Iron the blue away from the white fabric. Take another blue square piece of fabric and line it up with the white on top of the resulting “block” from the previous steps.

Snowflake Block Tutorial

Repeat the above steps and again iron the blue away from the white.

Snowflake Block Tutorial Snowflake Block Tutorial

If you used the 1/4″ lines you now have two bonus half square triangles to do with what you wish! (For a project this small I would skip this step, but if you’re doing something larger by all means enjoy your bonus blocks!)

Snowflake Block Tutorial

Using the center white line as a guide, trim the block to a square of 3×3″.

Snowflake Block Tutorial Snowflake Block Tutorial

Repeat 3 more times so that you have 4 diagonals to your snowflake.

Follow my sashing tutorial to finish off the snowflake block!

Snowflake Block Tutorial Snowflake Block Tutorial

Snowman Door Hanger

For The Year of the Snowman 2013 my mother-in-law and I made burlap snowman door hangers for the girls in the family. We found an example on Pinterest, but it led only to a photograph.

Luckily my mother-in-law is a genius when it comes to crafts! I have created for you a simple tutorial.

How-to make a Burlap Snowman Door Hanger

Start first with a template of your snowman (or whatever else you want to create!) and trace it onto folded burlap. Pin the two piece of burlap together.

Burlap Snowman Door Hanger Tutorial Burlap Snowman Door Hanger Tutorial

Using a zig-zag stitch follow the outline of the snowman. (We used grey thread so it would show up in these photos. Make sure to use a thread that will easily be covered up with whatever paint you use.) At the bottom of the door hanger leave a 3″ gap, like you do with pillowcases.

Burlap Snowman Door Hanger Tutorial

Using pinking shears, cut just outside the seam. Lay out your door hanger on a trash bag or newspaper. It’s time to paint!

Burlap Snowman Door Hanger Tutorial

With the help from my father-in-law, holes were created at the top of the door hanger. A straw, cut to the width of the space between the holes was used to keep the door hanger sturdy. Thread your string/twine/jute through the holes and straw.

Burlap Snowman Door Hanger Tutorial Burlap Snowman Door Hanger Tutorial

Stuff your door hanger with paper or plastic bags.

Burlap Snowman Door Hanger Tutorial Burlap Snowman Door Hanger Tutorial

Using a thread to blend in with the paint, zig-zag stitch the door hanger closed. Garnish with a store bought accessory!

Burlap Snowman Door Hanger Tutorial