M&M Cookies

I’ve been homeschooling Firecracker (and by proxy, Treat) this school year, which is why things have slowed down quite a bit around here in the blog-o-sphere.

But I’ve really been enjoying it!

I’ve been following a curriculum I purchased last summer, but mixing it up somewhat drastically to fit certain themes or occasions in our lives. For example: We actually started with units 9 and 16 instead of 1 and 2. We actually just did unit 2 in January!

And now that we have somewhat of a routine with how the units are organized, I’ve been venturing out and creating my own units, too! All of the units I’ve developed are centered around the holidays.

We’re currently on, you guessed it, Valentine’s Day!

And I’ve been getting really into this least favorite holiday of mine. I’ve been cutting their sandwiches and cheese slices into hearts for lunch and we’re crafting up a storm.

We even made Valentines for our long distance family members. (The photo below was sent from my beautiful sister-in-law and shared with her permission.)

img_2202

I found the idea for the Valentines on Pinterest. The boys loved having me paint their hands, saying it tickled. (Mega crafting milestone for my boys!) I cut the yarn to be the length of their arm span. The boys each picked the background color for each of their Valentines depending on who they were being sent to! It was fun to watch their little minds work in decision mode.

img_2158-2

Inside their Valentine boxes were a couple of appropriately colored M&M cookies. We sent so many cookies that there was only one cookie leftover for the 4 of us to share. (I ran out of brown sugar to make more – tragedy! Seriously. I have got to hit up a grocery store, like, ASAP, so I can make more of these cookies for us!)

M&M Cookies | Sew You Think You Can Cook | http://sewyouthinkyoucancook.com

I don’t think I’ve ever baked cookies that involved melted butter before, I was skeptical. But using melted butter made the mixing of these cookies insanely easy – no stand mixer required! I love the use of brown sugar in cookies, I think it gives the cookies a great depth of flavor. And of course, holiday colored M&Ms provide the perfect texture to these soft and chewy cookies.

This recipe makes approximately 21 cookies.

M&M Cookies

Ingredients:

  • 2 C flour
  • 1/2 tsp baking soda
  • 1/2 tsp salt
  • 1 1/2 sticks butter, melted
  • 1 C brown sugar
  • 1/2 C sugar
  • 1 egg
  • 1 egg yolk
  • 2 tsp vanilla extract
  • 1 C M&Ms

Steps:

  1. Preheat oven to 350 degrees F. Line two cookie sheets with silicone baking mats, parchment paper, or spray with cooking oil.
  2. In a bowl, whisk together the flour, baking soda, and salt.
  3. In another large bowl, whisk together the melted butter and sugars until combined. Add the eggs and vanilla, mixing until fully incorporated.
  4. Slowly add the flour mixture to the wet ingredients, switching to a spatula for easier mixing. Fold in the M&Ms.
  5. Spoon onto prepared baking sheets. Bake 10-12 minutes, until the edges are golden. Let cool on baking sheets.

*This recipe is adapted from Kristyn at https://lilluna.com/giant-chewy-mm-cookies/*

M&M Cookies perfect for Valentine's Day | Sew You Think You Can Cook | http://sewyouthinkyoucancook.com

Tuesday Tattles: 2nd Birthday

I hope everyone had a wonderful Christmas surrounded by loved ones. We’ve been enjoying the sunshine and time with grandparents. The kids were beyond spoiled and the joy and wonder of Christmas was evident everywhere.

Tuesday Tattles

My Treat turned TWO in October and we celebrated with a playground party in early November. (Little fun fact: shopping for birthday party decorations the week before Halloween is slightly insane.)

My guy has had an attraction to sports balls as early as I can remember, and he’s naturally athletic, coordinated, and too brave for his own good. A sports themed birthday would be a no-brainer. And then he had me second guessing my decision with an obsession with animals that rivaled anything to date! We celebrated his actual birthday with a trip to the zoo. If he continues his love of animals and zoo trips, you’ll be seeing an animal themed third birthday next year

As has become my birthday tradition, I made a banner for my birthday boy. I punched out circles of cardstock and decorated them to look like baseballs, tennis balls, basketballs, and a soccer ball. Even ovals for footballs. I used navy stickers for the lettering, to make it easier.

I stuck to the four “main” sports: football, soccer, basketball, and baseball. (If the Chicago Cubs had made it into the World Series a second year in a row I definitely would have adjusted to a Cubs only theme.)

IMG_5541

This birthday party was the first of the 4 we’ve previously thrown for the boys that did not include extended family. I am grateful for fantastic friends who offered their help in setting up and taking down the decorations at the park.

The décor included:

  • Green table cloths
  • Small white plates for the dessert table
  • Gold oval plates for the snack table (they looked like footballs!)
  • Red and yellow napkins
  • Blue spoons and forks
  • The party favor bags were simple black cellophane bags and stored in a large football shaped bowl
    • Inside the bags were bubbles, sports balls, chocolate candies, and dum-dums

My favorite part of any party décor are the balloons. Turns out this old soul of mine has a little kid in it, after all. Those wonderful friends I mentioned at the beginning of this post came over early to help us blow up about a dozen balloons, including the mega #2. The balloons got all tangled before even leaving our house, and my OCD self let it go, because it looked really cool! We didn’t even make it out of the front door before we lost 10 of the balloons, including the mega #2. The screams that emitted from my children were heard from the playground where daddy was setting up. He saw those balloons fly into the sky and came running to help console. Heck, I was a wreck, too! I hadn’t gotten a single picture of my guy with his #2 balloon.

IMG_5532

The food helped bring the sports theme to life, one dish for each sport:

  • I made the superfood layer dip again, arranging the layers with shredded cheese on top and decorating it with black beans to create the stripes of a basketball
  • My favorite display was the fruit tray to look like a baseball field. I used my largest rimmed baking sheet and arranged five small ramekins for the bases and pitching mound. Those were filled with pretzel sticks, toothpicks, chocolate hummus, and caramel yogurt dip. Different fruits were arranged to create the outfield, infield, and stands
  • I’d ordered a pull-apart cupcake cake from the local grocery store to look like a soccer ball and it turned out fantastically!
  • I made cocoa krispie treats in the shape of footballs and decorated the laces with melted white chocolate

Just like last year, we had a threat of rain, but the sky cleared and it was a beautiful, slightly windy day, perfect for a playground party.

IMG_5561

Leprechaun Lunch Bag Puppet

I’m just popping in today to share a super quick and adorable St. Patrick’s Day craft you can do with you little ones. (If your kids are older than mine, they might actually make a Leprechaun with the crafting supplies.)

I had saved a few ideas on Pinterest and showed them to Firecracker to pick a craft to do and he immediately chose this Lepruchaun Lunch Bag Puppet. A trip to the Dollar Tree shortly followed for some large googly eyes and brown lunch bags – we already had everything else we’d need.

Here’s what you need: brown paper lunch bags, construction paper (green, black, yellow, orange), large googly eyes, marker, buttons.

Firecracker had been looking forward to crafting all week long and the first thing he wanted to do Friday morning was make our craft. Turns out those brief moments were the best of the day, as a trip to the doctor’s office shortly followed to discover that between my two boys, they had 3 ear infections.

With Treat having just woken up as well, he got to join in the crafting fun. For him, that meant pulling all of the buttons and googly eyes off of the paper bag, but he seemed to enjoy himself. IMG_2712

Firecracker just wanted to glue a bunch of googly eyes on his Leprechaun[‘s hat] and a few buttons. He had no interest in creating the orange beard.

The night before crafting day, I cut out the paper hats, buckles, and strips for the beard. I then glued it together to ensure that my trusty liquid Elmer’s glue would work. Spoiler alert: it works perfectly.

Leprechaun Lunch Bag Puppet | Sew You Think You Can Cook | http://sewyouthinkyoucancook.com

Tuesday Tattles #21

Tuesday Tattles

It’s been a long time coming, but the time has finally come to share the favorite reading material of my toddler.

These books have more words and higher level learning material than the still enjoyed baby book list I shared previously.

Books for a Toddler's Library

Disclaimer: This post contains Amazon affiliate links.

Winnie the Pooh’s Thinking Spot

This 12 book set teaches science in a way that can be understood by “a bear of very little brain.” These stories are about 25 pages long with full color images. We read this books following some TV time. Topics include gardening, gravity, and weather.

Daniel Tiger’s Neighborhood Books

Daniel Tiger’s Neighborhood on PBS is one of the TV shows I’m more than happy to let my kids watch. With lessons on managing emotions and understanding others, I think children and parents can learn a lot from the simple songs. While I think Daniel Tiger is geared more for Pre-K and Kindergarten aged children, my little ones learn a good bit from him, too. Treat received Daniel’s Day at the Beach and I was surprised to see that it was almost the exact script from the show in book form. Both of my boys like Daniel Tiger and enjoy him in literature form, too. Now if only the lessons could be learned more quickly… but then again, they are only 2 and 1 years of age.

There’s No Place Like Space

11014631_10102770016796001_2929400061734412428_nThis book is one that we’ve had for a long time (that’s a 7 month old Firecracker in that picture!). As a rocket scientist, I couldn’t not purchase this particular installment from The Cat in the Hat’s Learning Library. I just love the rhyming tour of our solar system and the beautiful illustration. We also have Oh Say Can You Say What’s the Weather Today which as also shared its time in the spotlight.

In the Forest

This pull tab book can be enjoyed by babies and toddlers alike, however pull tabs, flip tabs, and other interactive books are promptly demolished by Treat so they are reserved for parental supervision time and/or Firecracker only. In the Forest beautifully explains the changing of seasons through colors and animal activities. This adorable book was such a big hit that I gifted the Under the Waves version to a friend’s 2 year old daughter who loves the ocean.

Chug Chug Tractor

I have never seen a book be a bigger hit with both of my children simultaneously as this book. Chug Chug Tractor is a lift flap book with a light activated sound on each page. The story follows a tractor’s day on the farm from morning to night. If there isn’t enough light flooding into the house then the noises won’t happen, but when they do work the excitement on their little faces is enough to make anyone smile. But, you now how I said my littlest one can destroy a flip tab book in seconds flat? This particular book has the most tape of any in our collection, both Scotch and clear packing tapes!

Dragons

We picked up this Usborne book at the Popcorn Festival in Beavercreek, OH over two years ago and it’s been a big hit. It’s a fun flip tab book explaining the folklore of dragons and how they differ among cultures. It’s a fun book for fantasy loving adults, too!

Any book with stickers at the end

img_5437A lot of the “step into reading” books contain stickers, particularly if they’re books from a TV show or movie. I’ll usually pick up one of these books before a vacation -a new story and new stickers can always entertain small hands for at least 20 minutes. At first, I’d require reading through the story before getting a sticker. Of course, now that they can pull the sticker off the paper in {mostly} one piece themselves, it’s harder to police the sticker collection.


Burlap Tiger Craft

When my mother-in-law visited in October she brought along two crafts for Firecracker to make.

One was the Tissue Paper Pumpkin Craft perfect for pre-Halloween crafting! He loved making it so much he couldn’t wait to make the tiger she promised him was coming later in the week.

This burlap tiger craft follows the same methodology as the tissue paper pumpkin, with just a touch of more “skill” to make the stripes look like a tiger.

Each tiger received a collar and we had the kids pick whichever fabric they wanted for their tigers. I was excited to see if Treat would even pick, but as he wasn’t making his own tiger, I wanted there to be a little bit of input on the craft from him. He picked a blue collar. Firecracker picked green.

collar-picking

How to make a Burlap Tiger

Start with a template of a tiger (or whatever other shape you want to create) and trace it onto a piece of Natural Burlap Paper. This 12×12″ paper has a stiff backing perfect for crafting. Cut out tiger.

Burlap TIger Craft Tutorial | Sew You Think You Can Cook

Working with the burlap side up. Paint the tiger with orange craft paint.

Using black fabric scraps, cut out stripes for the tiger. From white fabric scraps cut out the ears, eyes, and muzzle. A pink triangle glued onto the muzzle makes for a perfect nose. More black fabric centered in the eyes creates pupils.

Burlap Tiger Craft | Sew You Think You Can Cook

Paint modge podge over the tiger. An empty yogurt container is a perfect vessel for portioning out the craft glue.

Burlap TIger Craft Tutorial | Sew You Think You Can Cook

Seal down the stripes by painting over the tiger with another layer of modge podge.

Using modge podge again, attach the ears, eyes, and nose.

Optional: add a collar with your child’s name (or a name they choose) around the neck of the tiger.


Hot glue a string on the back for easy hanging.

Burlap Tiger Craft | Sew You Think You Can Cook | http://sewyouthinkyoucancook.com

Tuesday Tattles: 1st Birthday

Tuesday Tattles

My baby boy is now ONE!

If year one goes by quickly for the first born, it goes even faster with the second child. My Treat has been walking for 2 months now and loves to run and climb. He wants anything his big brother is playing with or eating – and his favorite thing to do is steal chocolate milk.

Today I will share with you the planning (and execution) of his birthday party.

family

I think first birthdays are pretty special. And, for me, I refused to have my son’s party on any day other than THE day. I am extremely grateful to have family willing to travel across the country to help us celebrate. It was even the first time Treat got to spend time with both of his Godparents at the same time!

We’ve got a great group of friends who braved the rain to come to a party at the playground, too!

Spider-Man themed First Birthday | Sew You Think You Can Cook | http://sewyouthinkyoucancook.com

When my son was born the day before Halloween, I knew I’d have to have another appropriately themed super hero party. My options were Spider-Man or Batman. I decided to go with Spider-Man to keep my boys in the same comic universe (nerd alert).

While there is plenty of pre-made party decor for Spider-Man, I decided to keep things simple using a lot of red, white, and a bit of blue.

  • Red table cloths (fun discovery – a wet table makes for great adhesive)
  • White plates
  • Red napkins
  • Blue spoons and forks
  • Silverware holders were simply empty {clean} cans which I wrapped with white card stock and glued on a Spider-Man. My sister-in-law did some incredible spiderweb labeling for me!
  • We had two tables at the playground and I put a cluster of red, white, and blue balloons in the center of each table held in place with Spider-Man balloon weights.
  • The party favor bags were simple red treat bags. I cut out Spider-Man eyes from white sticker paper, tracing their outline in black Sharpie. I put a “Thank You” sticker with each kid’s name on the back.
  • Treat had his smash cake in the Radio Flyer wagon. (Had it not been raining I would have put his name banner on the wagon.) A giant red number 1 balloon, 12″ white, and 12″ blue decorated the wagon.

Treat’s incredible “Happy First Birthday” banner was made for me by a friend. When she discovered that I’d always cut the banners out by hand, she immediately offered her services for all future decorating needs. I took her up on it due to our complicated schedules during September and October. She even glued all the pieces together for me and all I had to do was string them together and hang them up!

And now for the important part of the party: The Food!

  • The main course was a taco platter perfect for feeding 25 people.
  • Keeping with the Mexican food theme, we made a typical layer dip. I adjusted the layers to put tomato on top and piped a sour cream spiderweb on top.
  • The second layer dip was a super food version: sweet potatoes, quinoa, black beans, enchilada sauce, cheese, and sour cream. I put the sour cream layer on top and tried creating a spiderweb with the enchilada sauce. Because I make my own enchilada sauce, the onions made it a bit more difficult than I was hoping and the result wasn’t as pretty as envisioned.
  • I ordered cupcakes and a 5″ round cake from a local grocery store. They were able to make a spiderweb cake for me in red and white. A blue 1 candle and spider ring made the perfect decorations.

A Spider-Man themed 1st birthday | Sew You Think You Can Cook | http://sewyouthinkyoucancook.com

Disclaimer: This post contains affiliate links.

Tuesday Tattles #17

It’s come to my realization that I haven’t actually shared our favorite kids books! I know I’ve sprinkled them into some of Firecracker’s monthly favorites – a series that’s gone the wayside as he approached and passed 2.

As I started to list all of the books that we love I gawked at how long it was and yet how much I was leaving out. So, I’m going to do a few book series during Tuesday Tattles over the next couple of months.

I’m going to start with the best bedtime books. These are books that have helped lull my kids into naps or have become cemented into the bedtime routine.

our-top-8-books-for-bed-time-sew-you-think-you-can-cook

Green Eggs and Ham by Dr. Seuss

This title might seem like a strange one to include on a bedtime book list, but between 19-22 months I had this book engraved into my memory. Our bedtime routine always concluded with my son falling asleep in my lap while I rocked him and read Green Eggs and Ham. Not only is it a book to encourage trying new foods, its very rhythmic and repetitive script transforms into the perfect “lullaby.”

The Cat in the Hat by Dr. Seuss

The Cat in the Hat isn’t quite as repetitive as Green Eggs and Ham but I did develop a rhythm in reading it that turned out to be just the ticket I needed for nap time. (Back when Firecracker took naps.) It’s a long book for an active boy to sit through and we’d often only make it halfway though, never venturing into the part of the story with Thing 1 and Thing 2, before he’d drift off to sleep in my lap in the rocking chair.

img_0497Danny and the Dinosaur by Syd Hoff

Danny and the Dinosaur was one of my husband’s favorite books as a kid and my in-laws gave us the Danny and the Dinosaur 50th Anniversary Box Set before our cross-country move. I remember it being the first book I read in our new home. Just like The Cat in the HatDanny and the Dinosaur quickly became associated with pre-nap reading.

Steam Train, Dream Train Colors by Sherri Duskey Rinker

My mom found this book and Steam Train, Dream Train 1-2-3 for my boys for Easter. I used to keep them both in the car (the books, not the boys) and Firecracker would happily “read” through them, often finally falling asleep. I’m not sure when it happened, but the colors book found its way inside and is now mandatory bedtime reading. He even has the first page memorized. He doesn’t fall asleep reading this book, though. We often read it 2-3 times. Graduating from color recognition, he states all of the letters in the words at each turn of the page. I can recite this book for memory and can “read” it in the pitch black of night.

img_3044
img_2950Where Do Steam Trains Sleep at Night? by Brianna Caplan Sayres

Here’s another gem given to Firecracker by my mom. It’s a book that he was immediately drawn to. It’s a great book for little train lovers. The book describes different bed time routines for each style of train in two line poems about parent and child engines. My son loves finding the mouse “hidden” on each page.

The Goodnight Train by June Sobel

There had to be a unique train book that didn’t come from my mom, right?! We found this one in a cute children’s boutique nearby. I love the illustrations and whimsical feel. The Goodnight Train gets rotated with Where Do Steam Train Sleep at Night? at night. As a result, neither of them are memorized making it difficult to read when bedtime procrastination has left me not even a glow of sunlight.

img_3005Goodnight, Dragons by Judith Roth

Not every book can be about trains! I do have a second child after all. While we’ve had this book long before Treat came along, it didn’t get quite the attention or love until fairly recently. Goodnight, Dragons is, hands down, Treat’s favorite book. It’s the only one he’ll actually sit still (ish) for! What I love most about this book is its message: “Everybody needs a cuddle; maybe dragons more than most.”

If Animals Kissed Good Night by Ann Whitford Paul

The last book on my list is my personal favorite. It has cute little rhymes for multiple parent-child animal pairings as the day turns into night. But I think this book holds a special place in my heart because of the memories I have reading it to Firecracker when he was 12-18 months old: he was just learning how to kiss (a skill he is now way too aggressive with) and with every couplet read he’d turn and give me a kiss.

Disclaimer: This post contains affiliate links. 

Tuesday Tattles #14

Tuesday Tattles

Today’s Tuesday Tattles is all about removing superglue from a toddler’s fingers.

Fun right?!

A couple of months ago Firecracker’s wooden helicopter broke. The metal spoke holding the propeller snapped. Because it’s one of his favorite toys, I decided we should try and fix it. Super glue can fix anything, right?

Well, probably, if you know how to use it properly.

My husband and I very carefully applied some glue to the top of the spoke and held the top in place. After a few seconds I put the toy on the table to dry. Almost immediately Firecracker grabbed it. The top fell off and his fingers were covered in super glue. He ran up to Daddy and asked for “help.” We are quite thankful he was not strong enough to pull his fingers apart.

Immediately I reached out to the internet. I needed a method that was safe for my toddler. Using laundry detergent, nail polish remover, or WD-40 was not going to cut it. Not surprisingly, warm soap and water is perfectly capable to remove super glue from skin, especially if you’re acting quickly enough. I immediately took Firecracker to the sink and used as warm of water as he could tolerate. I then used hand soap until his fingers pried apart.

The dried super glue will eventually flake off on it’s own, but because I have a boy who can’t keep his fingers out of his mouth for more than three minutes, I knew I had to get the glue off completely. I set him in my lap, turned on Chuggington and took to his fingers with an emery board.

How to Remove Super Glue from Skin

Disclaimer: This post contains affiliate links.

Thursday Thoughts #18

Thursday Thoughts

This move to California was our second real military move. (Our first from Auburn to FL hardly counts as we had very little inventory to relocate and the distance was only 200 miles.) You can read about our move to Ohio here.

We left a small home in Ohio and were expecting something even smaller out in the Los Angeles area. In preparation for that we gave some of our furniture to my brother-in-law who just purchased a home with his fiancé, and my in-laws were more than generous in offering to store some other items until we return to the East coast. I begrudgingly left the majority of my fabric, quilting and scrapbooking supplies, and Monopoly collection behind with them. Stuart and I had many conversations about the “must-haves” in a new home and a third bedroom for an office/craft space was simply a “nice-to-have” as my free time with two little ones is quite limited and this blog is my hobby priority number one.

Unlike the previous move, this one was not a “door-to-door” move, meaning we did not have a destination address. With two boys under two and a husband in a grueling Masters program there simply wasn’t any time to take a trip to California to house hunt ahead of time. So, we booked a stay in Temporary Housing and used the 8 days provided upon reporting to find a place to live. As a result, we knew our items would end up being held in a storage facility until we could provide the moving company with our final address.

The moving company we were assigned to this move was incredible. A crew of three guys came the Monday after Easter to pack up everything. They were punctual, friendly, patient, and very courteous. They worked quickly and efficiently and while the team lead was inventorying every box, the other guys started to move everything into the garage to make loading day go smoothly. The same crew returned the following day to disassemble furniture, and along with the driver load the moving truck. We provided Subway for lunch on day one and tipped them on day two. Having the same crew for both days really helped things go smoothly.

We had a bedroom marked off as a “do not pack” room containing anything and everything that would be traveling across the country in the van. My parents came to attend Stuart’s graduation and while here, they helped us pack the other vehicle before the movers arrived. That car was loaded down with my grandmother’s antique secretary desk, quilts, and scrapbooks, along with all important documentation.

When there are young children involved, I highly recommend dropping them off with a friend while the movers are packing your home. Unfortunately that wasn’t an available option for us, but luckily my mom planned to stay and help us with the cross country drive. My mom and I were able to keep the boys occupied in the “do not pack” room and run errands. We handled the weighing of the van and returning of cable equipment to keep out of the way while my husband stayed at the house. We also handled the lunch pick-up and delivery.

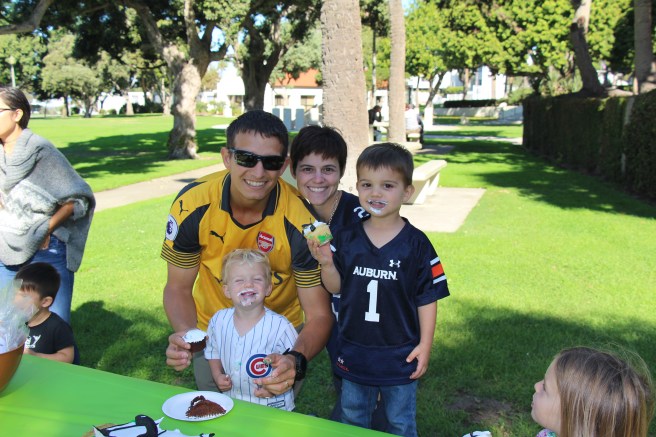
That same piece of advice is even more important when the movers are unloading your belongings into your new home. This time we had my mother-in-law who flew out to California to help. She was able to keep Firecracker out of the house and at the park almost the entire day! I was able to wear Treat during his nap and keep him more easily contained as he was much less mobile. 

While our delivery crew didn’t start out as personable as our packing crew, they were quite competent and earned both the taco lunch and a tip for having to deal with our inconvenient location and countless stairs.

Because my mother-in-law stayed for the first week in our new place, I was able unpack our boxes myself instead of allowing the movers to do it. I had learned from our previous experience, when the movers unpack the boxes they essentially dump everything out on the floor, which I knew wouldn’t work well with two curious boys. There were a few exceptions to what we had them unpack – we wanted them to open up all of our wedding china and stemware and art boxes to ensure they weren’t damaged during delivery.

Unfortunately, a few boxes didn’t make it all the way to California including our bin of snowboarding gear and one box of our wedding stemware. At first inspection my husband’s weight plates didn’t make it either, but the team lead called the storage facility and they were found. He returned the next day with the weights and took away all of the boxes and packing paper that we had gotten through on that first night, which was over half of them!

One bookshelf, a desk, and our Keurig ended up in the “RIP” category.

Overall I am happy with our moving experience.

We moved many essential things ourselves because of the length of our trip and the unknown amount of time we’d be living in a hotel. Here are some of the things I wish we had added to our long list: vacuum cleaner, tape measure, scissors and/or exacto knife.

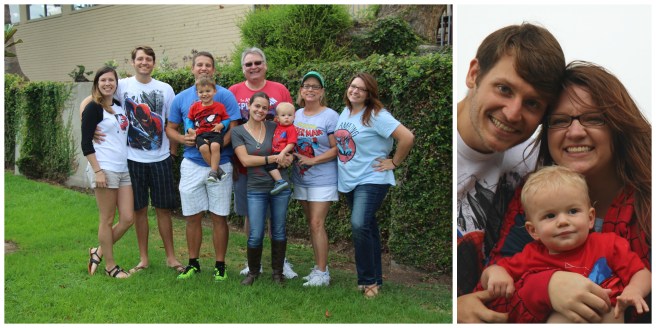
I’m going to reiterate: The biggest piece of advice I have for anyone moving with children – get help! My mom helped us get out of Ohio and traveled with us all the way to California. Having a third set of hands was invaluable. My mother-in-law was able to fly out to California the week of our delivery and she was able to take Firecracker to the park and on walks while the movers were unloading the truck. My sister-in-law came down the day after delivery and was a huge help with both boys keeping them entertained while we did a lot of unpacking and organizing of our home. She and my mother-in-law were able to share the brunt of the kids’ energy, too. If they weren’t able to provide so much help I know that I’d still be living in a house of brown cardboard boxes over one month later. I look forward to their next visits when things aren’t quite as hectic and more valuable time can be spent with them. I know their presence was much appreciated by the boys too, if their behavior after their departure is any indication!

Tuesday Tattles: Road Trip Edition

Tuesday Tattles

Now that we are almost settled in California I figure it’s as good a time as any to share my newly acquired wisdom on a long road trip with little ones!

Tip number 1: get a minivan.

Only joking, except that we absolutely love ours and it definitely makes road trip driving (and everyday) driving a little easier. The amount of floor space and storage space we had was impressive!

img_1224
Taking a road trip is definitely easier than flying when babies are involved. But it’s not exactly a walk in the park either. Not having a limit on items and liquids makes life so much better, not to mention you don’t have to have a squirming baby on your lap giving you busted lips and black eyes.

Here’s a list of some of the items that made our 5-day drive go relatively smoothly:

Car Seat Toys

I put two car seat toys on rings for Treat to stare at and occasionally grab. The links
prevented him from accidentally throwing them out of his car seat. Mr. Turtle and Freckles are now well loved car companions. (Those names were given by me during an attempt to cheer him up.)

Zeta the Zebra Teething Toy

Firecracker had the classic Sophie the Giraffe teething toy so to prevent any confusion Treat gets a different version. (Granted, Sophie has been lost for almost a year now.)

Disposable Bed Mats

Now here’s an item you probably didn’t expect to see on this list! Treat is the king of diaper blowouts and I wasn’t about to worry about needing to wash the car seat cover in the middle of nowhere. I simply folded up one of these (cutting one in half to fold would be even better!) under his bum for the trip. Really, I should maintain this practice until he starts solid foods…

Diapers and Wipes

I simply kept a jumbo diaper box and filled it with diapers for each the kids as well as a tub of wipes (with refills) on the floor in the backseat for easy access.

Hand Sanitizing Wipes

When gas stations and public rest area restrooms are the main stops it’s highly recommended to have an easy way to clean both adult hands and children hands.

Mirrors

If you don’t already use mirrors for the kiddos during day-to-day travel, you’ll definitely want them for a long road trip. It’s always good to know if they’re asleep and/or starting to stir when planning driving breaks.

Media Station

Unless your vehicle is equipped with rear entertainment, you can easily create your own set up. We got a $5 universal tablet holder and hooked it up to the middle seat headrest. The holder is intended for the back of headrests but as my kids are still rear facing our method worked just fine! We downloaded a season of  Wallykazam and turned it on in moments of great need. Surprisingly Firecracker didn’t acknowledge its addition to the backseat for a long time so we didn’t need to use it until halfway through our trip.

For the adults, books on CD to help with the 40-odd hours of driving. My choice: the whole Harry Potter series! We got through all of books 1 and 2 and more than half of book 3! I am now continuing listening to the series to make LA traffic much more bearable.

Box of Books and Toys

I knew we couldn’t let the movers pack up all of the toys so I kept a bin of the absolute favorites for Firecracker to grab and play with as desired. Of course all the trains made the cut as did Scout, phone, and laptop. I kept some books out for hotel nights, too, mostly those that are bedtime appropriate.

Food

A small cooler of food was definitely a blessing on a long trip. I was able to keep cheese and fruit as well as ingredients for countless PB&Js. Snacks for the adults was also necessary for long stretches of driving. And water! Just don’t forget some silverware, baggies, and cups.

Cereal Storage Box

I can’t take credit for this one. I saw this tip on Pinterest many years ago and have kept a bin (and plastic shopping bags) in my car ever since as a vehicular garbage can. It’s great for tissues, food wrappers, and receipts. I suggest keeping soiled diapers in a deodorized bag though if you can’t toss them elsewhere right away. (Yes, we made a highly necessary diaper and outfit change in the middle of nowhere. Only once though!)

img_1225
Coming soon will be more details as well as tips and lessons learned for getting through another military move.

Dislclaimer: This post contains affiliate links.