
When my mother-in-law visited in October she brought along two crafts for Firecracker to make.
One was the Tissue Paper Pumpkin Craft perfect for pre-Halloween crafting! He loved making it so much he couldn’t wait to make the tiger she promised him was coming later in the week.
This burlap tiger craft follows the same methodology as the tissue paper pumpkin, with just a touch of more “skill” to make the stripes look like a tiger.
Each tiger received a collar and we had the kids pick whichever fabric they wanted for their tigers. I was excited to see if Treat would even pick, but as he wasn’t making his own tiger, I wanted there to be a little bit of input on the craft from him. He picked a blue collar. Firecracker picked green.

How to make a Burlap Tiger
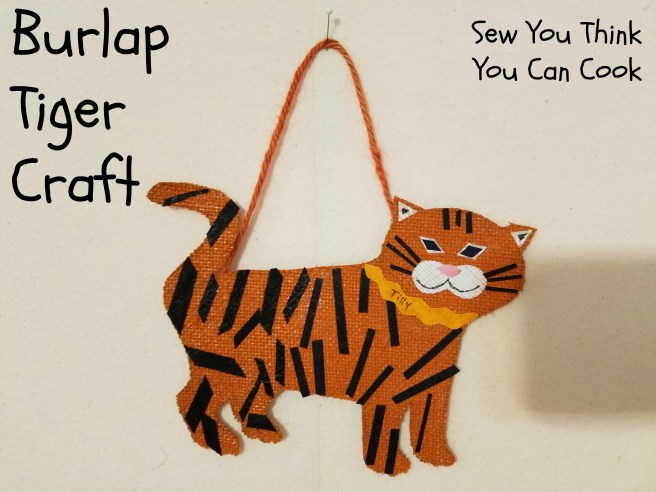
Start with a template of a tiger (or whatever other shape you want to create) and trace it onto a piece of Natural Burlap Paper. This 12×12″ paper has a stiff backing perfect for crafting. Cut out tiger.

Working with the burlap side up. Paint the tiger with orange craft paint.
Using black fabric scraps, cut out stripes for the tiger. From white fabric scraps cut out the ears, eyes, and muzzle. A pink triangle glued onto the muzzle makes for a perfect nose. More black fabric centered in the eyes creates pupils.

Paint modge podge over the tiger. An empty yogurt container is a perfect vessel for portioning out the craft glue.


Seal down the stripes by painting over the tiger with another layer of modge podge.
Using modge podge again, attach the ears, eyes, and nose.
Optional: add a collar with your child’s name (or a name they choose) around the neck of the tiger.
Hot glue a string on the back for easy hanging.


How cute!