Beet Pistachio Ravioli

It’s February and that means all things hearts and all things red and pink.

Now I am the first to defiantly declare that I hate pink. But as I mature my mind has opened up a bit to taking an interest in the girly color. I actually own three articles of clothing in the pink family!

But when it comes to pink foods, I’m all for it!

We’re talking beets. Again!

These pasta purses are simple to assemble and would definitely make for quite the showstopper at your Valentine’s dinner this month.

ravioli-purse-assembly

Using wonton or egg roll wrappers makes homemade ravioli a less daunting task. To cook the beets, either roast them in the oven or boil them until tender.
img_8745

Beet Pistachio Ravioli

Ingredients:

  • 2 beets, peeled, chopped, and cooked until tender
  • 1/2 C ricotta cheese
  • 1/2 C parmesan cheese
  • 1/4 C shelled pistachios
  • 3 tbsp mascarpone cheese
  • 1 tsp salt
  • 1/2 tsp pepper
  • 1 pkg (12 oz) wonton wrappers
  • water, for sealing the ravoili
  • melted butter, for serving
  • Meyer lemon olive oil, for serving
  • cooked pancetta or bacon, for serving (optional)
  • fresh mint, for garnish (optional)

Steps:

  1. Place cooked beets, ricotta, parmesan, pistachios, mascarpone, S+P in a food processor and puree until smooth.
  2. Place a small spoonful in the center of a wonton wrapper. Dip finger in a shallow bowl of water and trace the edge of the wrapper. Pinch wonton into a little purse. [see photos above] You can also simply fold the wonton wrapper into triangles.
  3. Cook assembled wontons in a pot of boiling salted water for approximately 4 minutes, until the wonton wrapper is clear and the ravioli float to the top.
  4. Serve ravioli warm with a drizzle of melted butter, Meyer lemon olive oil, S+P. Add some crispy pancetta or bacon for texture and fresh mint for freshness and greenery.

*This recipe is adapted from Erica at http://www.forkknifeandlove.com/easy-beet-pistachio-ravioli-with-lemon-butter-sauce/*

Beet and Pistachio Ravioli | Sew You Think You Can Cook

Creamy Walnut Pasta Sauce

Did everyone end their 2016 battling sickness or is it just us?

Pretty much all of November and December was spent with my boys passing back and forth some sniffles and coughs. My mom caught the head cold when she was here in early December and it clung to her for 3 weeks. And, unfortunately for Treat, it developed into an almost ear infection and some precautionary antibiotics before our holiday travel.

My mother-in-law came to visit a couple of weeks before Christmas. She took a week to spend quality time with her children out in California. My sister-in-law lives in Napa working in the wine industry and we’re down in the Los Angeles area, so she took advantage and planned a multi-city travel itinerary.

Firecracker simply loves it when the grandparents come to visit and has come to expect crafting projects when his Tilly (my MIL) comes to visit. Of course, she didn’t disappoint and had some adorable alphabet themed Christmas crafts to do. Crafts that have inspired me to begin planning some 2017 Christmas crafting already. (I’m just going to leave that there, chuckle at it, and land my feet on the ground knowing that’ll never happen. At least not in advance!) See my Instagram posts for adorable holiday crafting fun.

My mother-in-law was coughing a little bit and her voice was starting to go. Her trip took a turn for the worse and she ended up spending her last day in California sleeping in her hotel room. Upon returning to Alabama, a doctor’s visit revealed she had bronchitis.

At least we managed to stay clear of that!

We then traveled to Florida for Christmas. Our 2nd day there was the start of illnesses. Treat ended up having some projectile vomiting and we weren’t really sure what to chalk it up to, thinking it was just a side-effect of his medicine, mucusy coughs, or teething. But then the next night, I was the one battling what was evidently a stomach bug. That bug continued its way through our family reaching my dad, my brother, Firecracker, and my brother’s mother-in-law, sister-in-law, and nieces. My best friend’s husband had it, too.

My weakened immune system meant that I got that lingering head cold from my mom. Dad did, too.

Needless to say, our holiday vacation was one spent mostly on the couch.

img_5071What does any of that have to do with Creamy Walnut Pasta Sauce?

Not much really. Except that the pasta I used was a package my mother-in-law found while up in Napa. She brought me quite the fun kitchen gift set including holiday towels, colorful pasta, and a chocolate raspberry sauce.

Creamy Walnut Pasta Sauce

Ingredients:

  • 1 C toasted walnuts
  • 1/2 C mascarpone cheese
  • 1/3 C olive oil
  • 1/4 C shredded Parmesan cheese
  • 1/4 C grated Pecorino Romano cheese
  • 8 fresh basil leaves
  • 1 clove garlic
  • 1 lb pasta of choice
  • 1 C reserved pasta cooking water
  • 2 tbsp butter

Steps:

  1. Cook pasta in boiling salted water according to package instructions. Reserve 1 C of the cooking water before draining the pasta. Toss pasta with butter and return to pot to keep warm.
  2. Put toasted walnuts, olive oil, cheese, basil, and garlic in a food processor and pulse until smooth. Season to taste with S+P.
  3. Add sauce to the cooked pasta with 1/2-1 C of the pasta water. Serve with extra grated cheese and red pepper flakes if desired.

*This recipe is adapted from Andrea at http://cookingwithmammac.com/linguine-with-creamy-walnut-sauce/ *

Creamy Walnut Pasta Sauce | Sew You Think You Can Cook | http://sewyouthinkyoucancookk.com

Countdown to 2017: Most Popular

unnamedWe’re polishing off the year with the five best recipes of 2016.

I skipped yesterday’s Best Slow Cooker Recipes because, believe it or not, I didn’t blog a single one! I’ve used my Slow Cooker plenty but always remaking something or not finding the dish blog worthy. Ah well. There’s always next year.

This blogging countdown party is hosted by Sarah at Fantastical Sharing of Recipes.

2016 was an interesting blogging year for me. I’ve struggled to find my rhythm ever since our move in the spring. We’ve been in California 8 months now, I can’t keep using the move as an excuse! We are enjoying California living and are looking forward to the boys growing and the opportunities we have for exploring the West coast.

I’ve been contemplating whether or not I want to continue blogging. It’s hard not getting caught up in the numbers. I’m part of a lot of blogging groups and some support groups on Facebook. Comparing my little piece of the internet to all of these other “more successful” bloggers brings me down a little bit. I’ve taken a step back from those pages and am just enjoying being me.

It’ll be fun (hopefully?) to look at my annual stats from WordPress.

Well, it could have been fun, however the annual stats report hasn’t come in yet (as of 8:30pm PT on 12/30) and I’m hitting “schedule” on this post soon! If the report comes in and I’m available, I’ll edit this post as needed.

Sew You Think You Can Cook was viewed 40,349 times – that’s 2,535 more times than last year! Definitely not as big a jump as between 2014 and 2015, but my social media presence has been gaining great ground. My Facebook page has reached over 1,000 followers; if you’re one of them I thank you – keep clicking and please keep sharing!

Last year, the majority of my referrals came from Foodgawker. I’ve been quite proud of my photography skill advancement this year thanks to my new macro lens (sure, it’s still got ways to go), but the time and effort I’ve been able to expend towards submitting to Foodgawker and other similar “food porn” sites hasn’t been up to what it used to be. My acceptances have had a higher percentage, but I’m simply not submitting as often as I like or should. I’ll work on getting my images into more public spaces in the future.

This year, my most popular referrer were search engines (mostly Google and Bing), funnily enough though I don’t know what people are searching to reach me!

I’m fairly positive that my busiest day of the year was December 1st when I wrote about having lost our Christmas ornament box. Thanks to fellow military spouses who connected to my pain and shared my post on their own Facebook pages. It was my highest grossing Facebook post ever, reaching over 2,000 people alone! While I don’t think we’ll ever get our box of Christmas memories back, I’m blessed to have the people in my life who can help me make new memories and remind me that it’s still just “stuff.” I was touched when I received a surprise package from my mom’s step-sister with a kind note, a brand new Auburn ornament, and a sweet book for the boys.

And now for the top five recipes of 2016, these are in ranking order:

  1. BBQ Pulled Pork Pasta: A perfect way to use up leftovers!
  2. Carolina BBQ Pulled Pork: A tangy spin on slow cooker pork!
  3. Pot o’ Gold Cookies: Save these addicting cookies for St. Patrick’s Day!
  4. Chocolate Cherry Brownie Pie: This decadent pie was one of my favorite desserts this year, too!
  5. Cappuccino Crinkle Cookies: Save these caffeinated cookies for the adults!

Top 5 posts of 2016 | Sew You Think You Can Cook | http://sewyouthinkyoucancook.com

To see more popular recipes click here: An InLinkz Link-up

Chicken Marsala Ravioli

Whenever we go to Olive Garden my husband can’t help but order their Stuffed Chicken Marsala. He tries. He says he’s not going to do it – because he always wipes the plate clean – and every time Stuffed Chicken Marsala ends up being brought to our table and placed in front of him.

Not being a mushroom lover, I’ve actually never even tried it!

But when I got the idea for Marsala ravioli – honestly, I can’t even remember where the inspiration hit – I decided to give it a go.

Making the ravioli was another one of those, never-thought-I’d-do-that moments. I’m talking about putting meat in my food processor. Pureed meat has always given me the heebie jeebies (but I do like Liverwurst and pate… I’m odd). It’s one of the main reasons I decided to introduce my babies to food using the baby led weaning method. The filling for the ravioli isn’t pureed to a smooth consistency though, it just needs to be insanely finely minced so it can fit inside the pasta.

Like all of my ravioli recipes, I used wonton wrappers.

I’d assembled enough ravioli to freeze for two more meals! Good thing too because meal number one involved a sauce that wasn’t too great and was horribly photographed. Meal number two had a fantastically delcious sauce that this mushroom lover sopped up but photographs were still pretty bland. Meal number three was perfect and photographed decently – I didn’t forget the fresh parsley for garnishing my bowl of pasta this time!

The ravioli recipe comes from Tyler Florence and the sauce recipe comes from Giada De Laurentiis.

Chicken Marsala Ravioli

Ingredients:

  • 4 tbsp olive oil, divided use
  • 3/4 lb chicken breast, cubed
  • 1 shallot, chopped
  • 1 clove garlic, chopped
  • 1/4 C Marsala wine
  • 4 slices prosciutto, chopped
  • 4 bay leaves
  • fresh parsley, chopped
  • 2 tbsp bread crumbs
  • 2 tbsp grated Parmesan cheese, divided use
  • 1 egg
  • 1/4 C heavy cream
  • 2 packages wonton wrappers

Steps:

  1. Heat olive oil in a nonstick skillet over medium-high heat. Saute chicken until golden on both sides and fully cooked. Add the shallot and garlic and cook a minute.
  2. Deglaze the pan with the wine, bring to a quick bubble and add the prosciutto, bay leaves, and parsley. Allow Marsala to reduce a little and thicken. Stir in the bread crumbs, 1 tbsp Parmesan, and 1 tbsp olive oil.
  3. Remove the bay leaves and transfer filling mixture to a food processor. Add the egg, cream, and the remaining Parmesan and olive oil. Pulse until the filling comes together. Season to taste with S+P. Chill.
  4. Assemble ravioli: place a small spoonful of the filling in the center of a wonton wrapper. Wet the edges and fold into a triangle.
  5. Cook ravioli in boiling salted water 2 minutes, until they float and the wonton is translucent.

*This recipe is adapted from Tyler Florence at http://www.foodnetwork.com/recipes/tyler-florence/chicken-marsala-ravioli-filling-recipe.html*

Marsala Mushroom Sauce

Ingredients:

  • 2 tbsp olive oil, divided use
  • 8 oz cremini mushrooms, sliced
  • 1 shallot, minced
  • 1 1/2 tsp flour
  • 1/3 C Marsala wine
  • 1 1/4 C chicken broth

Steps:

  1. Heat 1 tbsp olive oil in a medium skillet over medium-high heat. Saute the mushrooms for 5 minutes, stirring often. Add the shallot, season with salt, and cook 2 more minutes.
  2. Reduce the heat to medium and whisk in the flour and remaining oil to form a paste. Stir in the wine until smooth. Add the broth and simmer 5-10 minutes.

*This recipe is adapted from Happy Cooking by Giada De Laurentiis*

Chicken Marsala Ravioli | Sew You Think You Can Cook | http://sewyouthinkyoucancook.com

Wing-it Mac & Cheese

5.5 weeks just the kids and me.

1 week on vacation.

1 week celebrating my baby’s first birthday.

That’s a lot of days doing very little cooking. It’s no surprise my scheduled posts have petered out and there wasn’t much to pull from the archives to share.

The moment has finally come to share a poorly photographed original recipe.

I made this Mac & Cheese just shy of one year ago. At that point in my life I had a two week old. Daylight Savings Time had ended and the dark Ohio nights were cold. What’s a better pick-me-up than some macaroni?

I decided to save another dish to wash by making my macaroni in a Dutch oven and putting it directly into the oven instead of transferring it to a casserole dish.

An Original Recipe

Wing-it Mac & Cheese

Ingredients:

  • 1/2 lb elbow noodles
  • 1 tbsp vegetable oil
  • 1/2 sweet onion, chopped
  • 1/2 tsp minced garlic
  • 1/4 tsp ground mustard
  • 1 tbsp flour
  • 2 C whole milk, at room temperature
  • 2 1/4 C shredded cheddar cheese
  • 1/2 C panko breadcrumbs
  • 1/2 tsp Italian seasoning
  • olive oil, for drizzling

Steps:

  1. Preheat oven to 350 degrees F.
  2. Cook pasta in boiling salted water according to package instructions to al dente.
  3. Heat vegetable oil in a Dutch oven over medium high heat. Saute onion until tender. Add minced garlic and saute one minute. Stir in mustard, S+P, and flour.
  4. Whisk in the milk. Bring to a gentle bubble. Add in the cheese a handful at a time, stirring until melted before adding more. Once all the cheese is incorporated, fold in the cooked macaroni noodles.
  5. In a small bowl, whisk the panko and Italian seasoning. Spread over the macaroni. Drizzle with a little olive oil.
  6. Bake 30 minutes. Allow macaroni to rest 5-10 minutes before digging in.

Wing-it Mac & Cheese for a simple weeknight dinner | Sew You Think You Can Cook | http://sewyouthinkyoucancook.com

#SundaySupper: Summer Corn

I have been waiting all year for fresh summer corn! I couldn’t have been more excited to see the theme for today’s #SundaySupper. I can’t wait to check out everyone’s incredible recipes to find new and exciting ways to prepare one of my favorite grains (corn isn’t a vegetable, you know)! Be sure to scroll past my recipe to check out what everyone made. Thanks to Ellen Folkman from Family Around the Table for hosting this weekend.

I do have to say, fresh corn is something that California just doesn’t have right. I have been disappointed in what pops up at the grocery stores. It’s probably the only thing (other than our friends) I miss about Ohio. Sigh. When I go visit my parents at the lake next month they better be prepared for lots of corn dishes made with Wisconsin grown corn on the cob. Now if only I could get it back to Cali.

Our farmers market near our home doesn’t have corn so I planned on driving to the larger one to see what was available. But. My excursion was halted before I got out of the driveway. I’d loaded up the boys and promised a trip to the farmers market and to a friends’ house for a playdate. Neither of those things were able to come to fruition thanks to our garage door.

The garage door broke. It’s had sticking problems since we moved in, but nothing that couldn’t be overcome by pushing the button a couple of extra times. But now, here I was with the car out of the garage and a baby screaming bloody murder. The garage door was neither up nor down and I couldn’t get it to go all the way up so I could return the van to its parking place. Luckily a neighbor was just leaving and he took the time to help me out. We discovered that the cable was completely off the pulley. I grabbed a step stool and he put it back for me. Unfortunately, it still didn’t do the trick. He was able to get the door completely open for me and I put the car back. I then had to do a mental exercise and take anything and everything I would need out of the trunk as I wouldn’t be able to get into it once I muscled the garage door closed. I took out the big double stroller, the beach blanket, and some sand toys.

I had to cancel with our friends. Instead, she kindly offered to pick up whatever I needed from the market and to come over to our house. She brought me some fresh white corn so I could still make my dish for today’s event!

The dish I’d been dreaming about was one in Rachael Ray’s Look + Cook Cookbook. How could I pass up cream, corn, and pasta!? Oh, and there’s bacon involved, too. I made this dinner when we invited over one of my husband’s coworkers and his girlfriend. The pasta was a hit and there wasn’t any leftover. Funnily enough, Firecracker fell asleep in my husband’s arms at the table and Treat fell asleep shortly thereafter, allowing us adults to enjoy the sunset with a cocktail in hand. (We’ve told them they need to come to dinner every day!)

Fresh Corn Fettuccine

Ingredients:

  • 1 lb fettuccine
  • 5 ears corn on the cob, sucked and kernels cut off the cob
  • 1 C heavy cream
  • 5 strips center-cut bacon, diced
  • 2 large shallots, diced
  • 1 bell pepper (I used 2 very small green ones we picked), diced
  • 1/2 C vegetable stock
  • 2 tsp dried thyme
  • 1 tomato, diced
  • hot sauce (to taste)
  • 1/2 – 1 C shredded parmesan cheese
  • 1/2 C fresh flat-leaf parsley, chopped
  • 1/2 C fresh basil, chopped

Steps:

  1. Bring a large pot of salted water to a boil. Cook pasta according to package instructions. Drain and set aside.
  2. Put 1/4 of the corn kernels in a food processor with the cream. Blend until smooth, season with S+P.
  3. In a large skillet, cook bacon over medium-high heat for about 5 minutes. Add the remaining corn, shallots, bell pepper, S+P, cook another 5 minutes until veggies are tender. Stir in the stock, thyme, and corn/cream mixture. Reduce the heat and simmer until slightly thickened. Gently stir in the tomato. Season to taste with hot sauce, S+P.
  4. Toss cooked pasta into the sauce with 1/2 C Parmesan cheese and the parsley. Garnish with basil and extra cheese.

*This recipe is adapted from Rachael Ray’s Look + Cook*

Fresh Corn Fettuccini for #SundaySupper from Sew You Think You Can Cook

Appetizer

Breakfast

Salad

Main Dish

Side Dish

Dessert

Sunday Supper MovementJoin the #SundaySupper conversation on twitter on Sunday! We tweet throughout the day and share recipes from all over the world. Our weekly chat starts at 7:00 pm ET. Follow the #SundaySupper hashtag and remember to include it in your tweets to join in the chat. To get more great Sunday Supper Recipes, visit our website or check out our Pinterest board.
Would you like to join the Sunday Supper Movement? It’s easy. You can sign up by clicking here: Sunday Supper Movement

Disclaimer: This post contains affiliate links.

Pistachio Mint Pesto

Traditionally speaking, I’m not the biggest pesto fan. I’m of course talking about the no frills basil and pine nut version. Maybe if I made my own I’d feel differently, but whenever I order something with pesto on it at a restaurant I don’t get that bright herby punch I’m expecting. I’ve made a couple unique pestoes on the blog before, Jalapeno and Beet, and we’ve loved both of them. The jalapeno one has been made multiple times already. And come to think of it, I have beets in the fridge right now without a planned future…

But today we’re talking about a new variety of pesto. One that exceeded my expectations! I had an abundance of mint and the internet at my fingertips. I decided to give this pesto twist a try and I am oh so glad I did! I don’t often work with pistachios, in fact, I tend to forget that they even exist. I don’t know why, they’re quite delicious!

I served the pesto over pasta originally. The leftovers brightened up my sandwiches during the week for lunch – I put cooked chicken, cheddar cheese, pesto, and spinach in a pita and gave it a quick toast in the toaster oven. Perfect.

Pistachio Mint Pesto (pasta)  Sew You Think You Can Cook

Pistachio Mint Pesto

Ingredients:

  • 1 C shelled pistachios
  • 1 C shredded Parmesan cheese
  • 1 C fresh mint
  • 1 C fresh parsley
  • 2 cloves garlic
  • 1/2 C olive oil
  • juice 1 large lemon

Steps:

  1. Put all ingredients in a food processor and pulse until smooth, scraping the sides of the bowl as needed.

*This recipe is adapted from Denise at http://sweetpeasandsaffron.com/2015/09/pistachio-mint-pesto.htmlhttp://sweetpeasandsaffron.com/2015/09/pistachio-mint-pesto.html*

Pistachio Mint Pesto  Sew You Think You Can Cook

BBQ Pulled Pork Pasta

Once upon a time I saw a bbq spaghetti on an episode of Diners, Drive-ins, and Dives. I couldn’t shake the urge to try it, so when we had a lot of leftover pulled pork from the Super Bowl I knew I’d have to make some barbecue pasta sauce. Because I stored the leftover pork and sauce separately I used a bottled barbecue sauce instead of the Carolina BBQ for this recipe.

I just loved this mashup of cuisines. It takes your tastebuds a moment to get over the “culture shock” of a spicy, smokey, sweet sauce instead of the expected acidic tomato sauce.

I urge you, the next time you have leftover pulled pork, do something a little different and try this barbecue pasta instead!

BBQ Pulled Pork Pasta

Ingredients:

  • 3 1/2 C dry pasta
  • 1 C tomato sauce
  • 3/4 C barbecue sauce
  • 1/2 C water
  • 3 tbsp tomato paste
  • 1 tsp Italian seasoning
  • 1/4 C chopped fresh basil (I used Gourmet Garden lightly dried herbs)
  • 2 C cooked, pulled pork
  • 2 scallions, sliced

Steps:

  1. Cook pasta in boiling salted water, until al dente. Drain.
  2. In a medium saucepan, combine tomato sauce, barbecue sauce, water and tomato paste. Bring sauce to a simmer over medium-high heat. Stir in the herbs and pulled pork.
  3. Put drained pasta into the pasta sauce. Garnish with the scallions.

*This recipe is adapted from Anna at http://hiddenponies.com/2013/05/bbq-pulled-pork-pasta/*

BBQ Pulled Pork Pasta is a fantastic way to use up leftover pulled pork! From Sew You Think You Can Cook

#SundaySupper: Root Vegetables

Every year in our marriage we’ve celebrated Valentine’s Day by enjoying fondue. That’s what happens when you get two Fondue Makers! Sometimes I do a cheese, sometimes chocolate, and sometimes even both!

This year, our 5th married Valentine’s Day, was a little different. Our stay here in Ohio has been for schooling, my husband will earn his Masters degree at the end of the month. He successfully defended his thesis this week! This calendar year has been quite a stressful and busy one so far and I am quite ready to get my husband back. So, for Valentine’s Day this year I was reading Chapters 4 and 5 of his thesis, being a second set of eyes to check for content cohesion and grammatical quirks.

I woke up really early on Sunday, February 14th to go to the grocery store before the post-church crowds did their shopping to get everything I’d need for Caramelized Shallot Fondue and Champagne Poached Pears. I also found some Florida Strawberries! And then I got to the check out only to discover that they couldn’t sell me alcohol before noon.

We decided we’d go back to get the champagne later in the day but a snow storm derailed those plans. It was on to Plan B. No plan. The plan of, “What’s in the fridge?” Beets. Pine nuts. Crescent rolls. Pasta. Bacon.

An internet search yielded a Beet Pesto Pizza. We didn’t have any of the toppings but the pesto we could make and serve over pasta instead. (We did toss some bacon in our pasta, too!)

The result? A beautiful, deep pink pasta which turned out to be simply perfect for Valentine’s Day! My garnish of parsley makes this a great option for Christmas, too.

That long introduction leads us to the theme for today’s #SundaySupper hosted by Cindy of Cindy’s Recipes and Writings, root vegetables. We contemplated adding some sweet potato to the pesto, but were too afraid of the color that might result. There are some great ideas for how to prepare a wide variety of root vegetables in today’s round-up, simply scroll past my photo to check them out!

Beet Pesto

Ingredients:

  • 1 large beet, peeled and diced
  • 2 tsp minced garlic
  • 2 tbsp pine nuts
  • 1/4 C extra virgin olive oil

Steps:

  1. Preheat oven to 400 degrees F.
  2. Toss beet and garlic in a little bit of olive oil. Season with S+P. Place on a baking sheet and roast 20-30 minutes, or until tender. (Note: roasting time will depend on size of dice.)
  3. When slightly cooled, place in a food processor and pulse until fine. Add the pine nuts and olive oil and puree until smooth. Season to taste with S+P.
  4. Option: Serve on pasta with parmesan and parsley.

Beet Pesto for #Sunday Supper from Sew You Think You Can Cook

Appetizers

Breakfast

Main

Sides

Desserts

8387592742_f6164fd5a8_oJoin the #SundaySupper conversation on twitter on Sunday! We tweet throughout the day and share recipes from all over the world. Our weekly chat starts at 7:00 pm ET. Follow the#SundaySupper hashtag and remember to include it in your tweets to join in the chat. To get more great Sunday Supper Recipes, visit our website or check out our Pinterest board.

Would you like to join the Sunday Supper Movement? It’s easy. You can sign up by clicking here: Sunday Supper Movement.

Disclaimer: This post contains affiliate links.

#FoodieExtravaganza: Noodles

foodieextravaganza-300

Can we take a moment and freak out a little bit about how it’s already March? I know February is a short month, but I feel like we just celebrated those #FoodieExtravaganza pies!

Each month we take turns hosting and selecting a foodie holiday associated with that month; March includes Noodle Month, Celery Month, and Frozen Food Month. Today we’re celebrating noodles! Thanks to our host, Lauren of From Gate to Plate, for not picking celery. 😉

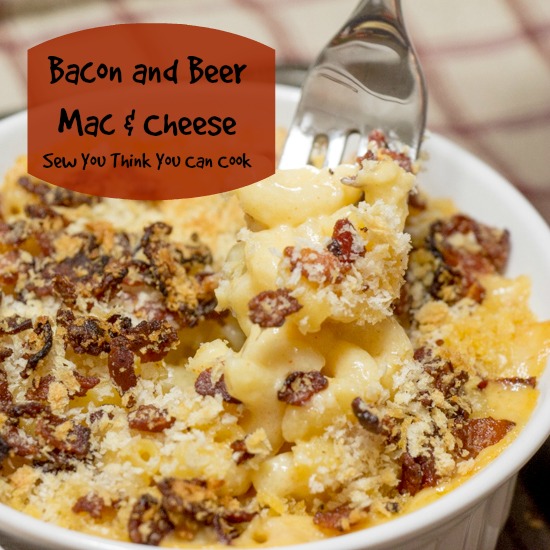
The noodle I am featuring in my recipe today are the classic elbow macaroni. But that’s all that’s classic about this dish! This macaroni and cheese is a guy’s dream – bacon and beer! I made this indulgent pasta for my husband’s birthday earlier this year. It would make for a wonderful Father’s Day meal, too.

Having beer in the cheese sauce really reminded me of fondue! I don’t care for beer, but it works amazingly well in macaroni and cheese! Especially when there’s a crust of bacon on top.

This recipe makes way more than the two servings quoted in the original recipe. I’d go ahead and say this macaroni would feed 4-6!

Beer and Bacon Mac & Cheese

Ingredients:

  • 2 1/2 C dry elbow noodles
  • 3 tbsp butter
  • 3 tbsp flour
  • 1 1/2 C milk
  • 1 bottle (12 oz) beer
  • 1 1/2 C shredded cheddar cheese
  • 1 1/2 C shredded Parmesan cheese
  • 1/2 tsp paprika
  • 1/2 tsp salt
  • 1/4 tsp garlic powder
  • 1/4 tsp pepper
  • 1/8 tsp nutmeg
  • 1/2 C panko bread crumbs
  • 8 strips center cut bacon, cooked and crumbled

Steps:

  1. Cook pasta in boiling salted water until barely al dente, about a minute less than the recommended cooking time. Drain.
  2. Preheat oven to 375 degrees F.
  3. Melt butter in a large pot over medium-high heat. Whisk in the flour and cook until golden. Add the milk and beer, whisking continuously. Slowly add the cheeses and stir until melted. Cook, stirring, 6 minutes until thickened. Season with the paprika, salt, garlic powder, pepper, and nutmeg.
  4. Add cooked noodles to the cheese sauce.
  5. Divide macaroni between ramekins or use a casserole dish.
  6. Combine the panko and cooked bacon. Top the macaroni.
  7. Bake until bubbly and the crust is golden, about 20 minutes. Allow macaroni to cool 5 minutes before serving.

*This recipe is adapted from Melanie at http://melaniemakes.com/blog/2014/02/bacon-crusted-beer-mac-and-cheese.html*

Bacon and Beer Mac & Cheese for #FoodieExtravaganza from Sew You Think You Can Cook

Be sure to check out these other recipes involving noodles:

One Pot Garlic Pasta by From Gate to Plate
Haluski (Fried Cabbage & Noodles) by Making Miracles
Homemade Chinese Noodles by Fearlessly Creative Mammas
Spicy Shrimp with Peanut Noodles by cookinandcraftin
Sopa Seca de Fideo – Spicy Mexican Noodles by Food Lust People Love
Green Bean and Squash Laksa by Caroline’s Cooking
Kakaós Tészta (Hungarian Cocoa Noodles) by Tara’s Multicultural Table
MiMi’s Baked Ziti by Cooking With Carlee
Tortellini and Tomato Salad by The Freshman Cook
Homemade Noodles by Our Good Life
Tossed Homemade Macaroni Noodles by A Day in the Life on the Farm
Soft Noodles with Veggies and Poached Egg by G’Gina’s Kitchenette

If you are a blogger and would like to join our group and blog along with us, come join our Facebook page Foodie Extravaganza. We would love to have you! If you’re a spectator looking for delicious tid-bits check out our Foodie Extravaganza Pinterest Board! Looking for our previous parties? Check them out HERE.