Seared Cod with Tangerines and Kale

The kids have been a little difficult lately.

Firecracker just turned 2.5 and I don’t know if there’s some cognitive leaping happening, physical growing, or it’s those 2 year old molars working their way in but his ability to listen and obey has taken a turn in the wrong direction. It’s been highly frustrating and our patience levels keep getting lower by the hour. It doesn’t help that he doesn’t nap and when he’s tired he becomes destructive and a bit of a Tasmanian devil. His ability to sleep through the night, a skill he’s never conquered, has reverted back to coming to our bed 2-4 times meaning none of us are getting the sleep we need!

Treat meanwhile is definitely working on teeth, he’s constantly hungry, and the cough he had at the end of the year has crept its way back into our lives. He’s following his brother around like a hawk and has developed quite the skills for climbing and “jumping.” There’s no room for a lapse in childcare with that one!

With two tired and hungry boys on my hands, my husband deserves a lot of credit on the execution of this recipe. I quickly made them a blue box of macaroni and cheese in the middle of trying to make our dinner. I pull out the freshly purchased cod from Whole Foods while my husband feeds the boys and I discover that one of the fillets was not deboned. And we don’t have proper fish cleaning tools. The adults switched places.

In a mode of determination, my husband grabbed a clean pair of pliers, washed them, and got to pulling. We’d definitely be “chopped” for execution skills as that fillet looked a bit mangled. He then proceeded to season the fish with S+P and sear it in olive oil while I get the kids cleaned up, put in pajamas, and started the bed time routine. I even stuck him on photography duty while I sat with Firecracker until he fell asleep.

He was able to eat his fish and accompanying salad warm while watching Treat and then getting him to fall asleep.

By the time I made my way back upstairs I had a cold plate waiting for me. And you know what, the fish was delicious cold! It was such a light, refreshing, and healthy meal.

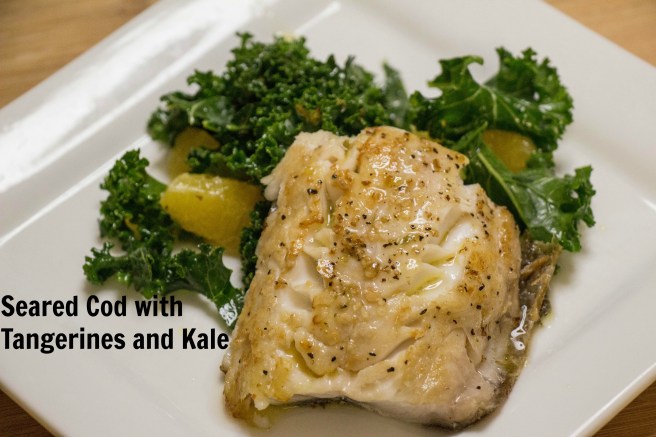
The dish was inspired from a recipe in Giada de Laurentiis’ cookbook Happy Cooking. We followed her method for cooking the fish, but the salad co-star was changed. I omitted the olives, used dried oregano instead of fresh, and the main difference, used kale from the farmer’s market instead of arugula.

I prepared the salad first, allowing the kale to marinate in the dressing while the rest of the meal was prepared. It’d been a long while since I’d last had kale and it was a nice surprise to realize how much I like the dark green!

Seared Cod with Tangerines and Kale

Ingredients:

  • 2 tangerines
  • 1 tsp Dijon mustard
  • 1/4 tsp dried oregano
  • 2 tbsp + 4 tsp olive oil, divided use
  • 4 C chopped kale, stems removed
  • 4 6-oz filets cod

Steps:R

  1. Using a paring knife, cut of the top and bottom of each tangerine. Follow the curve of the fruit to cut off the entire peel. Place a strainer over a small bowl. Segment the tangerines over the bowl then squeeze the juice out of the remaining flesh.
  2. To the tangerine juice, whisk the mustard, oregano, and 4 tsp olive oil. Reserve 1/4 C of the dressing. Toss the kale and tangerine segments in the dressing. Set aside.
  3. Season cod with S+P. Heat remaining olive oil in a large skillet over medium-high heat. Sear cod, flesh side down, for three minutes. Flip, an cook another three minutes. Serve alongside kale salad and drizzle with reserved dressing.

Seared Cod with Tangerines and Kale | Sew You Think You Can Cook | http://sewyouthinkyoucancook.com

Food Bloggers Recipe Swap: Shredded Beets with Citrus Vinaigrette

It’s my first time posting in the Food Bloggers Recipe Swap and I’m pretty excited.

I probably should have just waited until the new year to begin participating, but I was just too excited!

There’s been a lot going on here, as I’m sure in most people’s homes, the past two months. I’m now feeling the crunch to Christmas (and that is in no way a bad thing) and have been neglecting a lot of my blogging responsibilities, frantically scrambling to pull together a post the night before it’s due to go live.

I’ve been enjoying the bit of a break though, and have revived my cross stitch hobby. Christmas time always does that to me. I’ve also just begun a new friendship and have enjoyed getting out of the house and killing time at the mall talking to another adult human being during the day.

Somehow this week though, I’ve got to find time to pack for our holiday vacation, wrap the kid’s presents, send those Christmas cards, and order a few final gifts. My mother-in-law is coming into town tonight so I’m hoping I’ll be able to sneak in some of that holiday cheer while the kids are otherwise preoccupied. (hint hint, Tilly!)

What does any of that have to do with Food Bloggers Recipe Swap?

Well, nothing really. Except that by opting in for December, I committed myself to being assigned a blog, finding and recreating a recipe from that blog, and then sharing it with all of you, my dear readers. Much like the Secret Recipe Club which has sadly come to an end.

The main difference between this group and that is the posting leniency. As long as I get my post completed by the end of the month, life is peachy! I don’t think the assignments are a secret either, and should I choose, I could search through the assignment list and figure out who is digging through my recipe index, but I won’t spoil the surprise. 🙂

For my first month, I was assigned Love and Cilantro written by Danya. Danya grew up in Jamaica and now lives in Canada where she attends culinary school. I envy her bravery to switch up her life and live out her dreams. I often think about going to culinary school, maybe after the kids are in elementary school?

Danya’s blog is relatively new, just over a year old if my calculations are correct! With a shorter recipe selection than some blogs I’ve scoured you’d think my decision would be fairly simple. Think again! I’d narrowed it down to Spinach Stuffed Chicken Breast (which will still probably happen), Asian Salad, and the Raw Beet Salad I ultimately picked. Oh wait! There’s this beautiful Greek Chicken she shared on Sunday, too, dang – too late!

I’m really happy with the Beet Salad, though. I mean, I love beets, so why wouldn’t I like this salad!? I don’t often work with beets raw and it was fun to do so. The vinaigrette the shredded beets are tossed in is perfectly balanced – the lemon mellows out the orange and the white balsamic is a fun new ingredient to my pantry. I didn’t have chives so very thinly sliced a scallion.

I think this salad would make a beautiful addition to your holiday table this month – the bright color and flavor would brighten your plate wonderfully!

Shredded Beets with Citrus Vinaigrette

Ingredients:

  • 1 bunch beets, peeled and shredded
  • 1 orange, zested and juiced
  • 1 lemon, zested and juiced
  • 1/4 C white balsamic vinegar
  • 2 tbsp extra virgin olive oil
  • 1 tbsp agave (or honey)
  • 1 tsp Dijon mustard
  • 1-2 scallions, thinly sliced (or 4 chives)

Steps:

  1. Place shredded beets in a bowl.
  2. In a small bowl, whisk together the citrus, vinegar, oil, mustard, and agave. Season to taste with S+P. Toss beets with as much dressing as desired. Garnish with scallion/chives.

*This recipe is adapted from Danya at http://loveandcilantro.com/orange-beet-salad/*

Shredded Beets with Citrus Vinaigrette for Food Bloggers Recipe Swap from Sew You Think You Can Cook


#MuffinMonday: Chocolate Chip Blood Orange Muffins

Muffin Monday

#MuffinMonday is a group of muffin loving bakers who get together once a month to bake muffins to brighten their Mondays. There isn’t a theme to #MuffinMonday posts so anything goes, as long as it’s a muffin!

You can see all our of lovely muffins by following our Pinterest board. Updated links for all of our past events and more information about Muffin Monday can be found on our home page.

About a month and a half ago I finally had the opportunity to discover first hand the beauty that is the blood orange. I’ve known of them but had never found them anywhere. And then one of the farmers markets had them and I grabbed a fair few. Most of them I simply indulged in my new favorite thing to do: cut open a blood orange and snap a photo of it (see Instagram) then squeeze the juice out of it and have a fresh glass. As blood oranges can vary in color from orange to dark red I had a blast being surprised by each slice of the knife. I came to the conclusion that the darker the fruit, the sweeter its juice.


When I made these muffins I “wasted” the darker oranges on the juice that went into the batter. The ones I’d saved for the photographs looked like your boring, everyday run-of-the-mill orange. Go figure. The pigment of your orange will actually affect the final color of your muffin.

This recipe makes 1 dozen muffins.

Chocolate Chip Blood Orange Muffins

Ingredients:

  • 1 3/4 C flour
  • 1/2 C sugar
  • 1 1/2 tsp baking powder
  • 1 1/2 tsp baking soda
  • 1/4 tsp salt
  • zest of 3 blood oranges
  • 3/4 C chocolate chips
  • 2 eggs
  • 2/3 C fresh blood orange juice (3-4 oranges)
  • 1 stick  butter, melted
  • 1 tsp vanilla extract

Steps:

  1. Preheat oven to 400 degrees F. Line a muffin tin with liners.
  2. In a large bowl whisk together the flour, sugar, baking powder, baking soda, salt, and orange zest. Mix in the chocolate chips.
  3. In another bowl whisk together the eggs, juice, butter, and vanilla.
  4. Mix the wet ingredients into the dry ingredients. Divide batter among prepared muffin tin.
  5. Bake 20-25 minutes, or until a toothpick inserted comes out cleanly. Allow muffins to cool in the pan 5 minutes before removing to a cooling rack.

*This recipe is adapted from Tara at http://tarasmulticulturaltable.com/blood-orange-chocolate-chip-muffins/*

Chocolate Chip Blood Orange Muffins for #MuffinMonday from Sew You Think You Can Cook

And don’t forget to check out these other muffin recipes:

Banana Bread and Chocolate Muffins from Making Miracles

Grilled Cherry Muffins from Farm Fresh Feasts

Jamaican Me Hungry Muffins from A Day in the Life on the Farm

Margarita Sour Cream Muffins from Karen’s Kitchen Stories

Pancake Muffins from Passion Kneaded

Sweet Corn Muffins from Food Lust People Love

Kumquat Jam

I think my favorite thing about living in the Los Angeles area are the farmers markets. My son loves them, too! I have an adorable conversation saved on my phone of him saying “farmers market. blueberries. home. mouth.” I’m not sure what we’re going to do when berry season is over, he’s not yet two so “in season” is going to be quite a feat to explain.

While there is a farmers market across the street from our place every week, I had to take a trip to a larger one. Just to explore. There was more citrus at that location and I picked up some kumquats for my husband. Kumquats were one of the first “adventurous” items we picked up at the grocery store and he’s grown quite a fondness for them.

This particular batch was turned into jam! The resulting condiment has a bitter tartness. I think it’s the first time I’ve understood bitter as being a positive flavor component. The bitterness from the kumquat peels provides a balance with their natural sour edge.


Kumquat Jam

Ingredients:

  • 16 oz kumquats, sliced and seeds removed
  • 1 C sugar
  • 1/2 C orange juice
  • 1/2 C water
  • 1 tsp vanilla extract

Steps:

  1. Combine all ingredients in a large pot over medium heat. Bring to a boil and then reduce to a simmer. Simmer over medium-low heat for 35 minutes or until thickened, stirring frequently.

*This recipe is adapted from Nicole at http://wonkywonderful.com/kumquat-jam-recipe/*

Kumquat Jam  Sew You Think You Can Cook

Orange Ricotta Pancakes

orange ricotta pancakes 2  Sew You Think You Can CookI love finding new ways to use ricotta cheese. I almost always have leftover ricotta cheese whenever I cook with it, and that tub makes its way to the back of the fridge to be completely forgotten. Instead of letting that ricotta go to waste I add it to the weekend’s breakfast menu!

These pancakes were the first recipe we made from our favorite Brunch at Bobby’s. We served them with Almond Butter Syrup. Bobby suggested serving these pancakes with a fig compote and some pistachios.

Just like all breakfast sweets, Firecracker ate these up, so I loved getting the extra punch of protein from the ricotta.

*If you can find fresh ricotta, use that. However, allowing the more commonly found ricotta cheese to drain through a fine strainer for an hour is an acceptable substitute. (That’s definitely what I did!)

Orange Ricotta Pancakes

Ingredients:

  • 1 C fresh ricotta, or see note* above
  • 3/4 C milk
  • 3 eggs, separated
  • 1/2 tsp vanilla extract
  • zest of 1 orange
  • 3/4 C flour
  • 2 tbsp sugar
  • 1/2 tsp baking powder

Steps:

  1. In a bowl, whisk together the ricotta, milk, egg yolks, vanilla, and orange zest.
  2. In another large bowl, whisk together the flour, sugar, baking powder, and a pinch of salt.
  3. Using a handheld electric mixer, whip the egg whites until stiff peaks form.
  4. Combine the wet ingredients into the dry. Gently fold in the egg whites.
  5. On a hot buttered griddle drop 1/4 C of batter into pancakes. When bubbles form and start to pop flip the pancakes and cook until golden on both sides.

orange ricotta pancakes 1  Sew You Think You Can Cook

Disclaimer: This post contains affiliate links.

#handcraftededibles: Go Nuts

#handcraftededibles
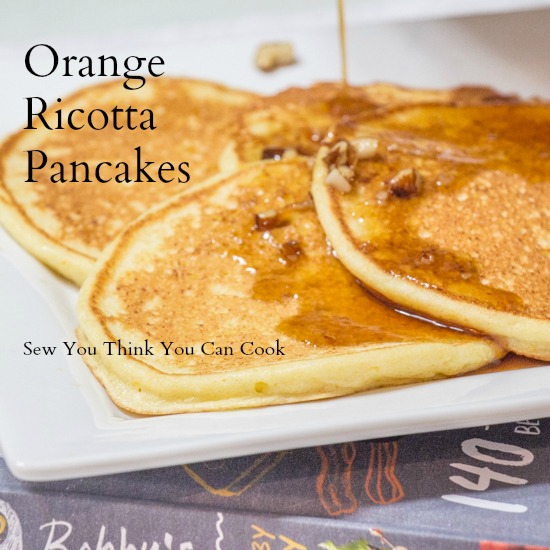
In an effort to make all of her holiday gifts this year, Camilla at Culinary Adventures with Camilla invited some of her favorite foodie bloggers to share recipes for hand-crated edibles. Over the course of twelve weeks, we’ll be sharing recipes for all your homemade holiday gifts. Hope you’ll follow along for inspiration. You can find out more information, including the schedule here.

Today’s theme is “Go Nuts”. Spiced and candied nuts or nut mixes make for perfect party food. Next time you’re invited to a holiday party, bring a pretty container full of flavored nuts to gift to the generous host.

I had a couple of recipes on the blog that would fit today’s theme, but I’ve decided to re-share my personal favorite, Orange Rosemary Roasted Almonds. These almonds are a great alternative to the popular traditional candied nuts and are guaranteed to wow your friends.

Orange Rosemary Roasted Almonds

Ingredients:

  • 4 C almonds
  • 6 tbsp sugar
  • 3 tbsp butter
  • 3 tbsp chopped fresh rosemary
  • 2 tbsp orange zest

Steps:

  1. Preheat oven to 400 degrees F. Line a baking sheet with aluminum foil.
  2. Place almonds on prepared baking sheet. Lightly spray with cooking spray and roast 10-15 minutes.
  3. In a small saucepan over medium heat melt together butter and sugar. Once the sugar is dissolved remove from  the heat and mix in the rosemary and orange zest.
  4. Toss roasted almonds and the butter mixture together in a large bowl. Spread nuts back out on baking sheet(s) to cool completely.

*This recipe is adapted from Christie at http://akitchenhoor.blogspot.com/2015/02/src-reveal-orange-and-rosemary-roasted.html*

Orange Rosemary Roasted Almonds | Sew You Think You Can Cook

To give nuts as a gift place them in a glass container and tie it with a bow along with the recipe! An entire gift basket of different nut flavors and varieties would be a great gift, too.

Here are some other options to fill your basket:

Next week – week 10 – check back for our recipes to inspire you as we let our confectioner’s skills shine. Think truffles, barks, anything
and everything with chocolate. Don’t forget to check out our #handcraftededibles pinterest board.

Orange Rosemary Roasted Almonds

Earlier this month I hosted our monthly Po-Ke-No game. Po-Ke-No is essentially bingo but instead of letter-number combinations, the board is filled with different playing cards and a standard deck of cards is used to call out the “tiles.”

Each month someone new hosts and gets to pick a theme for the night. We all bring $1 and a “Secret Santa” style $10 gift in a bag. We play through two rounds. In the first, the winner of each game picks a bag and shows everyone what’s inside. In the second round, the winner of each game gets to steal a gift of their choice. Each gift can only be stolen twice, making it effectively “owned” a total of three times. (Starbucks gift cards and cash are the first to be finished.) We play one more game for “all the marbles” aka that $1 buy-in.

While it’s not a requirement, I like to make my “Secret Santa” gift match the theme of the night. For example: for the theme of flowers I brought a flower silicone bowl cover (similar to this).

I chose the theme of citrus. I made a large batch of my Fresh Lemonade, these orange rosemary roasted almonds, and my Key Lime Cheesecake Filled Graham Cracker Bundt Cake. Everything was a success.

Orange Rosemary Roasted Almonds

Ingredients:

  • 4 C almonds
  • 6 tbsp sugar
  • 3 tbsp butter
  • 3 tbsp chopped fresh rosemary
  • 2 tbsp orange zest

Steps:

  1. Preheat oven to 400 degrees F. Line a baking sheet with aluminum foil.
  2. Place almonds on prepared baking sheet. Lightly spray with cooking spray and roast 10-15 minutes.
  3. In a small saucepan over medium heat melt together butter and sugar. Once the sugar is dissolved remove from  the heat and mix in the rosemary and orange zest.
  4. Toss roasted almonds and the butter mixture together in a large bowl. Spread nuts back out on baking sheet(s) to cool completely.

*This recipe is adapted from Christie at http://akitchenhoor.blogspot.com/2015/02/src-reveal-orange-and-rosemary-roasted.html*

Orange Rosemary Roasted Almonds | Sew You Think You Can Cook

Disclaimer: This post contains affiliate links.

Orange-Cardamom Roast Chicken

Until recently, my Food Network magazines have been within reach of my growing boy’s grasp. Once every week or so I’d find about 3-5 magazines sprawled across the floor, a few pages torn.

This mischievous talent of his does yield some delicious results though! I’ll sometimes find myself pouring over one of the editions again before returning it to it’s temporary home.

IMG_3924That’s how I found this recipe from Aarti in the March 2015 edition! I adjusted the recipe amounts to feed 2-3 people and instead of a whole chicken, I used 5 thighs as that’s what I had in my freezer. This juicy chicken was enjoyed by all in my family (the crispy skin was reserved for the adults).

Orange-Cardamom Roast Chicken

Ingredients:

  • 2 tbsp butter, softened
  • 1/2 tsp ground cardamom
  • 1 1/2 tsp orange zest
  • 1 1/2 tsp grated fresh ginger
  • 1 tsp minced garlic
  • 5 bone-in, skin-on chicken thighs
  • 4 Yukon gold potatoes, sliced
  • 1 tbsp vegetable oil

Steps:

  1. In a small bowl, combine butter, cardamom, orange zest, ginger, garlic, and S+P.
  2. Loosen the skin away from the meat of the chicken gently so as not to tear it. Using your fingers or a small spoon, place the butter evenly under the skin of each thigh. Pat chicken dry. Allow chicken to rest at room temperature for 30 minutes. (I opted to cover mine with plastic wrap during this time.)
  3. Toss the potato slices in the vegetable oil and season with S+P. Allow potatoes to rest for 25-30 minutes.
  4. Preheat oven to 500 degrees F.
  5. Drain potatoes and place them in an even layer in a cast iron skillet. Place the chicken on top of the potatoes. Cook for 40 minutes, rotating the skillet halfway through, until the skin is crispy and the chicken reaches an internal temperature of 165 degrees F.
  6. Allow chicken to rest for 10 minutes, covered with foil.
  7. Optional: place potatoes back in the oven for up to 5 minutes.

*This recipe is adapted from Aarti Sequeira*

Orange-Cardamom Roast Chicken  Sew You Think You Can Cook

Honey Orange Vinaigrette

I’m not sure I’ve mentioned this yet – but I have really loved spring and summer here in Ohio. (Despite Monday’s post complaining about the rain.) The weather barely gets above 90 degrees and the sun doesn’t set until 9! This extra sunlight has really taken a lot of pressure off me when it comes to preparing meals for the blog. And no snow on the ground means I can take my photos outside again!

IMG_3575This particular salad I made at the end of May when my little man was almost 11 months old. At this point he was an expert crawler and good at pulling himself up. His mobility skills allow me to bring him outside with me while I photograph food, which means I’m not putting it on the floor by the window and playing defense. It also means I don’t have to wait until nap time or for my husband to come home first!

I followed Renee’s suggestion and served this vinaigrette over a spinach salad with apples, shallots, and feta cheese.

Honey Orange Vinaigrette

Ingredients:

  • 1/3 C fresh orange juice
  • 1 tbsp honey
  • 1 tbsp apple cider vinegar
  • 1 1/2 tsp minced shallot
  • 1 tsp Dijon mustard
  • 1/2 tsp minced garlic
  • 2/3 C extra virgin olive oil

Steps:

  1. Place orange juice, honey, vinegar, shallot, mustard, and garlic in a small blender. Pulse until combined.
  2. While the blender is running slowly add the olive oil. Season to taste with S+P.
  3. Store in the fridge until ready to serve. Separation is normal, shake before using.

*This recipe is adapted from Renee at http://magnoliadays.com/2015/spinach-salad-honey-tangerine-dressing*

Honey Orange Vinaigrette | Sew You Think You Can Cook

#SundaySupper: Mother’s Day

It’s only fitting that today’s #SundaySupper is celebrating Mother’s Day. A big thank you to Camilla of Culinary Adventures with Camilla for “working” on this holiday to make sure the rest of us have our act together. Looking at the list of offerings today, most of us think of sweets when it comes to celebrating Mom. Be sure to scroll past my recipe to check them all out!

IMG_2338Today is my first Mother’s Day! I’ve always known I wanted to be a mom and so far it’s been everything I could have dreamed of and more! Everyday I am thankful to have the opportunity to stay home with my little man and watch him grow and learn.

When I tried to decide on what to make for today my mom told me to simply make something I like. Well that wasn’t very helpful – pizza, pasta, breakfast, Mexican? I decided on breakfast (I could eat breakfast any and every meal of the day) because when I think Mother’s Day, I think brunch.

When I think brunch, I think mimosas. I won’t be partaking in that alcoholic breakfast drink this year though because I am thrilled to finally announce that next year I’ll be celebrating today as a mother of two! That’s right, my little man will become a big brother in early November!

To celebrate the occasion I decided to turn the classic mimosa into a waffle!

Mimosa Waffles

Ingredients:

  • 1 1/2 C flour
  • 1 C white whole wheat flour
  • 2 tbsp sugar
  • 3 1/2 tsp baking powder
  • 2 eggs
  • 1/2 C vegetable oil
  • 3/4 C prosecco
  • 1 3/4 C milk
  • 1 1/4 tsp orange extract

Steps:

  1. In a large bowl whisk together all dry ingredients.
  2. In a separate bowl whisk together the wet ingredients.
  3. Combine wet and dry ingredients and pour into a hot waffle iron and cook until golden. Serve with whipped cream and fresh orange slices, if desired.

*This recipe is modified from my gingerbread man waffles*

mimosa waffles | sew you think you can cook

Celebratory Sips

Starters and Salads

Hearty Mains

Treats and Sweets

8387592742_f6164fd5a8_o

Join the #SundaySupper conversation on twitter on Sunday! We tweet throughout the day and share recipes from all over the world. Our weekly chat starts at 7:00 pm ET. Follow the#SundaySupper hashtag and remember to include it in your tweets to join in the chat. To get more great Sunday Supper Recipes, visit our website or check out our Pinterest board.

Would you like to join the Sunday Supper Movement? It’s easy. You can sign up by clicking here: Sunday Supper Movement.