#SundaySupper: Waffles!

I am so excited to be back blogging with the Sunday Supper Movement. My last post was the Regional Specialties themed day – OVER TWO MONTHS AGO! I have definitely missed being able to share the table with this great group of foodies.

As soon as the theme was revealed for today’s event, you know I couldn’t miss out on this one. Waffles! If you know me but at all you’d probably have reported a missing person had I not chimed in today. Thanks, Sue from A Palatable Pastime, for hosting today’s event at a time in my life when I could finally participate in #SundaySupper. I know you did it just for me and not because National Waffle Iron Day is Wednesday. 😉 Be sure to scroll past my recipe for a collection of over 35 waffles recipes.

Having made just a few waffles in my day, I decided to throw caution to the wind and make my own waffle. I did it “by feel” and needed to adjust my flour amount before I was comfortable with the batter. I’m happy to report that my waffles worked out, and my creative flavor combination wasn’t a failure.

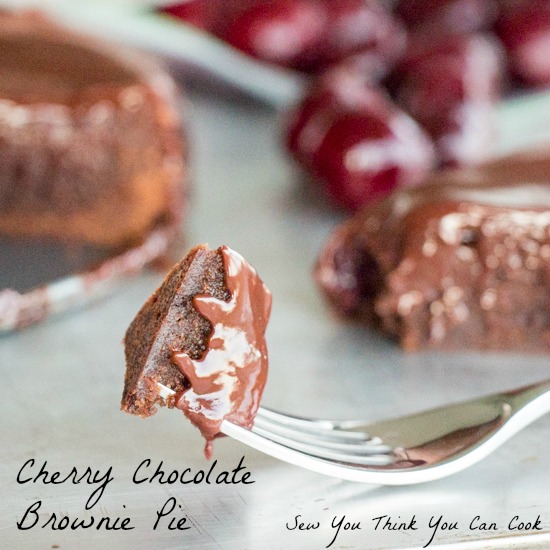
I love pairing cherries with chocolate, so those hand picked cherries of ours found their way into my waffles. As sometimes the only way to get Firecracker to eat is by way of waffle or pancake, I knew I had to throw something nutritious in there. That’s where the beets come in. I was going to roast them and toss them in a smoothie, but this way was easier.

An Original Recipe

Chocolate Cherry Beet Waffles

Ingredients:

  • 1 1/4 C flour
  • 3/4 C whole wheat flour
  • 1/4 C cocoa powder
  • 1/4 C sugar
  • 1 tbsp baking powder
  • 1/2 tsp salt
  • 1/4 tsp baking soda
  • 2 eggs
  • 2 C milk
  • 1/3 C vegetable oil
  • 1 tsp vanilla extract
  • 3/4 C shredded beets, patted dry
  • 2 C fresh cherries, pitted and chopped
  • whipped cream for serving (optional)

Steps:

  1. In a large bowl, whisk together the flours, cocoa powder, sugar, baking powder, salt, and baking soda.
  2. In another bowl, whisk together the eggs, milk, oil, and vanilla.
  3. Mix the wet ingredients into the dry ingredients. Fold in the beets and cherries.
  4. Into a hot greased waffle iron, drop 1/3 C of batter and cook until browned. Serve with whipped cream.

Chocolate Cherry Beet Waffles for #SundaySupper from Sew You Think You Can Cook

Sweet and Sinful:

Savory Brinner Winners:

Sunday Supper MovementJoin the #SundaySupper conversation on twitter on Sunday! We tweet throughout the day and share recipes from all over the world. Our weekly chat starts at 7:00 pm ET. Follow the #SundaySupper hashtag and remember to include it in your tweets to join in the chat. To get more great Sunday Supper Recipes, visit our website or check out our Pinterest board.

Would you like to join the Sunday Supper Movement? It’s easy. You can sign up by clicking here: Sunday Supper Movement

SRC: Double Chocolate Cookies

newsrcbanner

It’s Secret Recipe Club Reveal Day! In the Secret Recipe Club, each participating blogger is assigned a blog from another participating blogger and secretly searches their site for something to recreate. The accompanying blog post then goes live on reveal day! So while I was immersed in my assigned blog, someone else was picking through mine! I’m so excited to be part of this group, to see what on my blog peaks other’s interests and to stumble upon new blogs and new recipes.

It’s actually a miracle I’m even posting with The Secret Recipe Club today! We moved to California from Ohio last month and I felt quite confident that skipping out of April’s SRC reveal day would be the only break necessary to get through the travel.

I had no problem selecting and making my dish for today’s reveal, but I did have a problem blogging it! We got the keys to our new home April 16th, moved in April 18th, and received delivery of our goods on April 19th. I’m supposed to get internet installed today. Hopefully that happens. It’ll be a while before I get a chance to stop by and check out all of the other SRC posts today, but you can see them via the link at the bottom of my post.

Everything I’ve been doing has been via mobile, except for the rare occurrences when I was able to get away from the boys and sit at a coffee shop with wifi. I actually never left the house, if I had to drive, without my computer so I could at least type up blog posts (this one included) in Word so that when I did get a moment of internet bliss I could quickly and efficiently schedule some posts!

We met a few of our neighbors after moving in and one of them generously and thoughtfully brought over a 6 pack of beers from local breweries that he put together. I knew I’d be searching through my assigned blog, Dessert Before Dinner written by Stephanie, for a thank you treat. The Jalapeno Beer Cheese Bread caught my eye, but it was another SRC post. I knew everyone loves cookies so I decided on her White Chocolate Chunk Chocolate Cookies. I put most of the cookies in a large mason jar and tied it with a bow. It’s a good thing I did, too, because I found these cookies to be insanely addictive. I definitely broke my “only two cookies at a time” rule and even sneaked one for breakfast the following morning.

Double Chocolate Cookies for Secret Recipe Club from Sew You Think You Can Cook (1)

This recipe makes 18-20 cookies.

Double Chocolate Cookies

Ingredients:

  • 1 stick butter, softened
  • 1/3 C sugar
  • 1/3 C brown sugar
  • 1 egg
  • 1 tsp vanilla
  • 1 C flour
  • 1/4 C + 2 tbsp cocoa powder
  • 1/2 tsp baking soda
  • 1/4 tsp salt
  • 3/4 C white chocolate chips

Steps:

  1. Preheat oven to 350 degrees F.
  2. In the bowl of a stand mixer fitted with the paddle attachment, cream together the butter and both sugars until fluffy.
  3. Add the egg and vanilla and mix until combined.
  4. In a bowl, whisk together the flour, cocoa powder, baking soda, and salt. Add to the stand mixer and mix until combined. Fold in the white chocolate chips until evenly distributed in the dough.
  5. Drop spoonfuls of the cookie dough onto two baking sheets. Bake 10-13 minutes. Allow cookies to cool 5 minutes on the pan before removing to a cooling rack.

*This recipe is adapted from Stephanie at http://dessert-before-dinner.blogspot.com/2011/07/white-chocolate-chunk-chocolate-cookies.html*

Double Chocolate Cookies for #SecretRecipeClub from Sew You Think You Can Cook (2)

To see the other bloggers who participated in the Secret Recipe Club this month click here:

SRC: Cappuccino Crinkle Cookies

newsrcbanner

It’s Secret Recipe Club Reveal Day! In the Secret Recipe Club, each participating blogger is assigned a blog from another participating blogger and secretly searches their site for something to recreate. The accompanying blog post then goes live on reveal day! So while I was immersed in my assigned blog, someone else was picking through mine! I’m so excited to be part of this group, to see what on my blog peaks other’s interests and to stumble upon new blogs and new recipes.

This month I was assigned the blog Cook with Sara. To say I enjoyed this blog written by a fellow Midwesterner is an understatement. My secret Pinterest board has over 20 recipes on it, from Cherry Bread and Pineapple Sorbet to Creamy Brussels Sprouts Dip and Beef and Asparagus Stir Fry. I couldn’t decide if I wanted breakfast, dinner, a snack, or dessert. Everything looked so good! Not to mention Sara cooks with every day ingredients, making my decision process that much more difficult.

And that’s before I even got through her entire recipe index! While I was perusing Sara’s blog I received a request for cookies. My husband will be graduating with his Masters Degree in Systems Engineering this week! The spouse organization wanted to provide cookies to all of the professors who helped support our husbands. Of course I signed up to help out! But what to bake? I have two separate cookie cookbooks but it seemed like a much better idea to see what Sara had cooking in the blogosphere. I was on the hunt to try and empty out my carton of cocoa powder before the move next week. These Cappuccino Crinkle Cookies were just the ticket! I just had to wait for naptime to bake them and photograph them because there’s no way my toddler needs a chocolate cookie filled with caffeine! But do you know who does need cookies studded with caffeine? Parents and teachers!

This recipe makes approximately 30 cookies.

Cappuccino Crinkle Cookies

Ingredients:

  • 1/3 C butter, at room temperature
  • 1 C brown sugar
  • 2/3 C cocoa powder
  • 1 tbsp espresso powder
  • 1 tsp baking soda
  • 1 tsp cinnamon
  • 2 egg whites
  • 1/3 C buttermilk
  • 1 1/2 C flour
  • 1/4 – 1/2 C sugar, for rolling

Steps:

  1. In the bowl of  a stand mixer fitted with the paddle attachment, bet the butter until smooth. Mix in the brown sugar, cocoa powder, espresso, baking soda, and cinnamon. Beat until combined.
  2. Add in the egg whites and buttermilk until fully incorporated. Add in the flour until the dough comes together.
  3. Wrap the dough in plastic wrap and chill in the fridge for at least 30 minutes.
  4. Preheat oven to 350 degrees F.
  5. Place sugar in a bowl. Drop heaping teaspoons of cookie dough into the sugar. Roll the dough into balls and then roll the balls in the sugar again. Place on an ungreased cookie sheet and bake 8-11 minutes until the edges are firm and the cookies have crackled. Transfer cookies to a cooling rack.

*This recipe is adapted from Sara at http://cookwithsara.blogspot.com/2012/06/cappuccino-crinkles.html*

cappuccino crinkle cookies for Secret Recipe Club from Sew You Think You Can Cook

To see the other bloggers who participated in the Secret Recipe Club this month click here:

#SRC: Pot o’ Gold Cookies

newsrcbanner

Good morning and welcome to another edition of The Secret Recipe Club. For a little “behind the scenes” information, The Secret Recipe Club (SRC) is divided into four group. Each group posts on a different Monday of the month. I am in Group C and always post on the 3rd Monday of the month. Which meant that during those special months with five Mondays there’d be a week without any fun reveal day! So now, on the 5th Monday of the month there is a themed reveal and it’s a “free for all,” which means that there aren’t any group restrictions. I’m looking forward to getting to know some of the other bloggers in the club.

Who would have thought that February would ever have 5 Mondays in it!? Happy Leap Day, everyone! As it’s the last day of February the Secret Recipe Club is looking into March for inspiration. Leprechauns and Bunnies was the assignment as St. Patrick’s Day has to share its month with Easter  this year.

I don’t think I could have asked for a better assignment this month! Making Memories with your Kids has an incredible index of holiday foods and crafts. Erin is a single mom to two kids who are most definitely making memories together through baking and crafting. Her blog is such a great resource of ideas!

Her sloppy Joe baskets would work for either holiday, really. Erin made them as “Easter baskets” but they could easily be a “pot of gold,” too.

While I don’t care much for St. Patrick’s Day (especially now that I don’t live near Kate anymore) I decided to make her Pot o’ Gold Cookies instead of her Chocolate Peep Sugar Cookies simply because the former were simple and used ingredients I already had. I did take some liberty in forming a few as Easter eggs and decorating with purple sprinkles, but you’ll notice they’re not photographed. They weren’t very pretty; to make them like Easter eggs definitely use white chocolate instead!

Forming Pot O' Gold Cookies with Grandma  Sew You Think You Can Cook

These shortbread cookies were a huge hit! My mother-in-law helped make them and showed Firecracker how to roll the dough into balls. He wasn’t particularly interested and instead preferred to “Hulk smash” the balls. Until he discovered the deliciousness of the dough! It’s egg-free so I had no problems with letting him try it, though once I realized he was eating it I had to clear most off of his table to prevent a sugar rush!

If I hadn’t put these cookies in a bag they wouldn’t have lasted through the evening. They’re addicting! Luckily the “impenetrable” barrier of a resealable bag (and a trip to Graeter’s ice cream) kept them safe so I could share them with friends.

Pot O’ Gold Cookies

Ingredients:

  • 2 sticks butter, at room temperature
  • 1/2 C powdered sugar
  • 1 tsp almond extract
  • 2 1/4 C flour
  • 1/4 tsp salt
  • 1 C milk chocolate chips
  • yellow or gold sprinkles

Steps:

  1. Preheat oven to 400 degrees F.
  2. In the bowl of a stand mixer fitted with the paddle attachment, beat together the butter, sugar, and almond extract. Mix in the flour until it starts to combine. Turn dough out onto a flat surface and knead until smooth and combined.
  3. Roll dough into 1″ balls. Bake on an ungreased cookie sheet for 11 minutes, until the edges are lightly golden. Allow cookies to cool completely on the cookie sheet.
  4. Melt chocolate in a double boiler or the microwave. Spoon chocolate over the cookies and top with sprinkles. Allow chocolate to set before serving.

*This recipe is adapted from Erin at http://makingmemorieswithyourkids.com/2015/03/pot-of-gold-meltaway-cookies/*

Pot O' Gold Cookies for Secret Recipe Club from Sew You Think You Can Cook

I didn’t wait for the chocolate to set before photographing… Firecracker doesn’t like sticky things, he wasn’t quite sure what to do!

Pot O' Gold Cookies, not yet set  Sew You Think You Can Cook

To see the other bloggers who participated in the themed Secret Recipe Club this month click here:

#SundaySupper: Pies, Sweet and Savory

Did you know that February is Pie Month? Well, if you followed along with my #FoodieExtravaganza post at the beginning of the month you probably did!

Today’s Sunday Supper is all about pies. Any kind of pie is fair game, too! Normally I’d be hopping on the savory side of the fence in events like this one, but not this time! Gasp! Today I am sharing a sweet pie. And it’s very sweet at that!

There are over 60 pies so be sure to scroll past my recipe. Thank you to Erica of The Crumby Cupcake for hosting today.

Cherry Chocolate Brownie Pie, to be exact. This pie is made in a spring form pan for easy serving. The base of the pie is a rich and chocolaty brownie, it is then studded with cherries, and topped with a luscious ganache.

I used frozen, pitted cherries which I halved and laid along the top of the batter in concentric circles. There’s almond extract in the batter, too, which compliments the cherry flavor beautifully! And that ganache! It definitely takes this pie over the top. Any extra ganache pairs beautifully with some fresh strawberries, too.

Cherry Chocolate Brownie Pie

Ingredients:

  • 2/3 C butter, at room temperature
  • 1 1/4 C sugar
  • 1/2 C corn syrup
  • 2 eggs
  • 1 1/4 C flour
  • 1/2 C cocoa powder
  • 1/2 tsp salt
  • 3 tbsp milk
  • 1 tsp almond extract
  • 2 C cherries, pitted and halved (thawed if using frozen)
  • 1 C heavy cream
  • 8 oz semisweet chocolate chips

Steps:

  1. Preheat oven to 325 degrees F. Grease a spring form pan.
  2. In the bowl of a stand mixer fitted with the paddle attachment, beat together the butter and sugar until fluffy. Add in the corn syrup. Add the eggs, one at a time. Add in the almond extract.
  3. In a bowl, whisk together the flour, cocoa powder, and salt.
  4. Add 1/3 of the dry ingredients to the batter followed by 1 tbsp milk. Repeat the process until the dry ingredients and the milk are incorporated.
  5. Pour batter into prepared spring form pan. Top with cherries. Bake 45 minutes, or until a toothpick inserted comes out cleanly. Allow cake to cool completely. Remove the pie from the pan.
  6. Make the ganache: bring heavy cream to a low simmer, remove from the heat, and pour over the chocolate chips. Whisk until chocolate is melted and smooth. Pour over the pie base, allowing the ganache to drip down the sides of the pie.
  7. Refrigerate until set.

*This recipe is adapted from Danelle at http://www.letsdishrecipes.com/2014/08/chocolate-cherry-brownie-pie.html*

Cherry Chocolate Brownie Pie for #SundaySupper from Sew You Think You Can Cook
Sweet As Pie

Mealtime Pie

Plus

8387592742_f6164fd5a8_oJoin the #SundaySupper conversation on twitter on Sunday! We tweet throughout the day and share recipes from all over the world. Our weekly chat starts at 7:00 pm ET. Follow the#SundaySupper hashtag and remember to include it in your tweets to join in the chat. To get more great Sunday Supper Recipes, visit our website or check out our Pinterest board.

Would you like to join the Sunday Supper Movement? It’s easy. You can sign up by clicking here: Sunday Supper Movement.

Chocoholic Waffles

Valentine’s Day is this weekend (Sunday to be exact) and I have the perfect brunch to share with your loved ones – unless they don’t like chocolate. Every component of this recipe involves chocolate! There’s chocolate waffles, which are quite good on their own but it’s Valentine’s Day people, step it up. Then there’s a white chocolate custard, and to top that off there’s a mocha whipped cream! All three components compliment each other beautifully.

I am an admittedly lazy cook and seriously thought about not making the custard. But I couldn’t. Because, Bobby Flay. Yep, surprise! Yet another brunch recipe from one of our favorite celebrity chefs! This particular recipe is one we watched on Cooking Channel last year. It comes from the Brunch at Bobby’s episode titled Chocoholic Brunch.

Chocolate Waffles

Ingredients:

  • 2 C flour
  • 1/2 C cocoa powder
  • 2 tsp baking powder
  • 1 tsp baking soda
  • 1/4 tsp salt
  • 3 eggs, separated
  • 1/4 C brown sugar
  • 2 C buttermilk
  • 1/4 C canola oil
  • 1 tsp vanilla extract
  • 1/2 stick butter, melted
  • 3 oz semi-sweet chocolate, chopped

Steps:

  1. In a large bowl, whisk together the flour, cocoa powder, baking powder, baking soda, and salt.
  2. Whisk the egg yolks with the brown sugar until smooth. Add in the buttermilk, oil, and vanilla.
  3. Combine wet ingredients into the dry ingredients. Mix in the butter and the chocolate.
  4. Whip the egg whites until stiff peaks form. Gently fold into the waffles batter.
  5. Into a hot greased waffle iron, drop 1/3 C of batter and cook until browned.
  6. Assemble waffles with custard, whipped cream, and fresh strawberries.

White Chocolate Custard

Ingredients:

  • 1/2 vanilla bean, halved
  • 1 1/2 C half-and-half
  • 4 egg yolks
  • 2 tbsp sugar
  • 3 oz white chocolate, chopped

Steps:

  1. Scrape the seeds from the vanilla bean. Put the seeds and the pod in a small saucepan with the half-and-half. Bring to a simmer over medium heat, remove from the heat, and let cool.
  2. Whisk the egg yolks and sugar until pale yellow. Slowly add some of the half-and-half until smooth. Whisking, add to the pot of remaining half-and-half and return to the stove. Cook over medium heat without allowing it to boil, stirring with a wooden spoon, until the custard thickens enough to coat the spoon.
  3. Remove from the heat and whisk in the white chocolate until melted.
  4. Strain and refrigerate.

Mocha Whipped Cream

Ingredients:

  • 1 C heavy cream
  • 3 tbsp dark chocolate covered cacao nibs (I used Pacari)
  • 2 tbsp powdered sugar
  • 1/2 tsp vanilla extract
  • 1/2 tsp espresso powder

Steps:

  1. In a small saucepan over medium heat, bring heavy cream and cacao nibs to a simmer. Remove from heat and allow to cool. Place in a glass bowl, cover with plastic wrap, and place in the fridge overnight.
  2. Strain the cold cream and discard the nibs.
  3. Using a hand mixer, beat the cream until thickened. Add the powdered sugar, vanilla, and espresso powder. Beat until firm peaks form.

*These recipes are adapted from Bobby Flay at http://www.cookingchanneltv.com/recipes/bobby-flay/dark-chocolate-waffles-with-white-chocolate-custard-sauce-and-chocolate-espresso-whipped-cream.html*

chocoholic waffles chocolate waffles, white chocolate custard, mocha whipped cream  Sew You Think You Can Cook

A “Date Night” Potluck Party

We had our final Recipe Club meeting last week. With most of us moving in the next couple of months the group looks like it’s fizzled to a stop. I had a great time with these ladies and met my best friend up here (and Firecracker’s best friend, too!) through this group and I am forever grateful. I couldn’t have imagined this assignment here in Ohio without these fabulous ladies and the clubs and groups that I joined while here.

For our last meeting I suggested “Date Night” as a theme, taking a cue from the holiday this Sunday. We had a very small gathering, only six of us! (There are seven items listed below because I brought two dishes.) I wasn’t surprised by the small turn out as most of our husbands are in hunker down mode finishing up their theses..thesii? I know I can’t wait for thesis defense to happen and the stress level in our life go down just a tad. So it’s no surprise that there was a good deal of chocolate on the menu during out meeting!

Date Night Recipe Round UpHere are the recipes that were brought to the “Date Night” potluck”

Homemade “Kit Kat Bars”

Before I get into today’s recipe I feel compelled to explain why I put “Kit Kat Bars” in quotations. It’s for the same reason these don’t get the tag “Copy Cat.” The Kit Kat you buy in the red wrapper does not contain nuts, this homemade version gets its goodness from Nutella. But seriously, have you ever actually smelled Nutella? And have you ever smelled a Kit Kat? Samesies!

There are a lot of “copy cat” Kit Kat recipes out on Pinterest that use a wafer cookie for the filling. This recipe uses Nutella and crushed corn flakes to get that wafer effect and it’s delicious! We could just eat that filling and forget about the chocolate. I would suggest using whatever chocolate quality you prefer, I used bittersweet chocolate.

Stuart pointed out that this recipe would work much better as truffles, forming that filling into balls and then dipping into the chocolate as my chocolate to filling ratio was way off. (User error though – I’m sure the recipe is fine.) Another option would be to make half the chocolate and spread that out, let it set, then make the filling, and top it off with the rest of the chocolate for a more traditional “sandwiched” Kit Kat Bar.

Much like the Reese’s Cups from yesterday, these melt so are best kept in the fridge. And they actually taste better the next day(s)! My husband has banned me from making them again, because you open the fridge, you see a tray of Kit Kat Bars staring at you, so naturally you have to take one. Happy Halloween, right?

Homemade “Kit Kat Bars”

Ingredients:

  • 1 oz semi-sweet chocolate chips (a scant 1/4 C)
  • 1 tbsp butter
  • 3/4 C Nutella
  • 2 C crushed corn flakes (3-4 C whole)
  • 12 oz bittersweet chocolate, broken
  • 1 3/4 C heavy cream

Steps:

  1. Melt chocolate chips and 1 tbsp butter over a double boiler. Remove from heat and mix in the Nutella. Allow the mixture to cool slightly before stirring in the corn flakes. Spread mixture onto a 9×13″ baking sheet. Set in the fridge.
  2. Melt chocolate into heavy cream over a double boiler. Pour over Kit Kat Bar filling. Set in fridge until firm. Cut into bars.

*This recipe is adapted from Balaboosta by Einat Admony*

Homemade Kit Kat Bars | Sew You Think You Can Cook

Disclaimer: This post contains affiliate links.

Copy Cat: Reese’s Cups

I can’t have a candy week without including the most popular piece of candy – Reese’s.

That chocolate and peanut butter combination has become a winning recipe in everything from cakes to ice cream.

Reese’s has been one of those candies I thought would be easiest to make as there isn’t any boiling of sugar involved. I couldn’t have been more right! Although slightly tedious, this was a chocolate product I managed to do without supervision.

I had enough chocolate to make 24 Reese’s cups – thank heavens for the invention of the spatula because I scraped that bowl clean to cover that final piece of candy. I had enough peanut butter to make probably 10-15 more chocolate peanut butter cups. (I saved that peanut butter filling for mixing into brownie batter – because, why not!?)

I was quite nervous that despite spraying them I wouldn’t be able to pull the candies out of the cupcake liners. I had nothing to fear and these tasted just like the real thing- maybe better!

Without the added chemistry type ingredients, these babies melt fairly quickly, so I suggest storing them in the fridge.

Copy Cat: Reese’s Cups

Ingredients:

  • 1 bag (11.5 oz) milk chocolate chips (you could use dark or white chocolate if you prefer)
  • 1 jar (10 oz) creamy peanut butter
  • 3/4 C + 2 tbsp powdered sugar
  • 2-3 tbsp melted butter

Steps:

  1. Line a mini muffin tray with mini cupcake liners. Lightly spray with cooking spray.
  2. Melt chocolate over a double boiler.
  3. Spoon chocolate into liners and spread it up the sides. Place tray in the fridge for 10 minutes.
  4. In a large bowl mix peanut butter, powdered sugar, and butter with a hand mixer until smooth. Place in a piping bag. Pipe peanut butter mixture into chocolate lined cups. Flatten with spoon or finger.
  5. Top peanut butter filled cups with remaining melted chocolate.
  6. Chill at least 1 hour.

*This recipe is adapted from Jillee at http://www.onegoodthingbyjillee.com/2012/04/homemade-reeses-peanut-butter-cups.html

Copy Cat: Reese's Cups | Sew You Think You Can Cook

Copy Cat: Snickers

It’s Halloween week and that means I’ve got a theme. My very first Halloween blogging I did a week of Candy Corn inspired recipes and posts, including a pillow cover and pizza. The following year ghosts hit the scene so pancakes and cookies were created in adorable ghostly shapes.

I toyed with the idea of mummies, Frankenstein’s monster, or pumpkins this year but the opportunity to make candy couldn’t be surpassed. It was time to face my chocolate and sugar fears and try making trick-or-treat favorites at home. For the these 4 days I’ll be sharing some sweet treats all made from scratch!

To kick off “candy week” I am sharing a Copy Cat recipe for Snickers! And it was much easier than I ever thought it would be. I was definitely doing a happy dance after taking my first bite of homemade candy bar. It actually tastes like the real thing! I was nervous that the amount of chocolate looked too thin, but the ratios of chocolate to nougat and caramel is perfect!

This recipe makes a 9×13″ pan of layered goodness. That’s a cake’s worth of candy bars people! I hope you have friends to share these with. Throughout my weeks of candy making I’ve realized that homemade chocolate candy bars melt/soften fairly quickly and are best kept in the fridge. Keep that in mind if you plan on gifting some homemade candy – don’t leave it on someone’s doorstep… unless there’s a lot of snow and cold to keep the candy from turning into a delicious mess.

Copy Cat: Snickers

Ingredients:

  • 2 1/2 C milk chocolate chips, divided use
  • 3/4 C creamy peanut butter, divided use
  • 1/2 stick butter
  • 1 C sugar
  • 1/4 C evaporated milk
  • 1 container (13 oz) marshmallow creme
  • 1 tsp vanilla extract
  • 1 1/2 C roughly chopped salted peanuts
  • 14 oz caramel squares, unwrapped
  • 1/4 C heavy cream

Steps:

  1. Line a 9×13″ cake pan with foil. Spray with non-stick cooking spray.
  2. In a microwave safe bowl, combine 1 1/4 C chocolate chips and 1/4 C peanut butter. Microwave 50-60 seconds, stirring every 20 seconds, or until completely melted and smooth. Evenly spread mixture into prepared cake pan. Place in fridge.
  3. In a large saucepan over medium heat melt butter. Add the sugar and evaporated milk. Stir and bring to a gentle boil. Cook 4-5 minutes, stirring occasionally to prevent the mixture from burning. Add in the marshmallow creme, 1/4 C peanut butter, and the vanilla extract. Stir until smooth. Remove from heat and fold in the chopped peanuts. Evenly spread the nougat over the chocolate layer. Return to fridge.
  4. In a microwave safe bowl, combine caramels and heavy cream. Microwave 2 minutes, stirring every 30 seconds, or until completely melted and smooth. Evenly spread caramel over the nougat layer. Return to fridge.
  5. In a microwave safe bowl, combine 1 1/4 C chocolate chips and 1/4 C peanut butter. Microwave 50-60 seconds, stirring every 20 seconds, or until completely melted and smooth. Evenly spread mixture over the caramel layer.
  6. Return to fridge and chill until completely set. Cut into bars.

*This recipe is adapted from Alyssa at http://therecipecritic.com/2013/11/homemade-snickers-bars/*

Copy Cat Snickers | Sew You Think You Can Cook