Blog-iversary

1yrToday is my blog’s anniversary! I can’t believe it’s been a year.  In my first year I have gained 132 followers and 113 Facebook friends. I’ve really enjoyed blogging. I will admit that I hit a spell in my first trimester of pregnancy when I was questioning my desire to continue with Sew You Think You Can Cook. Blame the hormones and exhaustion.

But I’m glad I stuck it out. I’ve met some great bloggers through The Crazy Ingredient Challenge, #BundtBakers, and Secret Recipe Club. I think joining in these link parties has brought me the most joy. It’s been nice to expand my horizons and get creative in the kitchen. In fact, I just joined another group – Foodie Extravaganza!

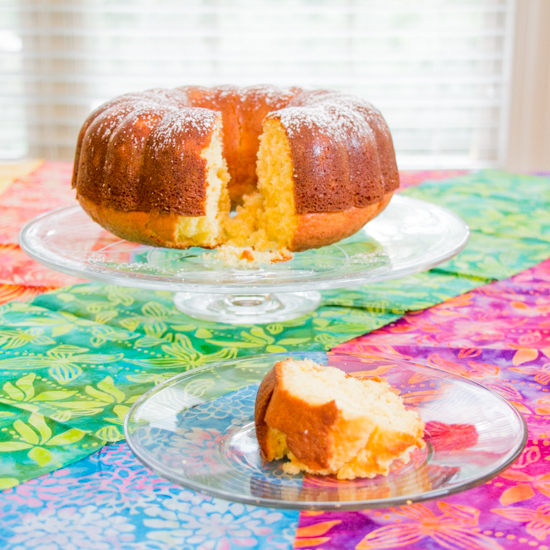
For my blog-iversary I decided to try something that’s always intrigued me. Using olive oil in baking. These cupcakes are beautiful – The olive oil gave them a nice golden color and the edges had a little bit of crisp to them which I adored. They’re not overly sweet so the cream cheese frosting accompanied them perfectly. I typically find icing to push cake over the top on sweetness level. I brought them to work and they were gone before lunch!

Olive Oil Cupcakes

Ingredients for cupcakes:

  • 1 1/4 C cake flour
  • 1 C sugar
  • 1/4 tsp salt
  • 1 tsp baking powder
  • 6 tbsp olive oil
  • 1 tsp vanilla extract
  • 2 eggs
  • 1/4 C sour cream
  • 1/4 C milk

Ingredients for frosting:

  • 1 stick butter, softened
  • 4 oz cream cheese, softened
  • 2 C powdered sugar

Steps:

  1. Preheat oven to 350 degrees F. Grease a cupcake tin, or line with cupcake liners.
  2. In the bowl of a stand mixer mix the flour, sugar, salt, and baking powder. Add the olive oil and vanilla and beat until combined. Add the eggs one at a time, until fully incorporated. Add the sour cream until combined. Add the milk. Mix until batter is smooth.
  3. Place cupcake batter into prepared cupcake tin. Bake 25-30 minutes, or until a toothpick comes out clean. Allow cupcakes to cool.
  4. Make the frosting: Cream together butter and cream cheese. Add the powdered sugar in two installments. Beat until smooth. Add milk 1/4 tsp at a time if needed (I didn’t need it).

*This recipe is adapted from Brita at http://www.bakingisascience.com/lemon-lime-olive-oil-cupcakes/*

Olive Oil Cupcakes

Guest Post: Grilled Marinated Chicken with Tomato-Fruit Salsa

I am very excited to feature my first guest post on Sew You Think You Can Cook! This post is brought to you on behalf of Hunt’s by Julia. Her recipe is perfect for summer and the grilling season. Enjoy! -Lauren

When I think of summer I think of dinners out on the back porch with food fresh off the grill.   While there will always be a soft spot in my heart for hot dogs and burgers, my favorite grill-able is chicken breast simply because of the huge range of flavor possibilities.  Thanks to the science of marinating, there is a chicken breast for every taste, so preparing a light dinner for a picky family is a snap.

This grilled chicken recipe was a hit for my entire family, including my preteen who has recently become “too cool” to enjoy his mom’s cooking.  The marinade kept the chicken from becoming dry, and the tomato-fruit salsa on top added a unique dimension of flavor that really took the edge off a hot summer night.

Grilled Chicken with Tomato-Fruit Salsa

 Grilled Marinated Chicken with Tomato-Fruit Salsa

 Ingredients for Chicken:

  • 1/4 cup Hunt’s® Tomato Ketchup
  • 1/4 cup Worcestershire sauce
  • 1/4 cup white wine vinegar
  • 1/4 cup honey
  • 2 tbsp light soy sauce
  • 2 cloves garlic, finely chopped
  • 6 boneless skinless chicken breast halves
  • PAM® Grilling Spray

Ingredients for Salsa:

  • 1 can (14.5oz each) Hunt’s® Petite Diced Tomatoes, drained
  • 1 cup finely chopped fresh pineapple
  • 1/4 cup finely chopped red onion
  • 1 tablespoon chopped fresh cilantro

Steps:

  1. Combine ketchup, Worcestershire sauce, vinegar, honey, soy sauce and garlic in large resealable plastic bag; blend well. Pound chicken with meat mallet to even out thickness for more even cooking. Add chicken to bag; seal. Turn to coat evenly with ketchup marinade. Refrigerate 2 hours or overnight.
  2. Remove chicken from bag; discard marinade.
  3. Combine drained tomatoes, pineapple, onion and cilantro in small bowl; set aside.
  4. Spray cold grill and utensils with grilling spray. Preheat grill to medium heat.
  5. Grill chicken about 10 minutes or until no longer pink in center (165°F), turning once. Serve chicken with salsa.

Pro Tips:

  • If you don’t want to us a grill, this chicken can also be cooked in a non-stick skillet over medium heat.  As always with chicken, be sure to cook all the way through until no longer pink in center (165°F).
  • Pineapple can be substituted for other favorite tropical fruits, like mango or papaya (or a combination!)

Author Bio: This is a guest post by Julia S. on behalf of Hunt’s. Visit our site at www.hunts.com to find tomato recipes, chili recipes, and easy meatloaf recipes.

Ginger Molasses Cookies

There are a lot of theories about foods to induce labor and while I don’t believe in any of them I’ve still used them as a nice excuse to indulge in hot wings.

And cookies.

A google search led me to a recipe for “labor inducing cookies” which are really gingersnaps with some cayenne. Except that I forgot to add the cayenne. I mean, really!? But, now I have a post perfect for National Gingersnap Day.

Quick question: Why is gingersnap day in July? Are we trying to go with the “Christmas in July” feel? The batter smelled like Thanksgiving to me!

These cookies are rich with molasses and spicy with ginger. (If you want to try to put someone into labor add the 1/2 tsp of cayenne I forgot about.)

Ginger Molasses Cookies

Ingredients:

  • 1 stick butter
  • 1/2 C sugar, plus extra for rolling cookies
  • 1 C brown sugar
  • 1/3 C molasses
  • 2 egg whites
  • 2 1/2 C flour
  • 1 1/2 tsp baking soda
  • 3/4 tsp cinnamon
  • 1 tsp ground ginger
  • 1/2 tsp ground cloves
  • 1/2 tsp salt

Steps:

  1. Preheat oven to 350 degrees F.
  2. In the bowl of a stand mixer fitted with the paddle attachment beat butter and sugars. When combined add the molasses. Add the egg whites.
  3. In a bowl whisk together the flour, baking soda, spices, and salt.
  4. Add dry ingredients to the butter and molasses mixture in two installments.
  5. Roll dough into 1″ balls. Roll balls in sugar. Place on a parchment paper lined baking sheet. Bake 10-12 minutes. Allow cookies to cool on the baking sheet.

*This recipe is adapted from http://www.justmommies.com/pregnancy/labor-and-childbirth/labor-inducing-cookie-recipe*

Ginger Molasses Cookies

P.S. – They didn’t work. Neither did spicy foods. Or pineapple.


Hummus Tostadas

A couple of weekends ago we went to the Destin Harbor Farmer’s Market. It was a small market with some beautiful selections. I love going to farmer’s markets because my “artistic” camera self comes out. The vibrancy of fresh produce makes me happy and I love taking close ups of the fruits on display.

Destin Harbor Farmer's Market

It was sweat-dripping hot that morning, and one of the venders definitely profited from the weather. Her Swell Pops hit the spot. Stuart got the Vanilla Bean and I enjoyed a Strawberry Balsamic.

Swell Pops

Across the way was The Greek Gourmet selling homemade hummus. Hummus is one of my go-to afternoon snacks, but I’ve never tried making my own. (Yes, I am aware it’s simple to do and it’s on my culinary bucket list.) There were great flavor options and we walked away with two containers! Original, which features a nice kick of garlic, and Spicy Black Bean.

What does all of this have to do with Mexican Monday? I’ll give you a hint. Read the last three words of the above paragraph.

We used this Spicy Black Bean Hummus in place of refried beans in making tostadas. And it worked beautifully. This hummus gets its kick from jalapenos. Because I knew the hummus was spicy I opted for a mellow protein to top our tostadas. I pulled out the crockpot, seasoned chicken with S+P, and dumped in some Rotel and cream cheese. We shredded it and enjoyed our Mexican Monday on Tostada Tuesday (I forget what was happening on Monday that required a postponement of our Mexican dinner.)

I appologize that we don’t have photos of this meal (sometimes hunger wins out), but next time you’re thinking of tostadas, get creative with your toppings! You could even turn them completely Greek and use original hummus with more classic Greek toppings – like olives, feta, and grilled squash.

Caprese Steak

As previously promised, here’s another steak recipe on Sew You Think You Can Cook. This one features a beautiful cut of steak, seared, topped with tomato and fresh mozzarella and baked to perfection. Top it with fresh basil and balsamic vinegar reduction and you have a restaurant quality dinner right in your own home.

I found this idea while perusing Foodgawker and thought it looked simple enough for my handy kitchen helpers to do. Funnily enough, neither of them actually read the recipe, or apparently listened to me when I told them how to prepare the meat. Mom declared that this one was Stuart’s to make because it involved grilling. It does not. And Stuart kept trying to go outside to the grill!

I guess when they think steak, they think grilling. Most probably do. But this recipe sears it off in a skillet to get a beautiful crust and then finishes in the oven. This cooking method creates perfectly juicy steaks.

Caprese Steak

Ingredients:

  • 1/2 C balsamic vinegar
  • 3 steaks
  • 1 beefsteak tomato
  • fresh mozzarella cheese
  • fresh basil

Steps:

  1. Preheat oven to 400 degrees F.
  2. In a small skillet reduce balsamic vinegar until reduced by half.
  3. Season steak with S+P.
  4. In a cast iron skillet over high heat cook both sides of the steak, 2-3 minutes until an even sear is achieved.
  5. Top steak with slice of tomato and mozzarella cheese. Bake until the reach a desired internal temperature.
  6. Garnish with fresh basil and top with balsamic.

*This recipe is adapted from K at http://www.onthewoodside.com/2013/11/seared-filet-with-tomato-and-fresh.html*

Caprese Steak


Spinach and Sausage Ravioli

Using won ton wrappers makes making ravioli an acceptable weeknight dinner. This recipe is very similar to the one I shared with you on Valentine’s Day. Except this one includes meat!

Stuart bought some Hot Italian Sausages from Publix for lunch one weekend and instead of relocating the sausages to the freezer he put the uneaten ones in the fridge. I knew I had to find a recipe to use up the meat before it went bad. Yes, I know I could’ve put them in the freezer, but here was thawed out meat ready and waiting!

I was also wanting pasta. But I didn’t want a heavy pasta because Mom was back in town helping me out. Typically when I crave pasta I’m wanting a cream based sauce – but I was trying to be conscious of my dinner choices. (Hence the increase in salad posts!) I chose to do ravioli because the blogger I found this from served hers simply with olive oil, salt, and pepper. Mom decided to follow suit and enjoy her ravioli this way. I used my favorite, vodka sauce. And Stuart polished off a traditional jarred marinara.

Mom doesn’t mind cooking, but she hates making decisions on what to make. So her deal was, “I’ll cook it, you just have to tell me what it is.” I actually felt guilty in picking ravioli. Not because it’s difficult, but because it is time consuming. So, I got off the couch and joined her at the dining table to help assemble the ravioli. We went through the entire package of won ton wrappers – we had leftovers for days! If you assemble only what you’ll eat, keep your left over wrappers in a sealed bag in the fridge – you can even wrap them in a damp paper towel to keep them from drying out.

Spinach and Sausage Ravioli

Ingredients:

  • 2 links hot Italian sausage, casings removed
  • 15 oz ricotta cheese
  • 2 C fresh baby spinach, finely chopped
  • 1 C shredded Asiago cheese
  • 1 egg
  • 1 pkg (12 oz) won ton wrappers (these can be found in the refrigerated area of the produce section)*

Steps:

  1. In a nonstick skillet, brown sausage over medium-high heat. Breaking up into little pieces. Drain any fat.
  2. In a bowl combine sausage, cheese, spinach, and egg. Season with S+P.
  3. Bring a pot of salted water to a boil while assembling the ravioli.
  4. Place about 1/2-1 tsp of filling in the center of each wrapper. Dip your finger in water and run along all four sides of the wrapper. Fold into a triangle and seal.
  5. Boil the ravioli in batches of 8-10 to avoid them breaking apart. Boil 3-4 minutes, or until they float. They will become slightly translucent.
  6. Heat your favorite pasta sauce and serve with ravioli. Garnish with freshly grated Parmesan or Asiago cheese if desired.

*This recipe is adapted from http://www.justputzing.com/2011/10/spinach-and-sausage-raviolis.html*

Sausage Ravioli

Disclaimer: This post contains affiliate links. 

SRC: Moroccan Carrots

newsrcbanner

Today is another Secret Recipe Club Reveal Day! In the secret recipe club, each participating blogger is assigned a blog from another participating blogger and secretly searches their site for something to recreate. The accompanying blog post then goes live on reveal day! So while I was immersed in my assigned blog, someone else was picking through mine! I’m so excited to be part of this group, to see what on my blog peaks other’s interests and to stumble upon new blogs and new recipes.

This month I was assigned Sally’s blog Bewitching Kitchen. Sally is a biochemist in Kansas, but was born in Brazil and spent years in France and California. As a result she features multiple cultures on her blog! Sally admits to being an “exercise-fanatic” – I think she’d get along very well with my husband! She also enjoys golf – I played golf in high school and Stuart has gotten into the sport. He plays almost once a week with friends – I’m nervous he might actually beat me the next time I finally get out onto a course. (It’s only happened once or twice in the 7 years we’ve been together.)

Sally has been blogging since 2009 so it’s not hard to understand that I struggled with finding something to recreate. I saved close to 20 recipes on my secret Pinterest board! As much as I wanted to make her Raspberry Brown Sugar Chocolate Chip Ice Cream, I decided to save it when I was released from bed rest. She had a couple hummus recipes that sounded interesting (cilantro jalapeno and roasted beet), two different pesto recipes that piqued my interest (asparagus and kale), multiple entrees and even a grilled salad! I ultimately went with a side dish.

I like it when fellow SRC members pick a side dish from someone’s blog as most of our posts are main dishes and not surprisingly desserts. I’ve admitted before that I don’t think about my side dish very often – I spend so much effort on planning and cooking the meal that I forget about our vegetable and/or starch. These carrots are a refreshing side dish perfect for spring and summer. I served them alongside my vineyard chicken.

Disclaimer: Stuart made this SRC recipe for me!

Moroccan Carrots

Ingredients:

  • 1 lb carrots
  • 1/2 C olive oil
  • zest of 1 orange
  • 1/4 C orange juice
  • juice of 1 lemon
  • 1/8 tsp cayenne pepper
  • 1/2 tsp cumin
  • 2 tbsp sugar

Steps:

  1. Slice peeled carrots and cook in boiling water for 5 minutes, or until fork tender.
  2. Whisk together olive oil, zest, 1/4 C orange juice, lemon juice, a pinch of sugar, S+P.
  3. Toss carrots in dressing, cayenne, cumin, sugar, and salt. Garnish with fresh parsley.

*This recipe is adapted from Sally at http://bewitchingkitchen.com/2010/02/18/moroccan-cooked-carrot-salad/*

Moroccan Carrots

Cookies & Creme Milkshake

I haven’t experienced any weird cravings during my pregnancy.

Sure, there’ll be a food item that I really want at the moment, but it’s not something unusal for me. (Chips and queso, popcorn, Sour Patch Kids)

However, I will say, I’ve never had more milkshakes in my life! (Oh, I’m not complaining!) We’ve played around with plain vanilla, strawberry, Butterfinger, Oreo, and chocloate covered strawberry.

Today is National Vanilla Milkshake Day and even though this particular recipe isn’t for a vanilla milkshake, I thought it’d be a great excuse to share this Cookies and Cream masterpiece. (But hey, if you omit the Oreo’s it’s a vanilla milkshake! Close enough.)

Cookies & Creme Milkshake

Ingredients:

  • 4 Oreo cookies
  • 1 C milk
  • 4 scoops vanilla ice cream

Steps:

  1. Place all ingredients in a blender. Blend until smooth.

Oreo Milkshake

#BundtBakers: Tropical

BundtBakers

I am very excited about this month’s #bundtbaker’s post! #BundtBakers is a group of bundt loving bakers who get together once a month to bake bundts with a common ingredient or theme. We take turns hosting each month and choosing the theme or ingredient. This month’s theme is tropical and our lovely host is Lauren of From Gate to Plate.

When I saw that June’s theme was to be Tropical I was immediately reminded of last year’s birthday trip to Hawaii. I knew I wanted to do something Hawaiian in theme and flavor.

I searched the internet for traditional Hawaiian cakes. Finding ones that didn’t include coconut ended up being pretty difficult! But I did find this Pineapple Macadamia Nut Loaf recipe on alohafriends.com on their page of popular luau recipes. We didn’t experience the typical tourist luau on our vacation (I’d done it in 4th grade with my family, and Stuart and I decided it wasn’t worth the money without having kids to enjoy the show.) so I can’t tell you if this quick bread was present. The recipe reminded me of banana bread. Except that instead of bananas you use pineapple! With Hawaii being the largest exporter of macadamia nuts, I liked that they are distributed throughout this bundt.

Pineapple Macadamia Nut Bundt

Ingredients:

  • 3/4 C crushed fresh pineapple
  • 1 1/8 C pineapple juice
  • 3/4 C vegetable oil
  • 6 eggs
  • 1 1/2 C sugar
  • 4 1/2 C flour
  • 4 1/2 tsp baking powder
  • 1 C macadamia nuts, chopped if desired

Steps:

  1. Preheat oven to 350 degrees F. Grease bundt pan.
  2. In a large bowl combine pineapple, pineapple juice, vegetable oil, eggs, and sugar.
  3. In another bowl sift together flour and baking powder. Stir into wet ingredients. Fold in macadamia nuts. Pour into greased bundt pan.
  4. Bake 50-60 minutes, until a knife comes out cleanly.

*This recipe is adapted from Mike & Kim at http://www.alohafriends.com/recipes.html*

Pineapple Bundt

I photographed my bundt on top of fabric I purchased from Quilt Passions in Kailua-Kona. I love these fabrics and can’t wait to finally begin working on our Hawaii quilt. Someday I’ll get around to it… If you’d like to see my posts about our vacation on The Big Island please check them out! I encourage you to put a trip to Hawaii on your bucket list!

If you are a food blogger and would like to join us, just send an email with your blog URL to foodlustpeoplelove@gmail.com. All recipes and photographs can be found on our individual blogs, on our Pinterest board, and the #bundtbakers homepage.

And don’t forget to take a peek at what other talented bakers have baked this month:

Pink Coconut and Grapefruit Bundt Cake by Laura at Baking in Pyjamas
Guava and Cream Cheese Bundt Cake by Terri at Love and Confections
Guava and Pineapple Impossible Cake by Kelly at Passion Kneaded
Passion-Orange-Guava Bundt Cake by Felice at All That’s Left are the Crumbs
Mini Spiced Caramelized Pineapple Bundt Cakes by Lauren at From Gate to Plate
Hibiscus Lime Bundt Cake by Tux at Brooklyn Homemaker
Mango Brown Sugar Glazed Bundt Cake by Tara at Noshing with the Nolands
Pineapple Pound Cake by Renee at Magnolia Days
Mango Ginger Bundt Cake by Stacy at Food Lust People Love
Almost Pina Colada Bundt Cake by Margaret at Tea and Scones
Mexican Mango Cake by Veronica at My Catholic Kitchen
Mango Coconut Bundt by Jane at Jane’s Adventures in Dinner
Mini Pineapple Lime Mojito Bundt Cakes by Zainab at Blahnik Baker
Tropical Pineapple Bundt Cake by Chaya at Bizzy Bakes

Spinach Salad with Spicy Pineapple Dressing

Steak isn’t the only way for me to add iron into my diet – another option is spinach. Spinach is also the more heart friendly way to do it too. 😉 So with more red meat recipes, there’s also a chance for more salad nights!

I found this particular recipe when I was going through my very first Secret Recipe Club assignment. And now that this is the second recipe I’ve made from Lynsey’s blog – I am willing to bet my other pinned recipes from her will also be a big hit.

This salad recipe called out to me not only because of the iron rich spinach, but because of the pineapple dressing!

Spinach Salad with Spicy Pineapple Dressing

Ingredients:

  • 2 large chicken breasts, cut in half length-wise so they’re thin
  • 1 tsp ancho chili powder
  • 2 tbsp fresh cilantro
  • 1/2 jalapeno, seeded
  • 1 clove garlic
  • 1 1/4 C cubed fresh pineapple, divided use
  • 2 tbsp orange juice
  • 4 tsp apple cider vinegar
  • 1/4 C extra virgin olive oil
  • 8 C fresh baby spinach
  • 1/2 red bell pepper, sliced
  • 1/4 red onion, thinly sliced

Steps:

  1. Season chicken with chili powder, salt, and pepper. Grill 4 minutes on each side, or until chicken is cooked through. Set aside.
  2. In a blender combine cilantro, jalapeno, garlic, half of the pineapple, orange juice, and vinegar. Pulse until smooth. With the blender running, stream in the olive oil. Adjust seasonings to taste.
  3. In a large bowl toss the spinach with the bell pepper, onion, and remaining pineapple.
  4. To serve: distribute salad, top with chicken, and dress with pineapple dressing.

*This recipe is adapted from Lynsey at http://www.lynseylous.com/2012/05/grilled-chicken-and-spinach-salad-with.html?m=1*

 Pineapple Salad

recreatedbysrc