#EVOOChallenge: Dark Chocolate Chip Olive Oil Donuts

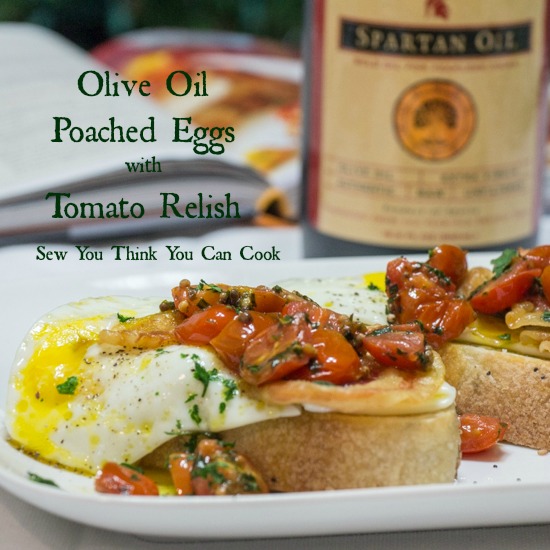
It’s the final day of the #EVOOChallenge. This challenge, in which we make foods with the only cooking fat being olive oil, was issued by Spartan Olive Oil. The goal is to highlight the benefits of using olive oil over its less healthy counterparts, I’m looking at you butter and vegetable oil. Search the hashtag on social media to see more great recipes!

While both olive oil and vegetable oil have 120 Calories and 14 grams of fat per tbsp, olive oil has 10 grams of monounsaturated fat (the good fat) whereas vegetable oil has only 3 grams of monounsaturated fat. Monounsaturated fat is actually good for your health; it reduces bad cholesterol and provides vitamin E. (Source: American Heart Association)

This unfiltered extra-virgin olive oil is made from the olives of 700 year old trees in Sparta, Greece. The flavorful oil has a rich golden color and smooth texture. I wanted to highlight the nutty, fruity flavor of the oil in my recipes this week.

I wanted to end the week on a sweet note and make dessert, or breakfast if you’re so inclined! I got a donut pan for my birthday last summer and thought it was about time it was christened! I brought my son into the kitchen and let him whisk the ingredients and add the pinch of salt… which ended up being more than a pinch… ah well!

I veered a bit from the recipe: I substituted cake flour for the pastry flour because I simply didn’t want to buy another flour variety (we’re moving in a couple of months and I really need to start cleaning house). I don’t know if chemically that was a valid substitution, but I ran away with it. I also used whole milk instead of buttermilk because I didn’t have any in the fridge. (Yes, I know there’s a substitution involving vinegar but for only 2 tbsp worth of milk I didn’t bother.) And yet another “lazy baker” change was to put dark chocolate chips inside the donuts instead of glazing them with a beautiful dark chocolate icing. With my first attempt at baking donuts I didn’t fully realize that the tops wouldn’t get golden so for aesthetic purposes they definitely benefit from a frosting. I wonder if it’d be possible to flip the donuts midway through the baking process to get both sides golden from the pan. (I’m just “talking” out loud here.)

Dark Chocolate Chip Olive Oil Donuts for the #EVOOChallenge from Sew You Think You Can Cook

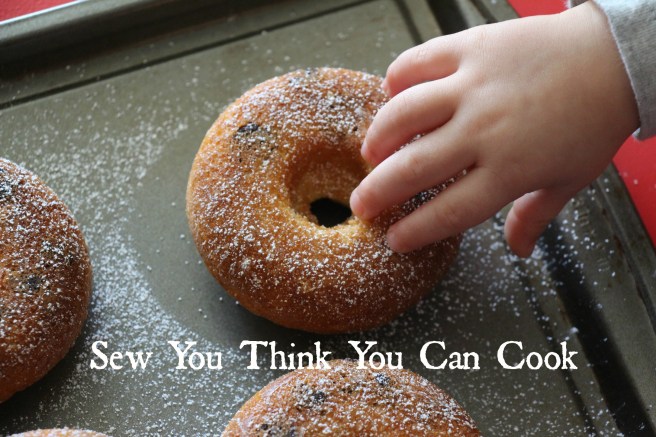
My 18 month old snagged a donut during food photography took a little bite and declared them “good.”

This recipe makes 6 baked donuts.

Dark Chocolate Chip Donuts

Ingredients:

  • 1 C cake flour
  • 1/2 C sugar
  • 1 tsp baking powder
  • 1/4 tsp salt
  • 2 eggs
  • 3 tbsp olive oil
  • 2 tbsp milk
  • 1/4 C dark chocolate chips

Steps:

  1. Preheat oven to 375 degrees F. Grease a 6 tin donut pan with olive oil.
  2. In a bowl, whisk together the flour, sugar, baking powder, and salt.
  3. In another bowl, whisk together the eggs, olive oil, and milk.
  4. Combine the wet ingredients into the dry ingredients until smooth. Fold in the chocolate chips.
  5. Divide batter evenly into prepared donut pan. Bake 10-15 minutes, until a toothpick inserted comes out cleanly.

*This recipe is modified from Tara at http://tarasmulticulturaltable.com/olive-oil-doughnuts-with-dark-chocolate-glaze-and-sea-salt/*

Dark Chocolate Chip Olive Oil Donuts for the #EVOOChallenge from Sew You Think You Can Cook (2)

Disclaimer: By participating in this 5 day challenge I received a bottle and pouch of Spartan Olive Oil. 

recreatedbysrc

#EVOOChallenge: Olive Oil Poached Eggs with Tomato Relish

It’s day 4 of the #EVOOChallenge. This challenge, in which we make foods with the only cooking fat being olive oil, was issued by Spartan Olive Oil. The goal is to highlight the benefits of using olive oil over its less healthy counterparts, I’m looking at you butter and vegetable oil. Search the hashtag on social media to see more great recipes!

While both olive oil and vegetable oil have 120 Calories and 14 grams of fat per tbsp, olive oil has 10 grams of monounsaturated fat (the good fat) whereas vegetable oil has only 3 grams of monounsaturated fat. Monounsaturated fat is actually good for your health; it reduces bad cholesterol and provides vitamin E. (Source: American Heart Association)

This unfiltered extra-virgin olive oil is made from the olives of 700 year old trees in Sparta, Greece. The flavorful oil has a rich golden color and smooth texture. I wanted to highlight the nutty, fruity flavor of the oil in my recipes this week.

Today’s recipe comes from Brunch at Bobby’s. This brunch is the 4th recipe we’ve made from this book and we’ve only had it since Christmas. (Remember that incredible Croissant French Toast? I feel like a spokesperson for this incredible cookbook. I should be getting paid!) How could I pass up the opportunity to stretch my culinary muscles by poaching eggs in olive oil?! I even went ahead and experimented with mustard seeds for the tomato relish recommended. I don’t even like eggs and I devoured two open faced sandwiches for lunch! As if the texture combinations between crispy pancetta and silky eggs isn’t enough, there’s a boost of flavor from the relish.

Olive Oil Poached Eggs with Tomato Relish

Ingredients:

  • 8 thin slices of pancetta
  • 4 thick slices of sourdough bread, toasted
  • 1 C plus 3 tbsp olive oil, divided use
  • 1 tsp yellow mustard seeds
  • 1/2 pt cherry tomatoes, quartered
  • pinch of sugar
  • splash of red wine vinegar
  • 2 tbsp chopped flat-leaf parsley (I used Gourmet Garden lightly dried herbs)
  • 2 tbsp chopped chives (I used Gourmet Garden lightly dried herbs)
  • 4 eggs

Steps:

  1. Preheat oven to 375 degrees F. Place pancetta on a rimmed baking sheet. Bake 8-10 minutes until crispy, flipping halfway through.
  2. Make the relish: Heat 3 tbsp olive oil in a pan over medium heat, add the mustard seeds and cook until they start to pop. Add the tomatoes, sugar, and vinegar. Mix in the parsley and chives. Transfer to a bowl.
  3. Heat the remaining 1 C of olive oil in a small skillet over medium heat, until it reaches 140 degrees F. Crack each egg into a ramekin and slide them into the oil, one at a time. Poach until the yolks are almost set, 3-5 minutes.
  4. Assemble: Place each egg on a slice of toasted sourdough, sprinkle with S+P. Top with 2 pieces of crispy pancetta and some of the tomato relish. Garnish with fresh parsley.

*This recipe is adapted from Brunch at Bobby’s*

Olive Oil Poached Eggs with Tomato Relish for the #EVOOChallenge from Sew You Think You Can Cook

Disclaimer 1: By participating in this 5 day challenge I received a bottle and pouch of Spartan Olive Oil. 

Disclaimer 2: This post contains affiliate links. 

#EVOOChallenge: Olive Oil Sandwich Bread

We’re halfway through the #EVOOChallenge! This challenge, in which we make foods with the only cooking fat being olive oil, was issued by Spartan Olive Oil. The goal is to highlight the benefits of using olive oil over its less healthy counterparts, I’m looking at you butter and vegetable oil. Search the hashtag on social media to see more great recipes!

While both olive oil and vegetable oil have 120 Calories and 14 grams of fat per tbsp, olive oil has 10 grams of monounsaturated fat (the good fat) whereas vegetable oil has only 3 grams of monounsaturated fat. Monounsaturated fat is actually good for your health; it reduces bad cholesterol and provides vitamin E. (Source: American Heart Association)

This unfiltered extra-virgin olive oil is made from the olives of 700 year old trees in Sparta, Greece. The flavorful oil has a rich golden color and smooth texture. I wanted to highlight the nutty, fruity flavor of the oil in my recipes this week.

I really wanted to make bread during this challenge. I had found a recipe for olive oil bread and tried that originally. It wasn’t quite a success. The recipe went against my instincts and my changes didn’t quite work out. I powered through and baked it just to check. It was dry, flakey, and crackery. So instead of trying again I decided to take a recipe I could trust and simply do a fat swap. I took the butter (or vegetable oil) and replaced it with Spartan Olive Oil.

My rise time took a longer than the recipe indicated but given the major snow day I wasn’t surprised. The dry weather also meant I had to add a little bit more water to the dough for it to come together. Another note: the loaf pan I have is 9.25″ x 5.25″ instead of 8.5″ x 4.5″ so I don’t have the classic domed sandwich bread shape.

This homemade sandwich bread is fantastic! It’s light and spongy with a beautiful golden crunchy crust. It makes for delicious toast topped with jam, simple bread and butter, and even a flavorful BLT.

Olive Oil Sandwich Bread 

Ingredients:

  • 1 pkt active dry yeast
  • 3 C flour
  • 2 tbsp sugar
  • 1 1/4 tsp salt
  • 1/2 C milk mixed with 1/2 C warm water
  • 1/4 C olive oil

Steps:

  1. Dissolve yeast in 1 tbsp warm water.
  2. Place all ingredients, including yeast, in the bowl of a stand mixer fitted with the dough hook. Knead until it forms a ball around the hook and comes away from the bowl. Add a little extra water if the dough is too dry.
  3. Oil hands and knead dough until smooth. Place in a greased bowl and cover. Allow dough to rise 1-2 hours until almost doubled in size.
  4. Punch down the dough and form into a log just slightly shorter than the loaf pan.
  5. Line loaf pan with parchment paper or lightly grease it. Place dough in prepared pan, cover, and let rise until the dough domes above the pan, another 1-2 hours.
  6. Preheat oven to 350 degrees F.
  7. Bake bread for 30-35 minutes, or until an internal temperate of 190 degrees F is reached.
  8. Remove loaf from pan and let cool on a wire rack.

*This recipe is adapted from http://www.kingarthurflour.com/recipes/classic-sandwich-bread-recipe*

Olive Oil Sandwich Bread for the #EVOOChallenge from Sew You Think You Can Cook

Disclaimer: By participating in this 5 day challenge I received a bottle and pouch of Spartan Olive Oil. 

CIC: Chickpeas & Honey

CIC-header

This month’s Crazy Ingredient Challenge was to combine chickpeas aka garbanzo beans and honey. Two ingredients that were already in my pantry. How was I to turn down the challenge!?

I kept it really simple this month and added only a few more ingredients, cinnamon sugar and olive oil. The result was a snack that we devoured within the hour! Roasted chickpeas will become a new snack staple and I can’t wait to play around with some other flavor combinations.

These chickpeas would be beautiful atop a salad, too. Much like the one I shared yesterday!

Cinnamon and Honey Roasted Chickpeas

Ingredients:

  • 1 can (15 oz) chickpeas, drained
  • 1 tbsp olive oil
  • 1 tbsp honey
  • 2 tsp cinnamon sugar

Steps:

  1. Lay chickpeas out on a clean towel and pat dry. Remove any lose skins. Leave chickpeas out until completely dried, about 45 minutes.
  2. Preheat oven to 400 degrees F. Line a baking sheet with aluminum foil.
  3. Lay chickpeas out on the prepared baking sheet. Roast 40 minutes, or until crunchy.
  4. Toss roasted chickpeas in oil. Add the honey and cinnamon sugar. Place chickpeas back on the baking sheet and roast another 5 minutes.

*This recipe is adapted from Debbie at http://www.madefrompinterest.net/roasted-chickpeas-recipe/*

Cinnamon and Honey Roasted Chickepeas for Crazy Ingredient Challenge from Sew You Think You Can Cook

To see the other bloggers who participated in this month’s Crazy Ingredient Challenge click on the link below.

#EVOOChallenge: Winter Salad with Shallot Balsamic Vinaigrette

It’s day 2 of the #EVOOChallenge. This challenge, in which we make foods with the only cooking fat being olive oil, was issued by Spartan Olive Oil. The goal is to highlight the benefits of using olive oil over its less healthy counterparts, I’m looking at you butter and vegetable oil. Search the hashtag on social media to see more great recipes!

While both olive oil and vegetable oil have 120 Calories and 14 grams of fat per tbsp, olive oil has 10 grams of monounsaturated fat (the good fat) whereas vegetable oil has only 3 grams of monounsaturated fat. Monounsaturated fat is actually good for your health; it reduces bad cholesterol and provides vitamin E. (Source: American Heart Association)

This unfiltered extra-virgin olive oil is made from the olives of 700 year old trees in Sparta, Greece. The flavorful oil has a rich golden color and smooth texture. I wanted to highlight the nutty, fruity flavor of the oil in my recipes this week.

Shallot Confit for the #EVOOChallenge from Sew You Think You Can CookOne of the cookbooks I got for Christmas is The Chef Next Door by Amanda Freitag. While flipping through it for the first time we came across a recipe for Shallot Confit. I knew I just had to try it for this challenge! The recipe calls for a mix of olive and canola oils, but as that would go against the rules I omitted the canola oil. I was a little nervous about omitting the canola oil and didn’t think substituting was the right way to go either. I opted with using fewer shallots than called for. And it worked.

These shallots would be incredible as a pizza topping, would add a little something extra to a sandwich, and could even work well in an onion dip. I decided to add them to salad. And as a bonus I used some of the oil in a vinaigrette!

The shallots will keep up to two weeks in the oil.

Winter Salad with Shallot Balsamic Vinaigrette 

Ingredients:

  • 4 whole shallots, peeled and trimmed
  • 1 C + 1 tbsp olive oil, divided use
  • 1 tsp thyme
  • 1 tsp peppercorns
  • 1 can (15 oz) chickpeas, drained
  • 1 tsp garlic powder
  • 2 oz balsamic vinegar
  • 1/4 tsp Dijon mustard
  • mixed baby greens (I used spinach, swiss chard, and arugula)
  • crumbled Feta cheese
  • cooked, crumbled bacon
  • pear, sliced

Steps:

  1. Make shallot confit: Place shallots in a small saucepan with 1 C oil to cover. Add the thyme, peppercorns, and S+P. Bring to a simmer over medium heat, reduce heat to low and cook 25 minutes until shallots are easily pierced. Allow shallots to cool. Store in fridge, covered.
  2. Roast chickpeas: Lay chickpeas out on a clean towel and pat dry. Remove any lose skins. Leave chickpeas out until completely dried, about 45 minutes. Preheat oven to 400 degrees F. Line a baking sheet with aluminum foil. Lay chickpeas out on the prepared baking sheet. Roast 40 minutes, or until crunchy. Toss roasted chickpeas in 1 tbsp oil. Add the garlic powder and a little salt to taste.
  3. Make dressing: Put 3 oz of the shallot confit oil in a jar with the balsamic vinegar, Dijon, and S+P. Shake until combined.
  4. Assemble salad: Top greens with Feta, bacon, pears, chopped shallot confit, and roasted chickpeas. Drizzle with vinaigrette.

*The shallot recipe is adapted from The Chef Next Door*

*The chickpea recipe is adapted from Debbie at http://www.madefrompinterest.net/roasted-chickpeas-recipe/*

Winter Salad with Shallot Balsamic Vinaigrette for the #EVOOChallenge from Sew You Think You Can Cook

Disclaimer 1: By participating in this 5 day challenge I received a bottle and pouch of Spartan Olive Oil. 

Disclaimer 2: This post contains affiliate links. 

#EVOOChallenge: Olive Oil Crackers

Today marks day 1 (of 5) of the #EVOOChallenge. This challenge, in which we make foods with the only cooking fat being olive oil, was issued by Spartan Olive Oil. The goal is to highlight the benefits of using olive oil over its less healthy counterparts, I’m looking at you butter and vegetable oil. Search the hashtag on social media to see more great recipes!

While both olive oil and vegetable oil have 120 Calories and 14 grams of fat per tbsp, olive oil has 10 grams of monounsaturated fat (the good fat) whereas vegetable oil has only 3 grams of monounsaturated fat. Monounsaturated fat is actually good for your health; it reduces bad cholesterol and provides vitamin E. (Source: American Heart Association)

This unfiltered extra-virgin olive oil is made from the olives of 700 year old trees in Sparta, Greece. The flavorful oil has a rich golden color and smooth texture. I wanted to highlight the nutty, fruity flavor of the oil in my recipes this week.

To kick off I’m sharing Olive Oil Crackers. As I was rolling out the dough my husband jokingly asked if I was making gingerbread crackers, after all it had finally snowed! I said that actually wasn’t a bad idea and pulled out an airplane cookie cutter that I’ve had for 6 years and never used. My 18 month old had fun helping me press the cutter into the dough. Unfortunately, that first batch ended up burnt so I ended up with less than 10 airplane crackers. (The majority of the dough was cut into squares because it was much less time consuming!)

Originally, I followed the recipe directions to sprinkle the herbs over the crackers before they go into the oven but they simply didn’t adhere. My husband had another good idea to roll the herbs into the dough. It definitely worked and tasted better, too! Having the herbs and salt baked in the cracker brought out the beautiful flavor of the olive oil.

These crackers are perfect for dipping in hummus!

Olive Oil Crackers

Ingredients:

  • 3 C flour
  • 2 tsp Kosher salt, divided use
  • 1 C warm water
  • 1/3 C olive oil
  • 1 tsp dried oregano
  • 1 tsp dried thyme

Steps:

  1. In the bowl of a stand mixer fitted with the dough hook combine the flour and 1 tsp salt. Slowly add in the water and oil while mixing at medium speed. Mix dough until it comes together, it will be a little tacky.
  2. Divide dough into 8 balls, cover and let rest 45 minutes.
  3. In a small bowl combine oregano, thyme, and 1 tsp Kosher salt.
  4. Preheat oven to 450 degrees F. Line a cookie sheet with parchment paper.
  5. Roll each ball dough out as thinly as possible, cut crackers, poke with a fork, and place on prepared cookie sheet. Options: Sprinkle cut crackers with seasonings or roll seasonings into the dough before cutting.
  6. Bake 8 minutes until crispy – keep an eye on them, they’ll burn quickly.

*This recipe is adapted from Lacey at http://www.asweetpeachef.com/snack/olive-oil-herb-crackers/*

Olive Oil Crackers for the #EVOOChallenge from Sew You Think You Can Cook

Disclaimer: By participating in this 5 day challenge I received a bottle and pouch of Spartan Olive Oil. 

SRC: Garlic Parmesan Sauce & Caesar Dressing

newsrcbanner

It’s Secret Recipe Club Reveal Day! In the Secret Recipe Club, each participating blogger is assigned a blog from another participating blogger and secretly searches their site for something to recreate. The accompanying blog post then goes live on reveal day! So while I was immersed in my assigned blog, someone else was picking through mine! I’m so excited to be part of this group, to see what on my blog peaks other’s interests and to stumble upon new blogs and new recipes.

With the new year I have switched groups and will now be posting with Group C on the 3rd Monday of the month instead of the 4th. (I did this so I can continue participating with #MuffinMonday!)

My first assigned blog in Group C is Kirstin of Loving Life! Kirstin and I have quite a lot in common: having both lived in FL and OH; her father was in the military and my husband is currently serving; and browsing the internet and window shopping are skills we both share, too.

I enjoyed searching through Kirstin’s blog and ended up making not one, but two of her recipes! I was this close (imagine me holding up my thumb and pointer finger really close together) to finally braving a cauliflower pizza crust but then I saw her Copy Cat recipe for Buffalo Wild Wings Garlic Parmesan Sauce. I had just tried B-Dub’s Caesar Salad which is topped with garlic Parmesan coated chicken and couldn’t stop dreaming about it. (Until I can go back to my Spicy Garlic wings post breastfeeding this Caesar salad will be my new B-Dub staple.) Conveniently Kirstin also had a Caesar dressing in her recipe index, too.

Instead of wings, I used chicken thighs to top our salads because that’s what I had in my freezer. I will definitely be making this dish again. The wing sauce was an exact match to the one you get at the restaurant. I know because the following week I found myself back at BWW ordering that salad. I might have a problem… Thank you Kirstin for fueling this new addiction.

Copy Cat: BWW Garlic Parmesan Sauce

Ingredients:

  • 6 cloves garlic, peeled
  • 2 tbsp olive oil
  • 1/2 C mayonnaise
  • 2 tbsp grated Parmesan cheese
  • 1 tbsp corn syrup
  • 1 tbsp apple cider vinegar
  • 1 tsp lemon juice
  • 1/2 tsp red pepper flakes
  • 1/2 tsp salt
  • 1/4 tsp black pepper
  • 1/4 tsp thyme
  • 1/4 tsp oregano
  • 1/4 tsp basil

Steps:

  1. Preheat oven to 350 degrees F. Place garlic cloves on a piece of aluminum foil and drizzle with olive oil, fold up and place on a baking sheet. Roast garlic 25 minutes, or until tender. Set aside to cool.
  2. Whisk the remaining ingredients until smooth.
  3. Mash the cooled garlic and add to the sauce. Refrigerate.
  4. To use: toss cooked wings in sauce or baste roasted chicken in the last 10 minutes of cook time.

*This recipe is adapted from Kirstin at http://troyerslovinglife.blogspot.com/2015/02/mock-buffalo-wild-wings-wing-night.html*

Caesar Dressing

Ingredients:

  • 2 tbsp fresh lemon juice
  • 1 tsp minced garlic
  • 3/4 tsp Dijon mustard
  • 3/4 tsp Worcestershire sauce
  • 1/2 tsp black pepper
  • 1/4 C mayonnaise
  • 1/2 C olive oil
  • 1/4 C grated Parmesan cheese

Steps:

  1. Whisk together the lemon juice, garlic, mustard, Worcestershire, and pepper. Add the mayo and whisk until combined. Add the olive oil while continuously whisking until smooth. Stir in the cheese. Season to taste with salt.
  2. Keep refrigerated up to 2 weeks.

*This recipe is adapted from Kirstin at http://troyerslovinglife.blogspot.com/2009/01/recipes-top-ramen-salad-yummy-quiche.html*

bww salad

To see the other bloggers who participated in the Secret Recipe Club this month click here:

BBQ Kale Chips

10313804_10103445114255281_4038587599929197876_nI have reached a new point as a busy mom of two trying keeping up a household and a blog. This post is being written from the WordPress app on my phone while I kid myself that I’m going to bed “early.”

Last week was the first week back to reality from the holidays. And it was a rough one! My husband started his final quarter of his Masters program and is working tirelessly on his thesis. The boys had doctor appointments 3 of the 5 days which made getting a rhythm of Dad back at work a little more difficult. Both naps and bedtimes have been difficult which means if I want to get any blogging done it’s not until after 11 or 12 and that means I crawl into bed at 1 am (with the hopes and prayers that both boys will sleep solidly until 7).

So now I’m trying out this app to see if I can gain multi-tasking time in snippets during late night feedings and moments when the kids fall asleep while out running errands.

Good thing I’m trying this post out on an easy recipe! Kale chips. These kale chips are dusted with barbecue seasoning after baking which makes this crunchy healthy snack a little addicting.

BBQ Kale Chips

Ingredients:

  • bunch of kale, stems removed
  • 1/8 C paprika
  • 1 tbsp ancho chili powder
  • 1 tbsp brown sugar
  • 1 1/2 tsp garlic powder
  • 1 1/2 tsp kosher salt
  • 1/4 tsp ground mustard

Steps:

  1. Preheat oven to 275 degrees F. Line a baking sheet with parchment paper.
  2. Tear kale into bite-sized pieces. Place on prepared baking sheet and spray with cooking spray.
  3. Bake kale chips 18-20 minutes, flipping halfway through, until crispy.
  4. Make barbecue seasoning: combine all the spices and brown sugar.
  5. Sprinkle seasoning over the kale chips after removing from the oven.

*This recipe is adapted from Jeff Mauro, Food Network Magazine January/February 2015*

BBQ Kale Chips | Sew You Think You Can Cook

Blogger CLUE: Citrus Shrimp

blogger CLUE

After a month of endless desserts and party foods the Blogger CLUE crew and I are on the hunt for healthy foods to bring in the new year.

This month I was tasked with searching through Wendy’s blog, A Day in the Life on the Farm. As her blog name suggests, Wendy lives on a farm where she and her husband are fairly self sufficient. They raise chickens, turkeys, and pigs for meat, have hens for egg laying, and have fruit trees and gardens on their 12 acres of land. I’m exhausted just thinking about it! Isn’t retirement supposed to be relaxing?!

I am very familiar with Wendy’s blog as I have worked with her in many events and blogging clubs. Surprisingly though I’ve not actually cooked anything from her recipe box. (She’s ambitiously tackled my Busia’s recipe for pierogi for a Secret Recipe Club post.)

I really wanted to return the favor of celebrating Polish cuisine and make her recipe for beet soup. I was pretty excited about it, too, and I don’t tend to get excited about soup. I went to the grocery store on a Sunday (something I tend to avoid). Kroger was packed! Post-holiday fridge-restocking was on everyone’s mind that afternoon many items were out of stock (I snagged the last carton of organic whole milk!). The missing ingredient that threw me into a tizzy was beets! How was I to make beet soup without beets!? Granted, there were some golden beets that looked pretty sad. I pushed my cart to a corner of the produce section, trying to be as out of the way as possible, and frantically searched through some of the other recipes I’d book marked from Wendy’s blog: between grilled mahi mahi, cranberry chicken, and spicy citrus shrimp, I decided on the shrimp.

This shopping curveball was a huge blessing in disguise. This shrimp dish is incredible! I served it over rice as dinner. It’s a perfect weeknight meal that I will be returning to. I had to swap the mango for pineapple due to allergies and the pineapple was my favorite part. I liked that the fruit wasn’t cooked with the shrimp, it was simply warmed through from the sauce, a perfect compliment to the flavors.

Citrus Shrimp

Ingredients:

  • 12-14 jumbo shrimp, peeled and deveined
  • 1 tbsp flour
  • juice of 1 orange
  • 1 tbsp lime juice
  • 1 tsp Kosher salt
  • 1/4 – 1/2 tsp chile paste (I used Gourmet Garden)
  • 1/2 C diced pineapple
  • 1 scallion, sliced

Steps:

  1. Preheat oven to 450 degrees F.
  2. Pat shrimp dry and toss in the flour. Place in a glass baking dish.
  3. In a small bowl whisk together the orange juice, lime juice, salt, and chili paste. Pour over the shrimp.
  4. Bake shrimp for 7 minutes. Flip the shrimp and bake another 7 minutes.
  5. Add the pineapple and scallions to the shrimp and toss to combine, thickening the sauce.
  6. Serve over rice.

*This recipe is modified from Wendy at http://adayinthelifeonthefarm.blogspot.com/2015/02/triplesbitesspicy-saucy-sexy-bites-for.html*

citrus shrimp for blogger clue from sew you think you can cook

Here’s a list of the other players of Blogger CLUE this month:

Enchilada Dip

Are you invested in the National Championship game tonight? I think it would be incredible if Clemson could keep their undefeated season but they have their work cut out for them, Alabama is a tough powerhouse to take down.

It’s hard for me to watch football without some sort of dip to snack on, especially if we have company over! Earlier this year In November my brother-in-law and his girlfriend now fiance (finally!) came to meet Treat. They are both also Auburn grads so there wasn’t any fight over which game we’d be watching on Saturday. It was the Georgia game and we knew it’d be a tough one, so good food was a must!

I’d been eyeing this dip on one of my Pinterest boards for a good while and was anxious to finally give it a shot! With enchilada flavors and real cheese it’s a step up from the usual favorite game day dip. It’s a thicker dip that’s pretty dang close to being called enchilada chili! Firecracker enjoyed the dip as well and I was happy to let him eat as much as he wanted – we could do a lot worse than beef, cheese, and veggies.

Enchilada Dip

Ingredients:

  • 1 lb ground beef
  • 1 1/2 C enchilada sauce
  • 1 can (15 oz) fiesta corn
  • 1 1/2 C shredded cheddar cheese, divided use
  • 1 1/2 C shredded Monterey Jack cheese, divided use

Steps:

  1. Preheat oven to 400 degrees F. Lightly grease oven-safe casserole dish.
  2. Brown ground beef in a high sided skillet over medium-high heat until cooked. Drain the fat.
  3. Add the enchilada sauce and corn to the skillet. Mix in 1 C cheddar and 1 C Monterey Jack cheeses, stirring until melted. Season to taste with S+P.
  4. Transfer dip to prepared baking dish. Top with remaining cheeses.
  5. Bake 5-10 minutes, or until bubbly and golden.
  6. Serve with tortilla chips.

*This recipe is modified from Chungah at http://damndelicious.net/2013/10/21/beef-enchilada-dip/*

Enchilada Dip | Sew You Think You Can Cook