Three Bean Salad

You guys, I have a story to share.

And it has absolutely nothing to do with the side dish I’m sharing with you. A dish that’s perfect for potlucks and looks like summer.

Today was a rough day. Tempers were running both short and high. The day started 45 minutes too early (when you have two energetic little boys at home, that 45 minutes is precious!), the broken garage door (full story on that Sunday) was being uncooperative putting me in a bad mood I couldn’t snap out of, and naps were not taken. My 2 year old didn’t listen even a little bit at the playground, and I have a “three strikes you’re out” rule which cut our trip quite short.

IMG_2621

When we got home all he wanted to do was play in his Duck Pond Water Table patio. I told him he had to prove to me that he could listen. He was charged with going into his room, getting a book, and sitting still while I read to him. My kid came back with a Chick-fil-A kid’s meal board book – a 4 sentence novel! FullSizeRender (1)Seriously, is my child that smart or was it simply coincidental? After some time playing in the water the boys had their first shared bath. Firecracker asked for dinner, which he didn’t eat. Treat was fussy, so I assumed he was also hungry (he did eat). At 6:20pm both boys were asleep at the table. Thankfully my husband was on his way home and I didn’t have to figure out how I was going to wriggle us out of our position. (See photo. –>)

It’s now 9pm and the boys are still sleeping in their beds! I’m a little nervous for what that means my tomorrow will look like. But I’m grateful for the date my husband and I ended up getting. We cooked dinner together and ate it on the patio. We then shared the kitchen clean up, and watched non-cartoon television. Ah, the exciting life of parents of young children.

Firecracker ended up waking around 9:30. He needed to come upstairs for a cup of water and to watch his nighttime programming. He then snuggled in our bed for a little bit before asking to go lay down in his room. Treat stayed asleep until his typical midnight awakening, and 4, and both were up between 6-6:30.
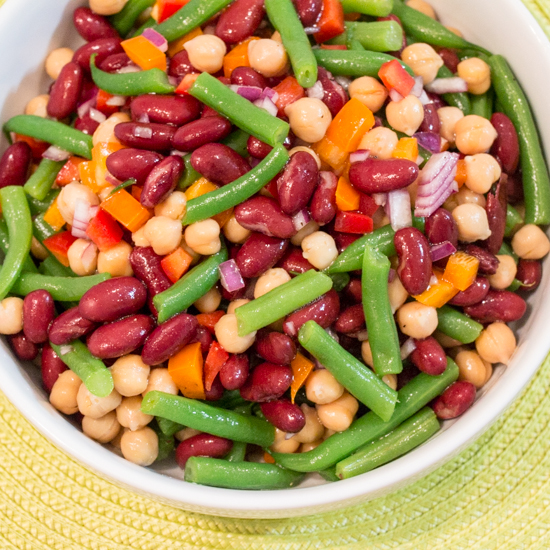
Three Bean Salad

Ingredients:

  • 1/2 lb fresh green beans, cut in 1/2″ pieces
  • 1 can (15 oz) chickpeas, drained and rinsed
  • 1 can (15 oz) red kidney beans, drained and rinsed
  • 1 bell pepper, diced (I used a combination of orange and red)
  • 1/2 red onion, diced
  • 2 tbsp chopped fresh parsley (I used Gourmet Garden lightly dried parsley)
  • 1/4 C + 2 tbsp apple cider vinegar
  • 1/4 C canola oil
  • 3 tbsp agave

Steps: 

  1. Cook green beans in a pot of boiling salted water for 4 minutes, or until desired tenderness is achieved. Drain and place the beans in a bowl of cold water to stop the cooking process. Drain.
  2. Toss green beans, chickpeas, kidney beans, pepper, and parsley in a large bowl.
  3. In a measuring cup, whisk together the vinegar, oil, and agave. Season to taste with S+P. Dress bean salad with as much dressing as desired.

*This recipe is adapted from Marcie at http://flavorthemoments.com/fresh-and-easy-three-bean-salad/*

Three Bean Salad - Sew You Think You Can Cook

Disclaimer: This post contains affiliate links.

#FoodieExtravaganza: Lemonade

foodieextravaganza-300

Happy August, everyone! August is a great month, although there aren’t any legal holidays to get you a day or two off of work. August is the final month of summer, the month when most people are taking family vacations, and the month that holds my birthday!

August also has some of the best foodie holidays. It’s National Brownies At Brunch Month (say, whaaat?!), National S’mores Day is the 10th, and the last day of the month is Eat Outdoors Day (what a fun family tradition to start!). Two years ago #FoodieExtravaganza celebrated waffles and last year potatoes.

The Foodie Extravaganza is a monthly party hosted by bloggers who love food! Each month we incorporate one main ingredient or theme into recipes to share with you. We take turns hosting and this month, it’s my turn! I decided on Lemonade Day, which falls on the 20th. Why? Because lemonade is one of my favorite summertime treats. I make a minimum of 2 homemade lemonades once summer hits. (You can read more about my citrus juicing love here.)

I decided to take a different approach with this year’s new lemonade. No sugar! Instead, this lemonade gets its sweetness from honey. You can alter how cloyingly sweet you want your beverage to be by playing around with different honey varieties. (About.com has a great resource for describing the different flavor profiles of each type of honey.)

Honey Mint Lemonade  Sew You Think You Can Cook

Honey Mint Lemonade

Ingredients:

  • 2 C freshly squeezed lemon juice (from 3 lb lemons)
  • 9 C water, divided use
  • 1/4 C honey (any variety of your choosing)
  • 3 sprigs fresh mint
  • sparkling water for serving (optional)

Steps:

  1. Microwave 1 C water for 1 minute, or until hot but not boiling. Stir honey into hot water until dissolved. Add mint and steep 5 minutes. Remove mint and discard.
  2. Combine honey mixture, lemon juice, and remaining 8 C water in a pitcher.
  3. Option to add a splash of sparkling water to serve.

*This recipe was inspired by SkinnyMs at http://skinnyms.com/homemade-honey-lemonade-with-fresh-mint-recipe/*

Honey Mint Lemonade for #FoodieExtravaganza from Sew You Think You Can Cook

Be sure to check out these other lemonades:

Dairy-Free Frosted Lemonade by Cookaholic Wife

Frosty Raw Strawberry Lemonade by Fearlessly Creative Mammas

Lemony White Sangria by Hardly A Goddess

Papaya Lemonade (or cocktail!) by Caroline’s Cooking

Passion Tea Lemonade by Making Miracles

Peachy Lemonade by A Day in the Life on the Farm

Pineapple Pink Lemonade Shaved Ice by Food Lust People Love

Shikanji (Indian Lemonade) by Tara’s Multicultural Table

Sparkling Apple and Watermelon Lemonade Spritzers by Sneha’s Recipe

Sparkling Blue Basil Lemonade by Culinary Adventures with Camilla

Sparkling Milk Lemonade by Our Good Life

If you are a blogger and would like to join our group and blog along with us, come join our Facebook page Foodie Extravaganza. We would love to have you! If you’re a spectator looking for delicious tid-bits check out our Foodie Extravaganza Pinterest Board! Looking for our previous parties? Check them out HERE.

Peanut Butter Crepes

Last month we went strawberry picking. Battling traffic for 2 1/2 hours (one way) for 50 minutes of picking time was absolutely worth it! These strawberries had the sweetest scent I’d ever sniffed. We had 4 1/2 pounds of strawberries making the road trip back home with us. Some green bell peppers, green beans, cherry tomatoes, and local honey hitched a ride, too.

13700220_10103887059219031_4812882046928772575_n

I’d put out a request to some of my local SoCal bloggers for their best strawberry recipes. And then, I didn’t use a single one! These strawberries barely made it a week. (To be fair, I froze about a third of them right away.) When something is just that good you almost don’t want to waste it as an ingredient. Instead, I decided to do crepes for dinner, filling them with our freshly picked strawberries.

I was quite hesitant with the crepe batter. It’s essentially all egg white and some peanut butter. I thought, “There’s no way!” But, I found the recipe from Natural Noshing’s Secret Recipe Club reveal of my dear friend Tara’s blog. I told myself that, if two people can succeed with these crepes, then it’s bound to work!

The first crepe is always a throw away – me, I ended up with a severely burnt crepe due to a child required my immediate attention. I told myself, “one more try”. And if it doesn’t work, I’ll throw in a bunch of flour and just make regular pancakes. Plan B was never needed. The only problem is that this recipe doesn’t make very many crepes! However, the use of peanut butter actually makes them filling and satisfying enough to feed 2 (and a half) people. You can always stretch out the crepes with whatever fillings you decide.

My crepes were filled with softened cream cheese, cinnamon sugar, and fresh sliced strawberries. Stuart filled his crepes with Nutella, fresh sliced strawberries, and honey. Firecracker had his with Nutella and fresh sliced strawberries.

Other filling options could include banana, jelly, chocolate chips, and/or maple syrup.

Peanut Butter Crepes

Ingredients:

  • 1 whole egg
  • 6 egg whites
  • 1/2 tsp vanilla extract
  • 1 heaping tbsp sugar
  • 2 tbsp creamy peanut butter

Steps:

  1. Using a hand mixer, whisk the egg and egg whites until frothy. Add in the vanilla, sugar, and peanut butter until smooth.
  2. Pour 1/4 C batter into a small greased skillet. (I used 1-2 tsp butter between each crepe) Swirl the pan around to create an even crepe. Once the surface bubbles flip and cook another minute. Remove, repeat with remaining batter.
  3. Serve with desired fillings.

*This recipe is adapted from Nora at https://naturalnoshing.wordpress.com/2015/07/26/peanut-butter-crepes-with-cinnamon-cream-cheese-filling-grain-free-src/*

Peanut Butter Crepes  Sew You Think You Can Cook

And if you need an idea for all those leftover egg yolks, might I suggest chocolate frozen custard?

#SundaySupper: Kids Favorite Recipes

I got pretty excited when I saw the theme for this weekend’s Sunday Supper announced a few weeks ago. Kids Favorites! As a relatively new mom, I can answer this prompt from the parental side of the equation.(If you were asking me as a child, my answer would have been Kraft mac and cheese…)

When I thought about what my 2 year old likes to eat, I immediately thought: chocolate. He will occasionally come up to me and straight up ask for chocolate. Now, when he asks for chocolate he really means Nutella. So really… I could just share a recipe for my kid’s favorite food… It’d look like this: Open jar of Nutella, provide a spoon, have a wet napkin handy.

I decided to expand upon that. Another of his favorites: ice cream. I could have done a Nutella ice cream, but when I had this planned on my menu my dad was here for Firecracker’s 2nd birthday. My dad, who is allergic to nuts, needs to have a little something sweet after dinner, so I stuck with plain chocolate. In all actuality, I kind of made the frozen custard more for my dad than for my son; not that Firecracker didn’t get excited for his small bowl of ice cream!

Chocolate Frozen Custard (toddler)  Sew You Think You Can Cook

I started out with one ice cream recipe in mind and then completely switched it up to make a frozen custard as I found myself with 5 egg yolks leftover from a crepe recipe that I’ll be sharing another day.

This ice cream or frozen custard, if you will, is incredibly rich and fully intended for those who adore chocolate. I found serving it with mint or raspberries helped cut the richness. My husband was out of town for work the week after I made this and he was quite bummed to discover that I’d only left him one serving when he returned! Sorry, I’m not sorry.

A big thank you to Ellen of Family Around the Table for hosting a great event. To discover more dishes loved by children, scroll past my recipe.

Chocolate Frozen Custard

Ingredients:

  • 3 C heavy cream, divided use
  • 1/4 C unsweetened cocoa powder
  • 1 C semi-sweet chocolate chips
  • 1 tsp vanilla extract
  • 5 egg yolks
  • 1/3 C sugar

Steps:

  1. Combine 1 1/2 C heavy cream with the cocoa powder in a medium saucepan over medium heat. Whisk continuously until the mixture is smooth. Remove from heat, add the chocolate chips, and stir until melted. Mix in the vanilla. Set aside. (Having only one medium saucepan, I simply scraped the mixture using a spatula into a glass bowl.)
  2. In a medium bowl, vigorously whisk the egg yolks with the sugar until pale yellow.
  3. In another (if you have it) saucepan, heat remaining 1 1/2 C heavy cream over medium heat. Bring to a simmer.
  4. Temper the egg yolks: Take about 1/4 C of the hot cream and whisk into eggs. Constantly whisking, add eggs to milk. Cook over low heat, stirring continuously with a wooden spoon, until the mixture thickens and reaches 170 degrees F. The custard should coat the back of a spoon so that your finger will leave a path.
  5. Strain the custard into a large bowl. Stir in the chocolate mixture from Step 1. Place the bowl of custard in a bowl of ice water to cool, stirring occasionally for 10-20 minutes. (Don’t let the water into the custard!)
  6. Cover the custard with plastic wrap, making sure to make contact with the custard. Place in the refrigerator a minimum of 3 hours.
  7. Follow ice cream maker instructions and freeze. Set frozen custard out at room temperature a few minutes prior to serving.

*This recipe is modified from Sara at http://www.thekitchn.com/recipe-mexican-chocolate-and-almond-ice-cream-dessert-recipes-from-the-kitchn-59333*

Chocolate Frozen Custard for #SundaySupper from Sew You Think You Can Cook

Appetizers

Snacks

Main Dish

Desserts

Sunday Supper MovementJoin the #SundaySupper conversation on twitter on Sunday! We tweet throughout the day and share recipes from all over the world. Our weekly chat starts at 7:00 pm ET. Follow the #SundaySupper hashtag and remember to include it in your tweets to join in the chat. To get more great Sunday Supper Recipes, visit our website or check out our Pinterest board.

Would you like to join the Sunday Supper Movement? It’s easy. You can sign up by clicking here: Sunday Supper Movement

Chicken and Broccoli Teriyaki

I think kids have a natural-born radar for sweets. The other day I was enjoying a homemade rice krispie treat and Firecracker walked over to me and took a bite of it right out of my hand. Now, he’s never seen a rice krispie treat before, how was he to know what it was?! He wouldn’t have done the same thing if it were celery in my hand instead. I was highly amused and slightly baffled.

While I’m on that note: Can someone please explain to me why if it comes out of a package or box my 2 year old will devour it?

As is normally the case if it comes from a restaurant. Chicken Teriyaki from the mall food court, perfect. Chicken Teriyaki made by Mom, no thanks. Maybe he sensed that the chicken wasn’t battered and fried…? My 8 month old enjoyed it at any rate. I think my husband enjoyed it most of all, if only just for the excuse to use his Darth Vader Lightsaber Chopsticks.

Chicken and Broccoli Teriyaki

Ingredients:

  • 2/3 C sugar
  • 1/2 C + 2 tbsp water, divided use
  • 1/3 C soy sauce
  • juice 1/2 lemon
  • 1 clove garlic, minced
  • 1 tsp grated ginger
  • 2 tbsp cornstarch
  • 2 tsp canola oil
  • 1 large chicken breast, chopped or sliced
  • 2 C broccoli florets
  • 1-2 scallions, thinly sliced (optional)

Steps:

  1. Combine sugar, 1/2 C water, soy sauce, lemon juice, garlic, and ginger in a small saucepan. Bring to a boil over high heat. Reduce the heat to a simmer. In a small bowl whisk together the cornstarch and 2 tsbp water until smooth. Add to the sauce. Allow sauce to thicken over low heat.
  2. In a wok or large skillet, heat canola oil over medium-high heat. Season chicken with S+P, saute chicken until browned and fully cooked. Add the broccoli to the pan and cook until tender.
  3. Add as much teriyaki sauce to the chicken and broccoli as desired, tossing to coat.
  4. Serve over a bed of rice and garnish of scallions.

*The sauce recipe is adapted from Kylee at http://www.kyleecooks.com/2016/06/homemade-teriyaki-sauce.html*

Chicken and Broccoli Teriyaki  Sew You Think You Can Cook

Disclaimer: This post contains affiliate links.

#MuffinMonday: Apple Blackberry Muffins

fb5cd-muffin2bmonday2bcrop#MuffinMonday is a group of muffin loving bakers who get together once a month to bake muffins to brighten their Mondays. There isn’t a theme to #MuffinMonday posts so anything goes, as long as it’s a muffin!

You can see all our of lovely muffins by following our Pinterest board. Updated links for all of our past events and more information about Muffin Monday can be found on our home page.

I am sharing with you this month a muffin I made way back in May after one of our weekly trips to the Farmers Market. I had picked up some blackberries from one of my favorite vendors for my husband. I am not the biggest blackberry lover mainly due to their texture. I didn’t think my husband would actually eat the entire carton of berries before they started to spoil so I decided to make muffins with about half of them. While assembling all of the baking supplies and getting my little helper situated, he started eating all of the berries! I knew I couldn’t use the fruit in the muffins, now; anything healthy my picky eater will willingly eat is all his! We had frozen blackberries for smoothie making, so I carried on with my muffin plan.

You’ll notice the recipe doesn’t call for any butter or oil, making them a little bit healthier than most breakfast treats I bake. I mean, there’s still sugar and syrup involved so it balances out, right? The downfall to not having butter or oil in the recipe means they’ll stick to muffin liners, so be sure to spray them as you would a non-lined muffin tin.

Apple Blackberry Muffins (toddler)  Sew You Think You Can Cook

Firecracker really enjoyed these muffins. I’m pretty sure he had 3 in one day.

I froze half of the muffins and had a quick morning snack throughout the month, I simply popped them in the microwave for 20-30 seconds.

This recipe makes 2 dozen muffins.

Apple Blackberry Muffins

Ingredients:

  • 3 C whole wheat flour
  • 3 1/2 tsp baking powder
  • 1 tbsp cinnamon
  • 1/2 tsp salt
  • 1/8 tsp baking soda
  • 1 large apple, peeled and finely diced
  • 2 eggs
  • 1/2 C brown sugar
  • 1 C milk
  • 1/2 C Greek yogurt
  • 1/2 C cinnamon applesauce
  • 1/4 C maple syrup
  • 2 tsp vanilla extract
  • 1 C blackberries, chopped

Steps:

  1. Preheat oven to 425 degrees F. Grease a muffin tin, even if using liners.
  2. In a large bowl, whisk together the flour, baking powder, cinnamon, salt, and baking soda. Add the apples and toss to coat until evenly distributed.
  3. In another bowl, whisk together the eggs and brown sugar. Mix in the milk, yogurt, applesauce, syrup, and vanilla.
  4. Add the wet ingredients into the dry ingredients, mixing until just combined. Gently fold in the blackberries. Fill muffin cups 3/4 of the way.
  5. Bake muffins for 5 minutes. Reduce oven temperature to 375 degrees F and bake another 15 minutes, or until a toothpick comes out cleanly.

*This recipe is adapted from Sally at http://sallysbakingaddiction.com/2013/10/14/sky-high-blackberry-apple-muffins/*

Apple Blackberry Muffins for #MuffinMonday from Sew You Think You Can Cook

And don’t forget to check out these other muffin recipes:

Cappuccino Chip Muffins by Palatable Pastime

Cheesy Chile Corn Muffins (Gluten Free) by Farm Fresh Feasts

Cinnamon Swirled Muffins by Passion Kneaded

Fresh Peach Muffins by Karen’s Kitchen Stories

Lemon Meringue Muffins by Making Miracles

Phase 3 Muffins by A Day in the Life on the Farm

Raspberry Mini Muffins by Food Lust People Love

#SundaySupper: Hamburgers and Hotdogs

4th of JulyWhen we found out how big the Fourth of July is here we knew that we’d be hard pressed to leave our home via vehicle that weekend. We also knew that we’d be able to see multiple firework shows from our balcony. With that in mind we were on the hunt for patio furniture. And we cut it close. Father’s Day weekend we drove all over town stopping at different furniture stores doing price checks. We did not purchase anything. We then re-measured the patio because I was quite skeptical that what we were thinking would actually fit. I’m glad I did because we would have definitely over purchased seating! The following weekend we went to Home Depot in the hopes that what we wanted would be in stock or delivered in time for the following weekend. Luck was on our side and we managed to fit all items in the back of the van. We then spent a couple of nights that week assembling chairs after the boys went to bed. Mission accomplished, we watched fireworks under Old Glory while the boys dozed off to sleep in our laps. It was the only thing that went right that weekend as I had come down with a 30 hour stomach bug – there wasn’t any company, grilling, sangria, or rice krispie treats.

IMG_9435The following week, we finally broke out the grill! And just in time, too, for today’s themed Sunday Supper of Hamburgers and Hotdogs. July is National Hotdog month, but the tastemakers at Sunday Supper Movement broadened the recipes to include the hotdog’s best friend, hamburger. Be sure to scroll past my recipe to see more great ideas for your next summer grilling bash. This event is hosted by Christie of A Kitchen Hoor’s Adventures.

I am not afraid to admit that I love a good hotdog. I enjoy mine topped with mostly yellow mustard and just a little bit of ketchup.  but, if it’s really good (aka Boar’s Head all-beef) I don’t require anything to dip it in either. I’ve never tried any fancy toppings, so I am sharing a fun hamburger with you instead.

A miso glazed chicken burger. This chicken burger is full of flavor and incredibly moist. Stuart labeled it our best executed burger yet! Instead of 4, I divided the meat into 5 patties, taking that 5th one and turning it into meatballs for the boys. The original recipe served these burgers with a cabbage apple slaw. Unbeknownst to me, my husband took our last apple to work that day! I ended up just “winging it” and created a dressing from the glaze for the coleslaw. The apple would have provided an extra crunch and freshness, but we had no complaints. There’s celery in the patty (which I thought was quite strange) that helps provide some of that texture anyway.

Miso Glazed Chicken Burgers

Ingredients:

  • 1 lb ground chicken
  • 1 rib celery, finely diced
  • 1/3 C finely diced onion
  • 1/2 C panko breadcrumbs
  • 1 egg white
  • 1 tbsp sesame oil
  • 1 tsp Kosher salt
  • 1 tsp pepper
  • 1/4 C miso paste
  • 5 tbsp apple cider vinegar, divided use
  • 1 1/2 tbsp brown sugar, divided use
  • 2 C coleslaw or shredded cabbage
  • 4-5 sesame seed hamburger buns

Steps:

  1. In a large bowl mix the chicken, celery, onion, panko, egg white, sesame oil, S+P with your hands until combined. Divide into 4-5 patties. Cover and put in refrigerator at least 30 minutes to firm up.
  2. In a small bowl combine the miso, 4 tbsp vinegar, and 1 tbsp brown sugar.
  3. In another large bowl, combine 1/3 of the miso glaze from Step 2 with the remaining vinegar and brown sugar. Add the slaw and toss to coat. Set aside.
  4. Grill burgers 6 minutes on each side. Brush the burgers with the remaining glaze from Step 2. Cook another 2 minutes, flip, brush with more glaze, and cook 2 more minutes, or until an internal temperature of 165 degrees F is reached.
  5. Place burgers on a sesame seed bun and top with the dressed cabbage.

*This recipe is modified from Cheryl at http://www.countryliving.com/food-drinks/recipes/a3885/miso-glaze-chicken-burgers-cabbage-apple-slaw-recipe-clv0612/*

Miso Glazed Chicken Burgers for #SundaySupper from Sew You Think You Can Cook

All American Burgers & Dogs

Cluck Burgers

Worldly Burgers & Dogs

Where’s the Beef Burgers

Where’s the Bun Burger

Dessert Burger

How to

Sunday Supper MovementJoin the #SundaySupper conversation on twitter on Sunday! We tweet throughout the day and share recipes from all over the world. Our weekly chat starts at 7:00 pm ET. Follow the #SundaySupper hashtag and remember to include it in your tweets to join in the chat. To get more great Sunday Supper Recipes, visit our website or check out our Pinterest board.

Would you like to join the Sunday Supper Movement? It’s easy. You can sign up by clicking here: Sunday Supper Movement

#BundtBakers: Secret Garden

4ae7b-bundtbakerspostI have been sitting on this cake for months! And that is not an exaggeration. Sue of Palatable Pastime is hosting and announced the theme of “Secret Garden” earlier this year. She defined the task by making a cake with flowers, herbs or summer vegetables. #BundtBakers is a group of bundt loving bakers who get together once a month to bake bundts with a common ingredient or theme. We take turns hosting each month and choosing the theme or ingredient.

I opted for the “herbs” qualification and used up my massive amount of mint! I quickly decided on doing a mojito bundt. For Cinco de Mayo we met with some of my husband’s new coworkers at a local Mexican restaurant to celebrate their project kick-off. Neither of us are really big margarita fans and we figured we’d try the mojito instead. I had forgotten about that particular cocktail over the years. I remember first having one at my neighbors house some 6-odd years ago with some homegrown sugar cane and mint – delicious.

This recipe was the first that I photographed with my new macro lens. In addition to my obsession with photographing blood oranges, I’ve found zoomed-in photos of zest to be fascinating.

As you probably know by now, I am not a huge fan of frosting in general, but specifically on my bundt cakes. I hate covering up the intricate details of my bundt pans. This cake did need more than just powdered sugar, so I decided to create a simple lime glaze and toss in some finely chopped mint for extra measure to top these moist, boozy cakes.

I used my Bundt Duet Pan for these Mojito Bundt Cakes.

Mojito Bundt Cakes

Ingredients for the cake:

  • 2 C flour
  • 2 tsp baking powder
  • 1 tsp baking soda
  • 1/2 tsp salt
  • 2 stick butter, softened
  • 1 C sugar
  • 1 egg
  • 2 tsp vanilla
  • 2 tsp lime zest
  • 2 tsp finely chopped fresh mint
  • 1/2 C rum
  • 1 1/4 C applesauce

Ingredients for the glaze:

  • 2 C powdered sugar
  • juice 1/2 lime, or to taste
  • lime zest
  • fine chopped fresh mint

Steps:

  1. Preheat oven to 350 degrees F. Grease two 2.5 C bundts.
  2. In a large bowl, whisk together the flour, baking powder, baking soda, and salt.
  3. In the bowl of a stand mixer fitted with the paddle attachment, cream the butter and sugar. Add the egg and vanilla and mix until combined. Add in the lime zest, mint, and rum and mix until fully incorporated.
  4. Add 1/3 of the dry ingredients, mixing until combined. Add 1/2 of the apple sauce, mixing until combined. Repeat, ending with the dry ingredients.
  5. Divide batter between the bundt pans. Bake 45-50 minutes, or until a knife inserted comes out cleanly. Allow cakes to cool in the pan before removing to a cooling rack.
  6. Make the glaze: Whisk together powdered sugar and lime juice until smooth. Fold in the lime zest and mint. Top cooled cakes with the glaze. Garnish with extra lime zest and mint, if desired.

*This recipe is modified from Kat at http://www.gooseberrymooseberry.com/2012/03/mini-mojito-cupcakes.html*

Mojito Bundt Cakes for #BundtBakers from Sew You Think You Can Cook

You can see all our of lovely Bundts by following our Pinterest board. Updated links for all of our past events and more information about #BundtBakers, can be found on our home page.

And don’t forget to take a peek at what other talented bakers have baked this month:

Almond Lavender Bundt by The Queen of Scones

Carrot Bundt Cake with Chamomile Orange Icing by Patty’s Cake

Chocolate and Mint Cake by Baking Yummies

Ginger & Lemon Crackle Courgette Bundt Cake by Baking in Pyjamas

Elderflower and Lemon Bundt by Jane’s Adventure in Dinner

Lavender & Honey Bundt by Living the Gourmet

Lavender & Lemon Bundt Cake by I Love Bundt Cakes

Lavender Lemonade Bundt by All That’s Left Are The Crumbs

Lemon and Rosewater Cake by Palatable Pastime

Lemon Balm Bundt Cake by Magnolia Days

Lemon Zucchini Bundt with Sugared Pansies by A Day in the Life on the Farm

Roses & Lemon Bundt Cake by kidsandchic

Spiced Zucchini Bundt Cake by Making Miracles

Sweet Chocolate Feel the Beet Cake by Faith, Hope, Love, & Luck Survive Despite a Whiskered Accomplice

Vanilla Rose Bundt with Edible Flowers by Our Good Life

Yorkshire Parkin Mini Bundt by Food Lust People Love

Zucchini, Cheddar and Chive Bundt by Cookaholic Wife

CIC: Corn and Peaches

CIC-header

I’m finally back with the Crazy Ingredient Challenge crew! It’s been half a year since I’ve been able to participate. While I did lose 3 months to our move across the country and lack of internet, usually I simply let it get away from me, not having enough time to pull something together. Often times the 20th of the month simply fell on another posting day for another culinary group and my ability to keep up with a double posting day is fairly lacking. But not this time!

This month’s crazy ingredient challenge was to come up with a dish combining corn and peaches. A perfect combination of summer flavors. I made sure to not only get this event written down in my planner, but also wrote down the day I’d be making the dish in my “to-do” column last week.

I’m not the biggest fan of peaches, (or so I thought) but my husband is and so I thought of him in coming up with an idea. I thought of doing something with the grill, maybe a salsa? And then all of a sudden an idea of cornbread came to me! I’m not sure where the inspiration came from, but I ran with it. I thought about grilling the peaches and then chopping them up into the dough. But let’s be honest, I don’t work the grill and I didn’t want to have to wait for Stuart to get home from work. So, “upside down cake” became the direction I went.

Peach upside down cornbread is such a fun take on the southern classic side dish. And one that makes cornbread that much better. I always find cornbread to be dry and begging for a dunk in honey or barbecue sauce. Not this one, it’s got the sweetness and moisture baked right on top of it!

Oh, and you know that side bar “or so I thought?” We’d picked up white peaches from Whole Foods instead of yellow and surprise! I found them to be amazing. Evidently I much prefer white peaches to yellow. Now I can’t wait to check the farmer’s market for some white peaches!

Peach Upside Down Cornbread

Ingredients:

  • 2 C cornmeal
  • 1 tbsp sugar
  • 2 tsp baking powder
  • 1 tsp Kosher salt
  • 1/2 tsp baking soda
  • 2 eggs
  • 1 C buttermilk
  • 1 C canned creamed corn
  • 2 tbsp canola oil
  • 1/3 C loosely packed brown sugar
  • 2 peaches, sliced

Steps:

  1. Place a cast iron skillet in the oven. Preheat oven to 450 degrees F.
  2. In a large bowl whisk together cornmeal, sugar, baking powder, salt, and baking soda.
  3. In another bowl whisk together the eggs, buttermilk, and creamed corn. Add the dry ingredients to the wet ingredients, mix until combined.
  4. When oven is preheated remove the skillet. Carefully swirl the oil into the skillet and evenly spread out the brown sugar. Lay the sliced peaches into the skillet, covering the area. Pour cornbread batter over top.
  5. Bake 20 minutes until golden. Allow cornbread to cool in the pan 10-15 minutes. Place a large plate or cutting board on top of the skillet and turn it upside down.

*The cornbread recipe is adapted from Alton Brown at http://www.foodnetwork.com/recipes/alton-brown/creamed-corn-cornbread-recipe.html*

Peach Upside Down Cornbread for #CrazyIngredientChallenge from Sew You Think You Can Cook

To see the other bloggers who participated in this month’s Crazy Ingredient Challenge click on the link below.

SRC: Mini Pecan Pie Cupcakes

newsrcbanner

It’s Secret Recipe Club Reveal Day! In the Secret Recipe Club, each participating blogger is assigned a blog from another participating blogger and secretly searches their site for something to recreate. The accompanying blog post then goes live on reveal day! So while I was immersed in my assigned blog, someone else was picking through mine! I’m so excited to be part of this group, to see what on my blog peaks other’s interests and to stumble upon new blogs and new recipes.

I had to chuckle when I received my assignment in my email this month. You see, for the past two reveals April of Angels Home Sweet Homestead was assigned my blog! For our themed barbecue/picnic reveal she made Mexican Street Corn Salad and for our traditional Group C reveal she chose Cinnamon and Honey Roasted Chickpeas. I suppose it was only fitting that I took my turn diving more deeply into April’s blog.

April’s philosophy behind her blog is fantastic. She writes:

I want to bring back a simpler way of life, where families sit down together to a home cooked meal and talk every day, growing as much of that food as possible with our own hands, and the old-fashioned art of canning that food too.

I just love that! While I can’t grow my own food – partly due to lack of yard but mostly due to lack of green thumb – I can provide home cooked meals for my family. After our 18 months in Ohio without a dining table, it was a goal for our California home to have a space dedicated to eating family dinners. Our large table fits perfectly off the kitchen (and doubles as extra counter space) and is set with two booster/highchair seats for my boys. We have finally gotten into a rhythm of dinner between 6-6:30 and I love it! Firecracker is reaching an age where he can recount the day’s activities to Daddy and I know that as the boys continue to get older, the stress of eating will give way to pure enjoyment and nurturing our relationships and bodies.

Seven recipes made their way to my secret Pinterest board from April’s blog including Fruity Breakfast Burritos, Restaurant Style Salsa, and Greek Yogurt Tuna Salad. I was going to show the list to my husband and have him decide what I’d make. But then I didn’t. Though I’m pretty sure I picked the “right” answer anyway.

While I was updating my planner this month I decided to take a peek at the food holidays for July. I was slightly surprised to see that National Pecan Pie Day isn’t in the fall, but it’s July 12th! My decision was made. April had on her blog, and a recipe that I’d saved prior, Pecan Pie Muffins.

Now, I’m not sure these qualify as a muffin. That’s why you’ll notice I renamed them cupcakes. Though I’m not sure if that’s accurate either. Muffins imply a little bit of healthiness. There’s absolutely nothing healthy about these sweet bites.I could say that pecans are a source of protein, but that’s really stretching it. I almost just called them Mini Pecan Pie Cups but without a crust I don’t think they qualify as pie.

Whatever you want to call them, they’re pretty delicious. (And that’s coming from someone who doesn’t care for pecan pie!) I ate two within an hour of them coming out of the oven – one to taste test and one as a snack during their photo shoot.

April made hers in a regular size muffin cup and got 6 of them, but I thought mini would be the way to go. I can’t have my husband taking only 3 to work, because let’s be honest, there’s no way all 6 would be leaving the house untouched. I’m glad I made them mini, too, because I don’t think I’d be able to eat an entire muffin of this dessert before my sweet tooth had enough.

Firecracker helped bake these treats, but he won’t be getting to try them – they’re simply too sticky and sweet for my 2 year old. Now I just have to send them with Stuart to work so he doesn’t see them sitting on the counter.

This recipe makes 24 mini muffins/cupcakes. I recommend baking these without liners, no greasing of the pan necessary – there’s plenty of butter in the batter. I was 2 liners short of 24 and those two cups were our favorites because the sugar gets all crispy and crusty on the edges. If you do use liners, not that they’re much easier to peel back if you allow the cupcakes to cool completely before eating.

Mini Pecan Pie Cupcakes

Ingredients:

  • 1 C brown sugar
  • 1 C chopped pecans
  • 1/2 C flour
  • 2/3 C butter, melted
  • 2 eggs, beaten

Steps:

  1. Preheat oven to 350 degrees F.
  2. In a large bowl, whisk together the sugar, pecans, and flour. Mix in the butter and egg until combined.
  3. Divide batter evenly among 24 mini muffin tin cups.
  4. Bake 18 minutes. Transfer to a cooling rack.

*This recipe is adapted from April at http://www.angelshomesweethomestead.com/2011/01/pecan-pie-muffins.html*

Mini Pecan Pie Cupcakes for #SecretRecipeClub from Sew You Think You Can Cook

To see the other bloggers who participated in The Secret Recipe Club this month click here: