Last week I was home sick from work. Which was great because I slept until 10:45 and then got to catch up on some of my favorite Food Network shows while curled on the couch drinking orange juice and water. But the biggest problem with being home during the day is what to do for lunch.
I have a confession to make.
I hate making lunch. I don’t know why. Sandwiches are always easy to put together, but I just hate doing it! Pulling out so many ingredients to simply place between bread for a not-so-spectacular sandwich just doesn’t seem worth it! When it comes to packing lunches for work, it’s usually leftovers or PB&J. And always a serving a fruit or vegetable.
My usual go to at home lunch is a grilled cheese sandwich. But I just wasn’t feeling it. So I decided to try grilling a peanut butter and jelly sandwich.
One question: Why haven’t I done this before?!
The crispiness of the bread and the ooey-gooey warmth of the peanut butter make for a completely different sandwich. This sandwich is almost bordering on breakfast – it reminded me of a stuffed french toast.
And the possibilities are endless – use Nutella, any flavor jam or jelly you like, marshmallow cream, fresh fruit…
Grilled PB&J
Ingredients:
2 slices of sandwich bread
butter or margarine, for spreading
peanut butter, for spreading
jam or jelly, for spreading
Steps:
Heat a small skillet over low to medium heat.
Butter one side of each slice of bread. Spread peanut butter on the opposite side of one slice and jam on the other. Sandwich together so that both buttered sides are facing out.
Place sandwich butter side down in warm skillet. Cook over medium heat until bottom piece of bread is golden.
Flip sandwich to toast the 2nd side until the bread is golden and the filling warm.
Today is another Secret Recipe Club Reveal Day! In the secret recipe club, each participating blogger is assigned a blog from another participating blogger and secretly searches their site for something to recreate. The accompanying blog post then goes live on reveal day! So while I was immersed in my assigned blog, someone else was picking through mine! I’m so excited to be part of this group, to see what on my blog peaks other’s interests and to stumble upon new blogs and new recipes.
This month I was assigned Jaime’s blog Mom’s Test Kitchen. I know it sounds silly, but my favorite thing about her blog is her tagline “What the Fork’s for Dinner.” Her About Me section is very well written and makes me laugh in all the right places. Particularly the part about the unexpected arrival of Princess P. Being pregnant, it’s fun to feel connected to Jaime as she shares her loving frustrations with pregnancy. (But sorry, Jaime, I actually LOVE being pregnant! But it probably helps that I still have yet to be touched by complete strangers – 9 weeks to go!) After becoming a stay-at-home-mom, Jaime started her blog as a way to keep organized and reawaken her adult self. Since then her “corner of the blog world” has boomed into the very impressive blog that she currently runs; Jaime participates in multiple Link Parties and features guest posts!
Pregnancy cravings have had me wanting to run to the nearest Dunkin (thankfully that’s 20 miles away and the efficiency-lover in me prevails) so I am very impressed that I didn’t recreate her Cinnamon Sugar Donut Muffins for this blog post (there’s still a good possibility I’ll end up making them). Due to Lent no-meat Fridays I was drawn to this Easy Vegetable Pot Pie, but it turned out that I don’t think I ever ended up cooking on Fridays – strange. But then a recent post on April 3rd sealed the deal: Candied Tomato Margherita Pizza.
I made this pizza after church on Easter Sunday (so her Empty Tomb Buns were a big contender too; but I’ll save them for when my future child is old enough to understand). Because I made this on Easter Sunday, a day when grocery stores were closed, my shopping fail in forgetting to buy fresh basil couldn’t be remedied. So naturally, I substituted bacon.
I used my pizza dough recipe and made 3 personal pizzas for Stuart and me to share. (The fourth ball of dough is now living in my freezer for another day.) The first I topped with the candied tomatoes and some crispy bacon. But it really was needed that something. That something was the basil I didn’t have. At least one of us had a head on our shoulders and Stuart suggested using the dried basil out of the spice cabinet. Perfect! Being the meat eater that he his, Stuart enjoyed the bonus bacon but I don’t feel it really added anything to the pizza so one of our 3 pizzas didn’t have any on it.
If you’ve never candied tomatoes – I hadn’t before this – I urge you to make some now. Put them on this pizza, put them in a sandwich, or eat them plain, I don’t care. But I do insist that you add tomatoes and brown sugar to your grocery list.
Preheat oven to 350 degrees F. Line a baking sheet with parchment paper.
Starting with 1/2 C of brown sugar, coat both sides of the tomatoes with sugar. Use more sugar if needed. Place tomatoes in a single layer on the baking sheet.
Bake for 30 minutes. Flip the tomatoes and bake another 15 minutes.
Place pizza stone in the oven and preheat to 450 degrees F (or follow instructions for your particular dough).
Roll pizza dough out and place on pizza peal (or rimless cookie sheet) that has been sprinkled with cornmeal. Brush entire crust with olive oil, sprinkle with salt, top with cheese, basil, candied tomatoes, and bacon.
Bake for 9 minutes (or follow instructions for your particular dough).
*This recipe is adapted from Jaime at http://momstestkitchen.com/2014/04/candied-margherita-pizza.html*
To see the other bloggers who participated in the Secret Recipe Club this month click here:
I have one more tried and true recipe from April’s edition of Food Network Magazine for this month.
It comes from their “Weeknight Meals” section.
In fact, it looked so good and so easy that I actually made it the same week I received my magazine in the mail!
They suggested serving it with grits, but I went with the more classic mashed potatoes. So I know that my nutrition facts are different from theirs, which indicated this meal is only 483 calories with 45 grams of protein and 18 grams of fat. (To achieve their numbers serve the pork chops and onion gravy with 3/4 C quick-cooking grits and 1/2 C shredded cheddar cheese.)
I am not a huge fan of gravy, and only ever “indulge” in it on Thanksgiving, but I have to admit this onion gravy was spot on. I do love onions so I’m sure that had something to do with the happy dance my taste buds were doing.
Pork Chops with Onion Gravy
Ingredients:
4 3/4″ thick pork chops
2 tsp vegetable oil
2 red onions, thinly sliced
1 tbsp flour
1 C chicken broth
1 bay leaf
1 1/2 tsp balsamic vinegar
fresh parsley, for garnish
Steps:
Season pork chops with S+P. In a large skillet over medium-high heat, brown both sides of pork chops in vegetable oil, 3 minutes per side. Remove from the pan and set aside.
Add onions to the skillet and cook, stirring, for 3 minutes. Reduce heat to medium and stir in the flour, cook another 2 minutes. Add the broth and bay leaf until thickened. Add the vinegar.
Return pork chops to the pan and cook until the pork is cooked through.
Serve pork smothered in the onion gravy and garnished with fresh parsley.
As a result, you get the more popularly known Taco Tuesday.
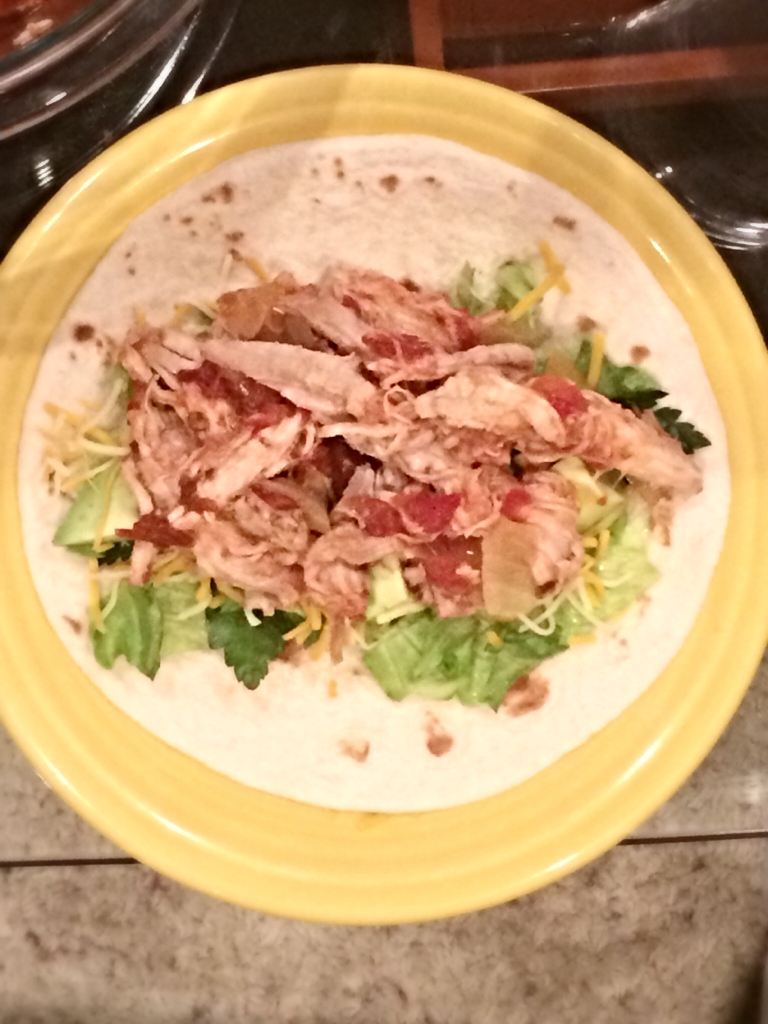
Stuart picked out this recipe off of foodgawker to have on one of our Mexican Mondays, but I altered it by taking advantage of my slow cooker and using pork instead as it was on sale and chicken was not.
On this particular Monday we both had a long day at the office (due to the fact that we carpool), so the decision to use the slow cooker was even more clutch! And because we got home late and were very hungry, photos were not taken. I did think enough to snap a photo with the trusty iPhone. Please accept my apologies for the sorry photograph.
Chipotle Pulled Pork Tacos
Ingredients:
2 lb boneless pork roast
1 onion, chopped
2 cloves garlic, minced
1 can (28 oz) diced tomatoes
3 chipotle peppers in adobo, chopped
lime
Steps:
Place pork in slow cooker, fat side up. Trim some of the fat if desired.
Top pork with onions, garlic, tomatoes, and chipotle peppers.
Cook on LOW 4-5 hours.
Shred the pork and return to the sauce and squeeze with the lime. Keep warm until ready to assemble tacos.
This month’s Crazy Ingredient Challenge reveal day falls on Easter so our host Dawn of Spatulas on Parade picked the ever popular Easter candy Peeps to be paired up with Lemons!
But back to April’s CIC post. The biggest challenge with this month was using an already finished product.
Leave it to the preggo to come up with a cocktail! (Please don’t call child services, but I did taste a sip so I could validate that the recipe works!) I present to you the perfect cocktail for your Easter Sunday – Marshmallow Peeps Lemon Drop Martini. This is definitely what adults want in their Easter basket. If we can’t hunt for eggs, then we might as well sip on something fun!
Marshmallow Peeps Lemon Drop Martini
Ingredients:
3 yellow peeps (any color will do, but a yellow lemon cocktail looks best)
3/4 C vodka
1/2 C sugar
1/2 C water
3/4 C lemon juice
sprinkles (optional)
Steps:
In a jar soak peeps in vodka for at least 4 days. Remove Peeps from vodka (strain if they’ve fallen apart).
In a small saucepan dissolve sugar in water over medium-high heat. Allow to cool.
Place sprinkles on a flat plate. Run a slice of lemon along the rim of the martini glass and gently twist the glass in the sprinkles.
In a cocktail shaker with ice combine equal parts lemon juice, simple syrup, and Peeps vodka. Pour into martini glasses.
To see the other bloggers who participated in this month’s Crazy Ingredient Challenge click on the link below.
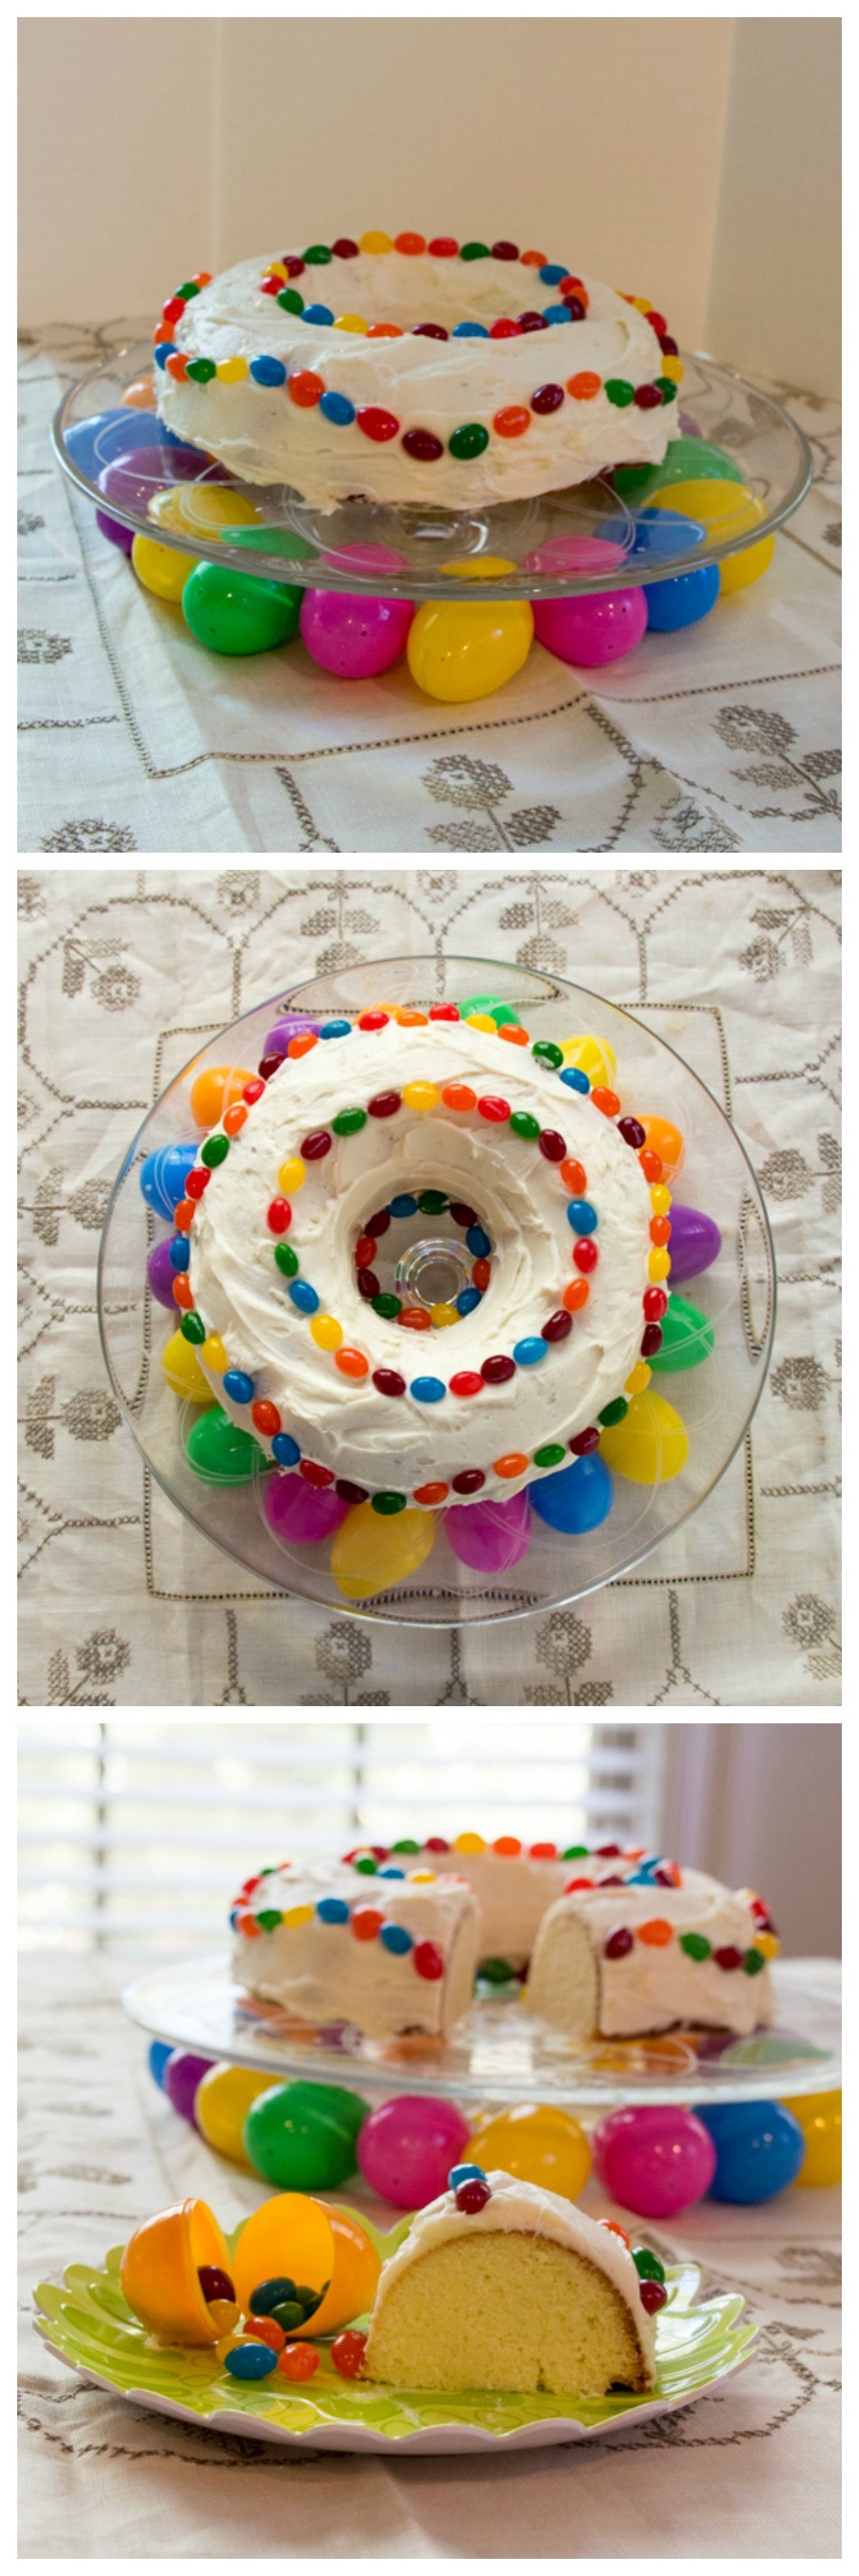
This is my second month as a member of #BundtBakers. #BundtBakers is a group of bundt loving bakers who get together once a month to bake bundts with a common ingredient or theme. We take turns hosting each month and choosing the theme or ingredient. This month’s theme is Easter and our lovely host is Tara from Noshing with the Nolands.
My first bundt was one of my grandmother’s recipes. This month’s bundt is as well.
With a theme of Easter there wasn’t any question in my mind as to what I would make. Busia would always make her pound cake and bake it in a Lamb or Chick cake mold and it would always be decorated with jelly beans. My mom has the chick cake mold but unfortunately we haven’t been able to find the lamb. I might just have to order a Spring Lamb 3-D Cake Mold off of Amazon. The first year I made this recipe we were having a group of friends over for Easter and I thought it’d be fun to serve cupcakes, and I decorated them with jelly beans to create a cute spring landscape.
2011 Easter Cupcake Landscape
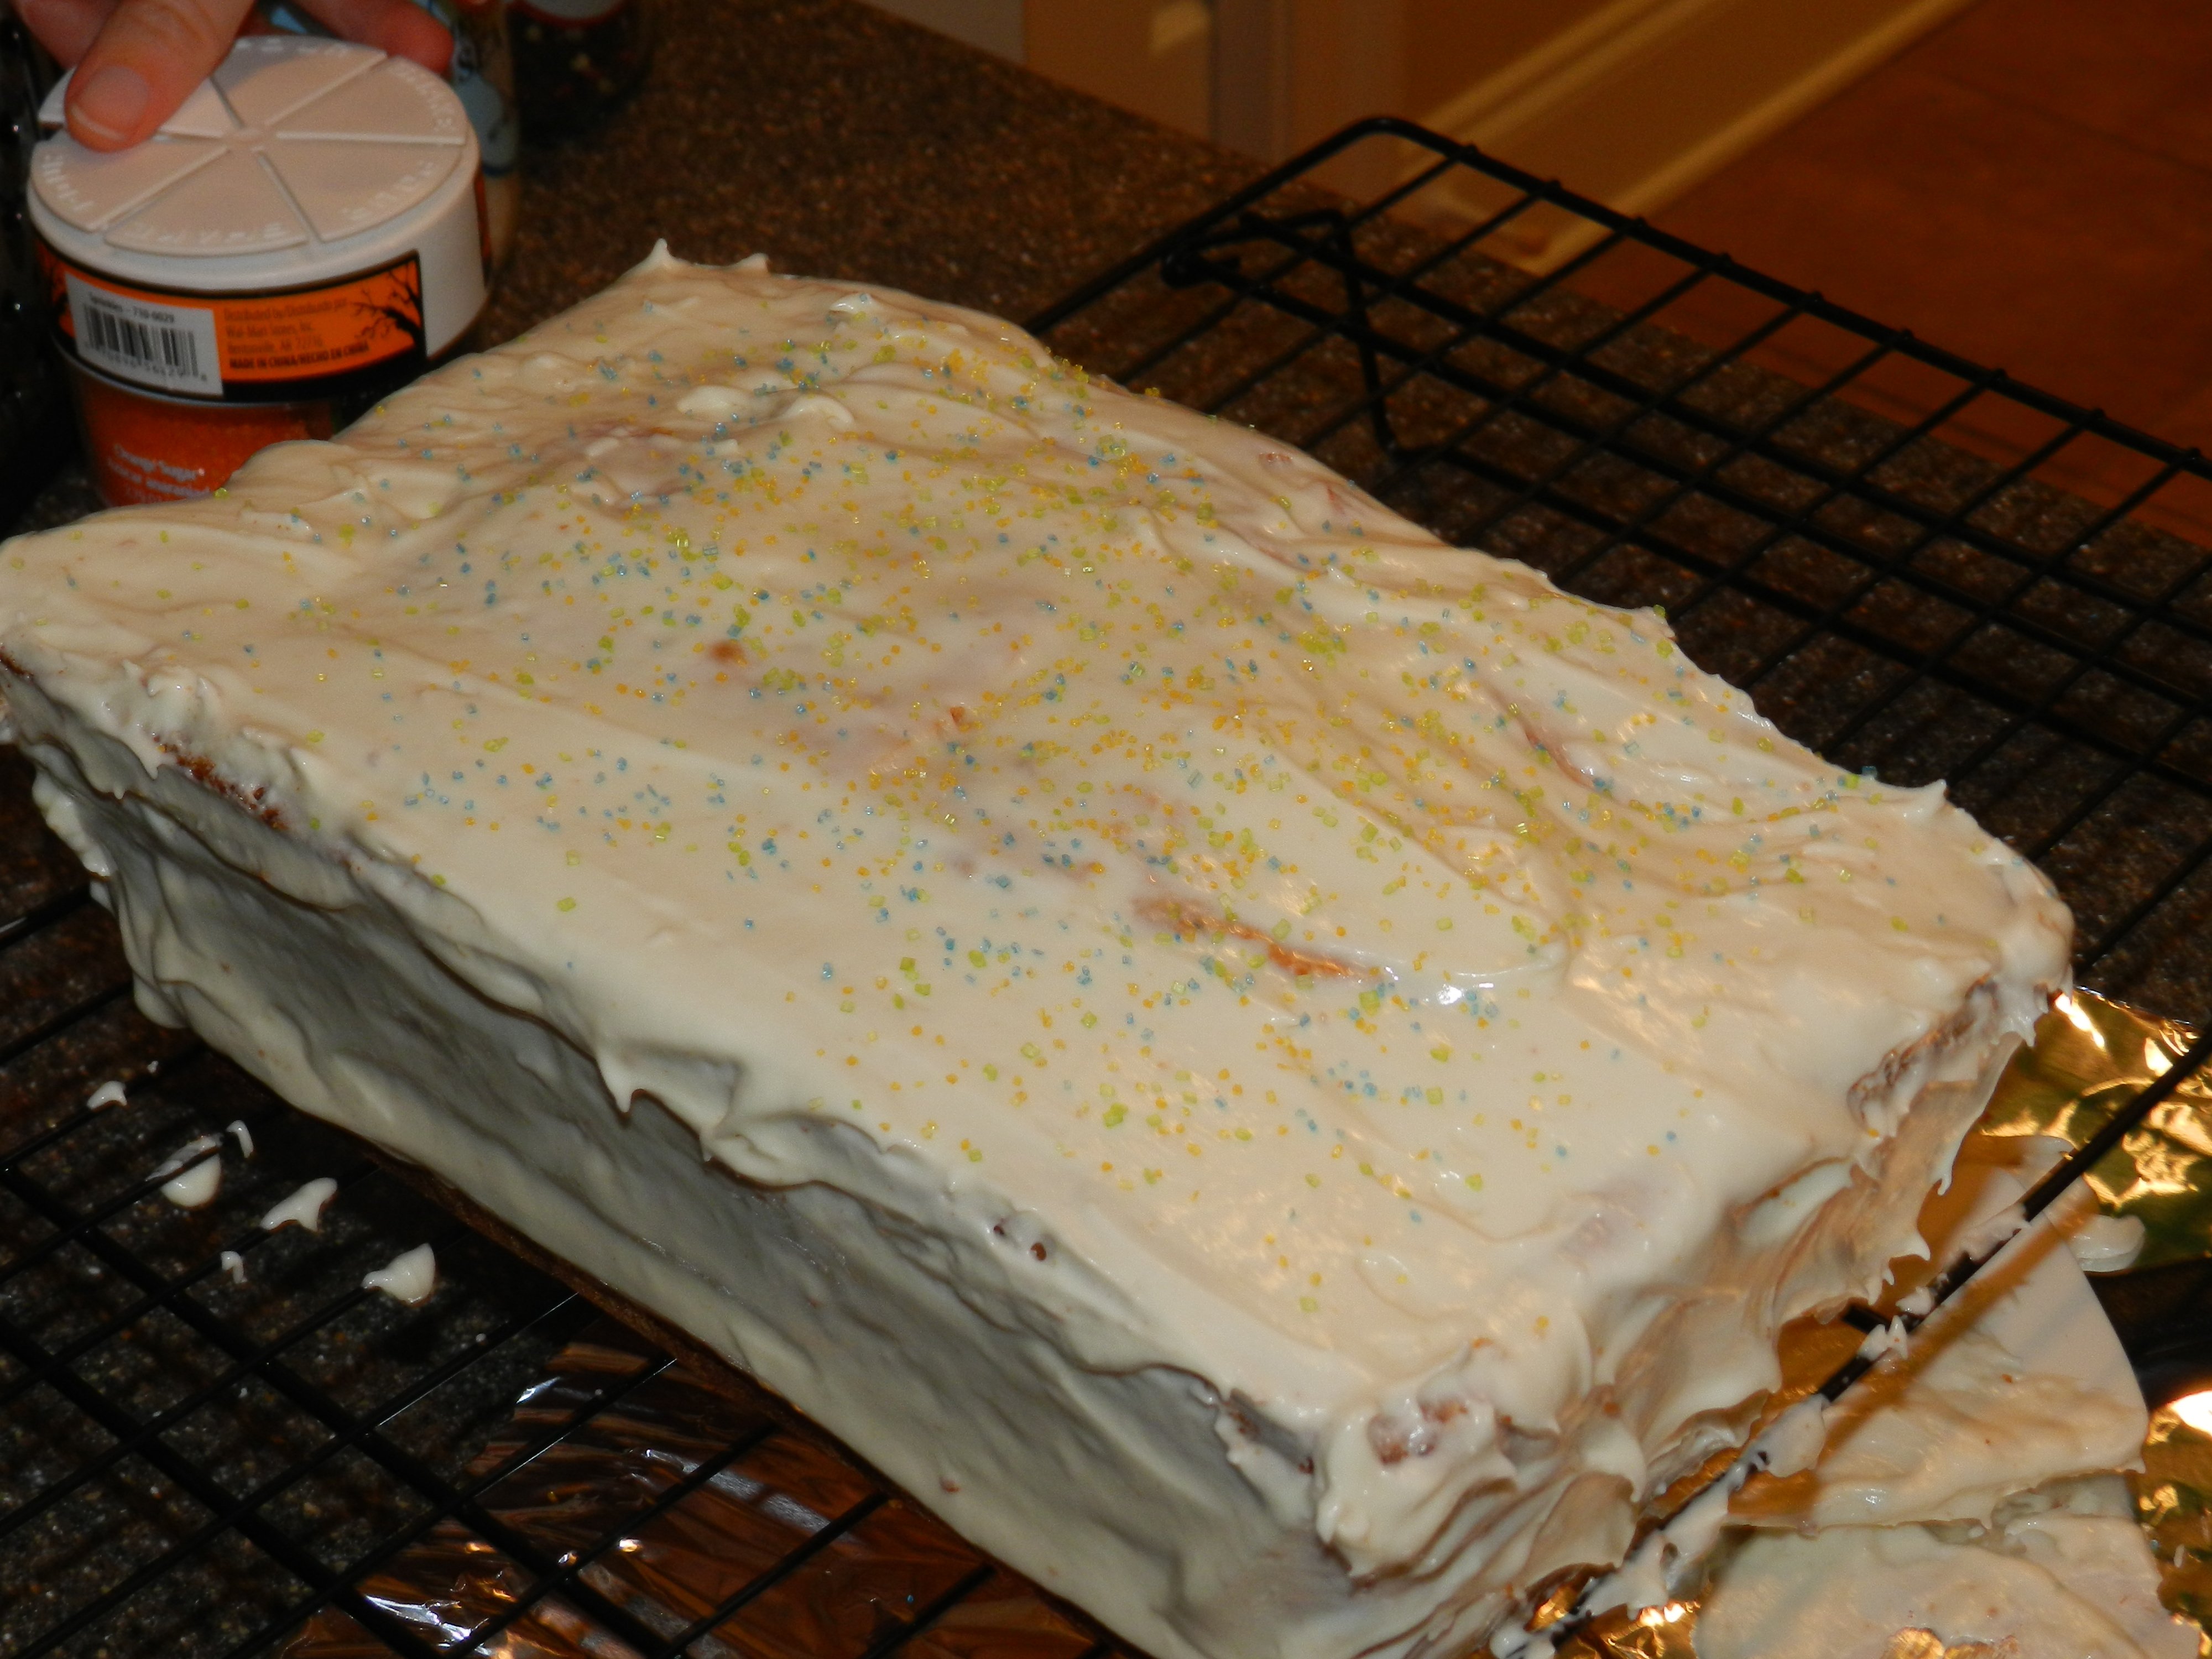
As I think is the norm for pound cake I made the recipe in a loaf pan. But I always had problems with the top cracking, and I have issues when it comes to frosting cakes so it was never pretty.
2012 Easter Pound Cake
Given that this blogging group is called #BundtBakers, this year I used my bundt pan to make my most beautiful Easter cake yet! Because the top of the cake becomes the bottom of the cake I didn’t need to worry about frosting uneven cake. The mold of the cake pan created a beautiful smooth surface that even my novice frosting abilities could handle. I decorated the cake in “Easter egg” style striping with jelly beans.
2014 Easter Bundt
Easter Pound Cake
Ingredients:
5 eggs, at room temperature
2 sticks butter, at room temperature
1 2/3 C sugar
1 tbsp lemon extract
1/2 tsp almond extract
2 C cake flour
1/2 tsp salt
Steps:
Preheat oven to 325 degrees F. Grease cake pan.
In the bowl of a stand mixer beat eggs and butter until smooth. Add in eggs one at a time until incorporated. Add in the sugar. Once combined add the lemon and almond extracts. Add the salt and flour in batches until batter is smooth. Pour into greased cake pan and bake 50-55 minutes, until a knife comes out clean.
Allow cake to cool before frosting with cream cheese frosting. (Recipe below)
Cream Cheese Frosting
Ingredients:
5 tbsp butter, at room temperature
5 tbsp cream cheese, at room temperature
3 – 3 1/2 C powdered sugar
1 1/2 tsp vanilla extract
milk, as needed
Steps:
In the bowl of a stand mixer beat together butter and cream cheese until combined.
Add sugar a few tablespoons at a time. Also, add vanilla 1/2 tsp at at time. Once all vanilla and 3 C of sugar have been added taste the frosting. Add more sugar to taste. Only add milk if needed to balance flavors or smooth out the icing. (I used very little more than 3 C of sugar and needed no milk.)
If you are a food blogger and would like to join us, send an email to Stacy at foodlustpeoplelove@gmail.com or ask to join our private Facebook group. This is a purely administrative group. All recipes and photographs can be found on our individual blogs or on our Pinterest board.
And don’t forget to take a peek at what other talented bakers have baked this month:
I thought it only fitting to cook the last recipe in the book!
This last entry references Deuteronomy 33:28 “And Israel shall dwell securely alone, Jacob’s blessing, in a land of grain and wine, and the heavens with drip dew.”
Rena titled this Bible study section “A Return to Eden” because it is up to the new residents of Israel to “restore [it] to its original Eden status.” The people are expected to bless the land, rather than the land bless them.
Easter Sunday marks the end of Lent, but that doesn’t mean a halt has to be put on your spiritual education until next year. Continue to live your life so that it blesses those around you.
As much as I would have liked to keep Rena’s recipe true to itself (Red Wine and Barley Salad) for this final blog post, I am allergic to barley so I substituted Israeli Couscous. Publix was out of red bell pepper so I bought a green one (I love the pop of color it brings to the salad though). After changing a few things I then changed even more to suit my personal preferences – I omitted the almonds, feta, and grapes. Having tasted the salad, grapes would be delicious in here – but the grapes in my fridge were questionable and thought it safest to leave them out. I absolutely love the dressing she created and actually tripled it to use as a marinade for grilled chicken to serve along side the couscous.
This recipe would be fantastic to add to your next potluck picnic as an alternate pasta salad!
1 tbsp parsley paste (use fresh parsley if you have it)
Steps:
Bring water to a boil. Add in the couscous and cook covered over low heat for 8-10 minutes, stirring occasionally, until all water is absorbed.
In a bowl combine couscous with onion, pepper, and tomatoes.
In a small bowl whisk together olive oil, vinegar, mustard, and parsley paste. Note: If you are using fresh parsley do not mix it with the dressing. Season to taste with salt and pepper.
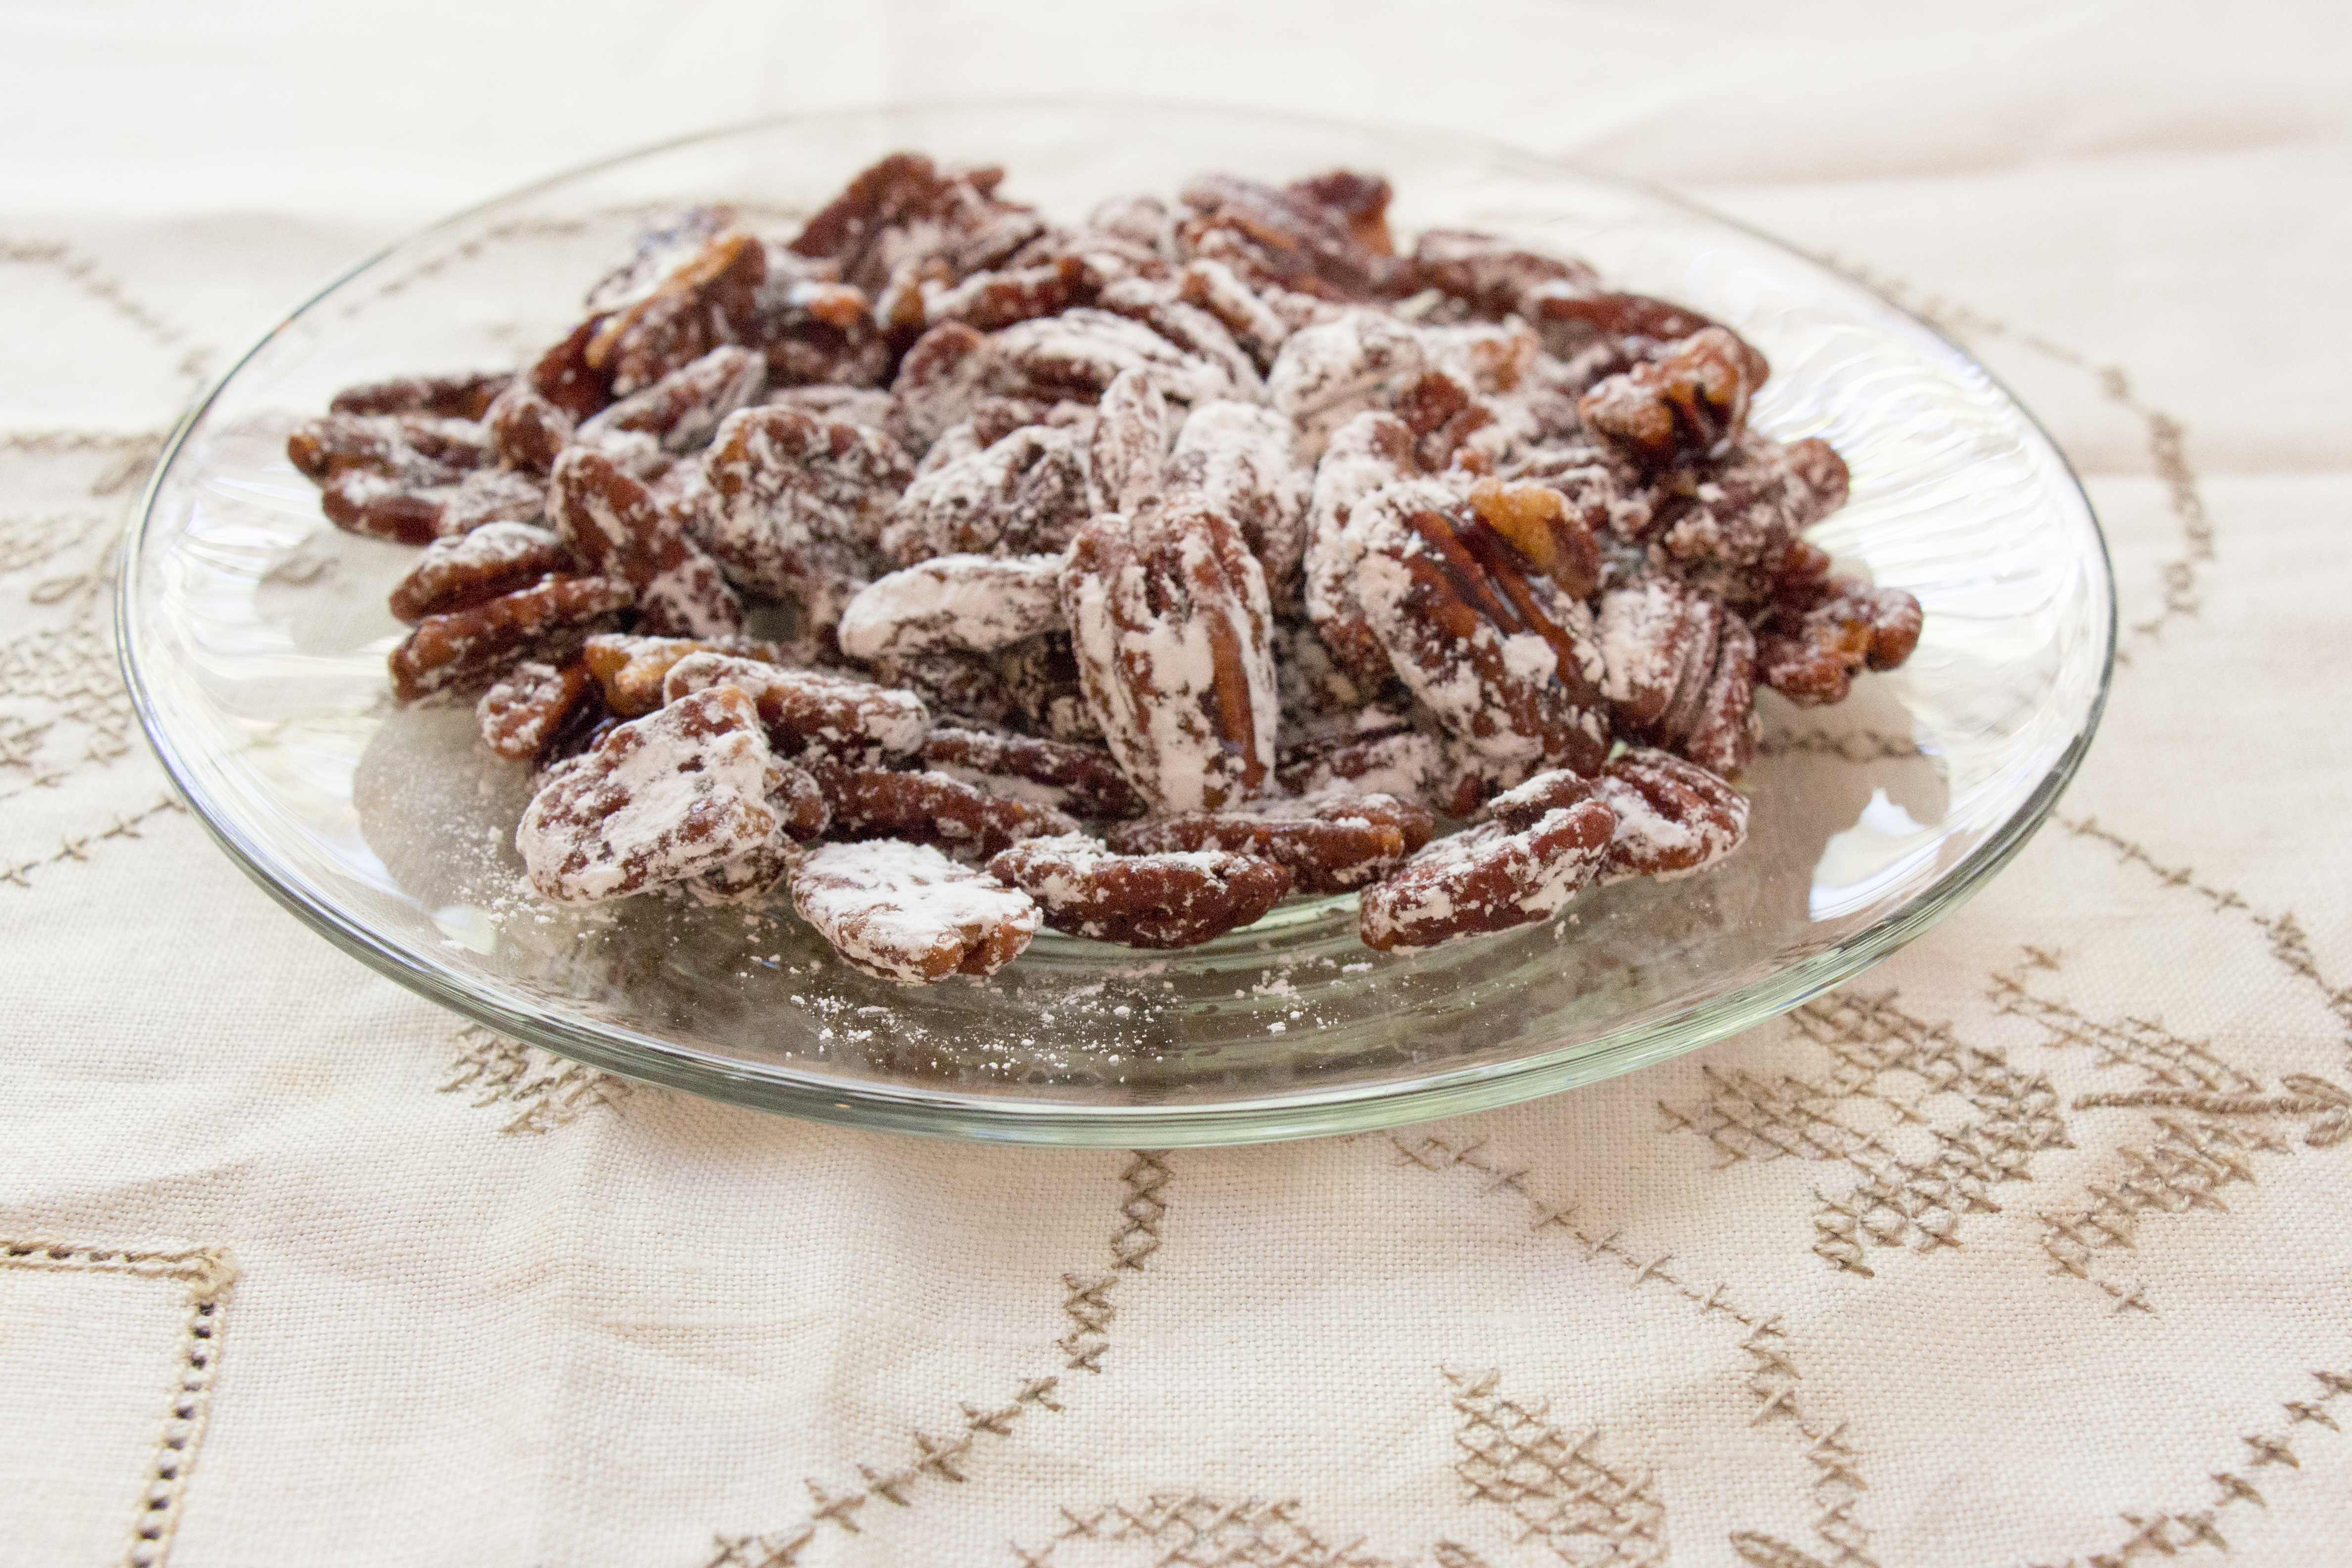
I’ve been wanting to try using the honey we brought back from Hawaii and after a trip to the Marietta Square farmer’s market in Atlanta where we inhaled Angel Pecans from Ye Olde Christmas and Candy Shoppe I knew that roasted nuts in honey would be a great way to utilize the Hawaiian honey. But first, I needed to do test runs with cheaper products.
National Pecan Day was an excellent excuse to try it out. I already had pecans in the pantry and my friend Tara of Tara’s Multicultural Table gave us vanilla bean infused honey for Christmas. I happily used that, roasted the pecans in the oven, and tossed with a little powdered sugar.
Vanilla Honey Roasted Pecans
Ingredients:
1/3 C vanilla bean infused honey
1 1/2 C pecan halves
1/8 – 1/4 C powdered sugar
Steps:
Preheat oven to 350 degrees F.
Place honey in a microwave safe dish and microwave for 20 seconds.
Toss pecans in honey. Place pecans in a single layer on a greased baking sheet and bake for 20 minutes, stirring halfway through.
Remove pecans from baking sheet and allow to cool in a single layer. Toss in powdered sugar, to taste.
I saw that Rena had a recipe for Trail Mix to accompany her study of Numbers 33:1-2 during which the journey from Egypt to Israel is detailed.
Today, Palm Sunday or Passion Sunday, marks the start of Holy Week in the Catholic Church. On Palm Sunday we celebrate Jesus’s entry into Jerusalem the week before his crucifixion. According to the Bible He was greeted by crowds placing palm branches along his path.
I thought that her Trail Mix would be a fun way to prepare for the journey of holy week ahead. During this week we celebrate Holy Thursday, the Last Supper, Good Friday, the Crucifixion of the Lord, and of course Easter Sunday, the day Jesus rose from the dead.
This week is also the last to survive without chocolate, or whatever other vice you gave up for Lent. So, make a healthy snack and power through!
Instead of Rena’s trail mix I made these Cinnamon Raisin Energy Balls – a healthier way to get your sweet tooth fix and a natural boost of energy.
If you are looking for a comforting side dish look no further. The perfect potato side dish made it’s way into my inbox on March 20th via Food Network’s Recipe of the Day email.
It’s rare when the Recipe of the Day is one that perfectly fits my menu or pantry items but this one arrived just in time to use up the bag of potatoes that were starting to get questionable.
And I got to break out the mandolin I got for Christmas! While I peeled potatoes Stuart slice away – he loved how quick and easy it was.
Scalloped Potatoes
Ingredients:
2 1/2 lb red potatoes
2 C half-and-half
1 tbsp kosher salt
1 clove garlic, smashed
2 tbsp unsalted butter
black pepper, to taste
Steps:
Preheat oven to 350 degrees F. Grease an 8×8″ casserole dish.
Peel and slice potatoes to 1/8″ thick slices. This is easily done with a mandolin but if you don’t have one slice as thinly as you can.
In a large pot combine potatoes with the remaining ingredients. Bring to a boil and reduce the heat to medium. Cook, stirring, until mixture has thickened.
Pull out the garlic clove and pour into prepared casserole dish. Give it a shake so the potatoes settle evenly.
Bake for 1 hour until bubbly and golden on top. Allow to rest for 10 minutes before cutting into it – if you don’t it’ll still taste fabulous but won’t look as beautiful.