Boston Crème Blondies

Sometimes I’m really on top of it.

And sometimes I’m posting one year’s football fare the following January.

I’ll let you decide which way this post is leaning!

Do you even remember who played in THE pro football game of 2017?

I wouldn’t have if it weren’t for the food photos still stored on my camera.

The answer: New England Patriots and Atlanta Falcons. The winner: New England Patriots with a score of 34-28. No, I did not remember the result of the game, thankfully the Internet knows everything.

To celebrate the big game, I thought it’d be fun to cook something associated with each team. For Atlanta, I went with something peach. (Peach Chipotle Meatballs you’ll be seeing next week.) For New England, Boston Crème Blondies!

blondies (Wal)

Just look how little that baby boy is!!

Boston Crème Blondies

Ingredients:

  • 3/4 C brown sugar
  • 1/3 C softened butter
  • 1 1/2 tsp vanilla extract, divided use
  • 1 egg
  • 1 C flour
  • 1 tsp baking powder
  • 1/8 tsp salt
  • 3 egg yolks
  • 6 tbsp sugar, divided use
  • 4 1/2 tbsp cornstarch
  • 1 1/2 C milk
  • 1/4 C semisweet chocolate chips
  • 1/4 C heavy cream

Steps:

  1. Preheat oven to 350 degrees F. Line an 8″ x 8″ baking pan with parchment paper.
  2. In the bowl of a stand mixer fitted with the paddle attachment, cream together the brown sugar, butter, and 1 tsp vanilla. Add the egg and mix until combined.
  3. In a small bowl, whisk together the flour, baking powder, and salt. Add to the creamed butter mixture and mix until incorporated.
  4. Press blondie batter into the prepared pan and bake 20-22 minutes. Cool.
  5. In a small bowl, whisk together the egg yolks, 3 tbsp sugar, and 1/2 tsp vanilla. Add the cornstarch and whisk until smooth.
  6. In a small saucepan over medium heat, combine milk and 3 tbsp sugar. Bring to a gently boil.
  7. Temper the egg yolks by adding 1/2 C, slowly, to the egg yolks, stirring constantly. When warm, pour the eggs into the saucepan over medium heat, stirring constantly until thickened. The mixture should coat the back of a spoon. Remove from heat and let cool in the pan for 10 minutes, stirring halfway through. Spread over the blondie base. Refrigerate until completely cooled.
  8. Make the ganache: Put chocolate chips and heavy cream in a microwave safe bowl. Microwave in 20 second increments, stirring, until the chocolate is melted. Allow ganache to cool only slightly, pour over the blondies. Let set before cutting into bars. (Option to cut squares first and drizzle with the chocolate.)

*This recipe is adapted from Holly at https://www.spendwithpennies.com/boston-cream-bars/*

Boston Creme Blondies | Sew You Think You Can Cook | http://sewyouthinkyoucancook.com

#CranberryWeek: Cranberry Cream Cheese Bars

It’s the final day of #CranberryWeek hosted by Caroline of Caroline’s Cooking. We’ve been sharing cranberry-inspired creations all week long in celebration of national cranberry day. Search #CranberryWeek to keep up to date and follow the #CranberryWeek Pinterest board for more cranberry inspiration.

My husband chipped away at the dish full of cranberry cream cheese bars with a warmed serving after the boys went to bed. I think he used it as his source of energy before tackling the dishes from dinner. 😉

I on the other hand, would have a little bit in the morning around 10 am. You know, when my first breakfast has worn off but it’s too close to lunch to have a second breakfast.

Cranberry Cream Cheese Bars for #CranberryWeek from Sew You Think You Can Cook (1)

I really like desserts that are acceptable for my mid-morning snack. The crust of these bars is made of oats – breakfast. The filling involves cream cheese – breakfast. Cranberries are a fruit – breakfast!

I liked eating my cranberry deliciousness with whipped cream, but no one would complain if you served yours with vanilla ice cream.

Cranberry Cream Cheese Bars

Ingredients:

  • 2 C flour
  • 1 1/2 C old fashioned oats
  • 1/2 C brown sugar
  • 1/4 C + 1 tbsp sugar, divided use
  • 1/2 tsp cinnamon
  • 2 sticks butter, softened
  • 1 block (8 oz) cream cheese, softened
  • 1 can (14 oz) sweetened condensed milk
  • 1/4 C key lime juice (or lemon juice)
  • 1/2 tsp vanilla extract
  • 1 can (16 oz) whole berry cranberry sauce
  • 2 tbsp cornstarch

Steps:

  1. Preheat oven to 350 degrees F. Grease a 9″ x 13″ baking pan.
  2. In a large bowl, mix the flour, oats, brown sugar, 1/4 C sugar, cinnamon, a pinch of salt, and the butter with a hand mixer. Set aside 1 1/2 C. Press the remaining mixture into the prepared pan. Bake 12 – 15 minutes, until golden. Set aside.
  3. In a large bowl, beat the cream cheese with a hand mixer until fluffy. Add in the condensed milk, key lime juice, and vanilla extract. Mix until smooth. Spread over the baked crust.
  4. In a small bowl combine the cranberry sauce, cornstarch, and remaining tablespoon of sugar. Evenly distribute over the cream cheese.
  5. Top with the remaining oat mixture.
  6. Bake 40 – 45 minutes, until golden.

*This recipe is adapted from Danelle at https://www.letsdishrecipes.com/2014/12/cranberry-cream-cheese-bars-with-quaker-whole-grain-oats.html*

Cranberry Cream Cheese Bars for #CranberryWeek from Sew You Think You Can Cook

Be sure to check out these other great cranberry recipes:

Cranberry Bliss Bars (Starbucks Copycat) from Family Around The Table

Cranberry Clementine Gin from Culinary Adventures with Camilla

Cranberry Clusters by The Freshman Cook

Cranberry Cream Cheese Bars from Sew You Think You Can Cook

Cranberry-Pistachio Dark Chocolate Bark from Books n’ Cooks

TBD from Palatable Pastime

Panettone from Caroline’s Cooking

You Make Me Blush Cocktail by A Day in the Life on the Farm

Warm Cranberry Punch from Everyday Eileen


#AppleWeek: Apple Pie Bread

21273153_1652451198122390_4333485463855047882_o

Welcome to the final day of #AppleWeek hosted by Carlee of Cooking with Carleee! Over 2 dozen bloggers have been celebrating the humble apple and elevating it into over 80 sensational recipes.

For my final offering of the week, I went with a dessert. While, the recipe title says “bread,” there’s no fooling. This “bread” is a cake. It starts by creaming together butter and sugar. Don’t be fooled by the loaf pan, you’re having cake for breakfast and it’s fantastic.

Apple Pie Bread

Ingredients:

  • 1 stick butter, at room temperature
  • 2/3 C sugar
  • 2 eggs
  • 1 1/2 tsp vanilla extract
  • 1 1/2 C flour
  • 1 3/4 tsp baking powder
  • 1/3 C brown sugar
  • 1/2 tsp cinnamon
  • 1/4 tsp nutmeg
  • 1/8 tsp allspice
  • 1/8 tsp cardamom
  • 1 apple, peeled and chopped
  • 1/2 C milk

Steps:

  1. Preheat oven to 350 degrees F. Line a 9″ loaf pan with parchment paper.
  2. In the bowl of a stand mixer fitted with the paddle attachment, cream together the butter and sugar until smooth. Add in the eggs and vanilla until fully incorporated. Add in the flour and baking powder, mixing until combined. Add the milk until the batter is smooth.
  3. In a small bowl whisk together the brown sugar, cinnamon, nutmeg, allspice, and cardamom.
  4. Pour half of the batter into the prepared loaf pan. Top with half of the brown sugar mixture and half of the chopped apple. Repeat with the remaining batter, brown sugar, and apple.
  5. Bake 40 – 45 minutes.

*This recipe is adapted from Ashely at https://wishesndishes.com/cinnamon-apple-pie-bread/*

Apple Pie Bread for #AppleWeek from Sew You Think You Can Cook

When I received the Sandwich Hero knife from Chicago Cutlery for #AppleWeek I knew my final recipe just had to be a bread (okay, cake) of some kind. This knife has all sorts of hidden special talents and can handle most any task in the kitchen. For the use of cutting this bread/cake, it handled the mission wonderfully. I could cut through the sweet treat without crushing it or mashing the apples into the crumb.

Don’t forget to enter the giveaway for a knife block from Chicago Cutlery, and check out some great apple recipes:

Apfelstrudel Recipe (Apple Strudel from Scratch) from House of Nash Eats
Apple and Onion Cornbread from A Day in the Life on the Farm
Apple Butter Cheesecake from The Redhead Baker
Apple Chicken Stew from Jolene’s Recipe Journal
Apple Cider Dark & Stormy from The Crumby Kitchen
Apple Mincemeat Pie from Palatable Pastime
Apple Pie Bread from Sew You Think You Can Cook
Apple Pie Pancakes from 4 Sons ‘R’ Us
Apple Praline Bread from Family Around the Table
Apple Stuffing Crusted Pork Chops from Caroline’s Cooking
Battered Chocolate Caramel Apple Slices from The Freshman Cook
Caramel Apple Pull Apart Bread from Hezzi-D’s Books and Cooks
Apple Crack Slaw Eggrolls from Dad What’s 4 Dinner
Cinnamon Apple Donuts from Daily Dish Recipes
Diminutive Caramel Apples from Culinary Adventures with Camilla
Easy Caramel Apple Butter from Grumpy’s Honeybunch
Fast and Easy Peanut Butter Yogurt Fruit Dip from Cooking With Carlee
Mom’s Apple Cake from Books n’ Cooks
Oatmeal Applesauce Muffins from Amy’s Cooking Adventures
Roasted Butternut Squash and Apples from Simple and Savory
Roasted Sweet Potatoes and Apples from Feeding Big
Savory Apple Turkey Brie Galette from Bear & Bug Eats
Swiss Vegetarian Autumn Lasagna With Apples & Squash from All That’s Jas

Disclaimer: Thank you to #AppleWeek Sponsors: Rodelle, Dreamfarm, Casabella, Flahavan’s Irish Oatmeal, Pryex, Chicago Cutlery, Rainier Fruit, and Veggie Wash for providing prizes for #AppleWeek free of charge. These companies also provided the bloggers with samples and product to use for #AppleWeek. All opinions are my own.

#BrunchWeek: Biscuit Bar with Flavored Sugars

This post is sponsored in conjunction with #BrunchWeek. I received product samples from sponsor companies to aid in the creation of the #Brunchweek recipes. All opinions are mine alone.

Happy Friday, everyone!

While there’s one more day left of #BrunchWeek, today’s my last posting of the event. I hope you’ve enjoyed all of our brunch recipes and are ready for celebrating Mother’s Day this weekend.

I don’t think #BrunchWeek could be complete without biscuits. At least not a good southern brunch anyway.

In 2015 I made Cheddar Biscuits for breakfast sandwiches during #BrunchWeek, so it was time to go in a sweeter direction.

A biscuit bar with flavored sugars.

If you’re having a brunch party, a biscuit bar is the perfect way to go. You can use any biscuit recipe you like! Offer some classic biscuits, sweet biscuits, and savory biscuits. Offer honey, softened butter, and jams. And offer flavored sugars. (Those sugars can also be turned into party favors!)

Flavored Sugars for a Biscuit Bar for #BrunchWeek from Sew You Think You Can Cook

For my first foray into flavored sugar making I went with Lavender, Blood Orange, and for a little something different, Chile Lime.

These sugars are great on more than just buttered biscuits. They’re lovely on English muffins and French toast.

I actually used the chili lime sugar the last time I made my favorite black bean and corn salsa for tacos in place of agave.

Biscuits

Ingredients:

Steps:

  1. Preheat oven to 400 degrees F.
  2. In a food processor fitted with the dough blade, combine the flour, baking powder, sugar, and salt. Pulse. Add in the cold butter and pulse until the mixture looks like crumbs. Add in the milk and mix until just combined.
  3. Turn dough out onto a floured surface. Roll to 1″ thickness. Cut out biscuits using a biscuit cutter and place on a silicone mat lined cookie sheet.
  4. Bake 18-20 minutes, until lightly golden.

*This recipe is adapted from Damaris at http://www.foodnetwork.com/recipes/damaris-phillips/spiced-biscuits*

Lavender Sugar

Ingredients:

Steps:

  1. Place sugar and lavender in a small food processor and pulse.
  2. Store in an air tight container.

*This recipe is adapted from Rita at http://www.food.com/recipe/lavender-sugar-with-vanilla-101039*

Blood Orange Sugar

Ingredients:

Steps:

  1. Place sugar and orange zest in a small food processor and pulse.
  2. Spread sugar onto a rimmed baking sheet and let dry.
  3. Store in an air tight container.

*This recipe is adapted from Gabrielle at https://www.designmom.com/diy-flavored-sugar-valentines/*

Chile Lime Sugar

Ingredients:

Steps:

  1. Place ingredients in a small food processor and pulse.
  2. Spread sugar onto a rimmed baking sheet and let dry.
  3. Store in an air tight container.

*This recipe is adapted from Sommer at http://www.aspicyperspective.com/flavored-sugar-recipes/2/*

Don’t forget to enter our giveaway and be sure to check out these other great brunch recipes:

BW 2017 logo FINAL

BrunchWeek Beverages:

Blackberry Mint Bellinis from Sweet Beginnings
Cardamom Rose Cocktail from Culinary Adventures with Camilla
Lemon & Blueberry Mocktail from Girl Abroad
Mango Pina Colada from The Spiffy Cookie
Sparkling Mojito Lime Rickies from A Kitchen Hoor’s Adventures

BrunchWeek Egg Dishes:

Cheesy Asparagus Bacon Quiche from The Nifty Foodie
Creamed Asparagus Omelet from Wholistic Woman
Eggs in Hell from kimchi MOM
Asparagus and Cheddar Frittata from My Catholic Kitchen
Spring Veggie Quiche from A Day in the Life on the Farm

BrunchWeek Breads, Grains and Pastries:

Apple Cheddar Cream Cheese Danish from Amy’s Cooking Adventures
Apple Cinnamon Bread from It Bakes Me Happy
Gluten Free Apple Waffles from Gluten Free Crumbley
Banana Bread Buttermilk Pancakes from Love and Confections
Blackberry Cream Cheese Sweet Rolls from Pink Cake Plate
Brown Sugar Poptarts from Big Bear’s Wife
Creme Brulee French Toast from The Barbee Housewife
Cherry Almond Coffee Cake from The Chef Next Door
Cheddar Dinner Rolls from Family Around the Table
Cinnamon Apple Danish from Nik Snacks
Garlic and Herb Pull Apart Bread from Jane’s Adventures in Dinner
Lemon Poppy Seed Loaf Cake from Books n’ Cooks
Mocha Eclairs from The Redhead Baker
Sweet Apple Hand Pies with Cheddar Shortcrust from An Edible Mosaic

BrunchWeek Main Dishes:

Country Ham Biscuits with Peach Mustard from Palatable Pastime
Ham, Apple and Cheddar Melts from Cookaholic Wife
Ham, Egg, and Asparagus Breakfast Pizza Rants From My Crazy Kitchen
Shaved Asparagus, Herb Cream Cheese, and Smoked Salmon Pizza from Sarcastic Cooking
Yumbo Sliders from Cindy’s Recipes and Writings

BrunchWeek Fruits, Vegetables and Sides:

Rhubarb Crunch from Cooking with Carlee
Biscuit Bar with Flavored Sugars from Sew You Think You Can Cook
Low-Fat Apple Coffee Cake from Hardly A Goddess

Disclaimer: Thank you to #BrunchWeek Sponsors: Red Star Yeast, Dixie Crystals, Cabot Cheese, Nielsen-Massey, Rainier Fruit, and Michigan Asparagus for providing the prizes free of charge. These companies also provided the bloggers with samples and product to use for #BrunchWeek recipes. All opinions are my own. The #BrunchWeek giveaway is open to U.S. residents, age 18 & up. All entries for the winner will be checked and verified. By entering you give the right to use your name and likeness. The number of entries received determines the odds of winning. Six winners will be selected. The prize packages will be sent directly from the giveaway sponsors. The #BrunchWeek Bloggers are not responsible for the fulfillment or delivery of the prize packages. Bloggers hosting this giveaway and their immediate family members in their household cannot enter or win the giveaway. No purchase necessary. Void where prohibited by law. This promotion is in no way sponsored, endorsed or administered by, or associated with Facebook, Instagram, Pinterest, or any other social channel mentioned in the #Brunchweek posts or entry.

Champagne Cupcakes

The 3rd (and final) installment of my champagne week is definitely a dessert. There isn’t really any getting around it. These cupcakes do not qualify for breakfast. 

“But you could try…” as my son says when he asks me to sing a song I don’t know any of the words to. Sorry, kid, it’s just not gonna happen!

img_2318

I’ve always found that the flavor of champagne doesn’t always come through in baking. That is not the case with these cupcakes! These cupcakes, literally, taste like a glass of champagne. There’s even reduced champagne in the frosting to really boost the flavor.

These cupcakes are perfect for celebrating an anniversary, birthday, or holiday.

This recipe makes 12-15 cupcakes.

Champagne Cupcakes

Ingredients for cupcakes:

  • 1 stick butter, at room temperature
  • 1 C sugar
  • 2 eggs
  • 1 tsp vanilla
  • 1 3/4 C flour
  • 1/2 tsp baking soda
  • 1/2 tsp baking powder
  • 1/4 tsp salt
  • 1/2 C sour cream
  • 1/2 C champagne

Ingredients for frosting:

  • 1 C + 1 tbsp champagne
  • 2 sticks butter, at room temperature
  • 2 1/2 C powdered sugar
  • pinch of salt

Steps:

  1. Preheat oven to 350 degrees F. Line a cupcake tray with liners.
  2. In the bowl of a stand mixer fitted with the paddle attachment, cream together the butter and sugar. Add in the eggs one at a time along with the vanilla.
  3. In a bowl, whisk together the flour, baking soda, baking powder and salt. In a measuring cup, combine the sour cream and champagne. Alternating, add the dry ingredients and the wet ingredients to the stand mixer, beginning and ending with dry ingredients.
  4. Divide batter among prepared cupcake tray. Bake 20 minutes, until a toothpick inserted comes out clean. Transfer cupcakes to a cooling rack.
  5. In a small saucepan over medium-high heat, simmer the 1 C of champagne until it reduces down to 2 tbsp. Cool completely.
  6. In the bowl of a stand mixer fitted with the whisk attachment, cream together the butter and powdered sugar. Add the reduced champagne and the 1 tbsp champagne.
  7. Frost cooled cupcakes.

*This recipe is adapted from Haley at http://www.ifyougiveablondeakitchen.com/2014/12/29/cocktail-cupcakes-champagne-cupcakes/*

Champagne Cupcakes | Sew You Think You Can Cook | http://sewyouthinkyoucancook.com

Countdown to 2017: Dessert

unnamed
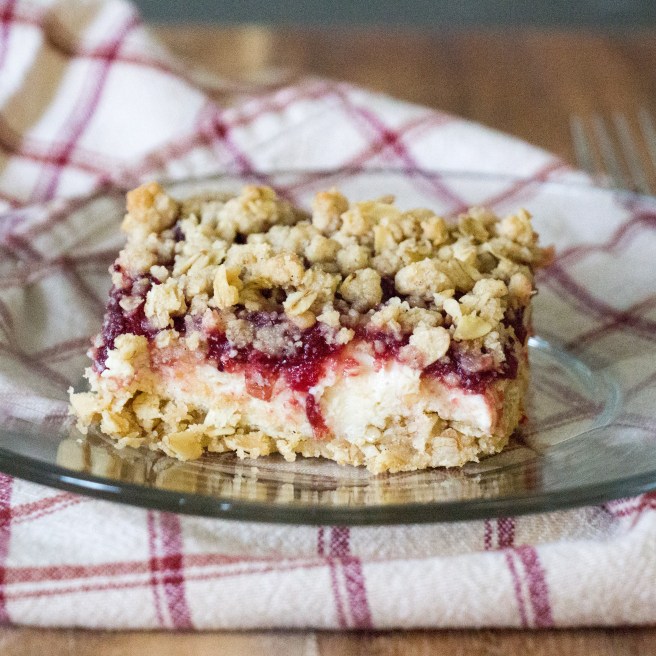
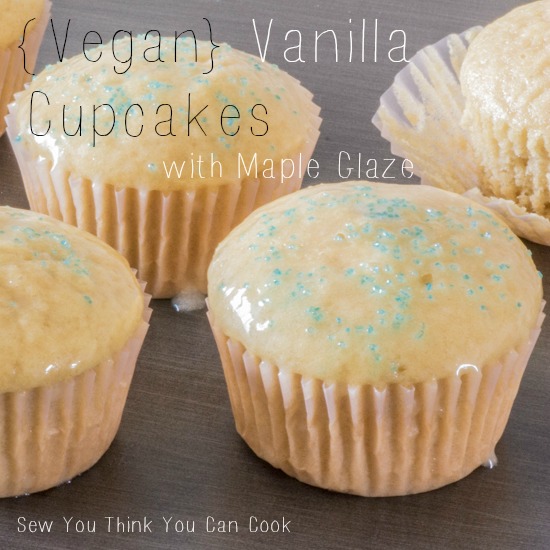
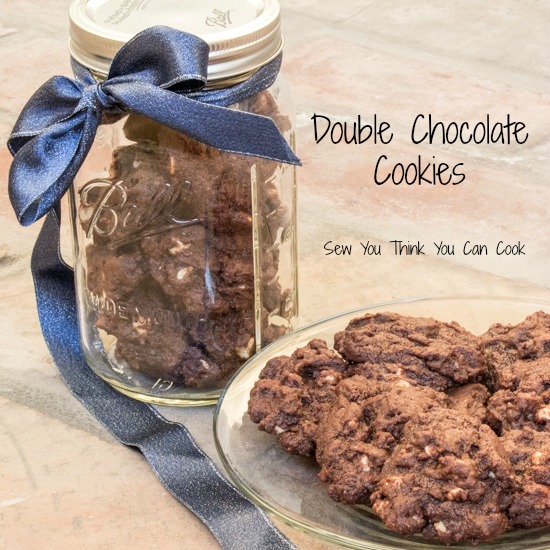
Today’s countdown though is all about dessert. Desserts are definitely the highest grossing posts on Sew You Think You Can Cook.

I actually make a fair number of sweets, too. Thanks to #BundtBakers.

This blogging countdown party is hosted by Sarah at Fantastical Sharing of Recipes.

My sweet tooth returned with a vengeance after Treat’s birth near the end of 2015 and I’m becoming a chocolate lover. The desserts I’m sharing as my favorites are those that I ate way more of than I care to admit.

Apple & Peanut Butter Bundt Cake

Apple Oat Crisp

Cherry Chocolate Brownie Pie

Egg Free Mint Gelato

Honey and Walnut Pear Bundt Cake

Best Dessert of 2016 | Sew You Think You Can Cook

To see a bunch of other dessert round-ups click here: An InLinkz Link-up

SRC: Mini Pecan Pie Cupcakes

newsrcbanner

It’s Secret Recipe Club Reveal Day! In the Secret Recipe Club, each participating blogger is assigned a blog from another participating blogger and secretly searches their site for something to recreate. The accompanying blog post then goes live on reveal day! So while I was immersed in my assigned blog, someone else was picking through mine! I’m so excited to be part of this group, to see what on my blog peaks other’s interests and to stumble upon new blogs and new recipes.

I had to chuckle when I received my assignment in my email this month. You see, for the past two reveals April of Angels Home Sweet Homestead was assigned my blog! For our themed barbecue/picnic reveal she made Mexican Street Corn Salad and for our traditional Group C reveal she chose Cinnamon and Honey Roasted Chickpeas. I suppose it was only fitting that I took my turn diving more deeply into April’s blog.

April’s philosophy behind her blog is fantastic. She writes:

I want to bring back a simpler way of life, where families sit down together to a home cooked meal and talk every day, growing as much of that food as possible with our own hands, and the old-fashioned art of canning that food too.

I just love that! While I can’t grow my own food – partly due to lack of yard but mostly due to lack of green thumb – I can provide home cooked meals for my family. After our 18 months in Ohio without a dining table, it was a goal for our California home to have a space dedicated to eating family dinners. Our large table fits perfectly off the kitchen (and doubles as extra counter space) and is set with two booster/highchair seats for my boys. We have finally gotten into a rhythm of dinner between 6-6:30 and I love it! Firecracker is reaching an age where he can recount the day’s activities to Daddy and I know that as the boys continue to get older, the stress of eating will give way to pure enjoyment and nurturing our relationships and bodies.

Seven recipes made their way to my secret Pinterest board from April’s blog including Fruity Breakfast Burritos, Restaurant Style Salsa, and Greek Yogurt Tuna Salad. I was going to show the list to my husband and have him decide what I’d make. But then I didn’t. Though I’m pretty sure I picked the “right” answer anyway.

While I was updating my planner this month I decided to take a peek at the food holidays for July. I was slightly surprised to see that National Pecan Pie Day isn’t in the fall, but it’s July 12th! My decision was made. April had on her blog, and a recipe that I’d saved prior, Pecan Pie Muffins.

Now, I’m not sure these qualify as a muffin. That’s why you’ll notice I renamed them cupcakes. Though I’m not sure if that’s accurate either. Muffins imply a little bit of healthiness. There’s absolutely nothing healthy about these sweet bites.I could say that pecans are a source of protein, but that’s really stretching it. I almost just called them Mini Pecan Pie Cups but without a crust I don’t think they qualify as pie.

Whatever you want to call them, they’re pretty delicious. (And that’s coming from someone who doesn’t care for pecan pie!) I ate two within an hour of them coming out of the oven – one to taste test and one as a snack during their photo shoot.

April made hers in a regular size muffin cup and got 6 of them, but I thought mini would be the way to go. I can’t have my husband taking only 3 to work, because let’s be honest, there’s no way all 6 would be leaving the house untouched. I’m glad I made them mini, too, because I don’t think I’d be able to eat an entire muffin of this dessert before my sweet tooth had enough.

Firecracker helped bake these treats, but he won’t be getting to try them – they’re simply too sticky and sweet for my 2 year old. Now I just have to send them with Stuart to work so he doesn’t see them sitting on the counter.

This recipe makes 24 mini muffins/cupcakes. I recommend baking these without liners, no greasing of the pan necessary – there’s plenty of butter in the batter. I was 2 liners short of 24 and those two cups were our favorites because the sugar gets all crispy and crusty on the edges. If you do use liners, not that they’re much easier to peel back if you allow the cupcakes to cool completely before eating.

Mini Pecan Pie Cupcakes

Ingredients:

  • 1 C brown sugar
  • 1 C chopped pecans
  • 1/2 C flour
  • 2/3 C butter, melted
  • 2 eggs, beaten

Steps:

  1. Preheat oven to 350 degrees F.
  2. In a large bowl, whisk together the sugar, pecans, and flour. Mix in the butter and egg until combined.
  3. Divide batter evenly among 24 mini muffin tin cups.
  4. Bake 18 minutes. Transfer to a cooling rack.

*This recipe is adapted from April at http://www.angelshomesweethomestead.com/2011/01/pecan-pie-muffins.html*

Mini Pecan Pie Cupcakes for #SecretRecipeClub from Sew You Think You Can Cook

To see the other bloggers who participated in The Secret Recipe Club this month click here:

Blog-iversary 3

3 yrsSew You Think You Can Cook is 3 years old!

This past year has been a whirlwind in my personal life between welcoming a second baby boy to our family and moving across the country.

Blogging-wise I have continued to grow. I have 43 more followers by e-mail and 270 more Facebook fans. I’ve become more active on Twitter and Instagram with a total following of 423 and 530, respectively.

In this fourth year I hope to find the time to delve into monetizing the blog and gaining some sponsored posts. That’s if my two busy boys allow me to do so! I did however, finally pay to own my domain name! As my “birthday gift,” take a look up at the top of your browser and you’ll notice something a little different. The “dot wordpress” is no longer there! I hope your finger memory (and mine!) adjusts quickly when you type in sewyouthinkyoucancook.com.

For Mother’s Day 2016 my husband got me a macro lens for my camera and I have enjoyed taking photos even more! I’m even breaking out the tripod these days. Now when I recreate a recipe from my blog for dinner, I try and reshoot the photos. Updated photographs can be found on Balsamic Glazed Beef Roast, Baby Baked Beef Burritos, and Sweet Potato Waffles.

I hope you’ll continue to follow along with my journey here on the internet.

It has become my tradition to share something new to me on this milestone. For my 1st year, I baked with olive oil. For my second, I made marshmallow for a cheesecake. Keeping with the sweet side of experimentation, this year I’m sharing a vegan cupcake!

Why vegan?

We have friends here in California that we knew in Ohio as well who follow a vegan lifestyle. They have a daughter who is 4, a son who is only 2 weeks younger than Firecracker, and are expecting a third child in a month-ish. We did a play date with them and Firecracker was insistent about wanting to bake cupcakes with “Emmer.” I found a recipe that didn’t require any strange ingredients (borrowing almond milk from them) or coconut. The kids did a fabulous job making these cupcakes and the dozen didn’t last long. Icing didn’t come to fruition though and instead I ended up with a glaze. But it’s a glaze that was fantastic! No one felt bummed or cheated by not having a beautiful frosting peaked top.

We will be having a joint birthday celebration for the 2 year olds next week and I’ll be remaking the cupcake base. Now to find an actual frosting – if you have a recipe for coconut free vegan frosting please share it with me in the comments!

This recipe makes 1 dozen cupcakes.

Vegan Vanilla Cupcakes

Ingredients:

  • 1 3/4 C flour
  • 1 C sugar
  • 1 tsp baking soda
  • 1/2 tsp salt
  • 1 C almond milk
  • 1/3 C olive oil
  • 1 tbsp white vinegar
  • 2 tsp vanilla extract

Steps:

  1. Preheat oven to 350 degrees F. Line cupcake tin with liners.
  2. In a large bowl, whisk together flour, sugar, baking soda, and salt. Add the almond milk, olive oil, vinegar, and vanilla. Mix until just combined.
  3. Divide batter in cupcake tin. Bake 18-20 minutes. Allow cupcakes too cool in the pan for 1 minute before removing to a cooling rack.

*This recipe is adapted from Alison at http://lovingitvegan.com/vegan-vanilla-cake/*

Vegan Maple Glaze

Ingredients:

  • 1 1/2 C powdered sugar
  • 1/2 C almond milk
  • 1/2 C canola oil
  • 1 tbsp maple syrup
  • 1/2 tsp vanilla extract

Steps:

  1. Using a hand mixer, whisk together all ingredients until smooth. Poor over cooled cupcakes.

Vegan Vanilla Cupcakes with Vegan Maple Glaze  Sew You Think You Can Cook

#FoodieExtravaganza: Midsummer Eve

foodieextravaganza-300

Laura of Baking in Pyjamas challenged us to create a dessert that is Midsummer Eve themed. I’m not going to lie, I had to Google “Midsummer Eve.” All I knew was that the summer solstice, the longest day of the year, falls on June 21st in the Northern Hemisphere. What I didn’t know was that in some countries it’s an official holiday! In Sweden, celebrations involve dancing and singing around a florally decorated maypole. In Scandinavia, people clean their homes and decorate them in flowers. In Denmark, traditional foods include pickled herring and strawberries.

Thankfully, Laura’s instructions were to make a dish that meant “midsummer” to us. To answer her call, I immediately thought ice cream! Though really, any time of year is good for ice cream in my book.

I found myself in possession of a massive amount of mint when the grocery store was sold out of the small packages. I’d only needed a couple of tablespoons to mix into Greek yogurt for some lamb burgers. (A recipe that is still under development here in order to be photograph-able) As such, you’ll be seeing a couple more minty recipes on the blog over the next couple of months.

Mint Gelato for #FoodieExtravaganza from Sew You Think You Can Cook (1)

But back to the recipe at hand. Fresh mint gelato. Egg-free gelato.

We are within walking distance of a very delicious gelato shop and our sweet teeth know it! I think I’ll be making ice cream much more often now so we can enjoy a cup for a fraction of the cost.

I didn’t have any chocolate in the house when I made the gelato but found that the fresh mint really did need another flavor to balance it. I decided to use some of my farmer’s market yield of berries to make a sauce. The brightness of the fruit was exactly what the gelato needed; better than chocolate even! To make the berry sauce I put some fresh (frozen works, too) berries in a small saucepan with a little sugar over medium heat until syrupy then gently mashed them with the back of a spoon to achieve the texture I wanted.

Egg-Free Mint Gelato

Ingredients:

  • 1 C sugar
  • 2 tbsp corn starch
  • 2 C whole milk
  • 2 C heavy cream
  • 6 sprigs fresh mint

Steps:

  1. Whisk together sugar, corn starch, milk, and heavy cream in a sauce pan over medium heat. Stir constantly until the mixture starts to bubble and thicken.
  2. Place a large bowl in an even larger bowl of ice water. Pour gelato base into the bowl to cool. Put the mint in the gelato and let steep for 5 minutes. Remove the mint. Place the gelato base in the refrigerator at least 4 hours to chill completely.
  3. Place gelato in ice cream maker and follow the directions for your ice cream maker.
  4. Serve with either a berry or chocolate sauce.

*This recipe is adapted from Leigh Anne at http://www.yourhomebasedmom.com/fresh-mint-gelato/*

Mint Gelato with Berry Sauce for #FoodieExtravaganza from Sew You Think You Can Cook (2)

Be sure to check out these other midsummer treats:

Blueberry Slab Pie by A Day in the Life on the Farm

Carrot Vanilla Custard by Sneha’s Recipe

Chocolate Fondue with Strawberries by Making Miracles

Dark Berry Gelato by Baking in Pyjamas

Kladdkaka by Culinary Adventures with Camilla

Mango Souffle by G’Gina’s Kitchenette

No Bake Lemon Cheesecake by Fearlessly Creative Mammas

Nordic Walnut Cake with Coffee Icing by Food Lust People Love

Simple Peach Crisp by Cooking with Traci

Swedish Cheesecake with Strawberries by Caroline’s Cooking

If you are a blogger and would like to join our group and blog along with us, come join our Facebook page Foodie Extravaganza. We would love to have you! If you’re a spectator looking for delicious tid-bits check out our Foodie Extravaganza Pinterest Board! Looking for our previous parties? Check them out HERE.

SRC: Double Chocolate Cookies

newsrcbanner

It’s Secret Recipe Club Reveal Day! In the Secret Recipe Club, each participating blogger is assigned a blog from another participating blogger and secretly searches their site for something to recreate. The accompanying blog post then goes live on reveal day! So while I was immersed in my assigned blog, someone else was picking through mine! I’m so excited to be part of this group, to see what on my blog peaks other’s interests and to stumble upon new blogs and new recipes.

It’s actually a miracle I’m even posting with The Secret Recipe Club today! We moved to California from Ohio last month and I felt quite confident that skipping out of April’s SRC reveal day would be the only break necessary to get through the travel.

I had no problem selecting and making my dish for today’s reveal, but I did have a problem blogging it! We got the keys to our new home April 16th, moved in April 18th, and received delivery of our goods on April 19th. I’m supposed to get internet installed today. Hopefully that happens. It’ll be a while before I get a chance to stop by and check out all of the other SRC posts today, but you can see them via the link at the bottom of my post.

Everything I’ve been doing has been via mobile, except for the rare occurrences when I was able to get away from the boys and sit at a coffee shop with wifi. I actually never left the house, if I had to drive, without my computer so I could at least type up blog posts (this one included) in Word so that when I did get a moment of internet bliss I could quickly and efficiently schedule some posts!

We met a few of our neighbors after moving in and one of them generously and thoughtfully brought over a 6 pack of beers from local breweries that he put together. I knew I’d be searching through my assigned blog, Dessert Before Dinner written by Stephanie, for a thank you treat. The Jalapeno Beer Cheese Bread caught my eye, but it was another SRC post. I knew everyone loves cookies so I decided on her White Chocolate Chunk Chocolate Cookies. I put most of the cookies in a large mason jar and tied it with a bow. It’s a good thing I did, too, because I found these cookies to be insanely addictive. I definitely broke my “only two cookies at a time” rule and even sneaked one for breakfast the following morning.

Double Chocolate Cookies for Secret Recipe Club from Sew You Think You Can Cook (1)

This recipe makes 18-20 cookies.

Double Chocolate Cookies

Ingredients:

  • 1 stick butter, softened
  • 1/3 C sugar
  • 1/3 C brown sugar
  • 1 egg
  • 1 tsp vanilla
  • 1 C flour
  • 1/4 C + 2 tbsp cocoa powder
  • 1/2 tsp baking soda
  • 1/4 tsp salt
  • 3/4 C white chocolate chips

Steps:

  1. Preheat oven to 350 degrees F.
  2. In the bowl of a stand mixer fitted with the paddle attachment, cream together the butter and both sugars until fluffy.
  3. Add the egg and vanilla and mix until combined.
  4. In a bowl, whisk together the flour, cocoa powder, baking soda, and salt. Add to the stand mixer and mix until combined. Fold in the white chocolate chips until evenly distributed in the dough.
  5. Drop spoonfuls of the cookie dough onto two baking sheets. Bake 10-13 minutes. Allow cookies to cool 5 minutes on the pan before removing to a cooling rack.

*This recipe is adapted from Stephanie at http://dessert-before-dinner.blogspot.com/2011/07/white-chocolate-chunk-chocolate-cookies.html*

Double Chocolate Cookies for #SecretRecipeClub from Sew You Think You Can Cook (2)

To see the other bloggers who participated in the Secret Recipe Club this month click here: