Carrot Cake Cookies

Shortly after I subscribed to Lauren’s blog, Lauren’s Latest, last year this recipe showed up in my inbox. And I had to make it. Same day. I got out of bed and headed to the kitchen to make these cookies. I took the leftovers to work Monday morning and they didn’t even last an hour. Yes, I’ve been sitting on these pictures and this recipe for a year, waiting for Easter to roll back around so I could share it.

I made some changes based on my pantry and allergies. Instead of coconut oil I used butter, I omitted the pecans, and used brown sugar instead of molasses. I frosted the cookies with leftover cream cheese frosting from Busia’s Easter pound cake.

These cookies are amazing and would make for a perfect addition to any Easter basket. The Easter bunny might like a nibble, too.

Carrot Cake Cookies

Ingredients:

  • 1 stick butter, at room temperature
  • 1/3 C sugar
  • 1 tbsp brown sugar
  • 1 egg
  • 1 tsp vanilla extract
  • 1 C flour
  • 1 tsp baking powder
  • 1 tsp cinnamon
  • 1/4 tsp nutmeg
  • 1/4 tsp salt
  • 1/2 C grated carrots
  • cream cheese frosting (optional)

Steps:

  1. Preheat oven to 350 degrees F.
  2. In the bowl of a stand mixer, beat together butter and sugars. When creamy add in egg and vanilla extract and mix until combined.
  3. In a separate bowl, whisk together flour, baking powder, cinnamon, nutmeg, and salt. Add to the wet ingredients until combined.
  4. Gently fold in the shredded carrot.
  5. Spoon cookie batter onto a greased baking sheet. Bake for 8-10 minutes, until the edges are golden and slightly puffy in the center. Allow cookies to cool on the baking sheet for two minutes before removing to a cooling rack.
  6. When cookies are completely cool, frost with cream cheese icing if desired.

*This recipe is adapted from Lauren at http://www.laurenslatest.com/carrot-cake-pecan-cookies-with-orange-cream-cheese-frosting/*

carrot cake cookies | Sew You Think You Can Cook

Cinnamon Biscotti & A Baby Shower

Biscotti Baby Shower

Surprise!

Today I have gathered some of my favorite bloggers to help me celebrate a very special friend of mine. Tara! Tara is the host of Tara’s Multicultural Table.

When Tara was pregnant with her son Evan I threw her a surprise baby shower. So keeping with tradition I thought it’d be fun to throw her another surprise shower. Now that we live in separate states this shower would be virtual. Cinnamon Biscotti | Sew You Think You Can Cook 3 If I thought keeping a secret the first go around was difficult it was nothing compared to this time! Both being food bloggers we’re constantly in communication about what we’re cooking up in the kitchen.

I wanted to have a theme for this online party. I thought about tapas – tying in to Tara’s blog’s theme. But then into my email should come another biscotti recipe from Tara. Tara loves baking – cookies, scones, breads. While I’d never made biscotti before I thought it’d be a perfect theme! Because biscotti are twice baked cookies and this is Tara’s second baby!

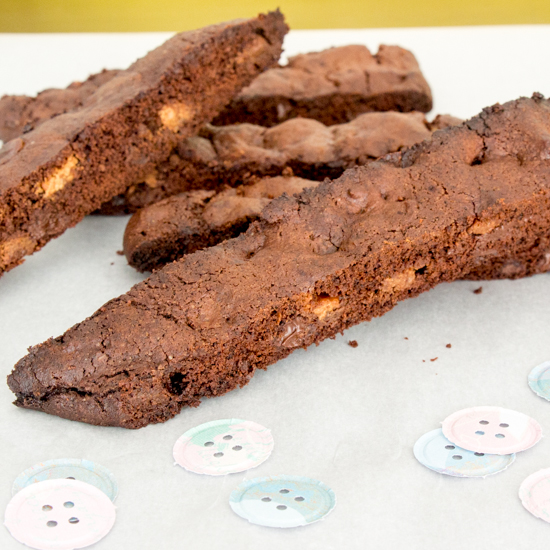
I baked two different recipes for this event. I really wanted to make Tiramisu Biscotti.

The first time Tara and I ever worked together in the kitchen, before we had blogs, we tried our hands at a tiramisu cheesecake. Tara wanted to do everything from scratch – including the lady fingers. Well, we pretty much failed at that endeavour. The lady fingers simply didn’t have the texture required for breaking down into cookie crumbs to form the crust. But we powered through. The cheesecake filling part was quite delicious.

tiramisu BiscottiMuch like our first tiramisu adventure, mine too wasn’t a complete success. The biscotti, while perfeclty delicious were burnt along the edges and simply didn’t provide very appetizing photographs – and I took 31 photos! The white chocolate chips in the cookie turned a little yellow too and didn’t give quite the effect I was thinking they would. I would have loved to simply remake them and pull them out of the oven sooner – but I didn’t have the ingredients on hand and guess, what, it was snowing. I will remake these some day and they’ll be honored with their own blog post – and better photos. We really did enjoy these biscotti!

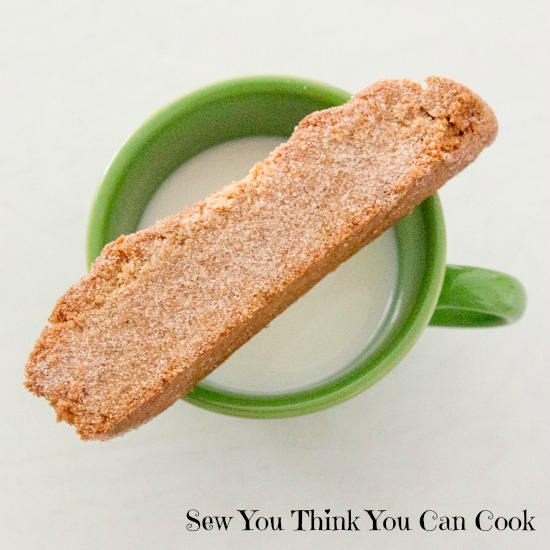
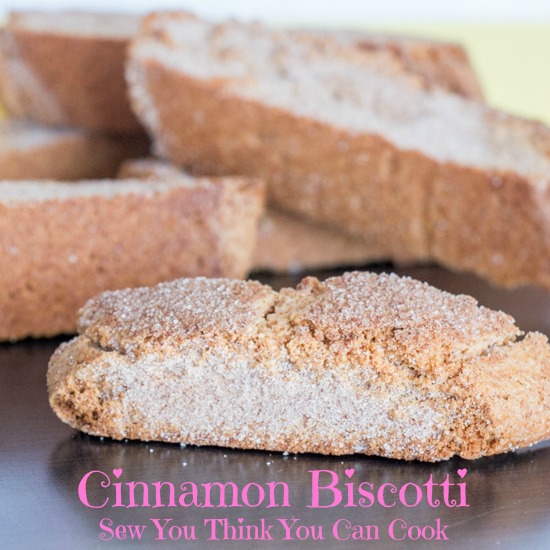
It was back to the drawing board and now with a slightly limited baking pantry. And then I found gold. Cinnamon biscotti. I have a very large obsession with cinnamon and could not pass this recipe up! Cinnamon Biscotti | Sew You Think You Can CookThese cookies didn’t turn out perfectly either – we cut them a little too thick and baked them a little too long. (I should have just followed the instructions – these cookies continue to harden once they’re out of the oven.) I know biscotti are supposed to be a hard cookie – perfect for dunking in coffee or tea – but these were too hard. They could not be enjoyed solo. As I don’t drink coffee, I ate mine with a cup a milk. And when the cookie was gone I was left with cinnamon milk to drink!

I would like to give a big congratulations to Tara. If you don’t follow her on Instagram you really should! (@taramctable) Her account is full of beautiful food photography and the occasional photograph of her adorable children and puppies. If you do follow Tara, you’ll have noticed that her precious child entered this world early a week and a half ago. (which means that I am now behind on her baby quilt! And I thought I was doing so well. The fabric is all cut and the sewing is underway)

So today’s suprise baby shower is more of a welcome baby party!

I would also like to thank my food friends in helping to celebrate Tara today! Please check out the beautiful cookie spread we have assembled for this event. You’ll find the list after my recipe.

Cinnamon Biscotti

Ingredients:

  • 6 tbsp butter, at room temperature
  • 1 1/4 C sugar, divided use
  • 2 eggs, divided use
  • 1 egg yolk
  • 1 tsp vanilla extract
  • 2 C flour
  • 1 tsp baking powder
  • 1/4 tsp salt
  • 3 tsp cinnamon, divided use

Steps:

  1. Preheat oven to 325 degrees F.
  2. In the bowl of a stand mixer beat together butter with 1 C sugar until fluffy. Add 1 egg and the egg yolk, mix until combined. Stir in the vanilla extract.
  3. In a large bowl, whisk together the flour, baking powder, salt, and 2 tsp cinnamon. Add the dry ingredients to the stand mixer in 3 batches, mixing until combined before incorporating more.
  4. Shape the dough into a log about 10 inches long and place on a parchment lined baking sheet.
  5. Beat the last egg and brush the cookie dough.
  6. Make cinnamon sugar: wisk together the remaining 1/4 C sugar with 1 tsp cinnamon. Sprinkle some of the sugar over the cookie dough, reserve the rest.
  7. Bake for 45 minutes.
  8. Slice dough into 3/4″ slices on the diagonal. Place cookies cut side down onto the baking sheet. Top with the reserved cinnamon sugar. Bake 15 minutes more. Allow to cool.
  9. Enjoy with coffee, tea, or milk.

*This recipe is adapted from Joan at http://chocolatechocolateandmore.com/2012/12/cinnamon-sugar-biscotti/*

Cinnamon Biscotti | Sew You Think You Can Cook 2

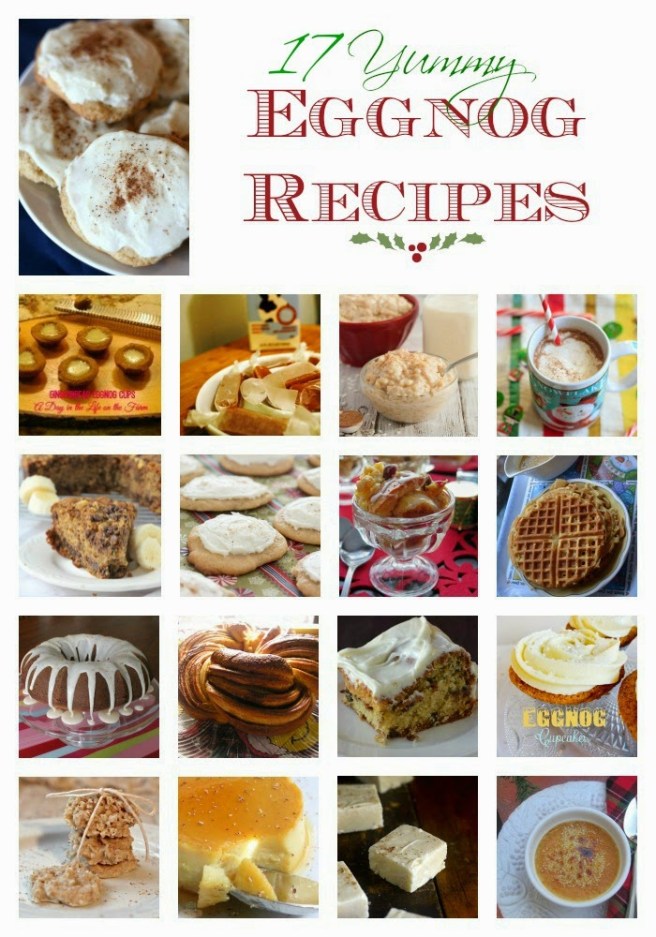
And don’t forget to take a peek at what my other guests have baked up:

Biscotti Bites from Nicole at I am a Honey Bee

Blueberry Pecan Biscotti from Renee at Magnolia Days

Cranberry Pistachio Biscotti from Stacy at Food Lust People Love

Dark Chocolate Orange Biscotti from Amy at Amy’s Cooking Adventures

Green Tea Biscotti Cookies from Rebekah at Making Miracles

Jam-Filled Mandelbrot from Kelly at Passion Kneaded

Maple Walnut Biscotti from Sally at Bewitching Kitchen

Nut-Free Anise Biscotti with Chocolate Chips from Susan at The Wimpy Vegetarian

Orange and Dark Chocolate Biscotti from Lynsey at Lynsey Lou’s

Parmesan-Peppercorn Biscotti from Camilla at Culinary Adventures with Camilla

Tangelo, Date, and Almond Biscotti from Karen at Karen’s Kitchen Stories

Spa Water from of Dorothy at Shockingly Delicious

Candy Cane Snickerdoodles

Happy Christmas Eve!

Tonight’s the night to put out milk and cookies for Santa.

This year, let’s give Santa some variety and try something new.

The favorite snickerdoodle gets a holiday makeover with some crushed candy canes.

The recipe I present to you today celebrates the semi-homemade mentality for a perfect last minute party favorite. It uses premade sugar cookie dough. (Feel free to make your own sugar cookie dough from scratch, if you prefer.) I made these cookies as part of my donation to a cookie drive. When I told my mom about these cookies she simply added crushed candy canes to her favorite snickerdoodle recipe.

Candy Cane Snickerdoodles

Ingredients:

  • 1 roll (16oz) refrigerated sugar cookie dough
  • 1/4 C flour
  • 2 tbsp sugar
  • 1/2 tsp cinnamon
  • 3 candy canes, crushed

Steps:

  1. Preheat oven to 350 degrees F.
  2. In the bowl of a stand mixer break up the sugar cookie dough. Mix in the flour.
  3. In a small bowl, combine sugar, cinnamon, and candy canes.
  4. Gather cookie dough and roll into a log. Cut into 3 dozen cookies. Roll into balls and roll in the cinnamon sugar mixture. Place cookies on an ungreased cookie sheet and bake 10-14 minutes. Allow cookies to cool on cookie sheet for one minute before removing to a cooling rack.

*This recipe is adapted from Deborah at http://www.pillsbury.com/recipes/peppermint-snickerdoodles/c23f7546-0ebe-4897-b678-9ab173c4b2d8*

CC Snickerdoodles 1 FG1 CC Snickerdoodles 2 FG1

Sprinkle Cookies

Today’s cookie recipe comes from my good friend Tara. Tara blogs over at Tara’s Multicultural Table. Tara and I used to live near each other and I would get to taste her food first hand. Now that we have both relocated I’m going to have to make her recipes myself if I want to taste the things that come out of her kitchen. I’m only slightly bitter about this.

When Tara posted these Sprinkle Cookies I pinned them immediately. I was very intrigued by the concept. I’d also never heard of (not that I’m an expert cookie recipes) a cookie recipe that uses cornstarch.

We absolutely loved these cookies! I donated them to a Christmas Cookie Drive earlier this month so I only got to eat one of them. These cookies reminded me of cookie dough – I suspect the cornstarch is to blame for the unique texture. With a variety of sprinkles on the market these could be done to fit any holiday or match any party decor. So bring on the sprinkles, and make some cookies!

Sprinkle Cookies

Ingredients:

  • 1 1/2 C flour
  • 2 tsp cornstarch
  • 1 tsp baking powder
  • 1 tsp baking soda
  • 1/4 tsp salt
  • 1 stick butter, softened
  • 3/4 C sugar
  • 1 egg
  • 2 tsp vanilla extract
  • 1/4 C sprinkles

Steps:

  1. In a large bowl, whisk together flour, cornstarch, baking powder, baking soda, and salt.
  2. In the bowl of a stand mixer, cream together the butter and sugar. Add egg and mix until incorporated. Add the vanilla extract and mix. Add the dry ingredients in two batches, mixing until combined after each addition. Gently fold in the sprinkles.
  3. Gather cookie dough and roll into a log. Cut into 3 dozen cookies. Roll cookies into a ball and place on a parchment lined cookie sheet. Cover with plastic wrap and place in the fridge for at least an hour.
  4. Preheat oven to 350 degrees F. Remove plastic wrap and bake cookies for 8 minutes – until cooked yet not golden. Allow cookies to cool on the cookie sheet for five minutes before removing to a cooling rack.

*This recipe is adapted from Tara at http://www.tarasmulticulturaltable.com/sprinkle-cookies/*

Sprinkle Cookies

Chocolate Christmas Cookies

It is time for the Christmas countdown. Although most of you have probably already been counting down since December 1, or from Thanksgiving, or even those of you who jump the gun, from Halloween.

I am just now starting my Christmas count down. I can probably blame it on the five month old, but this is the most unprepared I’ve ever felt for Christmas. I think the real culprit is that we didn’t put up Christmas lights this year. The house we’re living in is very old and only has one single two-pronged outlet. So all I could do was put out the fun lighted gift boxesby our front door. Stuart promises me that we’ll figure out how to do more next year. I also have my snowman door hanger up by the mailbox. Inside is a little better, but still doesn’t hold a candle to last year. Last year I had a fireplace with a mantle that I happily decorated with garland and winter birds. This year I have fewer surfaces and had to break up my Christmas villagebetween two bookshelves – one of which doesn’t have access to an outlet so it’s a dark village; and even still, some of my houses had to be left in their boxes. At least I still have a Christmas tree to be proud of! If I could only have one element of Christmas decor it would have to be my tree. There is just something about the glow of a Christmas tree that makes the world a better place.

Sorry, that was a 250 word tangent to tell you that my Christmas countdown has begun and we’re celebrating on the blog with cookies! Today until Christmas Eve I’ll be sharing three new cookie recipes. Maybe I’ll make this an annual thing and next year there’ll be more new cookie recipes Christmas week!

Christmas Cookies 1

Roll-out sugar cookies are a traditional cookie that must be made every Christmas. Today I am sharing a twist on the classic recipe – a chocolate version! When I make the traditional cookies I put sprinkles on them before popping them in the oven, but with chocolate I left them plain. (If I had gold and silver sprinkles I would’ve given them a shot.)

Because I like thin cookies and didn’t need to feed an army I halved the recipe. In doing so I forgot to halve both the vanilla extract and the salt and when I pulled the dough out of the fridge it smelled like Kahlua. I crossed my fingers that my altered flavor profile wouldn’t be inedible, rolled out the dough, cut my shapes, and popped them in the oven. After baking, they smelled perfectly of chocolate. And they tasted like Teddy Grahams! The recipe written below uses the correct amount of vanilla extract and salt; Marian worked really hard to get the right ratio of ingredients for the perfect chocolate cookie so I will have to try these again and do it right!

Chocolate Christmas Roll-Out Cookies

Chocolate Roll-out Cookies

Ingredients:

  • 2 C flour
  • 3/4 C cocoa powder
  • 1/2 tsp salt
  • 2 sticks butter, softened
  • 1 C sugar
  • 1 egg
  • 1 1/2 tsp vanilla extract

Steps:

  1. In a large bowl, whisk together flour, cocoa powder, and salt.
  2. In the bowl of a stand mixer, cream together the butter and sugar. Add egg and mix until incorporated. Add the vanilla extract and mix. Add the dry ingredients in two batches, mixing until combined after each addition.
  3. Chill dough in fridge for at least one hour. (I did mine for a few days before having time to bake the cookies.)
  4. Preheat oven to 350 degrees F. Line cookie sheet with parchment paper.
  5. Roll out cookie dough on a floured surface to desired thickness. Cut out cookies and place on cookie sheet. Bake 8-12 minutes. (Will depend on your cookie thickness.) Let cookies cool on baking sheet for a minute before removing to a cooling rack.

*This recipe is adapted from Marian at http://sweetopia.net/2013/12/chocolate-sugar-cookie-recipe-cut-out-cookies/*

Christmas Cookies 2

Disclaimer: This post contains affiliate links.

SRC: Oatmeal Raisin Cookies

unnamed

With the holidays the Secret Recipe Club takes a break the last two Mondays of December and first two Mondays of January. But that didn’t stop 60 of us from partaking in a virtual cookie swap – SRC style. That means we kept to our “secret santa” style assignments but mixed up the groups and limited recipe selection to cookies only! As luck of the draw would have it, I was assigned a blog I’ve already had for a normal SRC reveal day – The More Than Occasional Baker.

During my August post we were busy with just having moved from Florida to Ohio and I followed her tutorial for homemade vanilla extract. And now I get to put it to use! (I mean, I’ve been using it, it’s already half gone!) But I get to use it in one of her recipes!

As can be expected from the more than occasional baker Ros, there were plenty of cookie recipes to pick from. Her Double Chocolate Cookies look addicting and her Leftover Frosting Cookies intriguing. I ultimately decided to go with her Oat and Cranberry Cookies. (I did substitute raisins as that’s what I had in the pantry.)

I had to convert the ingredient list and grew nervous when the mixture I was looking at in my stand mixer resembled granola. I frantically looked back over the recipe and realized I forgot the eggs! I don’t recommend adding eggs last, but luckily the cookies still turned out! I got 3 dozen large cookies from this recipe.

 Oatmeal Raisin Cookies

Ingredients:

  • 2 sticks butter, softened
  • 3/4 C brown sugar
  • 1/3 C sugar
  • 2 eggs
  • 1 tsp vanilla extract
  • 1 1/2 C flour
  • 1 tsp baking powder
  • 1 tsp cinnamon
  • 1/2 tsp salt
  • 4 C old fashioned oats
  • 1 C raisins

Steps:

  1. Preheat oven to 350 degrees F.
  2. In the bowl of a stand mixer, beat butter with both sugars. When fluffy, add eggs one at at time until incorporated.
  3. In a bowl, whisk together flour, baking powder, cinnamon, and salt. Add to wet ingredients in two batches, mixing until combined.
  4. Mix in the oats and raisins.
  5. Spoon dough onto parchment paper lined cookie sheets. (Because of my egg mishap I had to press the dough together with my hands before placing on cookie sheet.) Bake 15 minutes, until golden. Let cool on cookie sheet 5 minutes before removing to a cooling rack.

*This recipe is adapted from Ros at http://themorethanoccasionalbaker.blogspot.com/2011/11/oat-and-cranberry-cookie.html *

 Oatmeal Raisin Cookies

To see the other bloggers who participated in the Secret Recipe Club Cookie Carnival this month click here: 

#FoodieExtravaganza: Eggnog

foodieextravaganza-300

This month’s #FoodieExtravaganza is celebrating Eggnog! The Foodie Extravaganza is a monthly party hosted by bloggers who love food! Each month we incorporate one main ingredient into recipes to share with you. For December, I don’t think our host Alexis of We Like to Learn as We Go could have picked a more perfect ingredient!

I am pretty sensitive to nutmeg, so I’ve never been a huge fan of eggnog. I think though that my increased baking endeavors have helped me get used to it. My mom’s stuffing is a simple bread, egg, nutmeg, salt, and pepper and every year I try it and every year I can’t get past the nutmeg. But this year I enjoyed it! Hooray for growing up.

But back to the eggnog. I have no doubt that the brand of eggnog makes all the difference. For this challenge I bought the generic Target brand and loved it!

These cookies are absolutely divine. They really do melt in your mouth and are better than store bought. I garnished half of the cookies with cinnamon and half with nutmeg. I have some more frosting leftover and plan to make another half batch of cookies to use it up!

Eggnog Cookies

Ingredients for the cookies:

  • 3/4 C room temperature butter
  • 1/2 C sugar
  • 1/2 C brown sugar
  • 2 egg yolks
  • 1 tsp vanilla extract
  • 1/2 tsp rum extract
  • 1/2 C eggnog
  • 2 1/4 C flour
  • 2 tsp baking powder
  • 1/2 tsp salt
  • 1/4 tsp nutmeg
  • 1/2 tsp cinnamon

Ingredients for the frosting:

  • 1/2 C room temperature butter
  • 1/2 tsp rum  extract
  • 3 tbsp eggnog
  • 3 C powdered sugar

Steps:

  1. Preheat oven to 350 degrees F.
  2. In the bowl of a stand mixer, beat butter with both sugars until fluffy. Add egg yolks one at a time until combined. Mix in both extracts and eggnog.
  3. In a bowl whisk together the flour, baking powder, salt, and spices. Add dry ingredients to the stand mixer in two batches and mix until combined.
  4. Drop spoonfuls of dough onto a parchment lined cookie sheet. Bake for 12 minutes, until the edges are lightly golden. Let cool five minutes on cookie sheets and transfer to cooling rack.
  5. Make frosting: In the bowl of a stand mixer, beat butter until fluffy. Mix in rum extract, eggnog, and powdered sugar. If needed, add up to a total of 5 tbsp eggnog. Frost cookies once completely cooled and garnish with sprinkling of nutmeg or cinnamon.

*This recipe is adapted from Jaclyn at http://www.cookingclassy.com/2013/11/melt-mouth-eggnog-cookies/*

Eggnog Cookies

Be sure to check out these other festive eggnog recipes:

Gingerbread Eggnog Cookies – A Day in the Life on the Farm
Nutty Nog Caramels – Culinary Adventures with Camilla
Eggnog Rice Pudding – The Joyful Foodie 
Peppermint Eggnog Hot Chocolate – Trial and Eater
Eggnog Chocolate Chip Cake – Fearlessly Creative Mamas
Fruity Eggnog Bread Pudding – Cindy’s Recipes and Writings
Chewy Eggnog Cookies – We Like to Learn as We Go
Eggnog Waffles and Syrup – Making Miracles
Eggnog Pound Cake with Eggnog Glaze – Food Lust People Love 
Eggnog Kringel – Passion Kneaded
Banana Chocolate Chip Eggnog Coffee Cake – The Sweet {Tooth} Life
Eggnog Cupcakes – Baking in Pyjamas
No-Bake Eggnog Cookies – Rhubarb and Honey
Eggnog Mexican Flan – Pantry Friendly Cooking
Eggnog Fudge – Mrs. Penguin
Eggnog Creme Brulee – The Freshman Cook
 

Graveyard Cupcakes

The ghost theme continues with this super fun and adorable dessert.

I was originally planning on making another spin on S’more Brownies using ghost marshmallow peeps but during my trip to Joann’s for the ghost cookie cutterI used in Monday’s post my eyes fell upon these adorable ghost icing decorationsand I couldn’t resist! A change in plans was made and a discussion with Kate was in order. With her creative genius she suggested I do chocolate cupcakes with green icing and having these ghosts be coming back from the grave. I continued to follow her instruction and dipped Milano cookies in chocolate to create headstones.

I decided on a chocolate coffee cupcake for the base. My husband forgot his coffee on the counter one morning and I had the ambitious idea to save it, thinking I’d do something with cold coffee. These ideas are usually met with a lack of time or imagination, or even completely abandoned and everything I save with the intentions to do something awesome make their way to a dark corner of the refrigerator to die. But not this time! This time I found a use for that coffee! And because I did a coffee cupcake, I decided to use coffee creamer in the icing instead of milk. And my idea worked! Vanilla buttercream is my least favorite of the buttercreams and I didn’t think I’d be able to dye chocolate buttercream green very effectively. Using the Italian Sweet Cream flavor coffee creamer I had on stock for my mother-in-law made this frosting perfectly sweet and it complimented the cupcakes beautifully – making for an addicting chocolate cupcake. And I don’t say that about cake very often!

Chocolate Coffee Cupcakes with Coffee Creamer Frosting

Ingredients for cupcakes:

  • 1 stick butter, softened
  • 1 C sugar
  • 2 eggs
  • 1 3/4 C flour
  • 1/4 C cocoa powder
  • 2 tsp baking powder
  • 1 C cold coffee

Ingredients for decorating:

  • 2/3 C chocolate chips
  • 12 Milano cookies
  • 12 ghost icing decorations
  • 2 sticks butter, softened
  • 3 C powdered sugar
  • 1 tsp vanilla extract
  • 1 tbsp liquid coffee creamer
  • green food coloring

Steps:

  1. Preheat oven to 350 degrees F. Line cupcake tins with 16 cupcake liners. Note: there are only decorations for 12 cupcakes, the other 4 are bonus for the cook!
  2. In the bowl of a stand mixer fitted with the paddle attachment, cream together butter and sugar. Add eggs one at a time. Mix in vanilla.
  3. In a large bowl whisk together flour, cocoa powder, and baking powder. If you’re using unsalted butter, add a pinch of salt.
  4. Add 1/3 of the dry ingredients to the butter and mix until combined. Add 1/2 of the coffee and mix until combined. Repeat with another 1/3 of the dry ingredients, the last of the coffee, and ending with the remaining 1/3 of the flour mixture.
  5. Fill cupcake tins and bake 20 minutes, or until a toothpick comes out cleanly. Allow to cool.
  6. Over a double boiler, melt the chocolate chips. Dip the Milano cookies in the chocolate and let set on a piece of parchment paper.
  7. Make frosting: in the bowl of a stand mixer fitted with the paddle attachment, cream the butter and sugar. Add the vanilla and creamer. Add up to another tablespoon of creamer if needed. Mix in food coloring until desired color is achieved. Note: Depending on how you ice your cupcakes, there will be leftover frosting.
  8. Cut a cat’s eye slit into the cupcakes and place the chocolate covered cookies into the cupcakes.
  9. Ice the cupcakes. Decorate with the ghosts.

*This recipe is adapted from Roxana at http://roxanashomebaking.com/chocolate-coffee-cupcakes-with-coffee-buttercream-frosting-recipe/ *

Chocoalte Coffee Cupcakes with Coffee Creamer Frosting

Disclaimer: This post contains affiliate links.

SRC: Ghost Sugar Cookies

newsrcbanner

Today’s Secret Recipe Club post kicks off a week of ghostly treats in preparation for Halloween. I knew that in my search through my assigned blog, Making Miracles, I knew I would be narrowing down my scope to something that would fit into my plan this year. If you were to look at my secret Pinterest board you’d see that I didn’t do a very good job at tunnel vision.

Making Miracles is Rebekah’s blog about “food, family, and making memories.” Her blog started eight years ago to share her experiences at being a surrogate mother. I couldn’t think of a better gift to give to someone than the gift of a child. For six years Rebekah selflessly gave 4 daughters to parents dreaming of having their own children. Making Miracles was the perfect blog title.

Rebekah’s blog has transformed over the years into a very impressive food blog. With the exception of catching her blog during SRC reveal days, I was introduced to Rebekah through the blog event #10DaysofTailgate where together with 10 other bloggers we ate our way through the end of September cheering on our favorite teams. Let me tell you, it was very tempting not to tell her that I was assigned her blog this month.

If you don’t yet know, in the Secret Recipe Club, each participating blogger is assigned a blog from another participating blogger and secretly searches their site for something to recreate. The accompanying blog post then goes live on reveal day!

So back to my recipe searching.

My secret pinterest board is filled with over 25 recipes from Rebekah’s blog, including her pizza dip from #10DaysofTailgate, her buttermilk soaked parmesan baked pork chops, and chocolate chip cookie souffle. But to fit in with my Halloween week, I narrowed it down to quesadillas (either pizza or sweet potato black bean) or sugar cookies. After finding my ghost shaped cookie cutter, I knew I’d be going the cookie route.

This cookie recipe reminded me of my grandmother’s Roll Out Christmas Cookies. Instead of frosting, I put sprinkles on the cookies before baking them. There are two reasons for doing that: 1) that’s what my Busia did and 2) I don’t like frosting on my cookies. These sugar cookies are not overly sweet and that’s what makes them addicting. Without frosting, they’re also perfect for dunking in your coffee!

I halved Rebekah’s recipe and was nervous the dough didn’t come together perfectly, but after chilling in the fridge before rolling it was perfect! Do not skip the chilling step. If the dough gets too warm it’ll stick to the board and rolling pin all too easily. This means, in between throwing the cookies in the oven, put the dough back in the fridge.

While Rebekah likes thick, chewy cookies I’m the opposite and like thin, flaky cookies. I rolled my cookies to 1/4″ thickness until very lightly golden on the edges. This half recipe yielded approximately 4 dozen cookies. The amount you get will vary depending on the size of your cookie cutter(s) and your desired cookie thickness.

Ghost Sugar Cookies

Ingredients:

  • 1 1/2 sticks butter, softened
  • 1 C sugar
  • 2 eggs
  • 1/2 tsp vanilla extract
  • 2 1/2 C flour
  • 1 tsp baking powder
  • 1/2 tsp salt
  • sprinkles (optional)

Steps:

  1. In the bowl of a stand mixer, cream together butter and sugar. Add eggs one at a time. Add in vanilla.
  2. In a large bowl, whisk together the flour, baking powder, and salt.
  3. Add the flour to the butter in 3 batches.
  4. Wrap dough in plastic wrap and chill in fridge at least one hour.
  5. Preheat oven to 400 degrees F.
  6. Roll dough out on a floured surface. Cut out cookies and place an an ungreased cookie sheet. Sprinkle cookies with sprinkle, if desired. Bake 7 minutes.
  7. Cool cookies on a cooling rack.

*This recipe is adapted from Rebekah at http://rebekahrose.blogspot.com/2013/12/the-best-rolled-sugar-cookies.html?m=1 *

Ghost Sugar Cookies

To see the other bloggers who participated in the Secret Recipe Club this month click here:

Ginger Molasses Cookies

There are a lot of theories about foods to induce labor and while I don’t believe in any of them I’ve still used them as a nice excuse to indulge in hot wings.

And cookies.

A google search led me to a recipe for “labor inducing cookies” which are really gingersnaps with some cayenne. Except that I forgot to add the cayenne. I mean, really!? But, now I have a post perfect for National Gingersnap Day.

Quick question: Why is gingersnap day in July? Are we trying to go with the “Christmas in July” feel? The batter smelled like Thanksgiving to me!

These cookies are rich with molasses and spicy with ginger. (If you want to try to put someone into labor add the 1/2 tsp of cayenne I forgot about.)

Ginger Molasses Cookies

Ingredients:

  • 1 stick butter
  • 1/2 C sugar, plus extra for rolling cookies
  • 1 C brown sugar
  • 1/3 C molasses
  • 2 egg whites
  • 2 1/2 C flour
  • 1 1/2 tsp baking soda
  • 3/4 tsp cinnamon
  • 1 tsp ground ginger
  • 1/2 tsp ground cloves
  • 1/2 tsp salt

Steps:

  1. Preheat oven to 350 degrees F.
  2. In the bowl of a stand mixer fitted with the paddle attachment beat butter and sugars. When combined add the molasses. Add the egg whites.
  3. In a bowl whisk together the flour, baking soda, spices, and salt.
  4. Add dry ingredients to the butter and molasses mixture in two installments.
  5. Roll dough into 1″ balls. Roll balls in sugar. Place on a parchment paper lined baking sheet. Bake 10-12 minutes. Allow cookies to cool on the baking sheet.

*This recipe is adapted from http://www.justmommies.com/pregnancy/labor-and-childbirth/labor-inducing-cookie-recipe*

Ginger Molasses Cookies

P.S. – They didn’t work. Neither did spicy foods. Or pineapple.