Spinach and Ricotta Ravioli

For my first Valentine’s Day as a blogger I bring you the first dish I ever made for Stuart.

On our 1 year anniversary back in college I made him dinner. I was living in the dorms and my roommate with a car helped me get to the grocery store and to his apartment so that I could surprise him with dinner. I made ravioli, Caesar salad, and an apple crisp for dessert.

Everything turned out great – except the apple crisp. The salad was one of the prepackaged options from the store, so I couldn’t go wrong there. The ravioli came from a book, Teens Cook: How to Cook What You Want to Eat, that I was gifted before attending college. I think the apple crisp recipe came from that book as well, but I don’t remember. Oh, everything turned out fine and Stuart and his roommates ate it. But I was “forced” to use I Can’t Believe It’s Not Butter in place of real butter because apparently I was wrong to assume boys kept real butter in the fridge. Let me tell you, I could believe it wasn’t real butter and that not-real butter taste was only accented once baked in the crumble topping.

But I digress. This post is supposed to be about ravioli, not my abhorrence to fake butter.

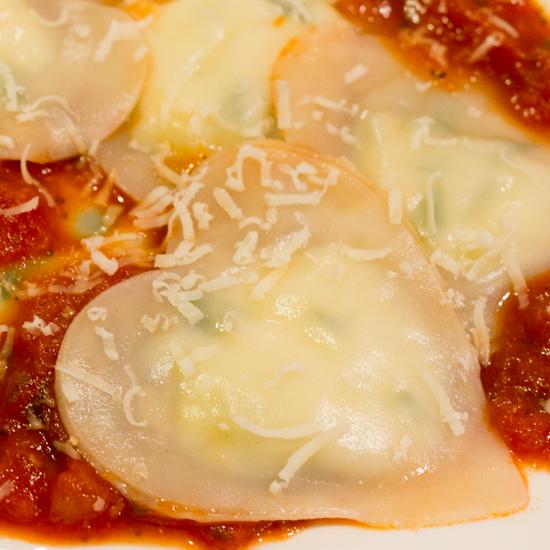
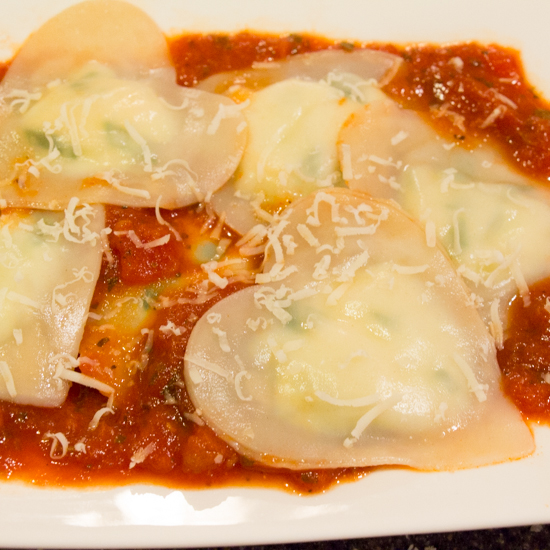
For the blog I decided to try making heart shaped ravioli. And it worked!

Won ton wrappers are used in place of fresh pasta which makes it a super simple meal. Typically I’d use one sheet of won ton wrapper and fold it over, but when you’re cutting hearts out of it you need to use two sheets per raviolo. (I think that’s the singular to ravioli… eh, it sounds fun anyway!) The amount of filling you place inside each heart will depend on the size of your cookie cutter – you need to make sure you can seal the ravioli so the filling doesn’t escape while boiling.

Spinach and Ricotta Ravioli

Ingredients:

  • 15 oz ricotta cheese
  • 1 C julienned fresh spinach
  • 1/2 C shredded Italian blend cheese (or Parmesan)
  • salt and pepper, to taste
  • 1 pkg (12 oz) won ton wrappers (these can be found in the refrigerated area of the produce section)*
  • your favorite pasta sauce

*You will need two packages if making heart shaped ravioli

Steps:

  1. In a bowl combine cheeses and spinach. Season with salt and pepper to taste.
  2. Bring a pot of salted water to a boil while assembling the ravioli.
  3. If making heart shaped ravioli, use a cookie cutter to cut hearts out of each won ton wrapper. Place about 1/4 tsp of filling in the center of the heart. Dip your finger in water and run along the edge of the heart. Place a second heart on top and seal shut.
  4. If not making heart shaped ravioli, place about 1/2-1 tsp of filling in the center of each wrapper. Dip your finger in water and run along all four sides of the wrapper. Fold into a triangle and seal.
  5. Boil the ravioli in batches of 8-10 to avoid them breaking apart. Boil 3-4 minutes, or until they float. They will become slightly translucent.
  6. Heat your favorite pasta sauce and serve with ravioli. Garnish with freshly grated Parmesan or Asiago cheese if desired.

Hearts Ravioli 1 Heart Ravioli 2

Disclaimer: This post contains affiliate links. 

Garlic Bread Grilled Cheese

Last week we were kept indoors and out of the office because of a winter storm.

Those of you new to Sew You Think You Can Cook, I live in Florida.

I know we won’t be getting any sympathy from our Northern friends, but keep in mind the Sunshine State gets snow once in a bluemoon. Therefore, our cities don’t have the need, nor could ever justify the budget, for equipment to handle icy roads. I saw on Facebook a fantastic meme of a beautiful Florida Sunset that said, “In Florida we salt margaritas, not sidewalks.” That couldn’t be better said; it’s why people relocate from the white North!

We definitely didn’t have it as bad as Atlanta and other Southern towns, but roads – and more importantly bridges – were closed Wednesday, January 29th. We were sent home from work at 2:00 pm on Tuesday with an expected return of 12:00 pm Wednesday. The return date and time were pushed back to Thursday at noon!

In having been out of town the previous weekend for Food Blog South I hadn’t yet been grocery shopping. We’ve been surviving on empty – frozen pizzas, breakfast foods, leftovers, and grilled cheese. There was a package of chicken thighs in the freezer which I used for grapefruit chicken (to be shared at a future date).

It was pretty cold when we were in Birmingham and Sunday morning our car (Edgar) wouldn’t start. Edgar was so dead that we couldn’t even shift gears into neutral to push it out of the parking spot. Thankfully my in-laws joined us and we were able to get a jump good enough to make it to the local Auto Zone. The battery was fried and a new one installed – a battery with a higher cold temperature rating! It’s a good thing too because on Wednesday Edgar was cocooned in a sheet of solid ice.

ImageImage

This recipe is probably the simplest recipe I have yet to share, and probably will ever share. It’s your typical grilled cheese, with an Everson twist. My father-in-law would always season the buttered bread with garlic powder, and that’s how my husband still prefers to eat it.

Garlic Bread Grilled Cheese

Ingredients:

  • 2 slices of sandwich bread
  • butter or margarine, for spreading
  • garlic powder, for sprinkling
  • 2 American cheese singles

Steps:

  1. Heat a small skillet over low to medium heat.
  2. Butter one side of each slice of bread. Sprinkle garlic powder on buttered side of each slice.
  3. Place one slice of bread butter side down in warm skillet. Top with both cheese singles and the other slice of bread, buttered side out. Cook until bottom piece of bread is golden.
  4. Flip sandwich to toast the 2nd side until the cheese is melted.
  5. Slice on a diagonal and serve.

Garlic Bread Grilled Cheese

recreatedbysrc

Taco Popcorn

This week I will be bringing you 4 different popcorn flavors. Perfect for your Super Bowl party!

I want to start with one that can kinda-sorta fall into my Mexican Monday theme.

This popcorn comes from Food Network Magazine’s January/February 2014 booklet of 50 Flavored Popcorns. Popcorn is tossed with corn chips, butter, and chili powder. Then quickly baked with cheese and scallions.

Taco Popcorn

Ingredients:

  • canola oil, enough to coat bottom of pot
  • 3/4 C popcorn kernels
  • 3 C corn chips
  • 6 tbsp salted butter, melted
  • 2 tbsp chili powder
  • 1 C shredded cheddar cheese
  • 2 scallions, chopped

Steps:

  1. Put canola oil in pot along with 2-3 kernels of popcorn. Cover and stand by. Once you hear the kernels pop, add the 3/4 C of popcorn. Cover and cook over medium heat until popping slows. Gently shake the pop during the popping process so as not to burn the popcorn at the bottom. Remove from heat and remain covered until popping has ceased, unless you want to be pelted with popcorn. (If you have another method of popping popcorn, feel free to use it.)
  2. Preheat oven to 350 deg.
  3. In an extra large bowl toss together popped popcorn and corn chips. Toss with chili powder. Toss with melted butter.
  4. Place popcorn mix on a baking sheet in an even layer. Top with shredded cheese and scallions. Bake for 3 minutes, or until cheese is melted. Season with salt to taste.

Taco Popcorn 1 Taco Popcorn 2 Taco Popcorn 3 Taco Popcorn 4

Creamed Spinach

Creamed Spinach is a pretty classic side dish for a meaty main course. And it’s easy to make at home!

In the past I’ve always bought the frozen stuff, and it is delicious. But when you make it yourself you can add any additional flavors you might like – such as garlic and cheese!

Be sure to have a great slice of bread, a biscuit, or a crescent roll to sop it all up!

Creamed Spinach

Ingredients:

  • 3 tbsp butter
  • 3 tbsp flour
  • 1 1/4 C milk
  • 1/2 tsp garlic powder
  • 1/4 tsp white pepper
  • 1/2 tsp salt
  • pinch nutmeg
  • 10 oz fresh spinach
  • 1 C shredded cheddar cheese

Steps:

  1. Melt butter over medium heat in a large pot. Whisk in flour until it forms a paste.
  2. Add in milk, constantly whisking. Season with garlic powder, salt, pepper, and nutmeg. Bring to a simmer, still whisking.
  3. Add spinach to the pot of milk. Stir with a wooden spoon until it wilts down. Stir in cheese until it melts.

*This recipe is modified from Katie at http://www.healthyseasonalrecipes.com/cheddar-creamed-spinach/*

Creamed Spinach

Game Night Cheese Die

Last night we were invited to a game night with friends. We were asked to bring an appetizer.

There are plenty of easy to eat appetizers to choose from, but I wanted to “go all out” and bring a themed dish. Unfortunately I’m not creative enough to come up with my own clever idea so I turned to the trusty internet. Most recipes I found were desert related – domino brownies, rice krispie treat billiards balls, etc. And then there was this die, made from cheese!

I’ve had cheese balls in the past and thought that this was a winner. The trick to making a cube instead of a ball is having enough time for the cheese to harden in a loaf pan. And to create the white exterior you “frost” the cube with more cream cheese. Stud it with black olives and you have yourself a die! (Mine wasn’t anatomically correct, but no one seemed to mind.)

Cheese Spread Cube

Ingredients:

  • 24 oz cream cheese, divided
  • 2 C shredded Italian blend cheese
  • 6 scallions, chopped
  • 1 tbsp milk
  • sliced black olives for decorating

Steps:

  1. Mix together 16 oz cream cheese with shredded cheese and scallions. Season with salt and pepper to taste.
  2. Place cheese in a plastic wrap lined loaf pan. Cover with more plastic wrap and place in the fridge for a minimum of 8 hours. You can do this the night before your party too.
  3. Remove cheese from the fridge and cut the loaf in half. Place one half on top of the other to create a cube. (Or make multiple smaller dice, whatever you decide.)
  4. Beat remaining 8 oz of cream cheese with the milk until smooth. (It’ll play a mind trick on you, thinking it’s marshmallow fluff or frosting!)
  5. As if you were frosting a cake, cover the die with the smooth cream cheese. Stud the 5 visible sides with olive slices.
  6. Serve with crackers or bread.

*This recipe was modified from http://www.tasteofhome.com/recipes/cheese-spread-dice*

 Cheese Spread Die

Italian Sausage and Red Pepper Pesto Panini

About twice a month I’m met with the “I don’t want to cook” flu. It’s usually accompanied by a strain of the “need to go to the grocery store” virus. There are two popular remedies to this illness: 1) date night out and 2) go to the store on the way home from work.  With this recipe, I’ve discovered a new antibiotic! Take what you have and make a sandwich.

In asking Stuart what he wanted for dinner he actually had an answer other than my favorite “I don’t know”. He wanted a panini. So I hit the web and found one that looked good. I shared the recipe and was given the vote of approval… along with the question, “Do we have what we need?” My answer, “ Um, we have bread.  And maybe cheese?” Instead of getting discouraged I read her blog post and thought, I could do that! (She utilized ingredients from her pantry/fridge to create her masterpiece.)

I used my engineering degree in the kitchen once again and improvised a panini maker. I slathered some butter on the outside of the sandwich and treated it like a grilled cheese. Except instead of using a skillet, I used my indoor grill pan. Taking the flat top of a saucepan, I pressed the sandwich. After achieving those traditional grill marks I flipped it over and repeated the process. The result – a beautiful panini fake out.

Italian Sausage and Red Pepper Pesto Panini

Ingredients:

  • 4 slices of bread
  • butter, for spreading
  • 2 tbsp red pepper pesto
  • 2 links hot Italian sausage, sliced into medallions
  • 2 slices white American cheese
  • kale

Steps:

  1. In a small skillet, cook sausage.
  2. Assemble sandwiches: Spread butter on all pieces of bread. On the opposite side of butter spread pesto on 2 of the slices. Top with sausage, kale, and cheese. Top with other slice of bread, butter side out.
  3. Press in panini maker or follow my method described above.

Fake Out Panini

Chorizo Mac and Cheese

I have another chorizo pasta combination for Mexican Monday. And although it makes quite a few more dishes and requires more ingredients than my previous Chorizo Carbonara, I am addicted to this one.

When I day dream about this dish – yes, I actually do this – I get hungry. The leftovers are even just as delicious as when it first comes out of the oven. And I’m not very big on leftovers, pastas in particular always take on a new rubbery texture, but not these!

There are also so many ways you could change this up and make it your own: use a different meat product, add peppers or chilies for heat, serve alongside guacamole, salsa or sour cream for extra creaminess with each bite. Is it time to eat yet?

Chorizo Mac and Cheese

Ingredients:

  • 2 C uncooked macaroni noodles
  • 1 C shredded Mexican cheese
  • 1 C shredded pepper jack cheese
  • 1 tsp of corn starch
  • 1 C milk
  • 2 links Mexican chorizo, casings removed
  • 1/2 red onion, diced
  • 1 heaping tbsp flour
  • 2 tbsp bread crumbs
  • olive oil, for drizzling

Steps:

  1. Cook pasta in a pot of boiling salted water until al dente. Drain and set aside.
  2. Preheat oven to 375 degrees F.
  3. In a bowl, combine cheeses and corn starch. Set aside.
  4. Warm milk in a small sauce pan over low heat – do not bring to a boil.
  5. Brown chorizo in a sauce pan – breaking it up like you would ground beef. Add in onion and cook until translucent. Sprinkle in flour and stir. Slowly add in warm milk, stirring after each addition. It will begin to turn into a beautiful pale orange sauce. Melt in cheeses a handful at a time, stirring. Mix in drained cooked pasta.
  6. Pour pasta into a greased casserole dish, sprinkle with bread crumbs and drizzle with olive oil. Bake 25 minutes.

*This recipe is adapted from Elise at http://www.simplyrecipes.com/recipes/chorizo_mac_and_cheese/*

Chorizo Mac and Cheese 2Come join Mac and Cheese Mania at Nutmeg Nanny and Rachel Cooks sponsored by Door to Door Organics and OXO!

Honey Lime Chicken Enchiladas

You’ve probably heard of Taco Tuesdays. In my household, we do Mexican Mondays. It allows for more versatility. It’s a culinary “tradition” that we’ve been doing for over a year and I’m impressed that I’ve been able to keep it fun and interesting. There are a few recipes that have become tried and true favorites and I will and do repeat them, but more often than not I’m finding something new to try.

These Honey Lime Chicken Enchiladas are a best seller – we’ll even have them any day of the week! If I’m entertaining family or friends, this is a simple go-to. And I haven’t gotten a single complaint yet! My mom’s cousin claims to hate honey, yet she cleared her plate.

The very first time I made this dish was after a vacation and my fridge and pantry were pretty empty. I did not have green enchilada sauce and knew that without tomatillos I wasn’t going to be able to make my own either. But, I found Emeril’s recipe for red enchilada sauce and had everything on hand to make that. Enchilada sauce is now a pantry staple, so I don’t bother making my own anymore. (But in a pinch I’ll always come back to Emeril’s recipe.)

The second time I made this dish, we had a crowd so I doubled the recipe. Because we loved it with red enchilada sauce, we decided to keep one casserole dish with red and with the other tried the green. I haven’t made it with green since! I’ve noticed that the red (medium heat) enchilada sauce creates a unique flavor profile with the chicken that keeps you coming back for more. But I urge you to try it both ways and see what works best for your family.

The recipe calls for cooked chicken and I have tried just about every preparation of cooked chicken with this dish. Honestly, my favorite is using grilled chicken, the extra flavor you get from the grill rounds out the dish perfectly. My quick go-to method is putting a whole chicken in the slow cooker, but you can easily pick up a rotisserie chicken from the store on your way home!

Honey Lime Chicken Enchiladas

Ingredients

  • 1 lb cooked shredded chicken
  • 6 tbsp honey
  • Zest 2-3 limes
  • juice 2-3 limes
  • 1 tbsp chili powder
  • 1/2 tsp garlic powder
  • Salt, to taste
  • 1 can (10 oz) enchilada sauce (red or green)
  • 1/4-1/2 C heavy cream
  • 8 oz Mexican-blend shredded cheese
  • 8-10 soft taco sized flour tortillas

Steps

  1. Marinate cooked chicken in honey, lime juice, chili and garlic powders, and salt for 30 minutes.
  2. Preheat oven to 350 degrees F.
  3. In a measuring cup, whisk together enchilada sauce and cream. Pour a thin layer of sauce on the bottom a 9×13″ baking dish.
  4. Assemble enchiladas with chicken and cheese (reserving some cheese for the top). Place seam-side down in the baking dish and top with remaining sauce and cheese.
  5. Bake covered for 30 minutes. Uncover and bake another 5 minutes until cheese is golden and sauce is bubbly.

*This recipe is adapted from Danelle at http://www.letsdishrecipes.com/2012/04/honey-lime-chicken-enchiladas.html*

Image

Be prepared for many more Mexican-style recipes in the future!

Busia’s Cheese Soup

My first truly culinary post is in honor of the woman who introduced me to the kitchen, my Busia. (Busia, pronounced boo-sha, is the Americanized Polish word for grandmother.) Busia didn’t teach me how to cook in the ways you might traditionally think of a grandmother teaching her granddaughter, but she did welcome me into her kitchen and let me be her sous chef – peeling carrots and potatoes and chopping veggies. And even still, my favorite part of making dinner is all the prep work! It might be the engineer in me though too – I love trying to keep everything the same size while I’m chopping.

If I had to choose just one recipe that makes me think of my grandmother, it’s her cheese soup. There are potatoes and carrots that need to be peeled and chopped along with celery. I don’t recall ever chopping the onion when I was younger, but it’s one of my favorite foods to dice now that I’ve learned the proper technique from watching countless hours of Food Network.

To me, the most comforting smell in the kitchen is the smell of onions sautéing in butter! And I think this recipe is the reason why.

While I was preparing the soup yesterday afternoon, the smells of Busia’s kitchen came into mine and I knew she was looking down on me, making sure the milk wouldn’t curdle when I added it to the roux and didn’t burn on the bottom of the pot.

I think it’s true when they say the secret ingredient is love, because it turned out perfectly.

Busia’s Cheese Soup

Ingredients:

  • 6 tbsp butter
  • 1/2 onion
  • 6 tbsp flour
  • 4 C warmed milk (I heated it in a glass bowl in microwave for ~4:30)
  • 4 C boiling chicken stock (I did this on the stove)
  • 4 carrots, peeled and diced
  • 4 stalks celery, diced
  • 2 potatoes, peeled and cubed (The potatoes will break down a little bit during cooking time)
  • 1 lb Velveeta, cubed

Steps

  1. In a large pot, melt butter. Add onion, season with salt, and cook until translucent. Add the flour and whisk until combined and a roux is formed, be careful not to let it burn.
  2. Add the warmed milk and whisk until combined. Add in the boiling chicken stock and the vegetables. Let simmer 1 hour, stirring occasionally.
  3. Melt in the Velveeta – it’s best to do it in batches, making sure the cheese melts completely before your next addition. After all the cheese is incorporated, let warm back through completely and serve.

Cheese Soup 2

Image