Tuesday Tattles: 1st Birthday

Tuesday Tattles

My baby boy is now ONE!

If year one goes by quickly for the first born, it goes even faster with the second child. My Treat has been walking for 2 months now and loves to run and climb. He wants anything his big brother is playing with or eating – and his favorite thing to do is steal chocolate milk.

Today I will share with you the planning (and execution) of his birthday party.

family

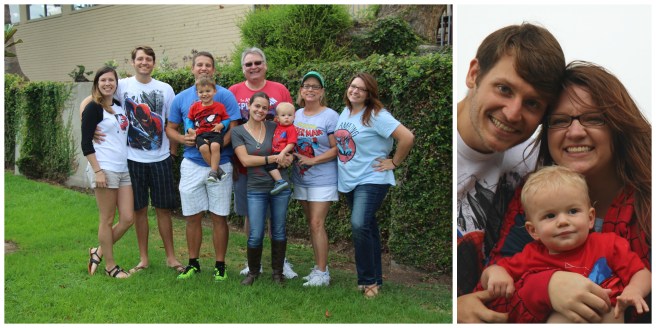
I think first birthdays are pretty special. And, for me, I refused to have my son’s party on any day other than THE day. I am extremely grateful to have family willing to travel across the country to help us celebrate. It was even the first time Treat got to spend time with both of his Godparents at the same time!

We’ve got a great group of friends who braved the rain to come to a party at the playground, too!

Spider-Man themed First Birthday | Sew You Think You Can Cook | http://sewyouthinkyoucancook.com

When my son was born the day before Halloween, I knew I’d have to have another appropriately themed super hero party. My options were Spider-Man or Batman. I decided to go with Spider-Man to keep my boys in the same comic universe (nerd alert).

While there is plenty of pre-made party decor for Spider-Man, I decided to keep things simple using a lot of red, white, and a bit of blue.

  • Red table cloths (fun discovery – a wet table makes for great adhesive)
  • White plates
  • Red napkins
  • Blue spoons and forks
  • Silverware holders were simply empty {clean} cans which I wrapped with white card stock and glued on a Spider-Man. My sister-in-law did some incredible spiderweb labeling for me!
  • We had two tables at the playground and I put a cluster of red, white, and blue balloons in the center of each table held in place with Spider-Man balloon weights.
  • The party favor bags were simple red treat bags. I cut out Spider-Man eyes from white sticker paper, tracing their outline in black Sharpie. I put a “Thank You” sticker with each kid’s name on the back.
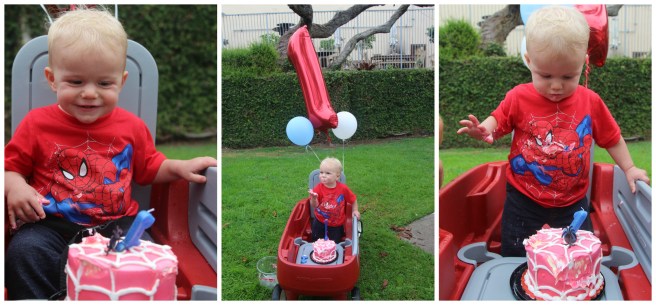
  • Treat had his smash cake in the Radio Flyer wagon. (Had it not been raining I would have put his name banner on the wagon.) A giant red number 1 balloon, 12″ white, and 12″ blue decorated the wagon.

Treat’s incredible “Happy First Birthday” banner was made for me by a friend. When she discovered that I’d always cut the banners out by hand, she immediately offered her services for all future decorating needs. I took her up on it due to our complicated schedules during September and October. She even glued all the pieces together for me and all I had to do was string them together and hang them up!

And now for the important part of the party: The Food!

  • The main course was a taco platter perfect for feeding 25 people.
  • Keeping with the Mexican food theme, we made a typical layer dip. I adjusted the layers to put tomato on top and piped a sour cream spiderweb on top.
  • The second layer dip was a super food version: sweet potatoes, quinoa, black beans, enchilada sauce, cheese, and sour cream. I put the sour cream layer on top and tried creating a spiderweb with the enchilada sauce. Because I make my own enchilada sauce, the onions made it a bit more difficult than I was hoping and the result wasn’t as pretty as envisioned.
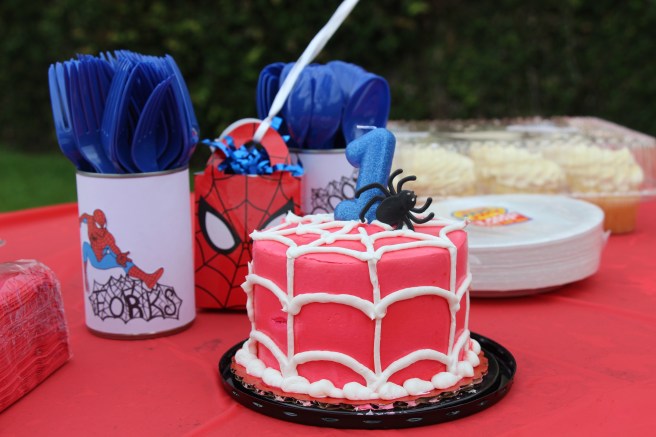
  • I ordered cupcakes and a 5″ round cake from a local grocery store. They were able to make a spiderweb cake for me in red and white. A blue 1 candle and spider ring made the perfect decorations.

A Spider-Man themed 1st birthday | Sew You Think You Can Cook | http://sewyouthinkyoucancook.com

Disclaimer: This post contains affiliate links.

Tuesday Tattles with OXO Tot

Tuesday Tattles

When you become a parent the general topics of your conversation change drastically. Discussions about bodily functions, sleep, and eating vie for the number one slot. I could have predicted those, though. You can delve even deeper into that eating category – how to introduce foods to baby, what foods to expose your little one to first, and when to get started. Closely linked to that conversation is drinking (and I’m not talking cocktails for the parentals): When to introduce water or milk? How much does your kid actually drink? And my personal favorite – what kind of cup do you use?

I can’t tell you how difficult it is to answer that final question. I think we’ve tried them all! And to be honest, after over a year we still didn’t have a clear winner. When I was selected to review OXO Tot’s newest line of cups I couldn’t have been more ecstatic. In my box was the Transitions Soft Spout Sippy Cup Set – Aqua and Transitions Sippy Cup (9 Oz.) Aqua. I was pleasantly surprised to also receive their ingenious Roll-Up Bib – Gray and Cleaning Set for Straw & Sippy Cups. (I used the cleaning tools on more than just sippy cups or bottles, I was able to get into the nooks and crannies of my Ninja single serve blender blade!)

IMG_9175

Firecracker has developed the most unfortunate taste for plastic – teething toys, sippy cups, and straws have all had their fair share of pieces bitten out of them. That meant the Transitions Sippy Cup is perfect for him – he can chew on the nozzle all he wants without tearing it apart. Its spill proof design is perfect for my little man on the go, too. I can confidently give it to him in the car, stroller, or just to have while he’s playing.

I have always found the spill-proof cups to be near impossible to drink out of – yes, I try! – but not this OXO Tot product! The spill-proof valve has a unique design that can be removed making it easy for cleaning, too. With two under two (at least for a few more days) the cup has already found its way under the couch more than once without a drop of water spilled.

IMG_9178

Because of the previously mentioned chewing habits of my almost-two year old, the Transitions Soft Spout Sippy Cup was handed to Treat. Up until this point we’d offered him water by simply holding up a small cup and kind of splashing the liquid into his mouth. The first time he drank from the cup most of it ended up down his front and we had to hold it for him. Just one short week later, the cup came with us to the beach and he was able to hold it by the handles and drink from it himself! (That didn’t stop big brother from wanting to help out, though.)

The Transitions Soft Spout Sippy Cup has another drinking configuration, too; a training lid that acts just like a regular cup. It has a clear cover to it that helps minimize a complete douse in liquid but allows the child to visually see what happens when they tip the cup. I think it’s really a smart concept and a perfect teaching tool. This cup, however, is not spill proof, so its use is reserved for meal times at the table under adult supervision.

The roll-up bib is another genius creation from OXO Tot. It has a large pocket for catching food, is machine washable, and rolls up! (As the name suggests.) The simple design makes this bib my go-to for bringing to restaurants or on picnics. I can even toss the dirty spoon into the pocket and keep all the sticky surfaces hidden from “contaminating” everything else in the lunchbox or diaper bag.

Bottom line. Would I recommend these OXO Tot products to my friends? Absolutely! We were already satisfied OXO Tot customers and I’m happy to report that the love with their products has only increased after reviewing these items.

Disclaimer: I received these items from OXO in exchange for my honest review. All opinions and comments are my own. 

Tuesday Tattles #14

Tuesday Tattles

Today’s Tuesday Tattles is all about removing superglue from a toddler’s fingers.

Fun right?!

A couple of months ago Firecracker’s wooden helicopter broke. The metal spoke holding the propeller snapped. Because it’s one of his favorite toys, I decided we should try and fix it. Super glue can fix anything, right?

Well, probably, if you know how to use it properly.

My husband and I very carefully applied some glue to the top of the spoke and held the top in place. After a few seconds I put the toy on the table to dry. Almost immediately Firecracker grabbed it. The top fell off and his fingers were covered in super glue. He ran up to Daddy and asked for “help.” We are quite thankful he was not strong enough to pull his fingers apart.

Immediately I reached out to the internet. I needed a method that was safe for my toddler. Using laundry detergent, nail polish remover, or WD-40 was not going to cut it. Not surprisingly, warm soap and water is perfectly capable to remove super glue from skin, especially if you’re acting quickly enough. I immediately took Firecracker to the sink and used as warm of water as he could tolerate. I then used hand soap until his fingers pried apart.

The dried super glue will eventually flake off on it’s own, but because I have a boy who can’t keep his fingers out of his mouth for more than three minutes, I knew I had to get the glue off completely. I set him in my lap, turned on Chuggington and took to his fingers with an emery board.

How to Remove Super Glue from Skin

Disclaimer: This post contains affiliate links.

Thursday Thoughts #18

Thursday Thoughts

This move to California was our second real military move. (Our first from Auburn to FL hardly counts as we had very little inventory to relocate and the distance was only 200 miles.) You can read about our move to Ohio here.

We left a small home in Ohio and were expecting something even smaller out in the Los Angeles area. In preparation for that we gave some of our furniture to my brother-in-law who just purchased a home with his fiancé, and my in-laws were more than generous in offering to store some other items until we return to the East coast. I begrudgingly left the majority of my fabric, quilting and scrapbooking supplies, and Monopoly collection behind with them. Stuart and I had many conversations about the “must-haves” in a new home and a third bedroom for an office/craft space was simply a “nice-to-have” as my free time with two little ones is quite limited and this blog is my hobby priority number one.

Unlike the previous move, this one was not a “door-to-door” move, meaning we did not have a destination address. With two boys under two and a husband in a grueling Masters program there simply wasn’t any time to take a trip to California to house hunt ahead of time. So, we booked a stay in Temporary Housing and used the 8 days provided upon reporting to find a place to live. As a result, we knew our items would end up being held in a storage facility until we could provide the moving company with our final address.

The moving company we were assigned to this move was incredible. A crew of three guys came the Monday after Easter to pack up everything. They were punctual, friendly, patient, and very courteous. They worked quickly and efficiently and while the team lead was inventorying every box, the other guys started to move everything into the garage to make loading day go smoothly. The same crew returned the following day to disassemble furniture, and along with the driver load the moving truck. We provided Subway for lunch on day one and tipped them on day two. Having the same crew for both days really helped things go smoothly.

We had a bedroom marked off as a “do not pack” room containing anything and everything that would be traveling across the country in the van. My parents came to attend Stuart’s graduation and while here, they helped us pack the other vehicle before the movers arrived. That car was loaded down with my grandmother’s antique secretary desk, quilts, and scrapbooks, along with all important documentation.

When there are young children involved, I highly recommend dropping them off with a friend while the movers are packing your home. Unfortunately that wasn’t an available option for us, but luckily my mom planned to stay and help us with the cross country drive. My mom and I were able to keep the boys occupied in the “do not pack” room and run errands. We handled the weighing of the van and returning of cable equipment to keep out of the way while my husband stayed at the house. We also handled the lunch pick-up and delivery.

That same piece of advice is even more important when the movers are unloading your belongings into your new home. This time we had my mother-in-law who flew out to California to help. She was able to keep Firecracker out of the house and at the park almost the entire day! I was able to wear Treat during his nap and keep him more easily contained as he was much less mobile. 

While our delivery crew didn’t start out as personable as our packing crew, they were quite competent and earned both the taco lunch and a tip for having to deal with our inconvenient location and countless stairs.

Because my mother-in-law stayed for the first week in our new place, I was able unpack our boxes myself instead of allowing the movers to do it. I had learned from our previous experience, when the movers unpack the boxes they essentially dump everything out on the floor, which I knew wouldn’t work well with two curious boys. There were a few exceptions to what we had them unpack – we wanted them to open up all of our wedding china and stemware and art boxes to ensure they weren’t damaged during delivery.

Unfortunately, a few boxes didn’t make it all the way to California including our bin of snowboarding gear and one box of our wedding stemware. At first inspection my husband’s weight plates didn’t make it either, but the team lead called the storage facility and they were found. He returned the next day with the weights and took away all of the boxes and packing paper that we had gotten through on that first night, which was over half of them!

One bookshelf, a desk, and our Keurig ended up in the “RIP” category.

Overall I am happy with our moving experience.

We moved many essential things ourselves because of the length of our trip and the unknown amount of time we’d be living in a hotel. Here are some of the things I wish we had added to our long list: vacuum cleaner, tape measure, scissors and/or exacto knife.

I’m going to reiterate: The biggest piece of advice I have for anyone moving with children – get help! My mom helped us get out of Ohio and traveled with us all the way to California. Having a third set of hands was invaluable. My mother-in-law was able to fly out to California the week of our delivery and she was able to take Firecracker to the park and on walks while the movers were unloading the truck. My sister-in-law came down the day after delivery and was a huge help with both boys keeping them entertained while we did a lot of unpacking and organizing of our home. She and my mother-in-law were able to share the brunt of the kids’ energy, too. If they weren’t able to provide so much help I know that I’d still be living in a house of brown cardboard boxes over one month later. I look forward to their next visits when things aren’t quite as hectic and more valuable time can be spent with them. I know their presence was much appreciated by the boys too, if their behavior after their departure is any indication!

Tuesday Tattles: Road Trip Edition

Tuesday Tattles

Now that we are almost settled in California I figure it’s as good a time as any to share my newly acquired wisdom on a long road trip with little ones!

Tip number 1: get a minivan.

Only joking, except that we absolutely love ours and it definitely makes road trip driving (and everyday) driving a little easier. The amount of floor space and storage space we had was impressive!

img_1224
Taking a road trip is definitely easier than flying when babies are involved. But it’s not exactly a walk in the park either. Not having a limit on items and liquids makes life so much better, not to mention you don’t have to have a squirming baby on your lap giving you busted lips and black eyes.

Here’s a list of some of the items that made our 5-day drive go relatively smoothly:

Car Seat Toys

I put two car seat toys on rings for Treat to stare at and occasionally grab. The links
prevented him from accidentally throwing them out of his car seat. Mr. Turtle and Freckles are now well loved car companions. (Those names were given by me during an attempt to cheer him up.)

Zeta the Zebra Teething Toy

Firecracker had the classic Sophie the Giraffe teething toy so to prevent any confusion Treat gets a different version. (Granted, Sophie has been lost for almost a year now.)

Disposable Bed Mats

Now here’s an item you probably didn’t expect to see on this list! Treat is the king of diaper blowouts and I wasn’t about to worry about needing to wash the car seat cover in the middle of nowhere. I simply folded up one of these (cutting one in half to fold would be even better!) under his bum for the trip. Really, I should maintain this practice until he starts solid foods…

Diapers and Wipes

I simply kept a jumbo diaper box and filled it with diapers for each the kids as well as a tub of wipes (with refills) on the floor in the backseat for easy access.

Hand Sanitizing Wipes

When gas stations and public rest area restrooms are the main stops it’s highly recommended to have an easy way to clean both adult hands and children hands.

Mirrors

If you don’t already use mirrors for the kiddos during day-to-day travel, you’ll definitely want them for a long road trip. It’s always good to know if they’re asleep and/or starting to stir when planning driving breaks.

Media Station

Unless your vehicle is equipped with rear entertainment, you can easily create your own set up. We got a $5 universal tablet holder and hooked it up to the middle seat headrest. The holder is intended for the back of headrests but as my kids are still rear facing our method worked just fine! We downloaded a season of  Wallykazam and turned it on in moments of great need. Surprisingly Firecracker didn’t acknowledge its addition to the backseat for a long time so we didn’t need to use it until halfway through our trip.

For the adults, books on CD to help with the 40-odd hours of driving. My choice: the whole Harry Potter series! We got through all of books 1 and 2 and more than half of book 3! I am now continuing listening to the series to make LA traffic much more bearable.

Box of Books and Toys

I knew we couldn’t let the movers pack up all of the toys so I kept a bin of the absolute favorites for Firecracker to grab and play with as desired. Of course all the trains made the cut as did Scout, phone, and laptop. I kept some books out for hotel nights, too, mostly those that are bedtime appropriate.

Food

A small cooler of food was definitely a blessing on a long trip. I was able to keep cheese and fruit as well as ingredients for countless PB&Js. Snacks for the adults was also necessary for long stretches of driving. And water! Just don’t forget some silverware, baggies, and cups.

Cereal Storage Box

I can’t take credit for this one. I saw this tip on Pinterest many years ago and have kept a bin (and plastic shopping bags) in my car ever since as a vehicular garbage can. It’s great for tissues, food wrappers, and receipts. I suggest keeping soiled diapers in a deodorized bag though if you can’t toss them elsewhere right away. (Yes, we made a highly necessary diaper and outfit change in the middle of nowhere. Only once though!)

img_1225
Coming soon will be more details as well as tips and lessons learned for getting through another military move.

Dislclaimer: This post contains affiliate links.

Four Hour Quilt Variation

When my good friend Tara (of Tara’s Multicultural Table) told me she was pregnant with her second child the wheels were already turning as to what quilt to sew for the new addition.

Her son, Evan, received my first ever baby quilt (his is the safari one) for his first Christmas. I’ve made quite a few Four Hour Quilts since then. I wanted to do something different this time. But I wanted something that would compliment big brother’s quilt. I found this photo via Pinterest and knew I had a winner. All I had to do was wait to see if Evan would be having a baby brother or baby sister.

It’s a girl! And that beautiful baby girl is my Goddaughter. I helped Tara decide on the theme for her nursery and hit the fabric shops. The theme: woodland, with pinks.

Four Hour Quilt Variation Tutorial (girl) | Sew You Think You Can Cook

Because this quilt is quick, easy, and fun to assemble, I decided to use the same quilt pattern for my baby boy, too. To have his quilt complement my little man’s I kept with a Winnie-the-Pooh theme with a Winnie-the-Pooh pattern for the back and quilt top fabric choices of the characters’ colors. (Orange for Tigger, Red for Pooh, Pink for Piglet, Grey for Eeyore, Blue for Roo, and Yellow for Rabbit)

Four Hour Quilt Variation Tutorial (neutral) | Sew You Think You Can Cook

Here’s the How-To for a Four Hour Quilt Variation:

For a baby quilt that finishes to 47×47″, you will need 48 5 1/2″ squares (this is a total of approximately 1 1/4 yd of fabric). You can use as many different fabric choices or as few as you like. I choose 5-7 different fabrics for these squares. The strips for the borders are cut to 3″. I typically use the same fabric for all 3 borders, but feel free to be as colorful as you want! (this is a total of approximately 1 1/2 yd of fabric)

The center of the quilt is assembled from 4 of the 5 1/2″ squares into a square.

Once your center is sewn together, measure the sides and cut two strips to fit the top and bottom. Measure again after the top and bottom are sewn on and cut two more strips to fit. You now have a framed center.

Sew two rows of 3 from the 5 1/2″ squares. Attach the rows to opposite sides of the framed center. Sew two columns of 4 from the 5 1/2″ squares. Attach the rows to the remaining sides of the center.

Once this new center is sewn together, measure the sides and cut two strips to fit the top and bottom. Measure again after the top and bottom are sewn on and cut two more strips to fit.

Sew two rows of 6 from the 5 1/2″ squares. Attach the rows to opposite sides of the framed center. Sew two columns of 8 from the 5 1/2″ squares. Attach the rows to the remaining sides of the center.

Once this new center is sewn together, measure the sides and cut two strips to fit the top and bottom. Measure again after the top and bottom are sewn on and cut two more strips to fit. You now have a finished quilt top.

Create a sandwich with the quilt top, batting and backing (2 3/4 yd of fabric). With baby quilts I use my sewing machine to do simple quilting – the stitch in the ditch method is perfect for this project.

Once you have your quilt, trim it, and bind it (1/2 yd of fabric).

Shopping Cart Cover Tutorial

One of my favorite baby “must-haves” is the Shopping Cart/High Chair Cover that my mother-in-law bought for us. When my son was just learning to sit on his own and able to handle being in the shopping cart or high chair it was nice to have the extra cushion for him to fall against.

And of course, it’s great for germ prevention. My favorite part is that I can use the strap attached to the cover instead of the ones attached to the high chair or shopping cart. Have you ever touched the straps on a public high chair?! They’re always sticky and gross. I can wipe down the chair and other surfaces no problem, but that strap is a whole other story. As for shopping carts, the straps are always located in the most awkward location – under the armpit and they don’t allow room to breathe or move.

I knew there had to be a way to make my own and it turns out that it’s much easier than I thought it’d be. There are a lot of steps but I was able to accomplish the shopping and sewing of this cover in just half a day. (With the supervision – aka emotional support – of my mother-in-law.)

While life continues to be hectic, this cover will be my new baby shower go-to item instead of the 4 Hour Quilt.  Contrary to the title “4 Hour Quilt” they always take me longer than 4 hours, the top can easily be assembled in an afternoon but the quilting and binding extend the life of the project and with almost two children in tow one would probably take me a year… But, enough of that.

Shopping Cart Cover Tutorial | Sew You Think You Can Cook

Here is the how-to for a Shopping Cart Cover Tutorial:

Supplies:

Steps:

  1. Cut the fleece and cotton fabric to 41 1/4″ squares.
  2. Curve all four corners on the cotton fabric. Do this by folding the fabric “hotdog style” then “hamburger style” so that all four corners are together. Use a curved ruler or plate as a template and cut the corners. Use the cotton fabric as a stencil for the fleece so the curves are identical in both pieces of fabric.Shopping Cart Cover Tutorial (step 2) | Sew You Think You Can Cook
  3.  Lay out the fleece. Find the center of the bottom edge.
    1. Mark 13″ up and 1″ to the left. Place the bottom right corner of a square/rectangle template measuring at least 5×5″ (I used a DVD case) at that mark. Trace the template and cut a hole. Shopping Cart Cover Tutorial (step 3a)| Sew You Think You Can Cook
    2. Mark 13″ up and 1″ to the right. Place the bottom left corner of a square/rectangle template measuring at least 5×5″ (I used a DVD case) at that mark. Trace the template and cut a hole.
  4. Place cotton fabric face up on work surface. Place the fleece on top. Trace the leg holes from step 3 but at 1/4-1/2″ inside of the opening so that the leg hole in the cotton fabric is smaller than in the fleece. Cut. Shopping Cart Cover Tutorial (step 4)| Sew You Think You Can Cook
  5. Pin the two fabrics together. Sew a straight stitch set to a length of 4 using a seam allowance of 3/8″ around the edge of the cover leaving a 4″ wide gap on one edge.
  6. Turn the cover inside out through the gap.
  7. Mark 1″ from the edge all the way around the cover. Sew a straight stitch set to a length of 4 on that line. Still leave the 4″ wide gap from step 5. (Note: This is for 3/4″ thick elastic.)
  8. Return to the leg holes. Place cover so that the fleece layer is on top and the cotton fabric face down. Cut a 45 degree angle on the cotton fabric into the corners of the leg holes. Fold the cotton fabric onto itself and then over the fleece. Pin. Zig-zag stitch around the leg holes, making sure to close the corners. Shopping Cart Cover Tutorial (step 8) | Sew You Think You Can Cook
  9. Find the center of each leg hole and measure 12″ above it. (The 12″ includes open leg hole space.) Mark this location. This mark is the center of a buttonhole. Make sure the buttonhole is large enough to fit the webbing strap (and/or buckle if desired) – do a test first. Sew buttonhole according to your sewing machine’s instructions.
  10. Melt the ends of the webbing. Do this by (carefully) holding a flame up to the ends.
  11. Insert the webbing through the buttonholes – making sure it’s not twisted.Shopping Cart Cover Tutorial (step 11) | Sew You Think You Can Cook
  12. Attach the buckle to the webbing. Sew an “X” inside a square to lock one end of the buckle. I decided to leave the other side free for adjusting. Shopping Cart Cover Tutorial (step 12) | Sew You Think You Can Cook
  13. Insert the elastic through the edge of the cover. Tip: Place a large safety pin at the end to make it easy to pull through the gap. Sew the elastic together.
  14. Close up the gap from Steps 3 and 4.
    1. Fold the edge fabric in on itself and sew as close to the edge as possible. Be sure not to sew the elastic!
    2. Use a straight stitch set to a length of 4 to close the gap closest to the inside of the cover. Be sure not to sew the elastic!

*This tutorial is modified from Stephanickety at http://thetiptoefairy.com/2013/05/how-to-make-your-own-shopping-cart-high-chair-cover/*

Disclaimer: This post contains affiliate links.

Tuesday Tattles #8

Tuesday Tattles

It’s been five months since I’ve done a “favorite products” version of Tuesday Tattles. My little man is now ONE!

Five months is a long time in the world of an infant. He has gone from army crawling to hands-and-knees crawling. From pulling up on furniture to full standing. From toddling with support to complete walking. He can squat to pick things up and carries items between rooms.

Saying “dada” has taken a backseat to finally saying “mama” and his first word is “duck” and he says it with enthusiasm when he sees a rubber ducky, a duck on a screen, or the stuffed animal that used to be mine as a child. He will even wave good-bye to the cashiers at the grocery store and says “ba ba” along with it.

With his 6 teeth (4 on top, 2 on bottom) he enjoys eating anything off of my plate. His favorite foods though are mushrooms, breakfast foods, black beans, and sweet potatoes. He will hum if something is good enough, too!

Tuesday Tattles 8

Fisher Price Apps

I hate to say it but the phone is one of my sons favorite things – ever. (He has actually chewed my Lifeproof case to the point where I’m not sure it’s “lifeproof” anymore. He’s not allowed to put it in his mouth any longer.) It’s okay though, he will flip through books on his own for ten minutes at a time. IMG_5266My husband found a couple Fisher Price Apps one morning and they’ve been great learning tools – as well as a wonderful distraction when needed. I’m pretty sure it’s through these learning apps that my son learned the word “duck”. On the Animals app he will touch through each animal until the duck appears – he even knows it comes after the pig.

I Love You Through And Through

This book by Bernadette Rossetti Shustak is definitely a favorite. The pages fall somewhere between paper and board book making them the perfect texture and thickness for little fingers to turn on their own. The illustrations are also adorable.

Activity Walker

11393224_10103032385357301_8014185378665337010_nWhen we went to visit friends in D.C. they had this walker for their son when he was learning how to walk. I’d been debating on buying one for my little man and his attachment to this toy had me on Amazon the minute we got home. I feel I was a little late in the game in buying it because he doesn’t get very much use from it now that he can walk independently. He will occasionally still play with the activity toys on the front though.

Play Triangle

Another toy I waited to purchase until I saw him playing with another kid’s is this play triangle. This toy has been well loved and still is. It’s the one I throw in the car if we’re going to someone’s house and I even stuffed it on our suitcase to have on our ten day vacation to the grandparents’. My little man decided this toy would make a good walking assistant and it is now scratched up from him bending over it and pushing it along the concrete on the back patio.

Alphabet Mat

10986993_10102992329559441_2932654624227789841_nWe’ve had the Alphabet Mat for a long time, and it was definitely more for me than him at the time. I went with the one made by B Toys because the color scheme was unique and had all my favorite colors. The abundance of orange and navy made this Auburn girl quite happy, too. Once my son discovered that the letters (and tiles) are removable they quickly became his favorite chew toy.

Blocks

This basic block set is a classic toy that has stood the test of time. My mom had a set in her toy closet from when she used to frequently babysit a friend’s kids over 8 years ago. These colorful shapes have been well loved (aka chewed on). While my son hasn’t yet had the patience or interest in learning how to put the shapes through their corresponding holes on the top he loves clapping them together and throwing them. And it may be coincidental, but he has accurately identified a couple of the shapes/colors when I’ve asked. The blue circle is definitely his favorite. My favorite thing to do with them is to start stacking the blocks. Without fail a little hand comes through to swipe my tower – followed by a giggle. This game was actually the first time my son actually played with me and when he was done demolishing my towers we played “tag” down the hallway.

Empty Water Bottles

I don’t care how many toys you have, the best play thing you can hand my son is a water bottle – full or empty doesn’t matter. Same goes for solo cups. 

Balls

I can’t begin to tell you how happy it makes my husband that our son loves to play with balls. He will throw a ball if you ask him to and can occasionally catch one tossed to him. Granted, it takes a lot of focus and multiple attempts – but it’s exciting every time! Any ball will do – tennis ball, Oball, plastic balls, volleyball, or beach ball; doesn’t matter the size, he’ll try and pick it up.

Disclaimer: This post contains affiliate links.

Tuesday Tattles: Teething Edition

Tuesday Tattles

At 8 months old my little man has two teeth. Unlike most babies, my son didn’t get these teeth together, the second one arrived about two weeks after the first. I know these teeth mark the beginning of a long process of teething but I have to jinx it and say that as far as a teething baby goes, he’s pretty easy. I had visions, or shall we say nightmares, of what I thought a teething baby would be like. Drooling, runny nose, feverish, with diarrhea, cranky, and inconsolable. So far I’ve only experienced two out of the six. And I would be completely okay with missing out on the other four. We had the crankiness and we had the drooling. Here is a list of things that have gotten us through so far.

Tuesday Tattles: Teething

Infant’s Tylenol

There is something about this magical elixir that makes everything better. There is an almost instantaneous shift in his mood once he’s tasted the grapey goodness of medicine. I use Tylenol as my last resort, when the crankiness level has reached the state of inconsolable and it’s obvious that he’s in pain. There’s a difference in the tone of his cry and the amount of chewing on whatever he can get his hands on is greater than normal. The teething objects will usually expand to his sleeves in desperation. As with all medicine, consult your doctor before use and only use the prescribed amount.

Bright Starts Chill Out Teethers

These teethers are probably the cheapest variety out there. They even sell a Pretty in Pink version where a portion of the proceeds go to breast cancer research! Pop ’em in the fridge for some soothing cold relief for your little one’s gums.

Nuby Icybite Hard/Soft Teething Keys

Wesley’s newest play date had a set of these teething keys and he went right after them, so I ran out and got him his own set. These are also refrigerator friendly.

Nuby Teething Blankie. Squeak & Crinkle Teether & Blanket

This little blanket has it all! A quadrant of it crinkles, the four corners have teething rings, one side has ribbons (although I think they’re too short for my tag-addicted son to take notice), and the center squeaks! A big thank you to my mom for sending this teether.

Vulli Sophie the Giraffe Teether

Sophie teethersSophie is getting another shout on the blog today. The original Sophie is still a favorite, as is teething ring version. The newest member of the Sophie family is the Sophie the Giraffe Squirting Bath Toy. My mother-in-law brought Wesley this toy on her last visit and the little man became very attached to it! It has yet to be played with in the bath, however.

Bright Starts Snuggle & Teethe

This teething toy is known as “Mr. Crinkles” in our house. We have the giraffe (no elephants allowed!) – the two feet each have a different textured teething surface and the animal crinkles. In addition to the elephant they  aalso have a monkey, which is totally cute. I saw it last weekend and almost bought it – but I refrained, as you can see the little guy has a lot of options already!

Lifeproof iPhone case

And now for the favorite chew toy of all – my cell phone. In preparation of having a baby, I converted over to the iPhone just so I could get a Lifeproof case. While I know it’s probably the least hygenic thing my son could ever put in his mouth, he does, and I let him. The corners are just the right fit and as a result my case has teeth scratches all over it.

His other favorite items? Books, magazines, paper (my W-2, for example), the taggie his Tilly made him, Fisher-Price Brilliant Basics Baby’s First Blocks, my hair, his thumb, the tags on anything (pillows, blankets, stuffed animals, etc) and bath toys.

Disclaimer: This post contains affiliate links.

Heart of a Hero

Today I have a super adorable quilt tutorial to share with you. But before I get to that I have an important piece of business to attend to. This quilt was made for Luke. Luke is the 2 month old son of very good friends of ours back in Florida. At his one week well-baby check-up Luke was diagnosed with a congenital heart defect. The severity of his condition is still being evaluted, but it is likely that Luke will require surgery well before his first birthday. You can follow Luke’s story here.

This week (2/7-2/14) is Congenital Heart Defect/Disease (CHD) Awareness Week. Congenital heart defects are the #1 birth defect, occuring in 1% of newborns – in the US that’s close to 40,000 infants each year. While some heart defects can be detected during utrasounds before birth, a CHD is usually detected by an abnormal sound or murmur of the infant’s heart. Other symptoms include fast breathing, excessive sweating, poor feeding/weight gain, or a bluish tint to the baby’s skin, lips, or fingernails. Depending on the severity of the heart defect immediate surgery could be required. 25% of children born with a CHD will require heart surgery, however surgery isn’t always a cure and most will require additional procedures and medications as adults. People with CHDs have a life-long risk of health problems, including growth and developmental delays, difficulty exercising, heart failure, and sudden cardiac arrest or stroke.

The cost for inpatient CHD surgery exceeds $2.2 billion each year. Here’s how you can help: The Children’s Heart Foundation (CHF) is the only organization in America that solely funds CHD research. They have generated over $6.3 million towards CHD research since 1996. 75% of the donations CHF receives goes directly to research and research-related education.

Resources: The Children’s Heart Foundation, Mended Little Hearts, The American Heart Association

CHD Awareness

The quilt I made for Luke follows a pattern I found on Pinterest. This free pattern comes from favoritefabric.com. If you purchase new fabric for this quilt feel free to follow their instructions. I used fabrics already in my possession for this quilt and therefore have different (and in my opinion less confusing) tutorial steps. After piecing together the blocks the quilt was simply too big for a tummy time quilt – the original finished quilt was 40.5″ x 52.5″. Mine is 41″ x 45″. (You can probably chalk that extra half inch to my seam allowance “skills”.) With a total of 13 different fabrics, this quilt has a lot of character and dimension. Luke’s parents knew they were having a boy so I looked through my collection for some great blues, greys, and tans to use. It wasn’t until “Heart of a Hero” was well underway that we found out his nursery was to be yellow and grey; oh well! And now that this quilt is named, I can only imagine how it would look in reds! Looks like I’m getting an itch to make another version….

Here’s the how-to for “Heart of a Hero”

Cut fabric:

Heart of a Hero 1

  • 8 squares 6 1/2″ fabric A
  • 8 rectangles 6 1/2″ x 2 1/2″ fabric B
  • 7 squares 6 1/2″ fabric C
  • 6 rectangles 6 1/2″ x 4 1/2″ fabric D
  • 3 rectangles 6 1/2″ x 2 1/2″ fabric D
  • 7 rectangles 4 1/2″ x 3 1/2″ fabric E
  • 7 rectangles 4 1/2″ x 3 1/2″ fabric F
  • 7 rectangles 3 1/2″ x 8 1/2″ fabric G
  • 8 squares 4 1/2″ fabric H
  • 8 rectangles 4 1/2″ x 2 1/2″ fabric I
  • 8 rectangles 2 1/2″ x 6 1/2″ fabric J
    • for the border: 1/3 yd
    • for the back: 2 3/4 yd
    • for the batting: 2 3/4 yd
    • for the binding: 1/3 yd

Using a 1/4″ seam allowance:

Heart of a Hero 2

  • Sew A above B (unit 1)
  • Sew 6 C above 6 6 1/2″ x 4 1/2″ D (unit 2)
  • Sew 1 C above 1 6 1/2″ x 2 1/2″ D (unit 3)
  • Sew E above F (unit 4)
  • Sew 2 G to the left side of E-F (unit 5)
  • Sew 5 G to the right side of E-F (unit 6)
  • Sew H above I (unit 7)
  • Sew 4 J to the left side of H-I (unit 8)
  • Sew 4 J to the right side of H-I (unit 9)
  • Sew 2 6 1/2″ x 2 1/2″ D above 2 unit 9 (unit 10)

Using a 1/4″ seam allowance:

  • Sew 2 unit 5 above 2 unit 1 (unit 11)
  • Sew 2 unit 2 above 2 unit 9 (unit 12)
  • Sew unit 11 to the left of unit 12 (unit 13)
  • Sew 4 unit 2 above 4 unit 8 (unit 14)
  • Sew 4 unit 6 above 4 unit 1 (unit 15)
  • Sew unit 13 to the left of unit 14 (unit 16)
  • Sew 2 unit 1 to the left of 2 unit 10 (unit 17)
  • Sew 1 unit 3 to the left of 1 unit 6 (unit 18)

Assemble quilt in three columns:

Heart of a Hero 3

  • From top to bottom, column 1: unit 17, unit 13, unit 16
  • From top to bottom, column 2: unit 13, unit 16, unit 18
  • From top to bottom, column 3: unit 17, unit 16, unit 16
    • Using a 1/4″ seam allowance, sew the units in the columns to each other before sewing the columns together

Once your center is sewn together, measure the sides and cut two 2 1/2″ strips of your border fabric to fit the left and right. Using a 1/4″ seam allowance attach the border strips to the left and right sides of the quilt. Measure again after the left and right sides are sewn on and cut two more 2 1/2″ strips of your border fabric to fit. Sew the top and bottom border strips to the quilt using a 1/4″ seam allowance.

Measure your final quilt top. Now piece together your backing fabric to fit your quilt top plus some overhang. The amount of overhang you need will depend on your or your quilter’s preference. Cut the same amount of batting, piecing together if needed.

Heart of a Hero 4

Sandwich the batting between your quilt top and your backing fabric. Quilt! If I am not sewing-in-the-ditch I like to use painter’s tape and a washable fabric marker to give some guidelines.

Assemble and attach binding fabric using your favorite method. (Maybe some day I’ll be confident enough and have an almost-perfectly bound quilt to do a tutorial.)

Don’t forget a tag!

Quilt Tutorial | Sew You Think You Can Cook