#BundtBakers: Cinnamon

4ae7b-bundtbakerspost

This month’s edition of #BundtBakers is a little different. No, you won’t notice anything unique about this month compared to any of the previous #BundtBakers events but behind the scenes I got to try my hand at hosting again! #BundtBakers is a group of bundt loving bakers who get together once a month to bake bundts with a common ingredient or theme. We take turns hosting each month and choosing the theme or ingredient.

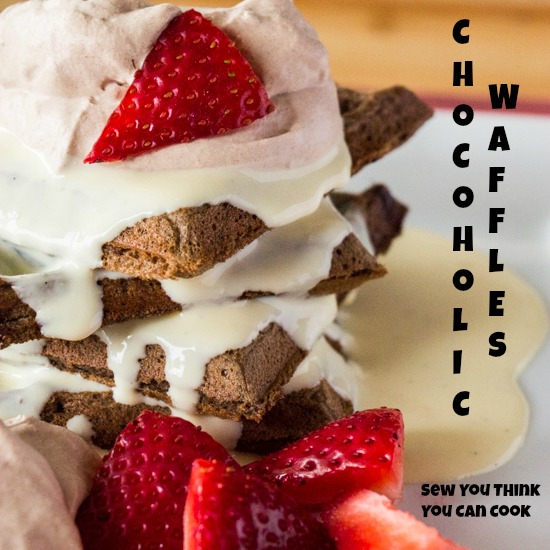
I picked the theme of cinnamon because there’s probably nothing I love more than some cinnamon. In fact, when we had our wonderful Valentine’s dessert my husband mentioned that it’d be great with some nuts and I said, “It could use some cinnamon, too!” to which he simply laughed and said, “You and your cinnamon!” But hey, I can’t help it, it’s just so good! And with 27 other bundt bakers joining me, I know I’m not alone in my love of the spice. Because I am hosting I was more aware of the recipe titles being submitted than I normally am and someone beat me to the punch on using red cinnamon candies in her cake (unfortunately the busyness of work and life prevented her from sharing her cake with us today). There isn’t a rule that says I couldn’t also make a cinnamon candy bundt, but I do like to try to be unique in my flavor profile when I’m aware enough to be so.

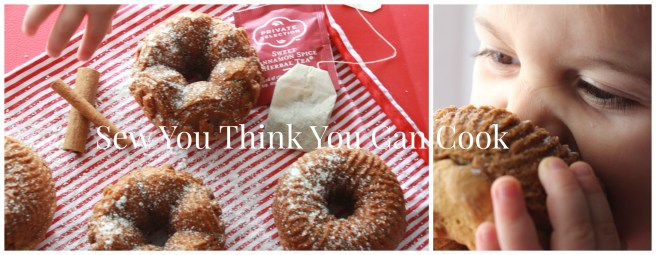
Instead I thought about doing a chai bundt, I’ve been wanting to use chai tea in baking, and that thought led me instead use the tea I had in my pantry! It’s “Sweet Cinnamon Spice Tea” and it’s fabulous, no honey required. I followed a recipe for a cake using Earl Grey tea. Instead of blueberries I added chopped walnuts to the cake, you won’t find them in the recipe though because I didn’t think it was the right choice, raisins or chocolate chips might be nice. Also, next time I’ll be steeping two tea bags because there simply wasn’t enough cinnamon flavor for my liking. This recipe followed a unique method for making the cake, too. I’d never make cake batter in a pot before! I divided my batter between my Garland Bundt Pan. The texture of these bundtlettes was quite different, too, it was almost a cross between a baked donut, a muffin, and a cake; perfect for breakfast, warmed, with a little butter. And, of course, compliments your morning cup of coffee or your afternoon cup of tea.

Selfishly, this cake was not shared with anyone outside of our little family. Firecracker helpfully (?) participated in the photography of these cakes and declared them “good” after stealing a bite.

If you don’t have smaller bundt pans feel free to use a large loaf pan or 6 C bundt pan and bake for 55 minutes.

Sweet Cinnamon Spice Tea Bundtlettes (1) for #BundtBakers from Sew You Think You Can Cook

Sweet Cinnamon Spice Tea Bundtletts

Ingredients:

  • 1-2 bags Sweet Cinnamon Spice herbal tea
  • 6 tbsp butter
  • 1/2 C sugar
  • 2 eggs
  • 1/4 C vanilla yogurt (not Greek)
  • 1 1/2 C flour
  • 2 tsp baking powder
  • 1/2 tsp baking soda
  • 1/4 tsp salt

Steps:

  1. Preheat oven to 350 degrees F. Grease six 1 C bundtlettes.
  2. Steep the tea bag in 1/2 C boiling water for 10 minutes. Cut open tea bag and stir the contents into the tea.
  3. In a medium saucepan, melt the butter. Remove from heat and stir in the sugar and eggs until smooth. Add the yogurt and tea.
  4. In a bowl, whisk together the flour, baking powder, baking soda, and salt. Add to the pot and mix until combined.
  5. Divide batter evenly in the prepared bundt pan. Bake 25-30 minutes, until a toothpick inserted comes out cleanly. Allow bundts to cool in the pan before turning out.

*This recipe is modified from Izy at http://www.topwithcinnamon.com/2014/01/earl-grey-tea-blueberry-and-lemon-cake.html*

Sweet Cinnamon Spice Tea Bundtlettes (2) for #BundtBakers from Sew You Think You Can Cook

You can see all our of lovely Bundts by following our Pinterest board. Updated links for all of our past events and more information about #BundtBakers, can be found on our home page.

And don’t forget to take a peek at what other talented bakers have baked this month:

Tuesday Tattles #11

Tuesday Tattles

Many parents have discovered that “silence means trouble,” but for the most part I wouldn’t agree. There are however always those exceptions that make that statement the truest summary of parenting out there.

Most of the time my son’s silence means he’s flipping through a book or playing with his trains. It’s moments like that that make my heart skip a beat. I am so thankful to have a child who is comfortable and able to play on his own and it’s a joy to watch his imagination blossom.

How to Remove Colored Pencil from the Wall (1)  Sew You Think You Can CookHowever, sometimes that silence means he’s figured out a way to climb on the table or get into one of the air vents in the floor. In the most recent moment of silence, that naughty action was coloring on the walls. I guess it’s a rite of passage for every child and parent!

I am happy to report that I found an easy cleaning solution! My son used colored pencils so I’m not sure this would work for crayons, it most definitely wouldn’t work for markers – at least I wouldn’t think so. And to add another caveat, I’m not sure if it’d work well on non-white walls.

There I sat with a soap soaked wash cloth scrubbing vigorously to no avail. Sure, I saw a tinge of pink appear on my white cloth but I shudder to think how long I’d have had to sit there rubbing back and forth. And then I had my aha moment. I was wiping at colored pencil, surely an eraser would do the trick! And, it did! Quick and painless.

How to Remove Colored Pencil from the Wall (2)  Sew You Think You Can Cook

I did try the eraser trick on some crayon on his play kitchen. It didn’t work as well. I don’t know if it’s because of the texture of the play kitchen or because of the crayon.

SRC: Carolina BBQ Pulled Pork

newsrcbanner

It’s Secret Recipe Club Reveal Day! In the Secret Recipe Club, each participating blogger is assigned a blog from another participating blogger and secretly searches their site for something to recreate. The accompanying blog post then goes live on reveal day! So while I was immersed in my assigned blog, someone else was picking through mine! I’m so excited to be part of this group, to see what on my blog peaks other’s interests and to stumble upon new blogs and new recipes.

This month I was assigned the fun blog Rainstorms and Love Notes written by Ashley. I mean, really, doesn’t her blog title just make you want to snuggle in with a cup of hot cocoa and have a good look around? I think Ashley and I could be good friends if our paths were to ever cross. All of her recipes are proclaimed to be easy, she enjoys a good DIY project on occasion, and isn’t afraid to admit she loves TV and football! I have nothing against the Pittsburgh Steelers though my NFL love extends to the Chicago Bears and my man Cam Newton’s Panthers. I can’t wait for this post to go live so I can officially follow her on social media and sign up for her blog’s newsletter, no more stalking from the shadows.

I knew I’d have fun picking a recipe from her blog when the first one I stumbled upon was a recipe I’d attemped making myself the previous weekend, Cinnamon Kettle Corn. For New Years Eve we went to our friends’ house for game night and they made the aforementioned popcorn. I took the recipe from them and tried making it for a movie night. Key word, tried. While my husband was putting Firecracker to bed I got started on the popcorn. This recipe is quite different from normal popcorn in that you put the cinnamon and sugar in the oil with the corn kernels! All of a sudden Treat awakens screaming and my attention is torn from the pot on the stove. To say I burnt the batch would be an intense understatement! I resorted to Plan B after a second set of hands was back in the kitchen. Regularly popped popcorn and cinnamon sugar in the melted butter. Fast forward a few weeks and it’s my husband’s turn to try the popcorn. He had much better success and we made sure he wouldn’t be distracted.

Wow, that’s a long tangent. Sorry folks!

I tried to focus my efforts towards Super Bowl recipes and these Pretzel Bites with Jalapeno Cheese Sauce or Cheese-Stuffed Salsa Burgers were quite tempting, but when I saw Carolina Barbecue I knew I had a winner. What better way to cheer on Cam than by eating Carolina Barbecue!? We were supposed to have another family join us for the game but their daughter caught a cold and had to cancel. I’d made a big batch of the pork and the sauce the day before in preparation, so when we were down to the two of us (plus the two boys) for the game watching I decided to only toss as much pork as we needed that night in the sauce. Firecracker ate his pork mixed with salsa instead.

The leftover shredded pork has been used in enchiladas, pasta, and pizza. You’ll see those recipes floating around the blog in the next couple of months. I also have plans to experiment with muffins. And maybe a pot of chili!

Carolina BBQ Pulled Pork

Ingredients for the pork:

  • 2 tsp Kosher salt
  • 1 tsp garlic powder
  • 1 tsp black pepper
  • 5 lb pork roast (I use loin)
  • hamburger buns

Ingredients for the sauce:

  • 2 C apple cider vinegar
  • 2/3 C ketchup
  • 2 tbsp brown sugar
  • 2 tbsp Worcestershire sauce
  • 1 tbsp ground mustard
  • 1 tbsp chili powder
  • 1/4 tsp cayenne

Steps:

  1. Make the sauce: Combine all ingredients in a saucepan over medium-high heat. Bring to a boil and reduce to a simmer. Cook 5-10 minutes.
  2. Combine salt, garlic powder, and pepper. Rub all over the pork. Place pork in a slow cooker and top with 2/3 of the barbecue sauce.
  3. Cook on HIGH 4-5 hours until the pork is tender and shreds easily. Remove pork from the slow cooker and let cool slightly. Using two forks shred the pork.
  4. Toss the shredded pork in the remaining barbecue sauce. Serve on hamburger buns.

*This recipe is adapted from Ashley at http://rainstormsandlovenotes.com/2013/09/north-carolina-style-pulled-pork-sandwiches.html*

Carolina BBQ Pulled Pork for Secret Recipe Club from Sew You Think You Can Cook

To see the other bloggers who participated in the Secret Recipe Club this month click here:

Chocoholic Waffles

Valentine’s Day is this weekend (Sunday to be exact) and I have the perfect brunch to share with your loved ones – unless they don’t like chocolate. Every component of this recipe involves chocolate! There’s chocolate waffles, which are quite good on their own but it’s Valentine’s Day people, step it up. Then there’s a white chocolate custard, and to top that off there’s a mocha whipped cream! All three components compliment each other beautifully.

I am an admittedly lazy cook and seriously thought about not making the custard. But I couldn’t. Because, Bobby Flay. Yep, surprise! Yet another brunch recipe from one of our favorite celebrity chefs! This particular recipe is one we watched on Cooking Channel last year. It comes from the Brunch at Bobby’s episode titled Chocoholic Brunch.

Chocolate Waffles

Ingredients:

  • 2 C flour
  • 1/2 C cocoa powder
  • 2 tsp baking powder
  • 1 tsp baking soda
  • 1/4 tsp salt
  • 3 eggs, separated
  • 1/4 C brown sugar
  • 2 C buttermilk
  • 1/4 C canola oil
  • 1 tsp vanilla extract
  • 1/2 stick butter, melted
  • 3 oz semi-sweet chocolate, chopped

Steps:

  1. In a large bowl, whisk together the flour, cocoa powder, baking powder, baking soda, and salt.
  2. Whisk the egg yolks with the brown sugar until smooth. Add in the buttermilk, oil, and vanilla.
  3. Combine wet ingredients into the dry ingredients. Mix in the butter and the chocolate.
  4. Whip the egg whites until stiff peaks form. Gently fold into the waffles batter.
  5. Into a hot greased waffle iron, drop 1/3 C of batter and cook until browned.
  6. Assemble waffles with custard, whipped cream, and fresh strawberries.

White Chocolate Custard

Ingredients:

  • 1/2 vanilla bean, halved
  • 1 1/2 C half-and-half
  • 4 egg yolks
  • 2 tbsp sugar
  • 3 oz white chocolate, chopped

Steps:

  1. Scrape the seeds from the vanilla bean. Put the seeds and the pod in a small saucepan with the half-and-half. Bring to a simmer over medium heat, remove from the heat, and let cool.
  2. Whisk the egg yolks and sugar until pale yellow. Slowly add some of the half-and-half until smooth. Whisking, add to the pot of remaining half-and-half and return to the stove. Cook over medium heat without allowing it to boil, stirring with a wooden spoon, until the custard thickens enough to coat the spoon.
  3. Remove from the heat and whisk in the white chocolate until melted.
  4. Strain and refrigerate.

Mocha Whipped Cream

Ingredients:

  • 1 C heavy cream
  • 3 tbsp dark chocolate covered cacao nibs (I used Pacari)
  • 2 tbsp powdered sugar
  • 1/2 tsp vanilla extract
  • 1/2 tsp espresso powder

Steps:

  1. In a small saucepan over medium heat, bring heavy cream and cacao nibs to a simmer. Remove from heat and allow to cool. Place in a glass bowl, cover with plastic wrap, and place in the fridge overnight.
  2. Strain the cold cream and discard the nibs.
  3. Using a hand mixer, beat the cream until thickened. Add the powdered sugar, vanilla, and espresso powder. Beat until firm peaks form.

*These recipes are adapted from Bobby Flay at http://www.cookingchanneltv.com/recipes/bobby-flay/dark-chocolate-waffles-with-white-chocolate-custard-sauce-and-chocolate-espresso-whipped-cream.html*

chocoholic waffles chocolate waffles, white chocolate custard, mocha whipped cream  Sew You Think You Can Cook

A “Date Night” Potluck Party

We had our final Recipe Club meeting last week. With most of us moving in the next couple of months the group looks like it’s fizzled to a stop. I had a great time with these ladies and met my best friend up here (and Firecracker’s best friend, too!) through this group and I am forever grateful. I couldn’t have imagined this assignment here in Ohio without these fabulous ladies and the clubs and groups that I joined while here.

For our last meeting I suggested “Date Night” as a theme, taking a cue from the holiday this Sunday. We had a very small gathering, only six of us! (There are seven items listed below because I brought two dishes.) I wasn’t surprised by the small turn out as most of our husbands are in hunker down mode finishing up their theses..thesii? I know I can’t wait for thesis defense to happen and the stress level in our life go down just a tad. So it’s no surprise that there was a good deal of chocolate on the menu during out meeting!

Date Night Recipe Round UpHere are the recipes that were brought to the “Date Night” potluck”

Blogger CLUE: Veggie Chili

blogger CLUE

Even though the groundhog has declared it spring, it’s still relatively cold and definitely grey out so the Blogger CLUE crew and I have been scouring our assignments to bring you a wonderful collection of soups or stews.

When I saw my assignment was Azmina of Lawyer Loves Lunch I got very excited! I always love reading her posts and recalled her professing her love of soups, so what could be more perfect for yours truly who doesn’t consider soup a favorite. I did find a couple good contenders though, leek and potato soup or turkey and wild rice soup were quite tempting, and I know my husband would have loved for me to try making pho, but I ended up going with her veggie chili.

I can officially say that I am now a fan of chili. For the longest time it was something I wouldn’t even consider. Then I created my own recipe for chili and professed that “I only like my chili.” Within the past year I’ve ventured out to trying other recipes and have always been happily surprised, so why not give a meat-free version a try? It is Ash Wednesday after all, and that means the Lenten season has begun and the search for meatless recipes is in full force. This vegetarian main course is a perfect fit, especially when the weather is less than ideal.

I did have to make a slight change to the original recipe: instead of a can of crushed tomatoes I used whole tomatoes because the grocery store was out of crushed tomatoes! (Who knew that was a thing.) My substitution actually worked in my favor because I do like some chunk to my chili. Instead of pureeing the veggies before adding the tomatoes and stock, I added the can of whole tomatoes to the veggies and used my immersion blender to crush them along with the veggies. If you like a smoother chili place the cooked veggies in a blender and puree until smooth before adding crushed tomatoes and the remaining ingredients. Additionally, because I left my veggies a little chunky I only used 3 cans of beans instead of 4, using varieties I had in my pantry.

I absolutely loved this chili recipe and it will definitely be in my chili rotation. I find that chili tastes better as leftovers, not something I say about most foods, and it made for a perfect lunch throughout the week; I would place some tortilla chips in the bottom of a bowl, ladle the chili, and top with shredded cheese before popping the bowl in the microwave. The chips get a little soft and provide a subtle corn flavor along with some additional texture.

Veggie Chili

Ingredients:

  • 2 tbsp olive oil
  • 1 onion, diced
  • 2 carrots, peeled and sliced
  • 1 bell pepper, diced – I used orange
  • 3 jalapenos, deseeded and minced
  • 1 can (28 oz) whole (or crushed) tomatoes
  • 3 C vegetable stock
  • 3 cans (15 oz) beans, drained and rinsed – I used dark red kidney beans, black beans, and garbanzo beans
  • 2 tbsp chili powder
  • 1 1/2 tsp cumin
  • 1 1/2 tsp coriander
  • 1 tsp garlic powder
  • 1/2 tsp cayenne

Steps:

  1. Heat oil over medium-high heat in a Dutch oven. Add onions, carrots, peppers, and jalapenos. Saute until tender, about 5 minutes.
  2. If using whole tomatoes, add them to the veggies and crush using an immersion blender until desired consistency is reached. If using crushed tomatoes, place veggies in a blender and pulse until desired consistency is reached then return the veggies to the pot before adding the tomatoes.
  3. Add the stock, beans, and spices. Bring chili to a boil, reduce to simmer and cook 20 minutes, or until desired thickness is reached. If chili gets too thick add additional stock or water. Add salt to taste.
  4. Serve with your favorite chili toppings: cheese, chips, sour cream, chives, etc.

*This recipe is adapted from Azmina at http://www.lawyerloveslunch.com/2012/03/chili-and-cornbread.html*

Veggi chili for Blogger CLUE from Sew You Think You Can Cook

Here’s a list of the other players of Blogger CLUE this month:

#FreshTastyValentines: Apple Salsa

LogoIt’s the final day of #FreshTastyValentines, a blogging event headed up by Camilla of Culinary Adventures with Camilla, and it’s also Mexican Monday!

I enjoy making salsas with fruit and have done so using strawberries and pineapple, so when Envy Apples signed up to be a #FreshTastyValentines sponsor I knew exactly how I’d want to highlight their produce; with a little heat and a little sweet.

We love trying new apples. Whenever there’s a variety at the grocery store we’ve not heard of we always pick up a couple to try. In my opinion, the perfect apple is all about texture as sweet vs tart simply depends on my mood. An apple must be both firm and crisp, and the Envy apples are just that; a perfect texture with the bonus of having a flesh resistant to browning, which would make these apples an excellent choice for kids’ lunchboxes or a party cheese plate.

12512546_10103496705705601_8103054962216754607_nWhen I opened up my beautiful box of Envy apples I was pleasantly surprised to be hit with an incredible aroma of fresh apple scent. The intoxicating smell let me know that these apple would have a strong, sweet flavor. I was not disappointed! (P.S. – I had chili on the stove bubbling away making my kitchen smell amazing in itself when I caught a whiff of the sweet apple aroma.) One apple was immediately “sacrificed” when my toddler grabbed it and took a bite, one apple was turned into salsa, and the last happily enjoyed alongside a bacon grilled cheese for lunch.

I pulled together the salsa in about ten minutes, but I probably spent twenty trying to get decent photographs. And then it was time to rush to Pure Barre, but not before first trying a bite of the salsa on a homemade cinnamon sugar tortilla chip. When I returned home from class there was only a bite and a half of the salsa left! My husband had completely devoured it. This recipe is one that I will make again, and I’ll be on constant alert for Envy apples.

Apple Salsa

Ingredients:

  • 1 tbsp butter
  • 1 Envy apple, diced
  • 1 jalapeno, deseeded and minced
  • 1/2 tsp cinnamon
  • 1 tbsp honey
  • 1 tsp lime juice

Steps:

  1. Melt butter in a small skillet over medium heat. Add the apples and jalapenos and saute until tender. Add the cinnamon and cook another 30 seconds. Stir in the honey and lime juice and cook until honey is reduced slightly, about 2 minutes.
  2. Serve with cinnamon sugar tortilla chips (brush whole wheat tortillas with melted butter, sprinkle with cinnamon sugar, and bake at 375degF for 10min).

*This recipe is adapted from https://www.kelloggsfamilyrewards.com/en_US/recipes/sweet-and-spicy-apple-salsa-recipe.html*

apple salsa for #FoodieExtravaganza from Sew You Think You Can Cook

It’s the last day to enter our giveaway and be sure to check out the other bloggers who posted more Valentine’s recipes today:

Thank you to #FreshTastyValentines sponsors for providing bloggers with samples and products to use for #FreshTastyValentines recipe development without additional compensation. All opinions stated are those of the bloggers.


#FreshTastyValentines: Peruvian Purple Potato Soup

LogoCamilla’s (of Culinary Adventures with Camilla) #FreshTastyValentines continues!

I am not showcasing any of our amazing sponsors with today’s post because this soup is what I made last year for Valentine’s Day! (That being said, Gourmet Garden products would work beautifully in this soup.) I’m sharing it during this event because it falls beautifully under the theme of #FreshTastyValentines! It’s a fresh take on potato soup by using purple potatoes, it’s tasty (and spicy!), and it’s quite healthy with only 1 gram of fat, 4 grams of fiber, 5 grams of protein, and 150 Calories per serving.

Because Valentine’s Day fell on a Saturday last year and my MIL was visiting I wanted to pull out all the stops and make a three course meal. Soup, entree, and fondue for dessert.

For the entree my husband and I had picked up some Cornish hens to try out. We bought them too far in advance and hadn’t put them in the freezer. When we cut the packaging open we were bombarded with the smell of “don’t you dare try to eat me.” We were so disappointed! I don’t even remember what our Plan B was, probably pork tenderloin, but I do remember that we didn’t even make Plan B! Our decadent breakfast (which I’ll be sharing next week) kept our tummies happy all day.

But I did still make this soup, which ended up being our main course. I was once again disappointed by my menu, but only by appearance. I was expecting a purple soup, perfect for Valentine’s Day, but instead this soup was the color of chocolate. Which, I suppose, is still appropriate for the holiday. Squeezing lime right over the soup did create a fun purple swirl though! And this soup packs a kick, so that lime was necessary.

This soup makes 6 servings.

Peruvian Purple Potato Soup

Ingredients:

  • 1 tbsp olive oil
  • 1 sweet onion, diced
  • 2 jalapenos, deseeded and diced
  • 2 bay leaves
  • 1 1/2 tsp minced garlic
  • 4 C vegetable stock
  • 2 lb purple potatoes, peeled and chopped
  • 1/4 C fresh cilantro
  • lime juice

Steps:

  1. Heat olive oil over medium-high heat in a large pot (I used my Dutch oven). Saute the onion, jalapenos, and bay leaves until onion is tender and translucent. Add the garlic and cook until fragrant, about 1 minute.
  2. Add the stock and potatoes. Season with salt. Bring to a boil, reduce to a simmer, and cook 15 minutes, or until potatoes are tender.
  3. Using an immersion blender, puree the soup. (If you don’t have an immersion blender very carefully transfer to a traditional blender. Leave a gap in the lid and cover with a towel to prevent burns.)
  4. Add the cilantro and lime juice. Adjust salt if needed. Serve with an extra spritz of lime juice.

*This recipe is adapted from Isa at http://foodreference.com/html/purple-potato-soup1008.html*

Peruvian Purple Potato Soup for #FreshTastyValentines from Sew You Think You Can Cook

Don’t forget to enter our giveaway and be sure to check out the other bloggers who posted more Valentine’s recipes today:


Thank you to #FreshTastyValentines sponsors for providing bloggers with samples and products to use for #FreshTastyValentines recipe development without additional compensation. All opinions stated are those of the bloggers.

#FreshTastyValentines: Tangerine Hatch Chile Sherbet

LogoIt’s the fifth day of #FreshTastyValentines, a blogging event headed up by Camilla of Culinary Adventures with Camilla.

This event is the third opportunity I’ve had to work with Not Ketchup. I have enjoyed each product of theirs I’ve tried to date. I have used Blueberry White Pepper Not Ketchup in a chicken salad and the Cherry Chipotle flavor in slow cooker baked beans (which is my husband’s all time favorite recipe I’ve created). When they announced their newest flavor I couldn’t wait to give it a try. Just as I expected, it was sweet, tart, and smoky. And bonus – there isn’t any added sugar!

64b31-not2bketchup
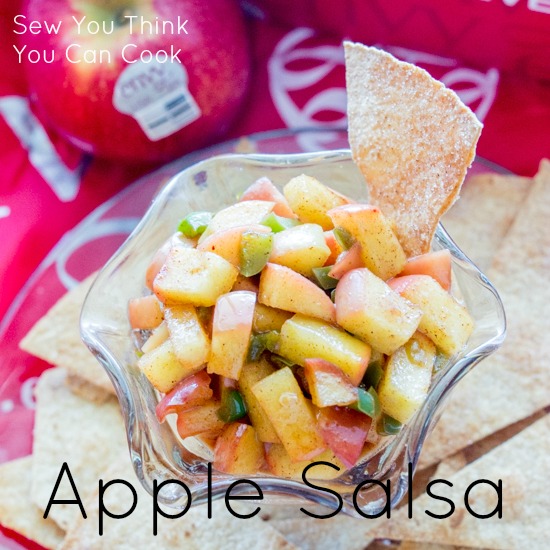
Honestly, I was going to turn it into a barbecue sauce for some baby back ribs, but when I posted my “thank you” on Instagram Erika (mastermind behind Not Ketchup) said, “your recipes are always delicious can’t wait to see what you come up with!” I felt the pressure to think outside of the box. And so I did.

You can’t have Valentine’s day without dessert. But instead of chocolate, I have something out of the box for you. A sherbet made with Tangerine Hatch Chile Not Ketchup! By happy coincidence, I’m currently watching Unique Sweets on Cooking Channel and the episode is about savory desserts. Aiko Pops in Denver is featured for creating popcicles by combine fruits and veggies. I have a feeling my recipe just might be trendy, people! My frozen treat gets brightness from tangerine juice, smoothness from milk, and some smokiness from the Not Ketchup. It’s a dessert that borders on the edge of savory. That’s why I paired it with a different kind of smokey sweet flavor – cookies made with honey and oats.

Tangerine Hatch Chile Sherbet

Ingredients:

  • 1 1/2 C tangerine juice
  • 1/2 C sugar
  • 1/2 C Tangerine Hatch Chile Not Ketchup
  • 1 tbsp lemon juice
  • 1 tsp vanilla extract
  • 1 1/2 C cold milk

Steps:

  1. Place tangerine juice, sugar, Not Ketchup, lemon juice, and vanilla in a blender. Blend until the sugar is dissolved. Transfer mixture to a large bowl and whisk in the cold milk.
  2. Place sherbet base in the refrigerator until it reaches 40 degrees F, at least an hour.
  3. Pour sherbet base into an ice cream maker according to manufacturer instructions.

*This recipe is modified from Alton Brown at http://www.foodnetwork.com/recipes/alton-brown/orange-sherbet-recipe.html*

Low-fat Tangerine Oaties

Ingredients:

  • 3/4 C honey
  • 1/2 C tangerine juice
  • 1 C old fashioned oats (I used Bob’s Red Mill)
  • 1 C flour
  • 1/2 C loosely packed light brown sugar
  • 1 tsp baking soda

Steps:

  1. In a small saucepan, combine honey and juice over medium heat. Cook until mixture is thicken and syrupy, about 15-20 minutes, stirring occasionally.
  2. Preheat oven to 350 degrees F. Line cookie sheets with parchment paper.
  3. In a large bowl, mix together the oats, flour, and sugar.
  4. In a small bowl, whisk the baking soda into 1 tbsp boiling water. Add to the dry ingredients. Add the honey mixture to the dough and mix with a wooden spoon until combined.
  5. Drop spoonfuls of dough onto the prepared cookie sheets, leaving 2″ between each cookie as they will spread.
  6. Bake cookies for 11 minutes, rotating the cookie sheets halfway through. Allow cookies to cool on the cookie sheets. Note: Cookies will be sticky. Store them in an air tight container with wax paper between the layers.

*This recipe is modified from Cookies*

Tangerine Hatch Chile Sherbet for #FreshTastyValentines from Sew You Think You Can Cook

Don’t forget to enter our giveaway and be sure to check out the other bloggers who posted more Valentine’s recipes today:

Thank you to #FreshTastyValentines sponsors for providing bloggers with samples and products to use for #FreshTastyValentines recipe development without additional compensation. All opinions stated are those of the bloggers.

Disclaimer: This post contains affiliate links.

#FoodieExtravaganza: American Pie

foodieextravaganza-300

It’s the first Wednesday of February and I’m taking a quick break from the #FreshTastyValentines event to celebrate “American Pies” with the #FoodieExtravaganza crew. My blogging friend Wendy over at A Day in the Life on the Farm is hosting today.

I’m not going to lie, I didn’t even look at what an “American” pie would be. All that comes to mind is apple, or maybe cherry. Pies aren’t my favorite dessert. I have an issue with warm fruit. My number one pie is Key Lime – cool and tart! Instead, I decided to go the savory route today and make a side dish that could work nicely with a brunch spread.

Yet another confession: I wasn’t happy with the photography. I struggle immensely with photographing cheese. AND the recipe actually called for gruyere, not cheddar. I accidentally deleted gruyere from my grocery list (it was part of this shopping fiasco) so I had to use what I had – cheddar. Which worked quite well, (Hey, cheddar is more American so maybe my dish does qualify after all!) but provided that yellow/orange tint. I was going to “give up” and try a different pie. But that was an even bigger fail! The only pie dish I have wasn’t large enough for the recipe I was making and everything had to be tossed into a dutch oven instead – delicious, but not pretty, and definitely not a pie. (Because it was a huge hit with Firecracker and myself, I will be trying it again with either a new pie dish or simply halving the recipe so it fits, so stay tuned for that one!)

So here I am sharing a fantastic recipe with mediocre pictures.

Cheddar Leek Potato Pie

Ingredients:

  • 1 sheet frozen puff pastry, thawed
  • 1 tsp butter
  • 1 bunch leeks, thinly sliced
  • 1 large Russet potato, thinly sliced (I used a mandoline)
  • 1 egg
  • 3/4 C half-and-half
  • 1 tsp thyme
  • 1 tsp garlic powder
  • 1 tsp pepper
  • 1/2 tsp salt
  • 1 C shredded cheddar cheese

Steps:

  1. Preheat oven to 350 degrees F. Line a pie dish with the thawed puff pastry. Trim and patch as needed to fit.
  2. Melt butter in a skillet over medium-high heat. Saute the leeks until cooked.
  3. In a small bowl whisk together the egg and half-and-half.
  4. In another small bowl whisk together the thyme, garlic powder, pepper, and salt.
  5. Evenly layer 1/3 of the sliced potatoes in the pie crust, top with 1/3 of the leeks, 1/3 of the spice blend, and 1/3 of the cheese. Repeat. For the final layer: place potatoes, leeks, and spices, pour the half-and-half over top of the pie, and top with remaining cheese.
  6. Bake 60-70 minutes, or until golden, bubbly, and a knife can cut smoothly through the potatoes.

*This recipe is adapted from Karen at http://www.karenskitchenstories.com/2015/03/potato-leek-pie.html*

cheddar potato leek pie for #FoodieExtravaganza from Sew You Think You Can Cook

Be sure to check out these other pies:

BLT Pie by Georgina of G’Gina’s Flavors Palatte

Cheeseburger Pie by Kathleen at Fearlessly Creative Mammas

Grapefruit Pie by Rebekah at Making Miracles

Ham and Broccoli Quiche by Wendy at A Day in the Life on the Farm

Homegrown Blackberry Pie by Carlee of Cooking with Carlee

No Bake Peanut Butter Pie by Lauren of From Gate to Plate

Peaches and Cream Pie by Elaine at Cookin and Craftin

Penne Pie by Terri at Our Good Life

Red Velvet Pudding Pie by Teri of The Freshman Cook

Tar Heel Pie by Tara of Tara’s Multicultural Table

The Impossible Coconut Pie by Stacy of Food Lust People Love

Walnut Crumble-Topped Apple Tart by Caroline at Caroline’s Cooking