Countdown to 2016: Dessert

countdownto2016I skipped yesterday’s countdown of Main Dishes because I instead shared my first #MuffinMonday post! Those Lemon Ricotta Muffins would definitely be on my breakfast favorites of 2015.

This blogging countdown party is hosted by Sarah at Fantastical Sharing of Recipes. Scoot on over to her page to see more round-up recipes.

Today’s countdown though is all about dessert. Desserts are definitely the highest grossing posts on Sew You Think You Can Cook.

So how did I pick my favorites? I do not have a very big sweet tooth and when it comes to cravings I reach for salty snacks over chocolate (though my like of chocolate has increased after my two pregnancies). When I bake I tend to enjoy a slice the day I make it and I’m content. My husband is the one who polishes off the desserts over the week. And/or I send them with him to work or take them to friends. So, this list encompasses the desserts that I ate more than once.

Copy Cat: Reese’s Cups

Copy Cat: Snickers

Cranberry Spice Bundt Cake

Cranberry Tart

Fudgey Cashew Brownies

Key Lime Cheesecake Filled Graham Cracker Bundt Cake

Mantecaditos

Tahini and Lemon Curd Ice Cream

White Chocolate Chip Cookie Souffles

2015 Dessert Round-Up.jpg

Brussels Sprout Crostini

Merry Christmas Eve Eve everyone! I hope you’re done with all your holiday shopping and are ready to enjoy the long weekend with your family and friends with good food, laughter, and lots of love.

12250143_10103361146232871_3749253079812426558_n

Every year my future sister-in-law’s family throws an open house party on Christmas Eve. We’ve gone the last couple of years and have brought along with us bacon wrapped dates (that almost burned my parents’ house down), sausage pinwheels, and broccoli and grape pasta salad.

This year I’ll be bringing an appetizer that we had as lunch this Thanksgiving. A Brussels Sprout Crostini. (We made it lunch by using toasted Italian sandwich bread slices instead of crostini sized bread slices.) The day before Thanksgiving my husband and I were watching an episode of Giada’s Holiday Handbook on Food Network and she made a charred Brussels sprout crostini for a holiday cocktail party. We looked at each other and declared, “That looks good!”

I suggested we make that for lunch on Thanksgiving, but as sandwiches with some meat. (We weren’t having our traditional Thanksgiving Brussels Sprouts since it was a small gathering this year.) We immediately headed to the store and it was the best decision ever. I fried up some pancetta to provide a crunch factor (and protein) to the sandwiches and omitted the pine nuts. I also used red wine vinegar in place of champagne vinegar because I had 3 bottles of red wine vinegar in my pantry (that’s what happens when you forget you have red wine vinegar a couple of times…).

I will be bringing an appetizer-appropriate version to the party tomorrow and will add those photos to this post after Christmas. I plan to bring everything already prepared but not assembled, allowing people to make their own crostini as they wish.

Brussels Sprouts Crostini

Ingredients:

  • 1/4 C red wine vinegar
  • 1/4 C sugar
  • 1/3 C dried cranberries
  • 1 lb Brussels sprouts, thinly sliced
  • 1/4 C extra-virgin olive oil
  • 1/2 tsp red pepper flakes
  • 1 1/4 C ricotta cheese
  • 4 oz pancetta, cooked and crumbled
  • 6 slices of thinly sliced Italian sandwich bread or 24 crostini

Steps:

  1. In a small saucepan over medium heat combine the vinegar and sugar. Bring to a simmer and cook until the sugar is dissolved. Remove from the heat and add the cranberries. Allow the dressing to sit for at least 10 minutes.
  2. Preheat the broiler.
  3. Toss the sliced Brussels sprouts with 2 tbsp olive oil, salt, and red pepper flakes. Place on a rimmed baking sheet and broil for 6 minutes, stirring halfway through.
  4. Transfer Brussels sprouts to a bowl and toss with the dressing from Step 1. Set aside.
  5. In another bowl, mix the remaining olive oil with the ricotta cheese. Season to taste with salt.
  6. Assemble crostini by spooning the ricotta mixture on the bread and topping with crumbled pancetta and the Brussels sprouts.

*This recipe is modified from Giada at http://www.foodnetwork.com/recipes/giada-de-laurentiis/charred-brussels-sprout-crostini.html*

Brussels Sprout Crostini | Sew You Think You Can Cook


Thursday Thoughts #13

Thursday Thoughts

I can’t believe my baby boy is just over a month old already! I did such an amazing job pre-scheduling blog posts for the month of November that I didn’t have an opening to share his birth story until now.

The birth of my baby boy was so different from that of my little man. Not only were we in a different hospital, we were in a different state! And to be honest, I liked my experience more with my little man. Up to a point. You’ll see what I mean as I tell you my story. (You can read about his birth here.)

I made the decision to take advantage of modern medicine and issued my baby boy his eviction papers at 39 weeks gestation. My reasoning for doing so was because of my almost 16 month old. 12190809_10206529152005791_5900510956335955599_nI really wanted to have his grandparents here to watch him while we were in this hospital. With us living in Ohio and the grandparents in Alabama and Florida, I knew it’d be easier to have a known due date and all four grandparents were able to be here!
My little man had never spent a night without us and while I had a good friend offer their home to him if needed, I didn’t want his first night away to be in an unfamiliar location. (Not to mention he doesn’t sleep through the night and their daughter does!)
My little man was well taken care of and smothered with lots of love during the entire process. His grandparents even took him trick-or-treating for the first time!

Because I was being induced early instead of late the process for induction was different than my first delivery.

Here is the story of how Walcott entered the world:

We checked into the hospital at 8 pm on Thursday night. Upon being taken to the labor room I found out that it was hospital policy to not allow any tub labor (I didn’t want to deliver in the tub) with an induced delivery. While that information wouldn’t have changed my decision, it would’ve been nice to know ahead of time. That news was a big blow and did nothing to calm my nerves. (Laboring in the warm bath was a great pain reliever with my little man.)

checking into hospitalThe family came with me to check in to get an idea of where the hospital was located and which room I was in. It also gave my little man a visual of where we were. He loved exploring the labor room and played hide and seek behind the curtains at the door. He was put in a night diaper and pajamas before leaving the hotel. My hope that he’d fall asleep in the car on the long drive back to the house was realized thereby making bed time much easier on the grandparents.

At 10 pm I was only dilated 2.5 cm so it was decided that a cervix ripening gel was to be inserted. I had to remain on my back for 30-45 minutes and highly encouraged to remain in bed for 4 hours, at which point there’d be a second application of the gel if needed. Unfortunately the gel and my stomach were not friends and I found myself taking frequent trips to the bathroom. Because that’s what every laboring mother wants to experience! I was still only dilated to 2.5 cm after the first 4 hours so a second round of gel and more stomach problems. This time there was progress and I hit 4 cm.

At 6:10 am Friday morning they started the Pitocin and at 6:20 a resident broke my water. Much like my first labor I reacted very well to the Pitocin with frequent contractions and again I experienced “back labor.” The Pitocin, which starts at a rate of 2 miliunits/minute, was increased to 4 and then eventually turned off completely.

The NST kept showing that my baby’s heart rate would drop with consecutive contractions so the nursing staff told me to remain on my left side. Honestly, we believe that the monitor would simply lose the baby when I was in certain positions due to my small stature. But, I know they could only go off of what the monitors indicated and so the positions that were best at pain tolerance – using a birthing ball or sitting up – were denied me. At 6 cm, around 8:30 am, I began to consider an epidural (laying in bed is not the best way to labor if you’re trying to go “natural”). I had a whimpery conversation with my mom and decided to go for it. Why not experience labor both ways, right?

The anesthesiologist was attending a C-section so I had to wait. The pain was reaching the “I give up” level. Because I had asked for the epidural I “rebelled” against the nurses and said “screw it” to laying on my side. I got on my hands and knees and felt immediately better (probably the best position if you’re trying to go “natural”, in my opinion)! Then I felt the pressure. I was complete and ready for delivery at 9:17 am.

The nurses kept saying, “Don’t push until the doctor gets here.” My mom, husband, and I were thinking “Okay, don’t be so dramatic!” I had pushed for 2 hours with my little man and had mentally prepared to have a repeat. My husband was already trying to figure out how to keep me calm and motivated through another delivery. (He had been glad I’d asked for the epidural!) Turns out the nurses were all right – after two contractions and less than 7 minutes of pushing my baby boy entered the world at 9:25 am. 5 minutes later the anesthesiologist arrived.

Induction Delivery  Sew You Think You Can Cook

CIC: Jalapenos & Sweet Potatoes

CIC-header

This month’s crazy ingredient challenge was to come up with a dish combining sweet potatoes and jalapenos. Nothing too crazy if you go a Southwest/Tex-Mex direction. I though of doing potato skins or some sort of play on jalapeno poppers – I guess I had game day snacks on my mind.

Instead though I decided to go with burgers. I got the idea after going to the zoo. Random. right?

On Veteran’s Day we took advantage of the husband’s day off and traveled to the Columbus Zoo. It was an incredible trip! It was a cool day and the animals were our to play! We saw a rhino rolling in the mud; lion cubs chasing their mama; the tigers and pumas were out in force, too; and we finally laid eyes on the red panda! The zoo wasn’t very crowded either on a Wednesday and we were able to let our toddler run around some.

Columbus Zoo Fall 2015

But back to the dish at hand.

The food at the zoo is actually pretty good. This visit was our second one to the Columbus Zoo and my husband ordered their black bean burger for lunch. (I like their cranberry feta salad.) After two enjoyable black bean burgers I figured I ought to give veggie burgers a try at home. And why not add some sweet potato and jalapeno!?

I’m pleased to declare my veggie burger adventure a successful one. While it wouldn’t fool a carnivore, it will satisfy one! I was surprised at how filling the patty was. I assembled my burger with cheese, lettuce, tomato, and mayo. Barbecue sauce or ketchup would also compliment the patty nicely.

An Original Recipe

BBQ Veggie Burgers

Ingredients:

  • 1/4 C diced red onion
  • 1 jalapeno, deseeded and diced
  • 1 tbsp olive oil
  • 1 clove garlic, minced
  • 1 can (15 oz) black beans, drained
  • 1/2 C mashed cooked sweet potato
  • 1 egg
  • 1 C panko breadcrumbs
  • 2 tsp barbecue seasoning (I probably could have bumped this up to 1 tbsp)
  • vegetable oil
  • 4 buns
  • toppings: cheese, lettuce, tomato, onion, etc

Steps:

  1. In a small skillet over medium-high heat, saute onion and jalapeno in olive oil until tender. Add the garlic and cook another minute. Remove from heat.
  2. In a bowl mash the black beans, leaving some texture. Mix in the sweet potato, sauteed veggies, egg, panko, and seasoning until combined. Form into 4 patties.
  3. Coat the bottom of a large skillet with vegetable oil. Cook patties over medium heat for 3-5 minutes on each side. Melt cheese, if using, on top of patties during the last two minutes of cook time.
  4. Assemble burgers as desired.

BBQ Veggie Burger for Crazy Ingredient Challenge from Sew You Think You Can Cook

To see the other bloggers who participated in this month’s Crazy Ingredient Challenge click on the link below.

Tuesday Tattles #10

Tuesday Tattles

It’s been another almost five months since I’ve done a “favorite products” version of Tuesday Tattles. My little man is now 16 1/2 months old.

12107130_10103304221470551_5559103387627477238_nA lot has happened since he’s turned one! He is more sure footed than ever, except for when he’s tired, and is a happy explorer. He can run, although not exactly gracefully, and enjoys running away from us to see if we’ll get him! But his number one activity is climbing. He’ll try and climb up on anything! I’ve caught him on top of my crafting table, laying next to my sewing machine. Chairs now have to be kept at a distance or tucked too far under the table to be of use.

His vocabulary has expanded from “duck” to include “all done”, “uh oh”, “up”, and “okay.” He is getting great at communicating when he is hungry too by running to the fridge and yelling “MAOW”. His favorite foods include sandwiches, berries, bananas, and the food that gets a happy dance, cheese.

Now on to the favorite toys of my one year old. A lot of today’s items are those he got at his first birthday. My family had some great ideas so if you have little ones on your holiday shopping list pay attention!

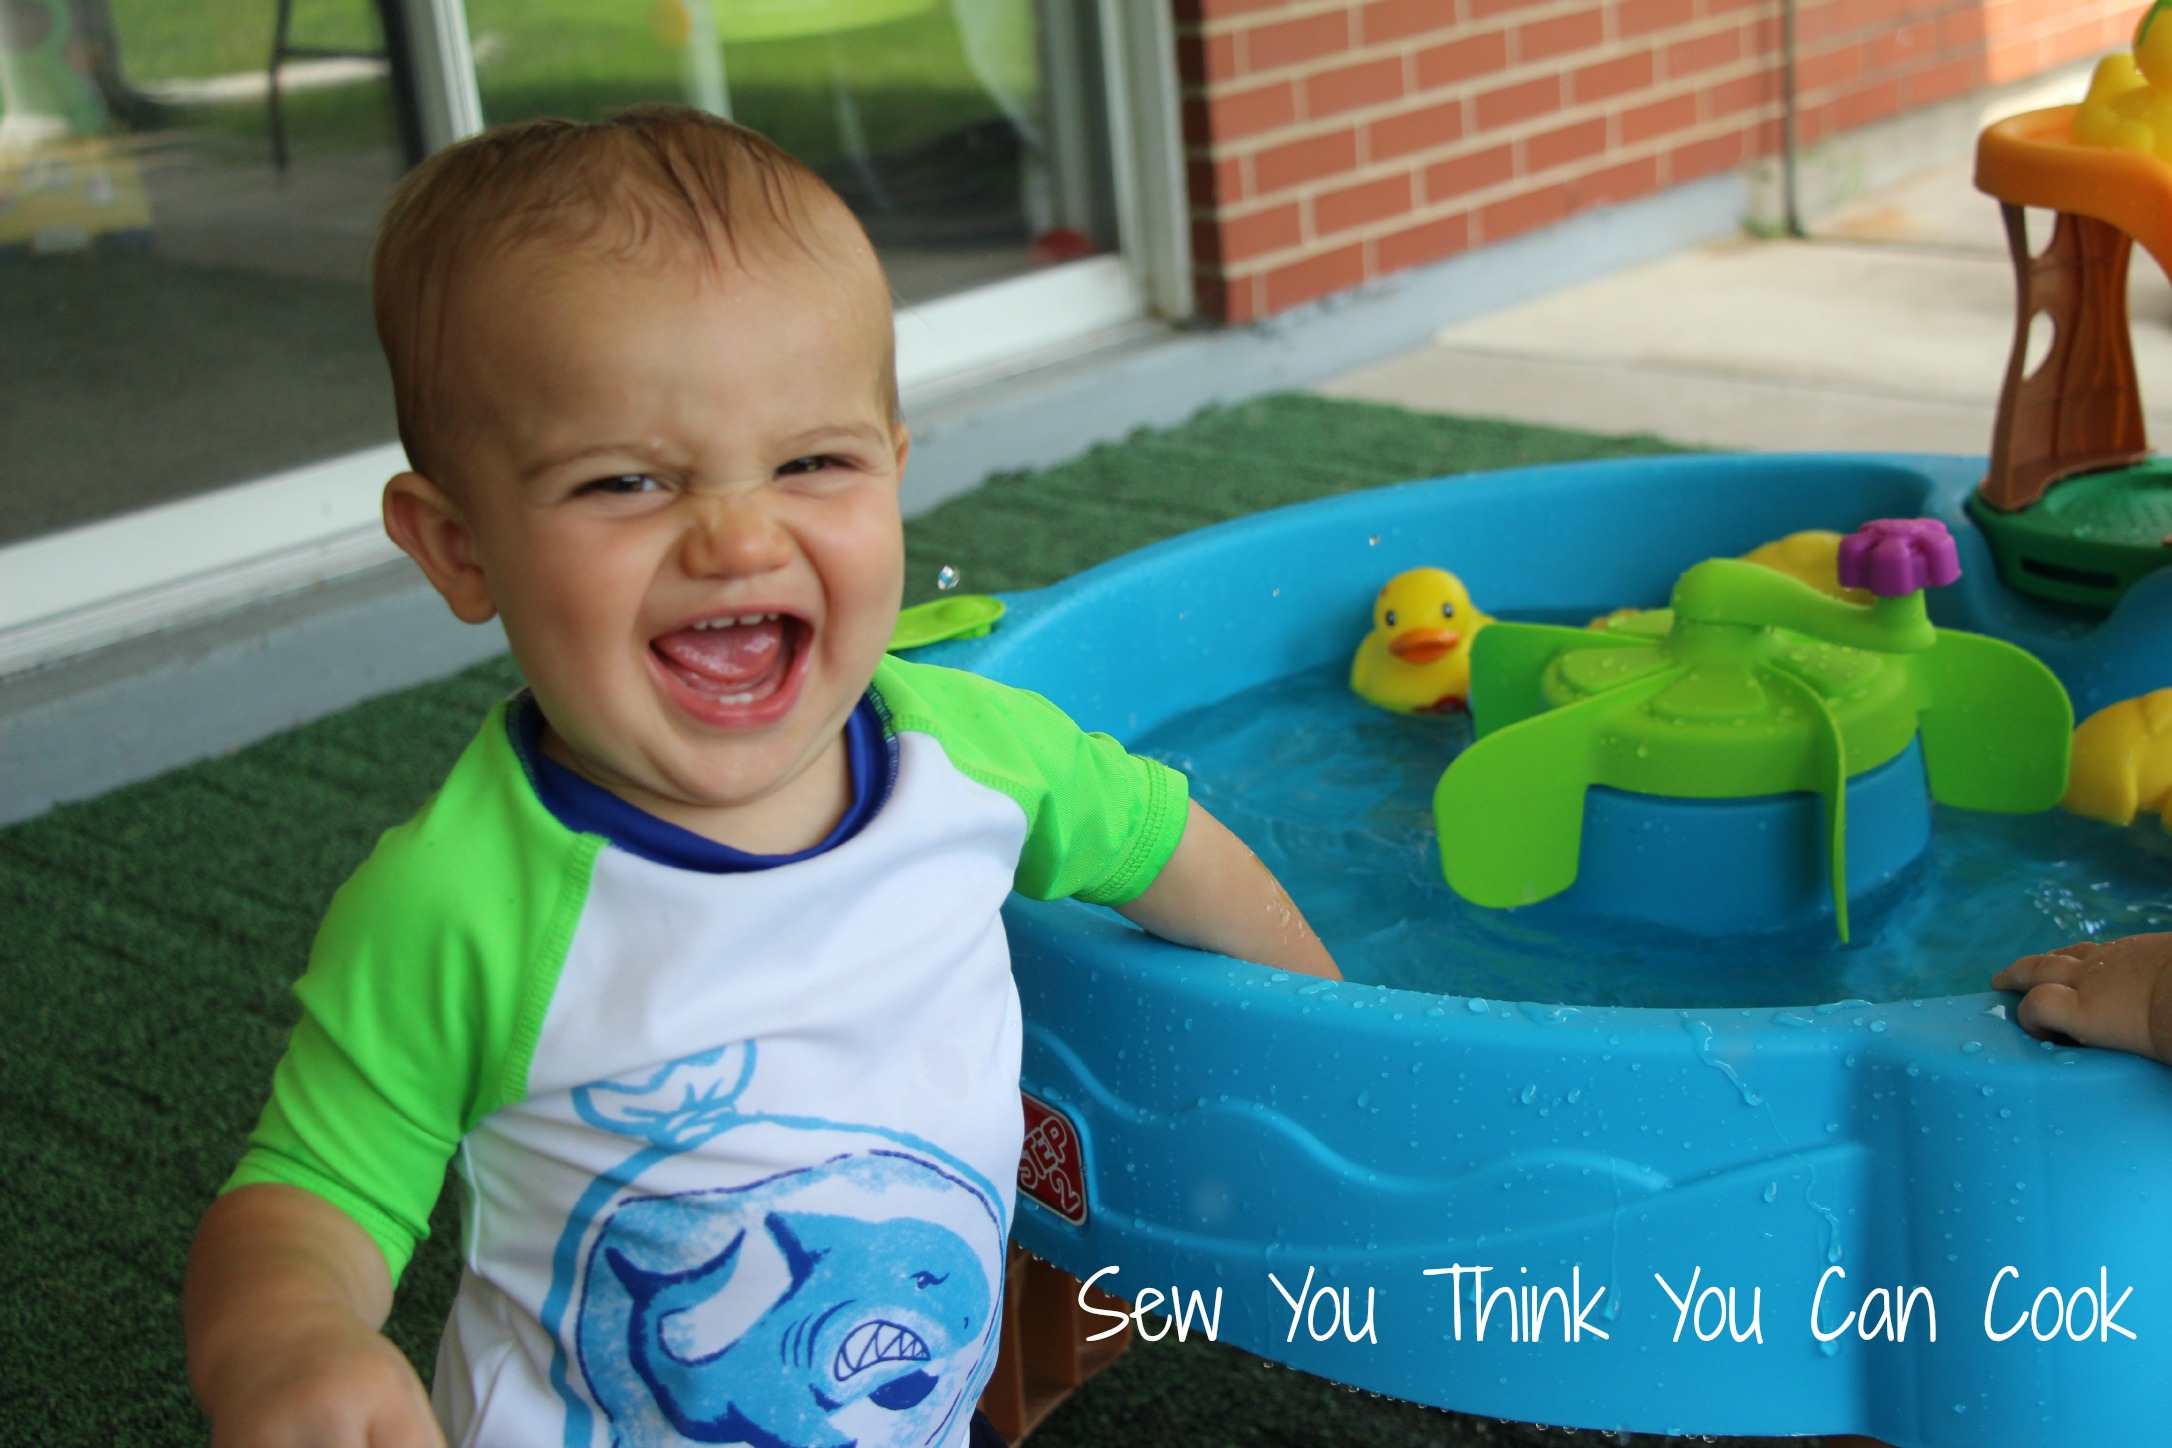
Duck Pond Water Table

toys for toddlers | sew you think you can cookA splash table is a fun warm weather activity and when I saw one that was duck themed I knew I had to get it! (Duck was my little man’s first word and he still loves rubber ducks and the duck stuffed animal I had as a child.) My son loves water – baths, showers, washing his hands. It’s getting too cold now but I know when it comes back out of the box come late spring he’ll find new enjoyment with it.

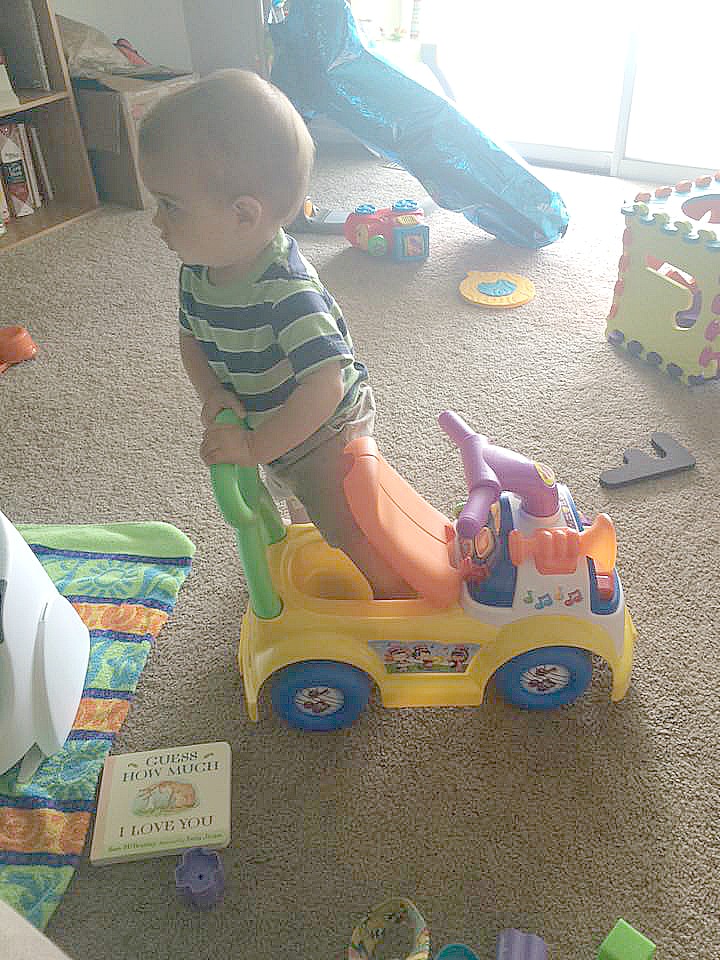
Little People Music Parade Ride-On

11755883_10103137355366561_2074814749816057856_nThis marching band car is a huge hit! He loves to press the music making buttons, push it around the house, sit on it and be pushed, sit on it and scoot around himself, and of course, try to fit himself in it. Surprisingly he still hasn’t put anything into the seat cavity, other than to immediately pull it out. Maybe with a little brother around he’ll re-discover the compartment as a place for safe keeping.
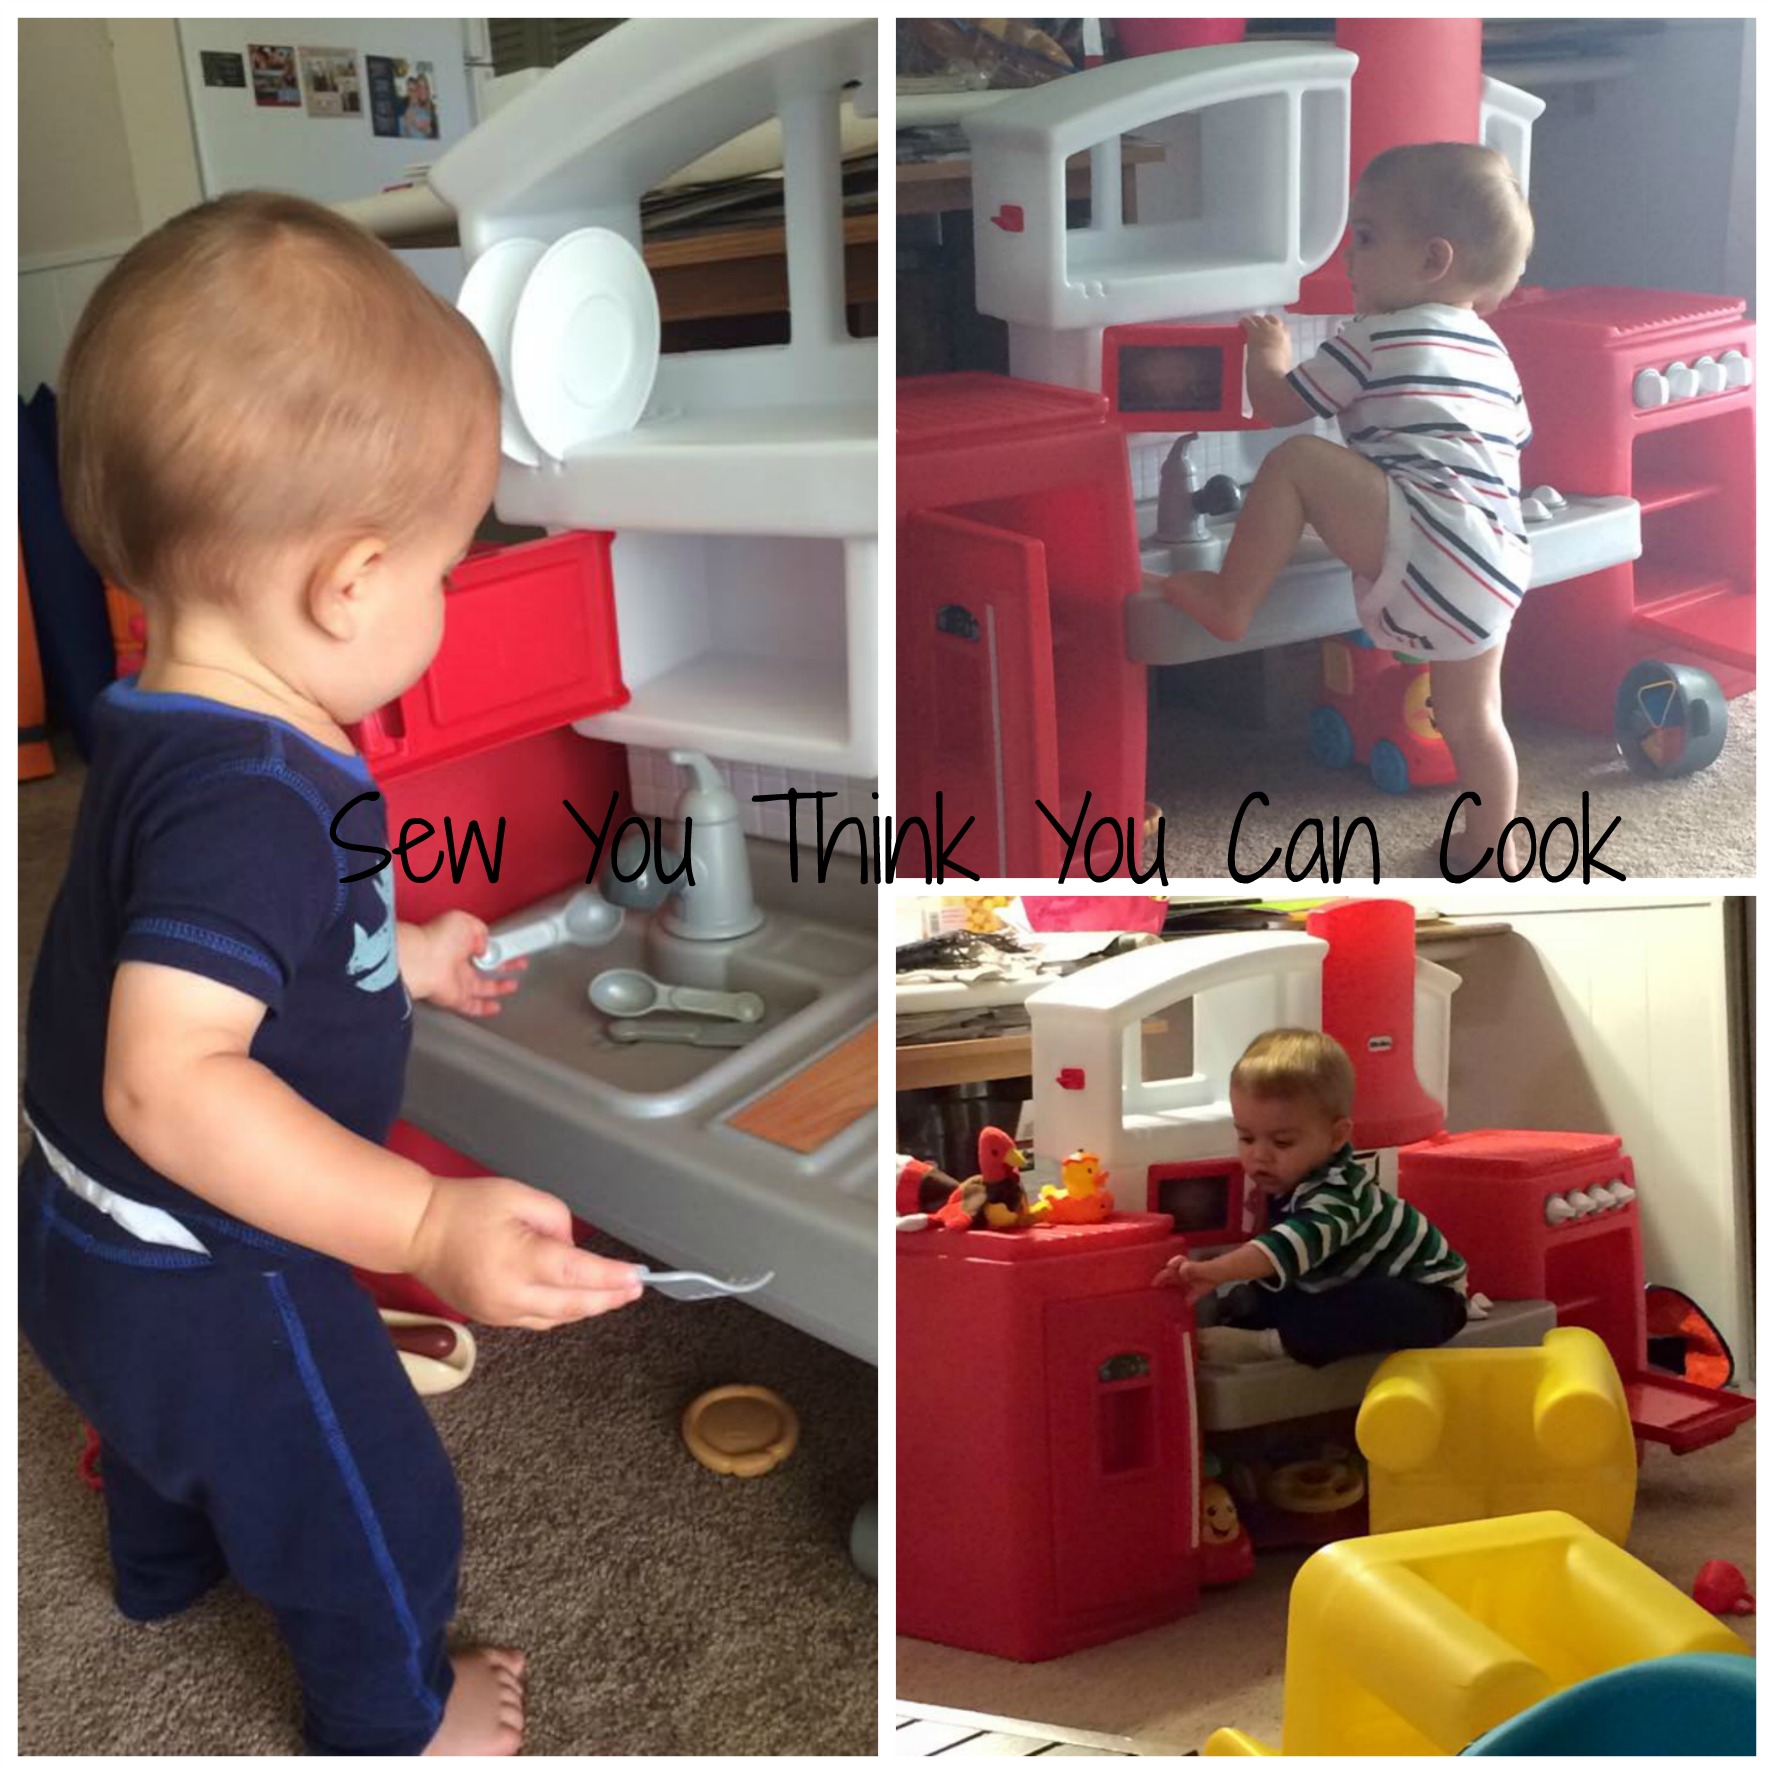
Play Kitchen

toys for toddlers 2 | sew you think you can cookA play kitchen is a perfect toy for a food blogger’s kid! And I’m happy to report that a lot of independent play has been developed through his play kitchen. (Allowing me to wash dishes peacefully.) He will bang the dishes, open up all the doors, and naturally try and climb it. This particular model comes with a shape sorting pot and it’s one of his favorite activities. All of the accessories do create a bit of a mess, but what’s a home with a toddler without a little clutter?

Classic Table and Chairs Set

toys for toddlers 3 | sew you think you can cookWe found this classic table and chairs set at a consignment shop in fantastic shape, so I jumped on the chance to bring it home. I thought he was still too little to really use it but I was proven wrong within ten minutes of having it home. He had immediately climbed up on top of the table and stood up. It was kept upside down for a while after that. And when he got tired of being in his booster seat I found he’d eat a sandwich like a big boy at his table. Turns out the table is also the perfect platform for superhero practice with Daddy.

Mega Bloks

Until quite recently my little man much preferred destroying towers as to building them but now he’ll stack a few before taking them apart. He likes to bring us the bag to open up and build with him, although the creativity and endless hours of fun are still a ways away.

The Little Engine That Could

This abridged version of the classic is definitely my 16 month old’s favorite book. We read it at least four times a day.

The Babies on the Bus

I must admit, I wasn’t thrilled pulling this one out of the birthday bag, but the gift giver definitely knew what they were doing. This book comes at a very close second for most read book in our house. I have managed to turn it into a fun read by not singing the song (no one needs that stuck in their head all childhood) and using hand motions. My son will now “sing” “LA LA LA” with the babies on the bus and say “shush shush shush” with the driver on the bus. He will also swing his arms “open and close” along with the “doors on the bus.”
Disclaimer: This post contains affiliate links.

Shopping Cart Cover Tutorial

One of my favorite baby “must-haves” is the Shopping Cart/High Chair Cover that my mother-in-law bought for us. When my son was just learning to sit on his own and able to handle being in the shopping cart or high chair it was nice to have the extra cushion for him to fall against.

And of course, it’s great for germ prevention. My favorite part is that I can use the strap attached to the cover instead of the ones attached to the high chair or shopping cart. Have you ever touched the straps on a public high chair?! They’re always sticky and gross. I can wipe down the chair and other surfaces no problem, but that strap is a whole other story. As for shopping carts, the straps are always located in the most awkward location – under the armpit and they don’t allow room to breathe or move.

I knew there had to be a way to make my own and it turns out that it’s much easier than I thought it’d be. There are a lot of steps but I was able to accomplish the shopping and sewing of this cover in just half a day. (With the supervision – aka emotional support – of my mother-in-law.)

While life continues to be hectic, this cover will be my new baby shower go-to item instead of the 4 Hour Quilt.  Contrary to the title “4 Hour Quilt” they always take me longer than 4 hours, the top can easily be assembled in an afternoon but the quilting and binding extend the life of the project and with almost two children in tow one would probably take me a year… But, enough of that.

Shopping Cart Cover Tutorial | Sew You Think You Can Cook

Here is the how-to for a Shopping Cart Cover Tutorial:

Supplies:

Steps:

  1. Cut the fleece and cotton fabric to 41 1/4″ squares.
  2. Curve all four corners on the cotton fabric. Do this by folding the fabric “hotdog style” then “hamburger style” so that all four corners are together. Use a curved ruler or plate as a template and cut the corners. Use the cotton fabric as a stencil for the fleece so the curves are identical in both pieces of fabric.Shopping Cart Cover Tutorial (step 2) | Sew You Think You Can Cook
  3.  Lay out the fleece. Find the center of the bottom edge.
    1. Mark 13″ up and 1″ to the left. Place the bottom right corner of a square/rectangle template measuring at least 5×5″ (I used a DVD case) at that mark. Trace the template and cut a hole. Shopping Cart Cover Tutorial (step 3a)| Sew You Think You Can Cook
    2. Mark 13″ up and 1″ to the right. Place the bottom left corner of a square/rectangle template measuring at least 5×5″ (I used a DVD case) at that mark. Trace the template and cut a hole.
  4. Place cotton fabric face up on work surface. Place the fleece on top. Trace the leg holes from step 3 but at 1/4-1/2″ inside of the opening so that the leg hole in the cotton fabric is smaller than in the fleece. Cut. Shopping Cart Cover Tutorial (step 4)| Sew You Think You Can Cook
  5. Pin the two fabrics together. Sew a straight stitch set to a length of 4 using a seam allowance of 3/8″ around the edge of the cover leaving a 4″ wide gap on one edge.
  6. Turn the cover inside out through the gap.
  7. Mark 1″ from the edge all the way around the cover. Sew a straight stitch set to a length of 4 on that line. Still leave the 4″ wide gap from step 5. (Note: This is for 3/4″ thick elastic.)
  8. Return to the leg holes. Place cover so that the fleece layer is on top and the cotton fabric face down. Cut a 45 degree angle on the cotton fabric into the corners of the leg holes. Fold the cotton fabric onto itself and then over the fleece. Pin. Zig-zag stitch around the leg holes, making sure to close the corners. Shopping Cart Cover Tutorial (step 8) | Sew You Think You Can Cook
  9. Find the center of each leg hole and measure 12″ above it. (The 12″ includes open leg hole space.) Mark this location. This mark is the center of a buttonhole. Make sure the buttonhole is large enough to fit the webbing strap (and/or buckle if desired) – do a test first. Sew buttonhole according to your sewing machine’s instructions.
  10. Melt the ends of the webbing. Do this by (carefully) holding a flame up to the ends.
  11. Insert the webbing through the buttonholes – making sure it’s not twisted.Shopping Cart Cover Tutorial (step 11) | Sew You Think You Can Cook
  12. Attach the buckle to the webbing. Sew an “X” inside a square to lock one end of the buckle. I decided to leave the other side free for adjusting. Shopping Cart Cover Tutorial (step 12) | Sew You Think You Can Cook
  13. Insert the elastic through the edge of the cover. Tip: Place a large safety pin at the end to make it easy to pull through the gap. Sew the elastic together.
  14. Close up the gap from Steps 3 and 4.
    1. Fold the edge fabric in on itself and sew as close to the edge as possible. Be sure not to sew the elastic!
    2. Use a straight stitch set to a length of 4 to close the gap closest to the inside of the cover. Be sure not to sew the elastic!

*This tutorial is modified from Stephanickety at http://thetiptoefairy.com/2013/05/how-to-make-your-own-shopping-cart-high-chair-cover/*

Disclaimer: This post contains affiliate links.

Greek Yogurt Pancakes

Every weekend I find myself standing in the kitchen, usually on Saturday morning, making either pancakes or waffles and if we have company I’ll leave it up to our guests to choose between the two.

When my mother-in-law and brother’s girlfriend we here earlier this month “pancakes” was the resounding answer. The reasoning was that you can make more pancakes at a time – sounds like I need an army of waffle irons!

While I often use my go-to recipes for pancakes or waffles, I do quite like to mix it up – as you can tell from my breakfast recipe index. With two tubs of Greek yogurt in my fridge I decided to try this recipe from She Wears Many Hats. I made a big batch at my husband’s request and it’s a good thing I did! While these pancakes are quite filling, feeding 4 adults and a 1-year-old we needed a little extra batter. There were two pancakes leftover that my son had for breakfast the next morning, too.

Greek Yogurt Pancakes

Ingredients:

  • 3 C flour
  • 2 tbsp baking powder
  • 1 1/2 tsp salt
  • 4 tbsp honey
  • 1 1/2 C milk
  • 1 1/2 C vanilla Greek yogurt
  • 3 eggs

Steps:

  1. In a large bowl whisk together the flour, baking powder, and salt.
  2. In another bowl whisk the eggs and stir in the honey, yogurt, and milk. Add the wet ingredients to the dry.
  3. On a hot buttered griddle drop 1/4 C of batter into pancakes. Flip pancakes when batter starts to set and bubbles form in the center of the pancake. Cook until both sides are golden brown.

*This recipe is adapted from Amy at http://shewearsmanyhats.com/yogurt-pancakes-recipe/*

Greek Yogurt Pancakes | Sew You Think You Can Cook

P.S. – Check out my awesome personalized mug! I made it at my friend Emily‘s house, she provided the supplies and the know-how.

Tuesday Tattles: TV Edition

I hate to say it, but the TV is on almost all day in my house. I am one of those people that needs to have the noise of the TV to stay sane, so I’ve adjusted the viewing to fit with those kid’s shows that I “approve” of and that my son likes.

My son will never sit still to actually watch a full episode of anything (unless he’s sick) but for those instances when he looks at the TV I want to make sure it’s toddler appropriate and there won’t be a commercial for the R-rated next horror movie.

Here’s a list of the shows we like:

Daniel TigerDaniel Tiger’s Neighborhood: While I know most of the situations in this show are geared towards older kids, 3-4, it does a great job in explaining different social situations and how to deal with different emotions. There’s even an episode when Daniel becomes a big brother that I have recorded and saved to be re-watched 8 weeks from now. My 14 month old will occasionally sit still to watch 5-10 minutes at a time – he likes the music and colors. And of course, the fact that Daniel is a tiger is a big hit in this Auburn household.

Peg + Cat: Okay, I must admit that I like Peg + Cat more than my son does. A glance at the TV will not captivate him with this show (and that’s okay!), but it’s often on during lunch and he’ll pay attention while he eats. Peg + Cat does a great job in teaching math skills, and the engineer in me loves that the cartoon is drawn on engineering paper with equations all along the background. There is always counting, sometimes by twos, shapes, and basic algebra. There are even references to history, science, and literature.

Thomas and FriendsAnd now for a show that my son likes better than I do. I know my brother and I grew up with Thomas the Tank Engine but I’m not fully convinced I like it. My son became captivated with the trains and the theme song, so I left it on. Each episode focuses on a different character who makes poor decisions. I’m not thrilled with the attitudes of these trains, but the episodes do explain what the character did wrong and the character always apologizes and fixes their mistakes. Thomas and Friends might become more applicable in Elementary School.

The Cat in the Hat Knows a Lot About That: I was introduced to this show a few years ago babysitting. Originally, The Cat in the Hat started off as being one that my son would shrug off, but now that he recognizes the “thing-a-ma-jigger” song he smiles and dances along. The main subject of this show is science; teaching viewers mainly about animals and weather.

IMG_6309Team Umizoomi: Here is another math centered show, and this one is more captivating for my little man. (It’s much more colorful than Peg + Cat is.) There are usually a couple of episodes that come on right before Dad returns home from work and turning Team Umizoomi on can help keep the early evening fussiness at bay. Every episode of Team Umizoomi involves counting, patterns, and shapes. The end of every episode encourages the kids to get up and move (not something my son needs help with!) by doing a celebratory “dance” called “The Crazy Shake.”

Wallykazam: I have saved the best for last. Wallykazam is not only my son’s favorite show, but my husband and I absolutely love it, too. Honestly, we’ll finish an episode long after our 14 month old has lost interest. Wallykazam teaches spelling and vocabulary by way of magic in a fantasy land. The characters (troll, goblin, dragon, giant, ogre, etc) are absolutely adorable (although my brother’s fiance will object because they all have bad teeth)! We record Wallykazam because it’s not on every day and will often watch an episode an hour before bed time to start calming down our ball-full-of-energy. At seeing Wally and Norville on the DVR list my son will point at the TV very excitedly and make his “I want” whimper.

5 Ingredients or Less Potluck Party

This month I put out a vote to my Recipe Club friends for the theme for our monthly potluck: 5 ingredients or less, tailgating, or a new dish. I wasn’t surprised to see that 5 ingredients or less won the vote by a landslide, especially with school starting up and schedules being busy.

5 ingredients or less potluck

What I didn’t expect was the plethora of desserts! My Lemon Ricotta Pasta was the only savory item on the menu! I had to adjust the recipe to fit the theme though. I eliminated the sausage and used garlic powder in the sauce instead of taking the effort to fry up garlic in olive oil. (Olive oil would not have counted towards my 5 ingredients, though.) I made my pasta dish right before heading out the door and kept it warm in a slow cooker at the event.

Thank goodness for boxed cake mix – we had an incredible apple pie dessert (apple pie filling, yellow cake mix, butter) and a berry crumble type dessert (berries, cake mix, butter), no one would know these desserts were “semi homemade.” And one of my friends turned to our group as guinea pigs to experiment with two different brands of gluten free cake mix for her daughter’s upcoming 1st birthday.

A cheese cake inspired dessert joined the menu because of a broken oven (cream cheese, condensed milk, lemon juice, cool whip, pre-made crust). And to round out the cold sweet offerings, a frozen blueberry dessert (blueberry pie filling, evaporated milk, lemon juice, almond extract, cool whip).

A dinner of pasta, desserts, and great conversation meant we were a happy bunch of ladies!

Tuesday Tattles #8

Tuesday Tattles

It’s been five months since I’ve done a “favorite products” version of Tuesday Tattles. My little man is now ONE!

Five months is a long time in the world of an infant. He has gone from army crawling to hands-and-knees crawling. From pulling up on furniture to full standing. From toddling with support to complete walking. He can squat to pick things up and carries items between rooms.

Saying “dada” has taken a backseat to finally saying “mama” and his first word is “duck” and he says it with enthusiasm when he sees a rubber ducky, a duck on a screen, or the stuffed animal that used to be mine as a child. He will even wave good-bye to the cashiers at the grocery store and says “ba ba” along with it.

With his 6 teeth (4 on top, 2 on bottom) he enjoys eating anything off of my plate. His favorite foods though are mushrooms, breakfast foods, black beans, and sweet potatoes. He will hum if something is good enough, too!

Tuesday Tattles 8

Fisher Price Apps

I hate to say it but the phone is one of my sons favorite things – ever. (He has actually chewed my Lifeproof case to the point where I’m not sure it’s “lifeproof” anymore. He’s not allowed to put it in his mouth any longer.) It’s okay though, he will flip through books on his own for ten minutes at a time. IMG_5266
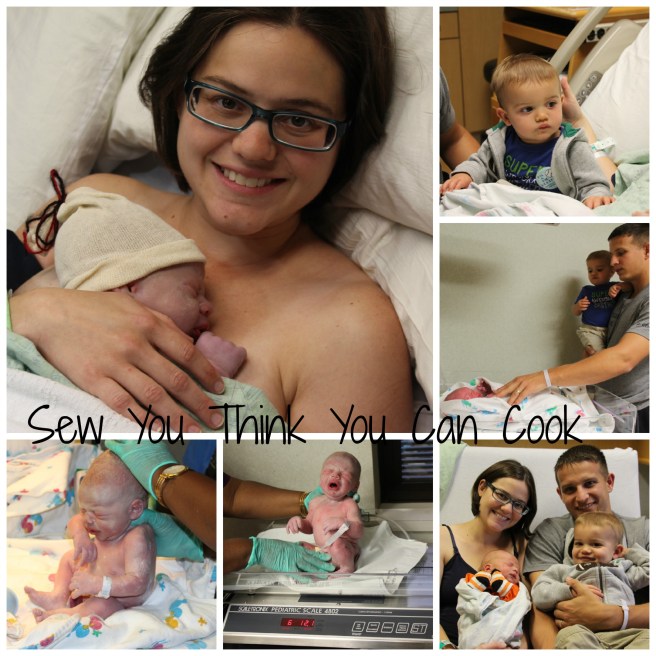
My husband found a couple Fisher Price Apps one morning and they’ve been great learning tools – as well as a wonderful distraction when needed. I’m pretty sure it’s through these learning apps that my son learned the word “duck”. On the Animals app he will touch through each animal until the duck appears – he even knows it comes after the pig.

I Love You Through And Through

This book by Bernadette Rossetti Shustak is definitely a favorite. The pages fall somewhere between paper and board book making them the perfect texture and thickness for little fingers to turn on their own. The illustrations are also adorable.

Activity Walker

11393224_10103032385357301_8014185378665337010_nWhen we went to visit friends in D.C. they had this walker for their son when he was learning how to walk. I’d been debating on buying one for my little man and his attachment to this toy had me on Amazon the minute we got home. I feel I was a little late in the game in buying it because he doesn’t get very much use from it now that he can walk independently. He will occasionally still play with the activity toys on the front though.

Play Triangle

Another toy I waited to purchase until I saw him playing with another kid’s is this play triangle. This toy has been well loved and still is. It’s the one I throw in the car if we’re going to someone’s house and I even stuffed it on our suitcase to have on our ten day vacation to the grandparents’. My little man decided this toy would make a good walking assistant and it is now scratched up from him bending over it and pushing it along the concrete on the back patio.

Alphabet Mat

10986993_10102992329559441_2932654624227789841_nWe’ve had the Alphabet Mat for a long time, and it was definitely more for me than him at the time. I went with the one made by B Toys because the color scheme was unique and had all my favorite colors. The abundance of orange and navy made this Auburn girl quite happy, too. Once my son discovered that the letters (and tiles) are removable they quickly became his favorite chew toy.

Blocks

This basic block set is a classic toy that has stood the test of time. My mom had a set in her toy closet from when she used to frequently babysit a friend’s kids over 8 years ago. These colorful shapes have been well loved (aka chewed on). While my son hasn’t yet had the patience or interest in learning how to put the shapes through their corresponding holes on the top he loves clapping them together and throwing them. And it may be coincidental, but he has accurately identified a couple of the shapes/colors when I’ve asked. The blue circle is definitely his favorite. My favorite thing to do with them is to start stacking the blocks. Without fail a little hand comes through to swipe my tower – followed by a giggle. This game was actually the first time my son actually played with me and when he was done demolishing my towers we played “tag” down the hallway.

Empty Water Bottles

I don’t care how many toys you have, the best play thing you can hand my son is a water bottle – full or empty doesn’t matter. Same goes for solo cups. 

Balls

I can’t begin to tell you how happy it makes my husband that our son loves to play with balls. He will throw a ball if you ask him to and can occasionally catch one tossed to him. Granted, it takes a lot of focus and multiple attempts – but it’s exciting every time! Any ball will do – tennis ball, Oball, plastic balls, volleyball, or beach ball; doesn’t matter the size, he’ll try and pick it up.

Disclaimer: This post contains affiliate links.