Spiced Apple Popsicles

I found these popsicle molds at Walmart at the beginning of summer for $1. I’d been wanting to use them, but I never got around to it. Before I knew it summer was over! But hey, I live in Florida, it’s still hot out, so therefore I can still enjoy homemade popsicles!

Evan couldn't get enough!
Evan couldn’t get enough!

This recipe is actually a perfect way to end the summer and start the fall – they taste like the Motts cinnamon applesauce from when I was a kid. Stuart said they reminded him of an apple cobbler.  These fall flavors are wrapped in a summer treat! I’ve made them twice already and earned the seal of approval from a 17-month-old. Evan actually ran around the table after finishing his popsicle to try and steal the one Stuart hadn’t yet finished!

Spiced Apple Popsicles

Ingredients:

  • 2 C Simply Apple Juice
  • 1/4 C brown sugar
  • juice of 1 lime
  • 1 cinnamon stick
  • 3 whole allspice berries
  • 1/2″ piece of ginger root, peeled
  • pinch of kosher salt

Steps:

  1. Combine ingredients in a saucepan. Bring to a gentle boil. Turn off the heat and bring down to room temperature.
  2. Strain popsicle mixture into a measuring cup and pour into popsicle molds. Freeze.
  3. Run the popsicle mold under cold water to make popsicle removal easier.

*This recipe is adapted from Giada DeLaurentiis at http://www.foodnetwork.com/recipes/giada-de-laurentiis/sweet-apple-pops-recipe/index.html*

Spiced Apple Popsicles 1 Spiced Apple Popsicles 2

Portuguese Hawaiian Sweet Bread

I’ve admitted before that I’m not much of a baker but this blog has helped me expand my kitchen skills. One thing I’d never even attempted to do before is bake bread! The thought of blooming yeast and rising dough frightened me.

Leave it to a Hawaiian vacation to get me to enter the world of bread making. I wanted to try making the sweet bread we had half of our mornings. The amount of steps looked daunting, but I had my husband in the kitchen with me acting as my safety blanket. I am so proud and excited to tell you that our first attempt was successful!

We enjoyed fresh toast every morning before work our first week back on the mainland. Now if only there were a way to get the bread faster I’d do it every weekend! Now though I won’t be as timid when I come across a fresh bread recipe.

Prep 1 Prep 2

Portuguese Hawaiian Sweet Bread

Ingredients:

  • 1/2 C milk
  • 4 tbsp butter, cubed
  • 1/3 C sugar
  • 1 1/4 tsp salt
  • 3 1/4 C all-purpose flour
  • 1 tbsp active-dry yeast
  • zest of 1 lemon
  • 2 large eggs
  • 1 large egg, whites reserved
  • 2 tsp vanilla

Steps:

  1. In a microwave safe bowl heat milk, butter, sugar, and salt until warm. Stir to soften the butter.
  2. In a stand mixer, combine flour, yeast, and zest. Add the warm milk mixture (stir before adding if mixture separated). Mix to combine. Add in the two whole eggs and 1 egg yolk along with the vanilla. Use the paddle to mix until smooth for 3 minutes and then switch to the dough hook for an additional 5 minutes. Note: The dough will be sticky.
  3. Form the dough into a ball and place in a large greased bowl to rise for 2 hours.
  4. Gently punch the dough to deflate it and roll it back into a ball. Put the dough in a greased 9″ round cake pan. Cover the dough with a clean shower cap (or you can use plastic wrap). Allow dough to rise for another 2 hours.
  5. Preheat oven to 350 degrees F.
  6. Mix 1 tbsp of water with the reserved egg white and brush onto the dough.
  7. Bake bread for 15 minutes. Cover it lightly with aluminum foil and bake for an additional 25 minutes, until the crust is golden brown. Note: The bread should reach an internal temperature of 190 degrees.
  8. Let the bread cool on a cooling rack before breaking into it.

*This recipe is modified from the King Arthur Flour test kitchens at http://www.kingarthurflour.com/recipes/portuguese-sweet-bread-recipe*

Portuguese Hawaiian Sweet Bread 1 Portuguese Hawaiian Sweet Bread 2

CIC: Coconut & Tomato

CIC-header

I interrupt my recount of Hawaiian food to bring you this month’s Crazy Ingredient Challenge! This month the task was to combine Coconut and Tomato. Upon seeing the ingredient list I thought I was going to sit this one out as I am allergic to coconut. But then I got an idea and decided, why not! Just because I can’t eat it doesn’t mean my friends can’t be my taste buds.

My original idea was to do a play on the Bloody Mary – either make a virgin version substituting vodka for coconut water, or simply adding coconut water to the cocktail, or even making a “creamy” version with coconut milk, garnished of course with toasted coconut.

This idea was altered slightly when I searched Food Network’s website for Bloody Mary recipes. I’d never had one before! I found Rachael Ray’s recipe for Bloody Mary Shrimp Cocktail and thought, that’s a better idea! And I can serve it with coconut shrimp instead of typical shrimp cocktail. This way also prevents my husband from trying multiple Bloody Marys before I came up with the right recipe. I also bought cocktail shrimp so I could dip in too!

I served this appetizer during last weekend’s football game. We had some friends over and I was given the “this is addicting” nod of approval. I hope this boozy dip makes it to your next tailgate!

Coconut Shrimp with Bloody Mary Dip

Ingredients for Shrimp:

  • Canola oil, for frying
  • 1 lb peeled, deveined shrimp
  • 1 C flour
  • 1/2 tbsp onion powder
  • 1/2 tbsp garlic powder
  • 4 eggs
  • 1 C panko breadcrumbs
  • 1 C shredded sweetened coconut

Ingredients for Dip:

  • 28 oz can crushed tomatoes
  • 2 tbsp horseradish
  • 2 tbsp Worcestershire
  • 2 tsp hot sauce
  • 2-3 shots of vodka, to taste

Steps:

  1. Bring oil to 350 degrees.
  2. In a large bowl combine flour, garlic powder, and onion powder. In another bowl beat eggs and season with S+P. In a third bowl combine coconut and panko. Season shrimp with S+P and dredge in flour, egg, and panko. Fry shrimp 2 minutes on each side. It’s best to do this in batches so as not to decrease the oil temperature too much.
  3. Combine dip ingredients. Serve with celery sticks!

*The shrimp is adapted from The Neelys and the dip is modified from Rachael Ray*

Coconut Shrimp and Bloody Mary Dip 2Coconut Shrimp and Bloody Mary Dip 1

Click the link below to see other blogs that participated in this month’s Crazy Ingredient Challenge!

recreatedbysrc

Loco Moco

Loco Moco is the number one comfort food on the Big Island. Rumor has it that it originated in Hilo. The story according to our travel guide, Lonely Planet Hawaii: The Big Island (Regional Travel Guide), September 2008 is as follows:

A group of teenage boys hung out at a local restaurant to play pinball and chow down on cheap food. A football player nicknamed “Crazy” was nominated to request a new dish. A large bowl of rice topped with hambuger and gravy. When the group relocated their hangout two over-easy fried eggs were added to the dish, creating Loco Moco as it is today.

Traditionally Loco Moco uses a hamburger patty as the choice of protein, but variations include pork, spam, etc. I made mine with leftover shredded pork. When we ate our Loco Moco in Hawaii Stuart said it needed one more egg, so I made three! Breaking into the yolk and combining the rice with the yolk and gravy is the best way to eat it.

Fried Egg Pork & Gravy

Loco Moco

Ingredients:

  • 3 C cooked rice
  • 3/4 lb cooked shredded pork
  • 1 can beef broth
  • flour for thickening
  • 1 tbsp butter, plus more for eggs
  • 3 eggs

Steps:

  1. In a saucepan, reduce beef broth. Stir in 1-2 tbsp of flour to thicken. Let reduce to desired consistency. Season with S+P. Stir in 1 tbsp butter. Warm shredded pork in the gravy.
  2. Melt a little butter in a small skillet. Crack eggs (I did mine one at a time) into skillet. Cook for only a couple of minutes before flipping. The yolk will still be runny.
  3. Assemble loco moco: spoon rice on a large plate, cover with the gravy and pork mixture, and top with the over-easy fried eggs.

Loco Moco 1

Loco Moco 2

French Onion Soup

While in Hawaii Stuart had the idea for me to recreate the foods we ate for my blog. Our favorite meal of the trip was at a little French restaurant in downtown Hilo. I haven’t attempted making crepes yet, but I do know how to make French Onion Soup.

I made this recipe back in 2011 after finding it on Kelsey’s Essentials on Cooking Channel. I altered the recipe slightly this go-around to utilize Slow Cooker Caramelized Onions, adjusted the liquid amounts for a desired consistency, and added more cheese.

French Onion Soup

Ingredients:

  • 3 lb onions, sliced and caramelized – less 1 C
  • 1 tbsp dried thyme
  • 1 C white wine
  • 1 tbsp flour
  • 4 C beef broth
  • 2 1/2 C chicken broth
  • 4 rolls bakery bread, cubed
  • 1/2 lb swiss cheese, shredded

Steps:

  1. Melt 1 tbsp butter in a large pot. Add the caramelized onions, season with thyme, salt and pepper. Cook for five minutes.
  2. Stir in the flour, mixing well. Pour in white wine and bring to a boil for five minutes. Season again with S+P.
  3. Add in both broths and bring to a simmer for 30 minutes.
  4. Preheat the broiler. Ladle soup into individual ramekins. Top each ramekin with cubed bread and cover with shredded cheese. Broil for about 4 minutes until cheese begins to brown.

French Onion Soup

Slow Cooker Caramelized Onions

Caramelized onions can take a sandwich to the next level, but you don’t always want to spend the time making caramelized onions just for a grilled cheese! I stumbled upon this fantastic idea to make caramelized onions in the slow cooker! It’s definitely one of those, “Why didn’t I think of that?” moments. Sure, it definitely takes longer but it’s so much easier and all the prep-work is done whenever you do want caramelized onions because you can freeze them too!

sliced onionsI actually cut my onions the night before, put them in a container which I then wrapped in plastic wrap and double bagged to keep the onion smell from permeating my entire refrigerator overnight. (No one wants to go to the office smelling like raw onion.) So in the morning all I had to do was dump my 3 lbs of onions into the crock pot with 3 tbsp of butter!

If you aren’t already hungry when you get home (I always am!), the smell of caramelized onions wafting over you as soon as you open the door will make you anxious to use them immediately! I used the onions for French Onion Soup – taking 30 minute off of my active cooking time. We also served them with burgers.

Slow Cooker Caramelized Onions

Ingredients:

  • 3 lb yellow onions
  • 3 tbsp butter, cubed

Steps:

  1. Using a sharp knife, slice onions thinly.
  2. Lightly spray inside of slow cooker with non stick cooking spray. Dump in onions and butter. Spritz top of onions with another hit of cooking spray.
  3. Cover and cook on high for 10 1/2 hours.

*This recipe is modified from Dorothy at http://www.shockinglydelicious.com/crock-pot-caramelized-onions-slow-and-steady-does-the-trick/*

Caramelized Onions

Corn Pepper Salsa Chicken Quesadilla

It amuses me to say that the best quesadilla I ever had was in Hawaii, and it’s even stranger to tell you that that quesadilla was had in the Honolulu airport (at Stinger Ray’s)!

For Mexican Monday I decided to attempt a recreation of this quesadilla. What I loved most about it was a back note of lime and the inclusion of corn in the filling. I didn’t succeed in a perfect copy cat recipe with my first attempt, but it was fun to do more with a quesadilla than stuff it with leftovers!

I marinated the chicken with chipotle and lime, sliced it and cooked it fajita style for extra flavor. I then sauteed the corn, onion, and pepper salsa with chili powder in the same skillet. For a kiss of heat I sliced open a serrano pepper (which Stuart purposefully ate!).

I actually prepared extra chicken and made rice to take to lunch the next day.

Saute Chicken 1Saute Chicken 2Saute Chicken 3Saute Salsa 1Saute Salsa 2Saute Salsa 3Assemble Quesadilla 1Assemble Quesadilla 2Assemble Quesadilla 3

An Original Recipe

Corn Pepper Salsa Chicken Quesadilla

Ingredients:

  • 2 boneless, skinless chicken breasts
  • zest of 1 lime
  • juice of 1 lime
  • 1/4 tsp corriander
  • 1/4 tsp cumin
  • 1/2 tsp onion powder
  • 1/2 tsp garlic powder
  • 1 1/2 tbsp minced chipotle pepper in adobo
  • 1/3 C olive oil
  • 1 C frozen corn, thawed
  • 1 small red bell pepper, diced
  • 1/2 C diced onion
  • 1/2 tsp chili powder
  • 1/2 serrano pepper, halved
  • 4 flour tortillas
  • 2 C shredded Mexican cheese

Steps:

  1. Combine lime, corriander, cumin, onion powder, garlic powder, chipotle, S+P, and olive oil. Marinate chicken at least 4 hours.
  2. Slice chicken. Saute chicken over medium-high heat in a large skillet in olive oil until cooked through.
  3. In the same skillet, cook the remaining ingredients. Deglaze the pan with a splash of chicken stock if desired.
  4. In a separate non-stick skillet, place tortilla and cover entire surface with cheese. On one half top with chicken and salsa. Fold the cheese-only half over the chicken. Flip until both sides are lightly golden and crispy. Serve with your favorite salsa and sour cream.

Corn Pepper Salsa Chicken Quesadilla

Key Lime Pie

As I’ve gotten “older” my sweet tooth has gotten smaller. When a craving hits, it’s usually for something salty – like popcorn. But there is one dessert that I can never say no to. And because today is my 25th birthday, I am going to indulge.

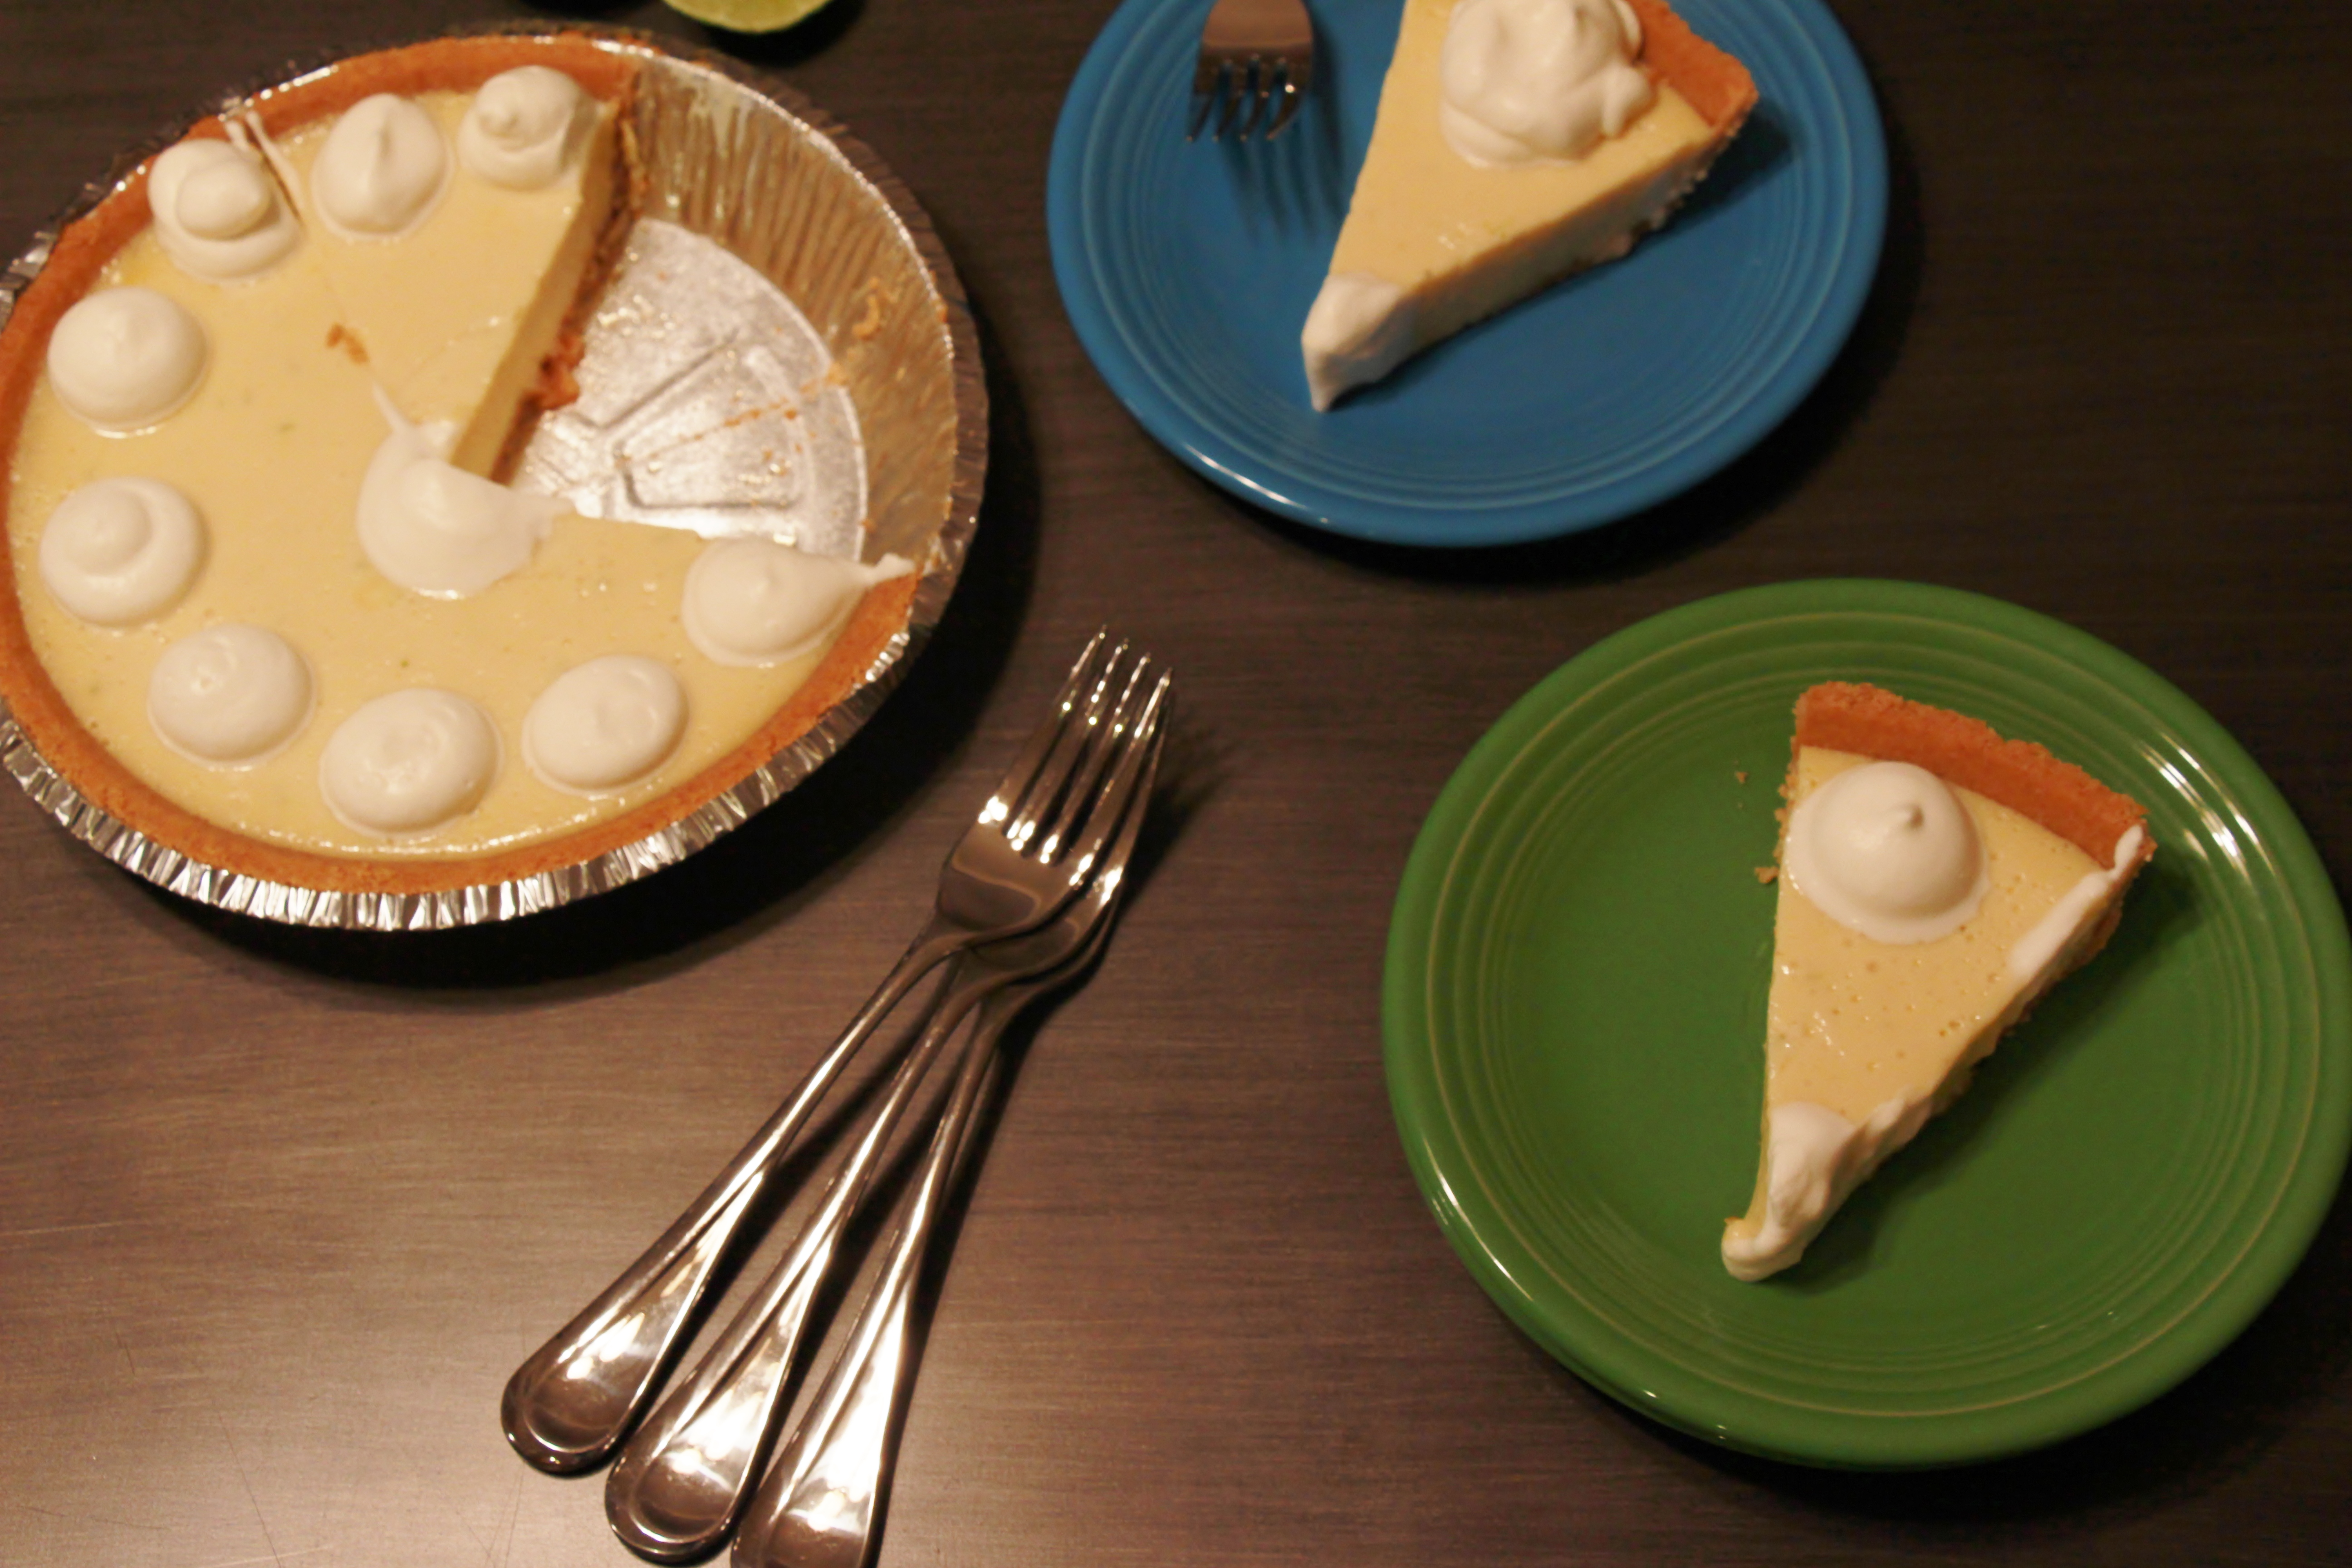
Key Lime Pie is my absolute favorite dessert, and Publix (sorry to anyone not in the South!) makes the best one! …. Or so I thought. I am very proud to declare that I now make the best Key Lime Pie. I’m particularly excited for this because I now know that I can have perfect key lime pie even when we leave the land of Publix.

A couple years ago I made a key lime pie for my brother’s fiancé’s birthday as it’s also one of her favorites. (Her favorite is actually pumpkin pie but my brother hates it, and her birthday is in July anyway.) I had actually squeezed the juice out of actual key limes! That pie was unbelievably tart. I don’t even recall which recipe I used.

This time I found Nellie & Joe Key West Lime Juice and happily used that (no funky ingredients involved). I would love to say that this was only my second attempt at key lime pie. But that’d be a lie. I made two pies for my birthday. The first was a complete disaster. My can of sweetened condensed milk had expired. And I didn’t notice it until I was emptying the contents into the egg yolk mixture. I immediately went to the internet and established that I should still be okay to use it. 

IMG_3072

So I carried on. Key lime pie is not naturally green (but if you want it to be by all means add a drop or two of food

coloring), but it’s definitely not supposed to be marigold. 

It’s not supposed to smell overpoweringly like sweetened condensed milk either. I did still taste it – the texture was a little off and it was still just a little too sour. So I went back to the store and back to square one. 

That failed attempt was actually a blessing in disguise because I found the perfect, better-than-Publix recipe! Third time’s the charm. 😉

Key Lime Pie

Ingredients:

  • 3 egg yolks
  • 1 egg white, beaten until frothy
  • 1 14oz can sweetened condensed milk
  • zest 1 lime
  • 1/2 C key lime juice
  • 9 in graham cracker pie crust
  • 1/2 C heavy whipping cream
  • 1/4 tsp vanilla extract
  • 1 tsp powdered sugar

Steps

  1. Preheat oven to 350 degrees F.
  2. Using a hand mixer, beat egg yolks with lime zest and sweetened condensed milk. Add in lime juice. Add the egg white.
  3. Pour pie filling into pie crust. Bake 15 minutes. Allow pie to cool to room temperature for at least an hour before covering and putting in the fridge.
  4. Using a hand mixer, make the whipped cream. Beat the heavy cream until it starts to get thick, then add in the vanilla and sugar. Beat until stiff peaks form. Top pie with whipped cream right before serving. Note: I don’t like my whipped cream to be too sweet, so feel free to add more sugar/vanilla to taste.

*This recipe is adapted from The Big Cheese at http://www.food.com/recipe/traditional-key-lime-pie-109918*
Key Lime Pie 1

Key Lime Pie 2

Chicken and Pineapple Kebobs with Honey Chipotle Glaze

The reason I love to cook is the same as any other chef and home-cook. I like to make people happy, and a great way to do that is through food. Just bring in a plate of cookies to the office and you’ll see what I’m talking about.

When I decide on a recipe, I’ve got one person’s interest on my mind – my husband’s. I know what type of flavors he likes and try to find something that will make him happy. This dish did just that.

“What are we having for dinner tonight?”

“Chicken and Pineapple Skewers with a Honey Chipotle sauce”

“You know me so well.”

Stuart is addicted to pineapple, he likes meat of any kind, is obsessed with honey, and enjoys chipotle spiciness. There’s no way this could go wrong. (And it didn’t!) If you’ve never had grilled pineapple, you really should try it – it brings out the sweetness of the fruit while toning down the tartness.

Chicken and Pineapple Kebobs with Honey Chipotle Glaze

Ingredients:

  • 2 boneless, skinless chicken breasts, cut into cubes
  • 1/2 fresh pineapple, cubed
  • 3 chipotle peppers in adobo
  • 1 tbsp Dijon mustard
  • 2 tbsp canola oil
  • 1 tsp kosher salt
  • 1/2 – 3/4 C honey, to taste

Steps

  1. Soak 10-12 bamboo skewers in water for 15-30 minutes.
  2. Assemble kebobs by alternating chicken and pineapple.
  3. Grill kebobs until chicken is cooked through.
  4. In a blender, puree chipotle peppers, mustard, oil, salt, and honey.
  5. Brush cooked kebobs with the glaze and reserve some for dipping.

*This recipe is adapted from http://bsugarmama.com/chicken-pineapple-skewers-with-honey-chipotle-glaze/*

Chicken and Pineapple Kebobs with Honey Chipotle Glaze 1

Chicken and Pineapple Kebobs with Honey Chipotle Glaze 2

Chicken and Pineapple Kebobs with Honey Chipotle Glaze 3

Banana Bread Muffins

I like almost any banana bread recipe. And Stuart likes to buy extra bananas with the intention of letting them get too ripe, just so that I can make banana bread.

I have tried many different recipes, and this one is our favorite. It uses a combination of whole wheat flour and all purpose flour.

Banana Bread Muffins 7

I’d purchased a bag of whole wheat flour for something (can’t remember what) and we hated it. So then I thought, “Great, what do I do with these three pounds of flour?!” I’d found an all whole wheat banana bread recipe… didn’t care for that. And then we tried this one. It’s mostly all purpose flour, but with just a bit of whole wheat flour. It’s enough whole wheat flour to give the bread some body, but not enough to make the loaf dry and mealy. Adding in cinnamon chips or chocolate chips gives it a little extra sweetness.

I prefer pouring my banana bread batter into either mini loaf pans or into muffin pans because it’s easier to grab on the way out the door than slicing off a piece out of the loaf pan.

Banana Bread Muffins 1 Banana Bread Muffins 2 Banana Bread Muffins 3 Banana Bread Muffins 4 Banana Bread Muffins 5 Banana Bread Muffins 6

Note: This recipe makes 10 muffins or 7 mini loaves. Doubling this recipe will yield enough batter for a full bread loaf.

Banana Bread Muffins

Ingredients:

  • 2 ripe bananas
  • 1 egg, whisked
  • 2 1/2 tbsp butter, melted
  • 3/8 C sugar
  • 1/2 tsp vanilla extract
  • 1/2 tsp baking soda
  • pinch of salt
  • 1/4 C whole wheat flour
  • 1/2 C all purpose flour
  • chocolate chips, cinamon chips, nuts (optional)

Steps

  1. Preheat oven to 350 degrees F.
  2. In a large bowl, mash the bananas. Stir in the melted butter (make sure it’s cooled slightly so it will not cook the egg). Stir in sugar, vanilla, and half to all of the egg (this will depend on how big your bananas are, I only used half of the egg). Add in baking soda and salt. Mix in flours.
  3. Pour two heaping tbsp of batter into each greased or lined muffin tray. If using nuts or chocolate/cinnamon chips, put five into each muffin and gently fold into batter with a small spoon. (I find that folding them into the batter before pouring ends up with all of them at the bottom of the bowl)
  4. Bake 20-22 minutes, or until a toothpick comes out clean. Note: If you are doubling the recipe, the loaf pan will take an hour to cook. Mini loaves will still only take 20 minutes.

*This recipe is adapted from Katherine at http://www.katherinemartinelli.com/blog/2011/over-ripe-banana-heaven/*

Banana Bread Muffins 8