Irish Bread Braid

SPD13

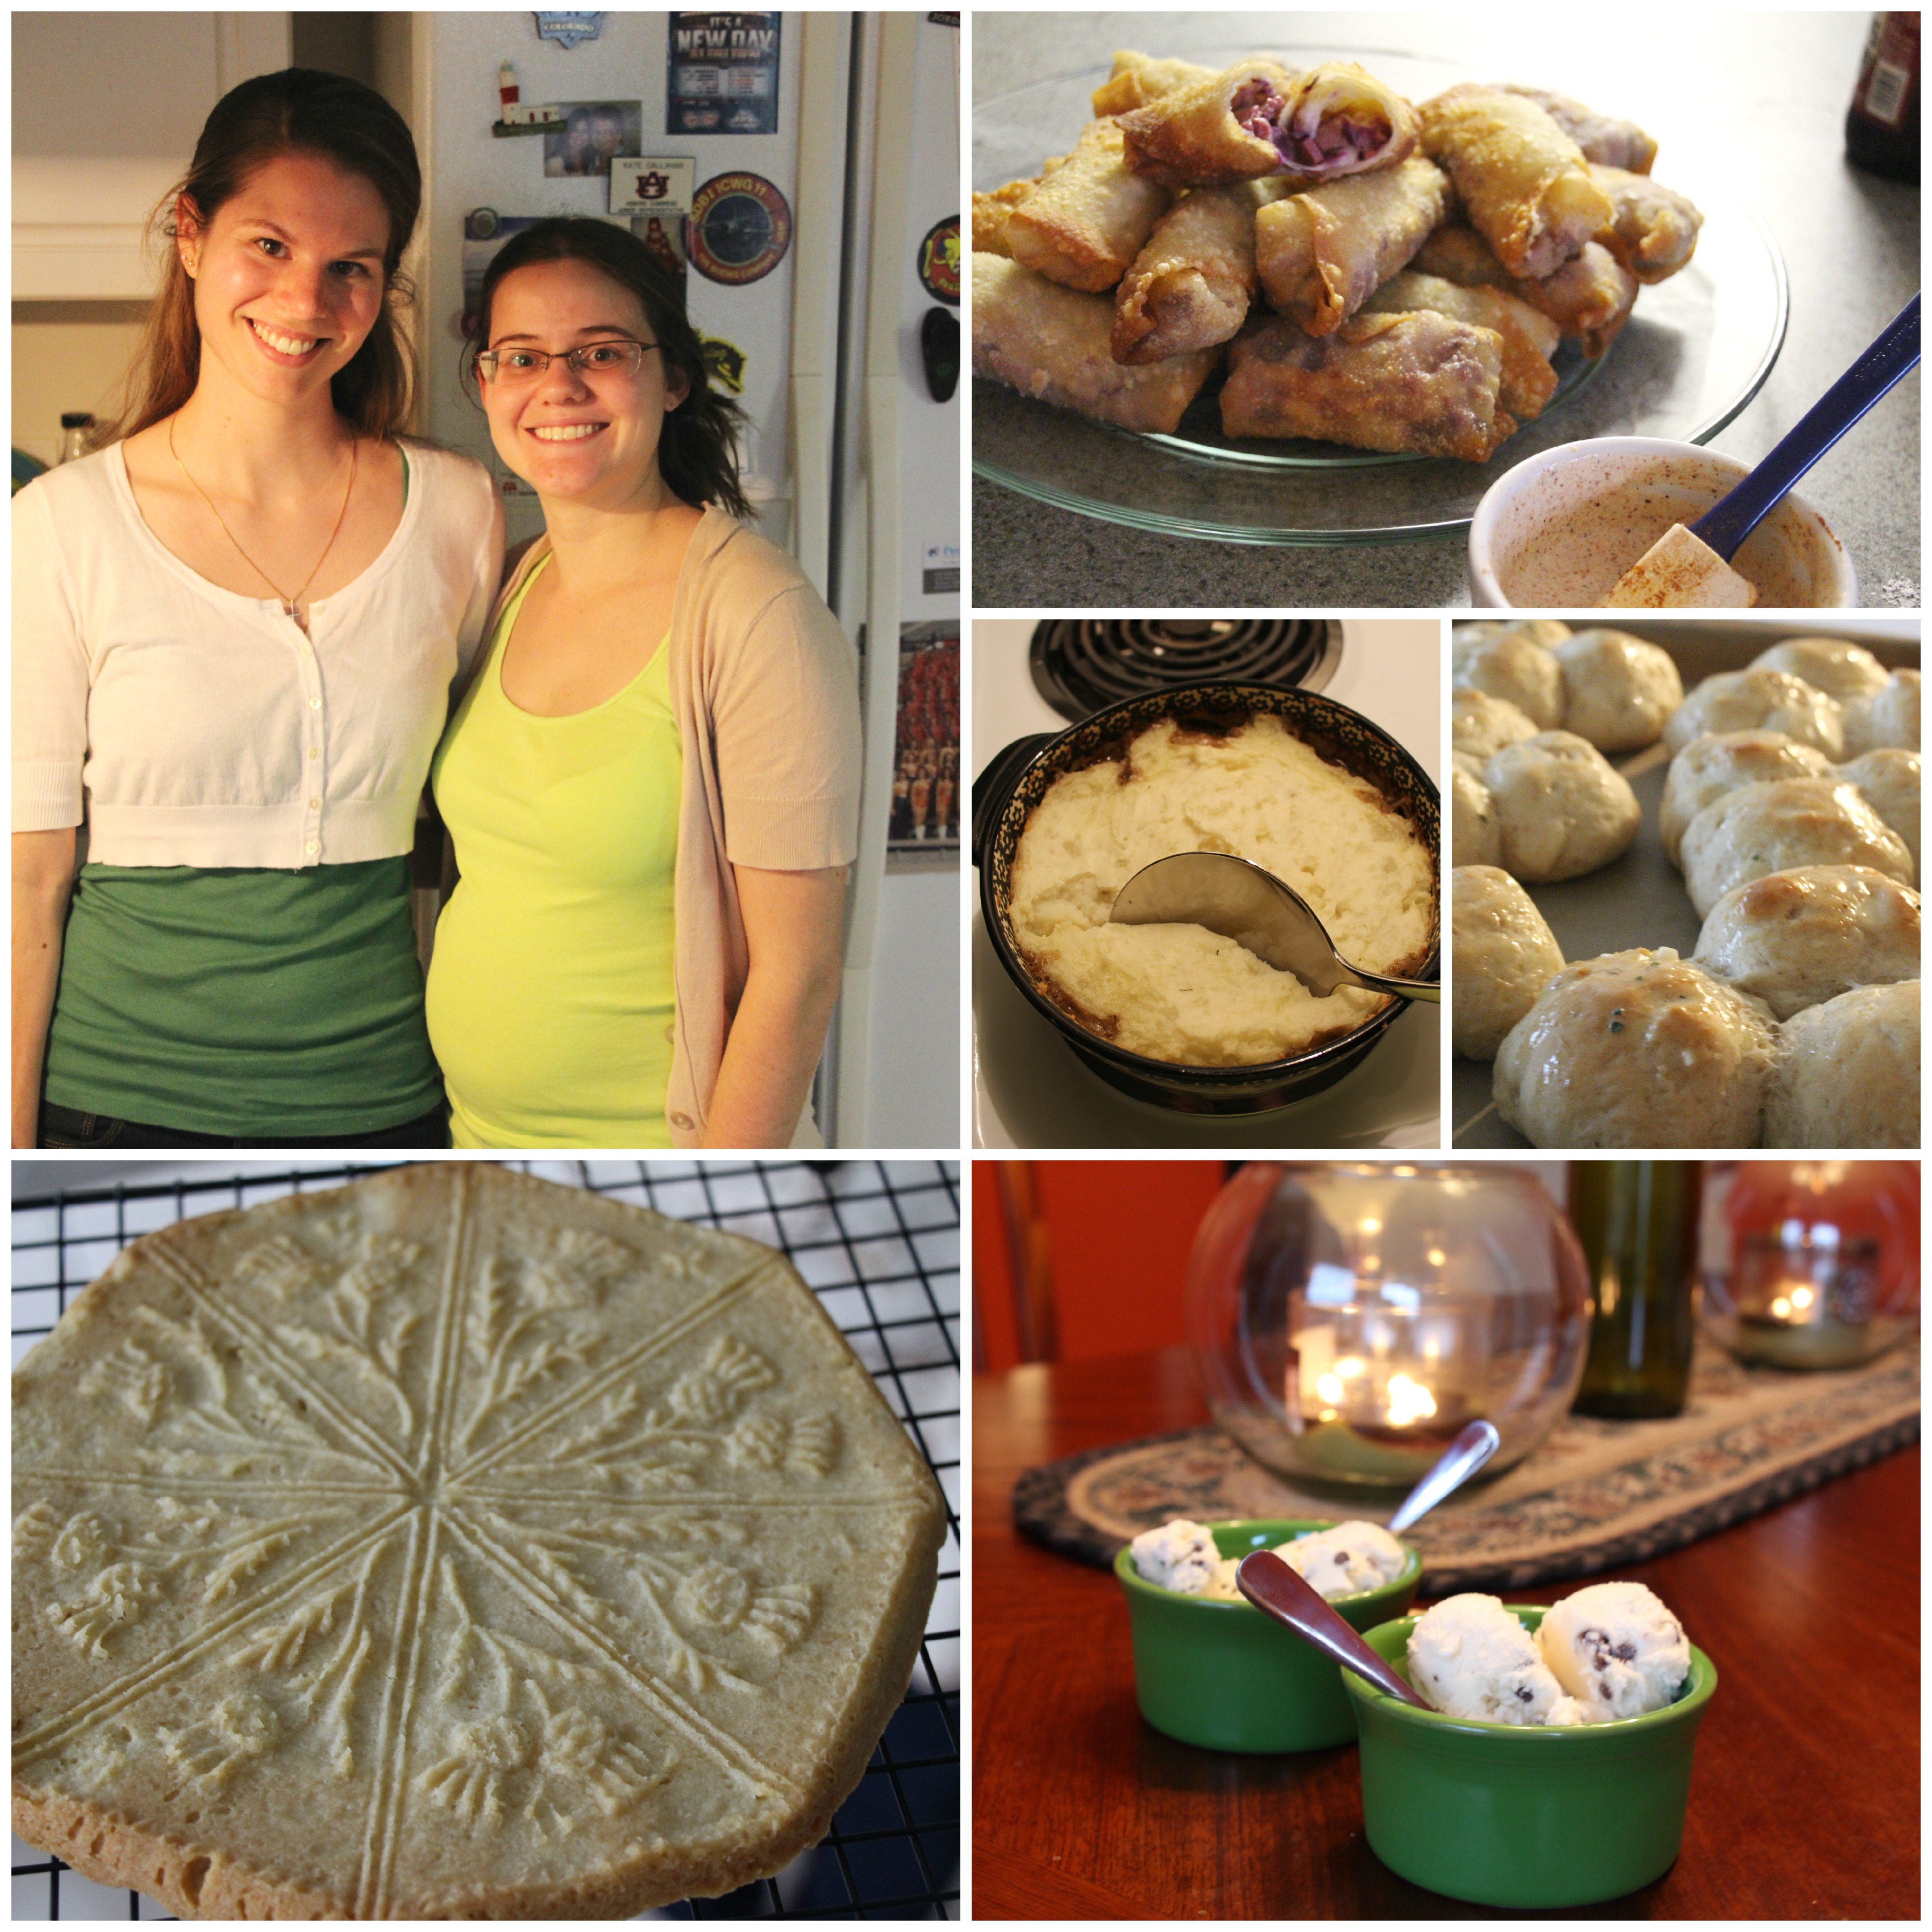
I never really celebrated St. Patrick’s Day until moving to the panhandle and becoming best friends with Kate. St. Patrick’s Day 2011 coincided with Auburn’s Spring Break and we had Kate and her now husband Josh over for a simple dinner and game night – individual meatloaves and mashed potatoes. That event began a four year tradition. In 2012 Kate and Josh were now living here and we went to their apartment for Ruben Egg Rolls, Shepherd’s Pie, and a yogurt parfait with angel food cake and mango. (Lesson learned – do not dye vanilla pudding green, it will mess with your mind and fool your taste buds.) I hosted in 2013 and served an Irish bread braid, individual meatloaves, and colcannon. Kate brought over a beautiful rainbow cake too!

This year marks our fourth, and probably final (as we’re moving this summer), St. Patrick’s Day together. It’s Kate’s turn to host and we’re combining our favorites – the Irish bread braid, Ruben egg rolls, Shepherd’s pie with shamrock rolls, and for dessert maple shortbread cookies and chocolate chip ice cream. It’s a big menu for four people, but we’re going all out this year!

St. Patrick's Day 2014

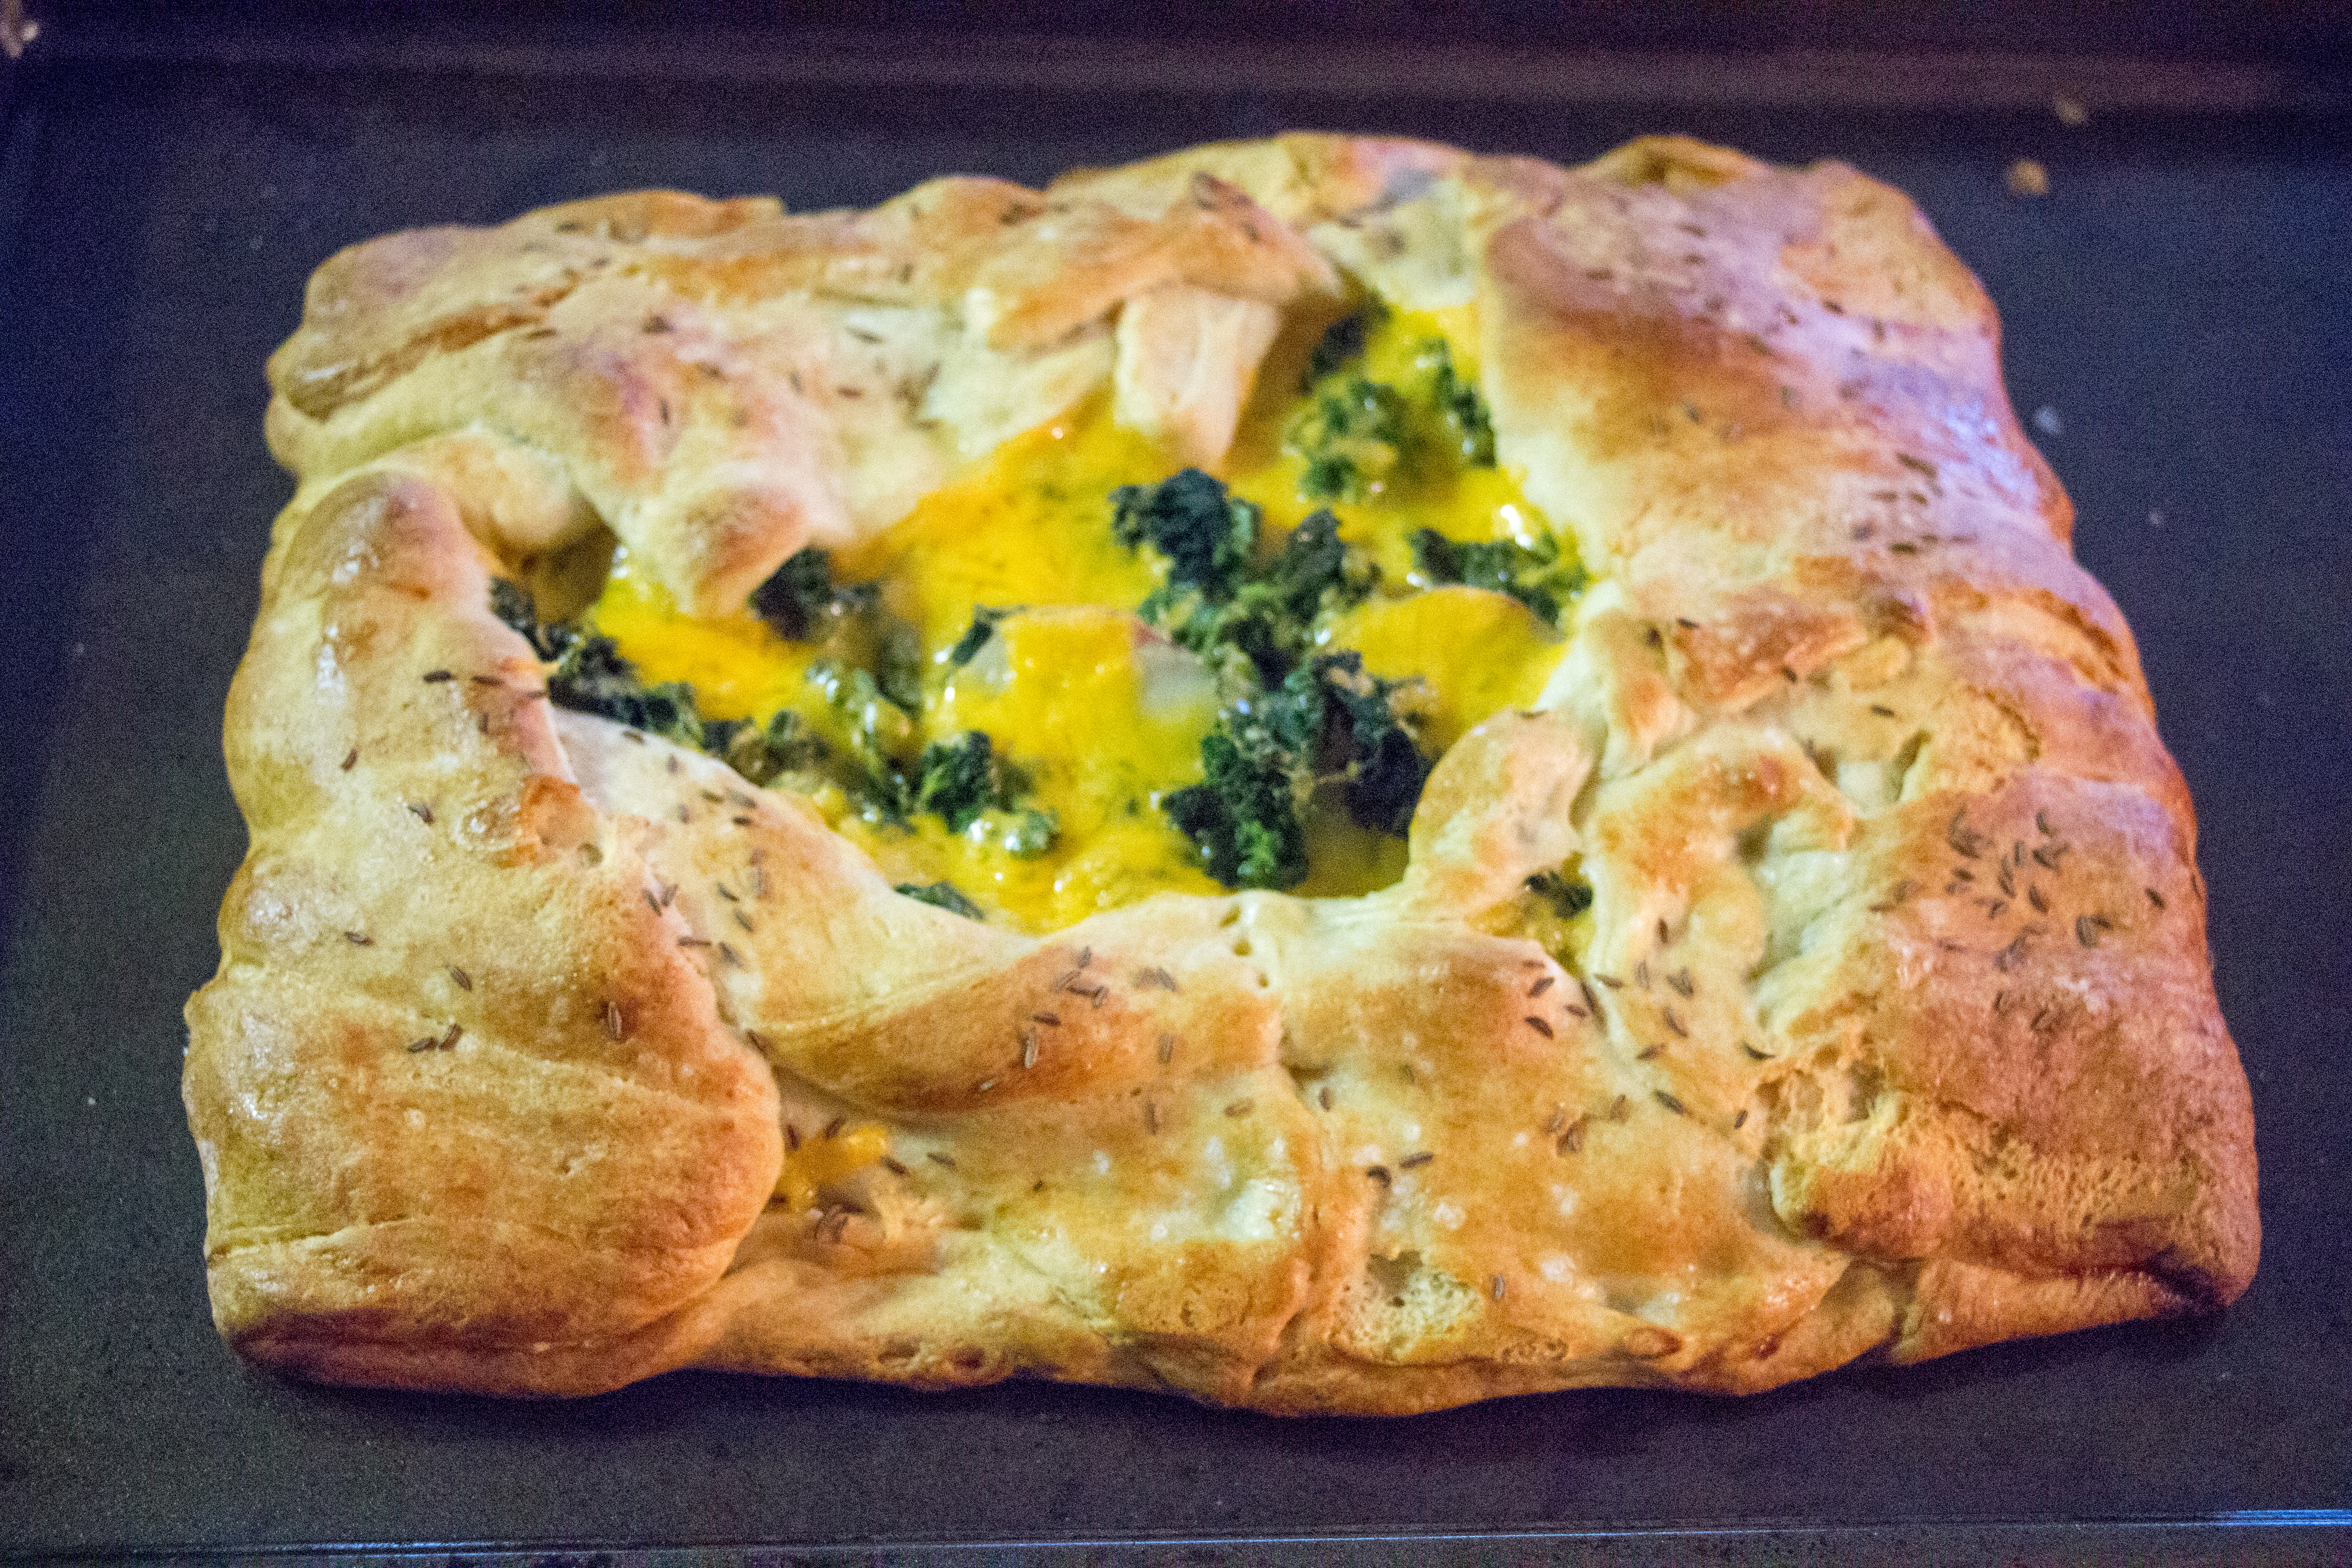
Fortunately, or unfortunately, depending on how you look at it – my crescent rolls were very easily tear-able and no matter how much I pinched and tried to make the dough seamless there was no hope. Instead I made a rustic-looking tart. But the flavors were still beautiful. I don’t know if the dough warmed up too much in the 30 minute drive to Kate’s or if using the name brand product is simply too good at it’s job – Stuart suggested maybe buying a generic brand of crescent dough in the hopes that it’s not as perforated. Here’s the real advice – if your store sells seamless crescent dough, buy it! None of my local stores do.

Last year I made this bread braid (see pre-baked photo in above collage) for St. Patrick’s Day and it was such a hit that Stuart requested it again for Easter. I will probably make it again, and if I’m successful in the braid I’ll post it!

Irish Bread Tart

Irish Bread Braid

Ingredients:

  • 3 red potatoes
  • 3 C chopped kale, stems removed
  • 2 cans seamless crescent roll dough
  • 1/2 lb sliced corned beef
  • 1 C shredded cheddar cheese
  • 1 egg
  • caraway seeds, for sprinkling

Steps:

  1. Boil kale in salted water for 4 minutes. Drain, pat dry, and set aside.
  2. Boil potatoes until tender. Let cool, slice, and set aside.
  3. Preheat oven to 375 degrees F.
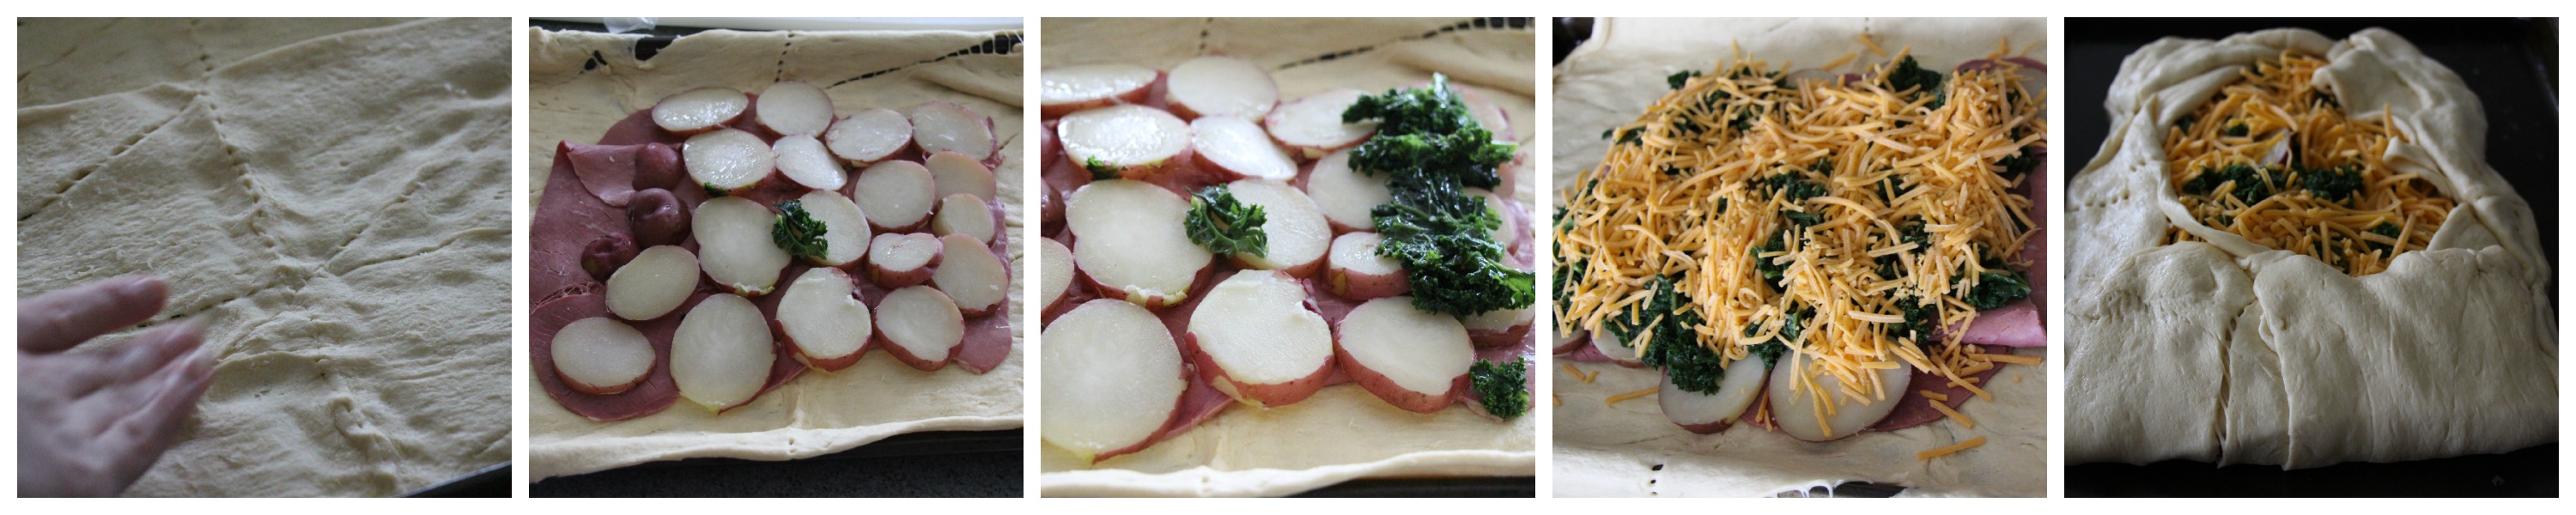
  4. On a greased baking sheet, unroll crescent dough and press side-by-side lengthwise into one larger rectangle. Additionally, press together all perforated seams if not using seamless.
  5. Place corned beef in the center of the rectangle, leaving 3″ on each side. Top with potato slices, kale, and shredded cheese.
  6. Cut dough into the same number of strips on each side of the filling, leaving an inch buffer around the filling. Criss-cross the strips over the filling to create a braid. Fold crescent dough around the filling to create a rustic tart. (See above photos.)
  7. In a small bowl whisk the egg with 1 tbsp water. Brush the bread with egg wash and sprinkle with caraway seeds and kosher salt, if desired.
  8. Bake for 25 minutes. If your bread braid turned into a rustic tart lightly cover with aluminum foil for 20 minutes, remove foil and bake another 5-8 minutes until the crust is golden and cooked through. Allow to cool slightly before slicing.

*This recipe is modified from girlversusdough at http://www.tablespoon.com/recipes/irish-bread-braid/aa8ebb56-1255-4cec-996f-3de32cb5456e*
Irish Bread Tart

Eating the Bible: A Tree of Life

Today’s Bible excerpt comes from probably the most known story in the Old Testament – the story of Adam and Eve. Although popular culture has labeled the forbidden fruit as an apple, the specific fruit is never actually mentioned in the Bible. Rena suggests the other possibilities: grapes, figs, and citron.

“And the woman saw that the tree was good to eat, and it was a desire for the eyes, and that the tree could pleasantly make one wise, and she took of its fruit, and she ate, and she gave to her husband who was with her, and he ate.” Genesis 3:6

The Tree of Life, or the Tree of Knowledge, while always planted in Eden wasn’t ever a temptation for Adam or Eve – until Satan entered the picture. Temptation is one of Lent’s biggest challenges – whether it’s to cheat and have that piece of chocolate or to forget abstinence on Friday’s when it’s most convenient. Lent is to symbolize the 40 days and 40 nights Jesus failed to succumb to the Devil and his temptations. Lent is an ever present reminder that temptation is all around us; a 6 week practice in refusing Satan.

One of my favorite things about Eating the Bibleis that Rena provides alternatives to her recipes to contribute to your individual Bible study. While Rena created a “Garden of Eden Salad” with wheat kernels, mushrooms, raisins, and figs. I took her advice and used a different wheat product to make breakfast.

Cream of Wheat is a great alternative to oatmeal or grits. If it weren’t for Stuart’s wisdom teeth removal in 2010, I wouldn’t have known what Cream of Wheat is. It was his main request while still unable to eat solid foods. Here’s a bonus tip too: A day or two prior to wisdom teeth surgery eat an entire pineapple. The pineapple will help prevent swelling. My mom forced my brother and me to do this, and I to Stuart. It works. However, it also might make you hate pineapple for a while. If you can’t find pineapple, drinking pineapple juice will also work.

When I went to the store yesterday to grab some for today’s breakfast I discovered that it now comes in individual packets, just like instant oatmeal – including flavor options! I chose the box of 8 pack Healthy Grain Cream of Wheat.

Garden of Eden Cream of Wheat

Ingredients:

  • 2 C milk
  • 1/2 C Cream of Wheat, or 2 pkts
  • 2 tbsp brown sugar
  • 1/2 tsp cinnamon
  • 1/2 C chopped apple (I used Braeburn)
  • 1/4 C raisins, or 1 snack-size box

Steps:

  1. Bring milk to a simmer over medium heat, stirring occasionally to prevent scalding.
  2. Whisk in Cream of Wheat, reduce heat to low, and cook for 2 1/2 minutes, whisking occasionally.
  3. Remove from heat and whisk in brown sugar and cinnamon. Add in apples and raisins. (You could add some pecans too if it so moves you!)

Cream of Wheat

Disclaimer: I have not been sponsored by Cream of Wheat. This post contains affiliate links.  

Cheddar Cheese Popcorn

I had so much fun making different flavored popcorns leading up to the Super Bowl, but there was one major flavor that I didn’t make. Cheddar Cheese! I had planned on it, but as I couldn’t find the powdered cheese at any of my local stores I had to order it off Amazon (Kraft Cheese Powder) and because I procrastinated in ordering, I didn’t get it in time. But I knew that an orange colored popcorn could be a great tie in to basketball and March Madness!

march madness

While basketball isn’t my favorite sport, I do get into creating a bracket for the tournament. If you are creating a bracket, Selection Sunday is tomorrow March 16th and the first round begins March 20th. The tournament continues until April 7th when the Championship Game will be played.

Cheddar Cheese Popcorn

Ingredients:

  • canola oil, enough to coat bottom of pot
  • 2/3 C popcorn kernels
  • 6 tbsp butter, melted
  • 2/3 C cheddar cheese powder
  • 1 tsp dry mustard

Steps:

  1. Put canola oil in pot along with 2-3 kernels of popcorn. Cover and stand by. Once you hear the kernels pop, add the popcorn. Cover and cook over medium heat until popping slows. Gently shake the pop during the popping process so as not to burn the popcorn at the bottom. Remove from heat and remain covered until popping has ceased, unless you want to be pelted with popcorn. (If you have another method of popping popcorn, feel free to use it.)
  2. In a small bowl whisk together cheddar cheese powder and mustard.
  3. In a large bowl toss popcorn in butter. Once coated add the cheese mixture, toss to coat evenly.

*This recipe is adapted from Anisa at http://whiskandheels.com/kitchen/cheesiest-cheddar-popcorn*

Cheddar Popcorn 1 Cheddar Popcorn 2 Cheddar Popcorn 3

P.S. – My keyboard may or may not be covered in cheddar cheese dust at the moment…. This is like the CHEETOS® version of Popcorn!

Disclaimer: This post contains affiliate links. 

Lemon Marshmallow Pie

As both a nerd and foodie there’s no day better than a “holiday” that celebrates both – Pi Day! March 14th is Pi Day. Why? Pi is an irrational constant with an infinite number of digits, the value of which is the ratio of a circle’s circumference to its diameter. Rounding to the hundredth’s place, Pi = 3.14. Hence, March 14 (3/14) is Pi Day! (Fun fact, it’s also Albert Einstein’s birthday.)

That being said, pies are not my favorite form of dessert. Well, not the traditional pies. I have a liking issue with warm fruit, so I don’t partake in America’s favorite Apple or Berry.

As I’ve mentioned before, my favorite pie is Key Lime. It’s served chilled and has a perfect balance of tart and sweet. The same can be said for this lemon marshmallow pie. And only three ingredients (four if you count the fresh fruit for garnish) separate you from a bright dessert. A dessert that will make you forget about winter’s extended stay and think you’ve just experienced a perfect spring day. With only five minutes of prep work required there isn’t any excuse to not try this pie. True, you could always make your own pie crust and lemon curd and probably marshmallow creme but I prefer to take the lazy way out. 😉

Lemon Marshmallow Pie

Ingredients:

  • 2 jars (10 oz) lemon curd
  • 1 jar (7 oz) marshmallow creme
  • 1 graham cracker pie crust

Steps:

  1. Using a hand mixer whip lemon curd and marshmallow creme until blended. Pour pie filling into pie crust.
  2. Refrigerate a few hours before serving with fresh berries.

*This recipe is adapted from Deborah at http://www.tasteandtellblog.com/lemon-marshmallow-tart/*

Lemon Marshmallow Pie

Eating the Bible: Mortar and Memories

Tonight’s post comes from Exodus 1:14

And they embittered their lives with hard labor, with mortar and with bricks and with all kinds of labor in the fields, in all of their work they worked with back-breaking labor.

I felt that this passage fits nicely with the journey of Lent. Maybe not in the literal sense, unless your Lenten observance is to volunteer with Habitat for Humanity (hey, that’s a good one!), but in the sense that honoring and serving God and the community does require hard work. Spiritual labor, although probably not physically taxing, can break you down and build you back up.

Rena decided to do a play on “mortar and bricks” by cutting meatloaf into the shape of bricks and stacking them, using a sauce as the mortar. I used my mini loaf pan to create mini meatloaves.

Mini Turkey Meatloaves

Ingredients:

  • 1 tbsp olive oil
  • 1/2 large onion, chopped
  • 1 clove garlic, minced
  • 1 small carrot, chopped
  • 1 lb ground turkey
  • 1/2 C breadcrumbs
  • 1 tbsp ketchup, plus more for topping
  • 1 tsp Worcestershire
  • 1 egg

Steps:

  1. Preheat oven to 350 degrees F.
  2. In a large skillet over medium-high heat saute onions in olive oil for 2 minutes. Season with S+P. Add garlic and stir, 30 seconds. Add carrots and cook another 5 minutes. Set aside.
  3. In a large bowl combine turkey, breadcrumbs, ketchup and egg. Add in the carrots, salt, pepper, and parsley.
  4. Form meatloaf into 7 mini meatloaves and place in greased mini loaf pan or on a greased baking dish. Top each with extra ketchup and bake 35-40 minutes.

*This recipe is modified from Eating the Bible by Rena Rossner*

Mini Turkey Meatloaf

 Disclaimer: This post contains affiliate links. 

Baby Baked Beef Burritos

Where it all began - this photo taken after graduation, 2010
Where it all began – this photo taken after graduation 2010

Stuart and I met working at Moe’s Southwest Grill in Auburn and whenever we go to a Moe’s we’re always silently critiquing the employee’s burrito rolling skill. On a full size burrito (not the baby ones in this recipe) we would always mix the filling ingredients by “shimmying” the tortilla around the filling. Not only does doing this ensure a perfect bite every time, but it also creates a nice shape to roll a mess-free burrito. Because the “shimmying” method isn’t often used, I don’t particularly like burritos. They’re usually too big for me and my bites have either only meat or only toppings. But when I saw this recipe for baked burritos I thought I’d give it a shot. I liked the idea of a crispy burrito. But when I went to make my grocery list I didn’t examine the tortillas I had on hand well enough – they weren’t burrito sized, they were taco sized. And let me tell you, these baby sized burritos were just perfect for me – every bite had everything!

It was a really long day at work and I was very tempted to forego Mexican Monday for something simpler but I am so glad I made these. Every meal the rest of the week failed to compare.

How to roll a Burrito

Baby Baked Beef Burritos

Ingredients:

  • 1 tbsp canola oil
  • 1/2 large onion, diced
  • 1 jalapeno, seeded and diced
  • 2 cloves garlic, minced
  • 1/2 lb ground beef
  • 1 tbsp tomato paste
  • 1 C corn kernels, drained/thawed
  • 1/2 C black beans, drained and rinsed
  • 1/4 C vegetable or beef broth
  • 1/2 tsp cumin
  • 1/2 tsp dried oregano
  • 1 1/4 tsp chili powder
  • 1 tbsp brown sugar
  • 1/2 tsp salt
  • 12 6″ flour tortillas
  • 1 C shredded Mexican blend cheese

Steps:

  1. Preheat oven to 400 degrees F.
  2. In a large skillet over medium-high heat saute onion and jalapeno in canola oil 3 minutes. Add garlic and stir 30 seconds. Add ground beef and cook, breaking up. Once cooked drain excess fat, if needed.
  3. Stir in 1 tbsp tomato paste. Add corn, black beans, and broth. Stir and add cumin, oregano, chili powder, brown sugar, and salt. Simmer until all liquid is absorbed.
  4. Assemble burritos with cheese and beef filling. (See photos above) Place seam side down on a greased baking sheet. Spray burritos with cooking spray and bake 18-20 minutes.
  5. Serve with salsa, queso, sour cream, or guacamole if desired.

*This recipe is modified from http://karmelowy.pl/chrupiace-burrito-z-wolowinacrispy-beef-burritos/*

Baby Baked Beef Burritos

Updated July 2016: I have made these burritos multiple times, often doubling the recipe to bring to a potluck or for serving to my extended family. The last time I made these, a couple of weeks ago, we had some new friends over for dinner. They were in the process of moving to Alabama. Having just completed a cross country move ourselves I knew they’d appreciate a home cooked meal before they hit the road, so we invited them over the night their belongings were being boxed up. We served them with salsa, guacamole, and taco seasoning spiked Greek yogurt. These mini burritos are definitely one of my favorite recipes here on the blog! They’re easy to do with little ones underfoot, too, as I can make the filling ahead of time, roll them at a separate time, and simply bake them before we’re ready to eat. Bonus: my kids have enjoyed them every time – eating only the filling.

Baby Baked Beef Burritos  Sew You Think You Can Cook


recreatedbysrc

Eating the Bible: Gifts of Contrition?

Rena created beautiful chicken packages filled with pistachio and almonds to complement Genesis 43:11.

“And Israel their father said to them: If it be so, then do this: take from the best of the land in your vessels and bring the man a gift: a little balsam, a little honey, some gum and resin, pistachios and almonds.”

The definition of contrition is sorrow for sin arising from fear of damnation.  The gifts given to Joseph from his brother were not gifts fit for a king, but rather a care package from home. The foods native to Israel are considered to be a symbol reminding Joseph of his betrayal; an effort to make him feel guilt.

Contrition is not a concept I agree with. And a God to be fearful of is not one I want to believe in. I can understand that religion and God is often used to impart “right” and “wrong”, especially on children, but I do not believe in using fear as a way to teach morality.

One of my favorite quotes is, “Integrity is doing the right thing, even when no one is watching.” by C.S. Lewis. And that philosophy is how I view God. I don’t make my decisions based on fear of God, I don’t do what I think it right because God would want it to be that way. I’d like to think that God is judging me on who I am, not who I am because of a fear. I think genuine actions are the most important.

Pistachio Almond Chicken Parcels

Ingredients:

  • 3 boneless, skinless chicken breasts
  • 1/2 C ground toasted shelled pistachios
  • 1/2 C ground toasted almonds
  • 1/2 C plain breadcrumbs
  • 1 tsp cinnamon
  • 1/2 tsp nutmeg
  • 1/2 tsp salt
  • 1/2 tsp pepper
  • 1/2 C honey, plus more for drizzling

Steps:

  1. Preheat oven to 350 degrees F.
  2. Cut chicken breasts in half to create 6 thinner breasts.
  3. Combine the remaining ingredients.
  4. Spread 1-2 tbsp of nut mixture on each chicken breast. Roll chicken and place in a greased baking dish. Top with any remaining nut mixture and drizzle with honey. Bake 30-35 minutes.

*This recipe is adapted from Eating the Bible by Rena Rossner*

Image

The nut mixture would be great placed in crescent rolls too!

Disclaimer: This post contains affiliate links. 

Hummus Chicken

My mom came to visit last weekend and while Stuart was off Adventure Racing.

We enjoyed a very girly weekend. We got our nails done, which I never do – I even picked a pink polish color!, we watched chick-flicks and ate popcorn, we went shopping, and she knitted a hat and booties while I worked on another baby quilt.

Oh – and after a trip to Home Depot we changed 7 light bulbs in my house.

Mom and I are perfectly happy with simple snack-style dinners – hummus with pita, popcorn, salad, cheese and crackers, etc. However I did plan to cook at least once while she was in town. I picked out a recipe that I thought she’d not only like but would make back home. Something healthy and simple. And this Hummus Chicken is exactly that. You could even add variation by simply using whatever flavor hummus you like – red pepper, basil, spicy, original! I served the chicken with asparagus. The original recipe suggested serving  roasted squash, but as that would kill me (allergies) I chose to omit the dangerous vegetable.

I didn’t end up making this either Friday night or Saturday while Stuart was gone, and we had plans to go to Sushi on Sunday for dinner so I decided to make the chicken for Sunday’s lunch. And as it was a most beautiful day I knew I’d get to take advantage of some natural light for once! Before plating the food I brought it over to my standard photography site to find that the window panes create shadows that are smaller than my plates. So much for that idea. (Next house – the windows and sunlight will be greatly scrutinized.) But I’ve read up on food photography tips and every blogger and book says to take the food outside. So, I did! And I think it turned out great! (Although we did have to shoo away a bumble bee!) As my schedule doesn’t allow for me to photograph meals outdoors I don’t have a set up or anything, so… my food was put on the sidewalk. But hey, it’s on a plate which is on a placemat. It did greatly amuse me though to be picking food up off the ground to then go inside and enjoy.

Hummus Chicken

Ingredients:

  • 4 chicken breasts
  • 8 tbsp hummus
  • 1/2 lemon
  • 1/2 tsp paprika

Steps:

  1. Preheat oven to 425 degrees F.
  2. Season chicken with S+P. Top each breast with 2 tbsp hummus. Place in a greased casserole dish.
  3. Squeeze chicken with lemon and sprinkle with paprika.
  4. Bake 25 minutes.

This recipe is adapted from Ali at http://www.gimmesomeoven.com/hummus-crusted-chicken/*

Image

Eating the Bible: Eternal Dust

Each year during Lent I try to reconnect with my faith. I am not the most religious girl, and I don’t often enter into conversations regarding religion and in no way offer to convert someone. I have an almost all-encompassing view of God. I was raised Catholic and when I do go to church I attend the local Catholic Church – I like the rhythm of mass. And while I don’t always agree with the Catholic viewpoint, I still get something out of each homily.

I see religion as a human’s way to understand life, as a way to provide a purpose to human existence. I do believe that there is a God – I don’t have an image of God, and I definitely don’t provide Him with a human quality – more of a giant ball of light and energy. I believe that every religion is actually one in the same (not I’m not trying to spark a debate here), and that different cultures and peoples choose to understand and believe in their vision of God differently.

With my blog I have decided to take a different outlook on my Lenten journey this year. It’s been a long time since I’ve given something up (candy, soda, fast food, etc) and instead I look to adding something to my life – usually it’s going to Church each Sunday (as I don’t do that weekly) or reading the New Testament. But with the blog I thought it’d be great to add a food aspect to my journey. I’ve never failed a Lenten promise and I don’t want to set myself up for failure here, so two times a week (Wednesdays and Sundays) I plan to cook a recipe from Rena Rossner’s Eating the Bible.On those days my posts will be in the evening after supper.

Rena took it upon herself to enrich her bible study through food. These recipes are inspired by the Old Testament. And even though Lent is about the 40 days Jesus spent wandering in the desert, renouncing the Devil and Temptation and ends with Holy Week which marks the death, burial, and resurrection of Jesus Christ (Easter!), I can still find Rena’s cookbook to help me slow down and think about God. While she references many stories from the Old Testament, she provides “food for thought” both in recipes and in questions to ask about God.

The first recipe that I’m trying from Eating the Bible is Eternal Dust which was inspired by Genesis 13:16. 

“And I will make your progeny like the dust of the earth: so that if a man could count the dust of the earth, then your progeny could also be counted.”

I feel this recipe applies greatly to Ash Wednesday. During Ash Wednesday mass, ashes are placed on our forehead in the shape of a cross while the words from Genesis 3:19 “Remember that thou art dust, and to dust thou shalt return.” are said.  Ash Wednesday serves as a reminder of earthly mortality and repentance to God.

Rena decided to make a spice rub, or a spice “dust”, as a compliment to this bible study. She titled her spice blend “Earthly Seasoning”.  I used this “Earthly Seasoning” on roasted shrimp and broccoli which I served over rice.

“Earthly Seasoning” is a mix of 1 tbsp paprika, 1 tbsp salt, 1 tbsp dry mustard, 1/2 tsp chili powder, 1 tbsp cumin, 2 tsp black pepper, 1 tbsp garlic powder, 1/2 tsp cayenne, and 1 tbsp sugar.

Earthly Seasoned Shrimp and Broccoli

Ingredients:

  • 3/4 lb peeled and deveined shrimp
  • 3/4 lb broccoli florets
  • 3 tbsp olive oil, divided use
  • 2 1/2 tsp “Earthly Seasoning” (recipe above), divided use

Steps:

  1. Preheat oven to 425 degrees F.
  2. Toss broccoli in 2 tbsp of olive oil and place on a baking sheet. Season with 1 1/2 tsp “Earthly Seasoning”. Roast for 10 minutes.
  3. Gently toss shrimp in remaining olive oil and seasoning. After broccoli has been roasting for 10 minutes flip broccoli and add the shrimp to the baking sheet. Cook another 8-10 minutes, turning half-way.
  4. Serve over rice with a squeeze of lemon.

*This recipe is modified from Adam at http://www.amateurgourmet.com/2009/02/roasted_shrimp.html*

Roasted Shrimp & Broccoli

Disclaimer: This post contains affiliate links. 

Mardi Gras Ice Cream

As a food blogger I feel obligated to present a dish on Fat Tuesday. I’ve never really celebrated Mardi Gras in all it’s glory and never had a King’s Cake until a few weeks ago when a coworker brought one into the office. As luck would have it I found the plastic baby – which means I’m responsible for bringing in next year’s cake. Unfortunately for them we’ll have moved to Ohio by then. So I thought I’d bake a treat and bring it in this year. And of course blog about it – two birds, one stone.

I was hoping to find something simple and these King’s Cake Bars caught my eye. Unfortunately my execution of said bars was abysmal. I think I over mixed the dough for the base and I managed to forget both the vanilla and cinnamon in the cream cheese filling. I used a smaller casserole dish than recommended so my baking time was considerably longer (2x as long!) and came out domed which caused the glaze to run down to the sides of the casserole dish. But, it did flatten out once it cooled. And even though I sprayed the pan and the dough is almost half butter it would not come up.

After the frustration subsided, I thought it’d be fun to make an ice cream. The cream cheese filling reminded me of cheese cake (cream cheese, egg, sugar) so I decided to try a cheese cake ice cream base with cinnamon. I garnished the ice cream with purple, green, and yellow sprinkles to play up the holiday. (I was too nervous to stir sprinkles into the ice cream machine for fear of resulting in streaky brown coloring.)

I have to admit, I was worried I messed up this recipe too. I used too small of a pot and didn’t temper the eggs enough so my custard had a few lumps. But, I decided to strain it and keep going. I’m glad I did because this ice cream is so delicious – it’s rich and creamy with great flavor from the cinnamon.

Cinnamon Cheese Cake Ice Cream

Ingredients:

  • 2 C half-and-half
  • 1/2 C heavy whipping cream
  • 1 C milk
  • 1 1/4 C sugar
  • 2 eggs
  • 8 oz cream cheese, at room temperature and cubed
  • 1 tsp vanilla extract
  • 1 tsp ground cinnamon

Steps:

  1. Heat the half-and-half, cream, and milk in a large saucepan over medium heat until it reaches 175 degrees F, but do not let boil. Whisk in sugar until dissolved.
  2. In a small bowl whisk eggs. Take about 1/4 C of the hot milk mixture and whisk into eggs to temper them. Constantly whisking, add eggs to milk. Cook over low heat, whisking, until the mixture thickens and reaches 160 degrees F.
  3. Pour custard through a fine strainer (I opted to line mine with a coffee filter, but I don’t think it was necessary) into a glass bowl. Whisk in the cream cheese until melted and smooth.
  4. Place the bowl of custard in a bowl of ice water to cool and stir for two minutes. (Don’t let the water into the custard.) Stir in vanilla and cinnamon. Remove from ice bath, cover, and place in fridge overnight.
  5. Follow ice cream maker instructions and freeze.

This recipe is modified from Taste of Home.

Mardi Gras Ice Cream Mardi Gras Ice Cream 2