BBQ-Pineapple Pulled Pork

Thanks to the invention of the slow cooker there couldn’t be any easier dinner than pulled pork.

It’s great for a crowd and fool proof. And all you need are two essential ingredients – pork and barbecue sauce. From there you can add even more flavor with a dry rub if you so desire. And sometimes it’s fun to add an extra ingredient or two.

In this instance, the addition of pineapple juice into the barbecue sauce! My mom actually made this and pureed some fresh pineapple in place of the juice. Dad said that he could actually taste the pineapple. When we made it using juice I couldn’t pick out the pineapple, but I’m sure it added to the sweetness.

Another wonderful thing about pulled pork, is that it makes for fabulous leftovers whether you simply reheat and place on a bun for more sandwiches or re-purpose it in a quesadilla like I did. Other great ideas include stuffed baked potatoes or pizzas!

BBQ-Pineapple Pulled Pork

Ingredients:

  • 1/4 C brown sugar
  • 1 tsp chili powder
  • 1 tsp paprika
  • 1 tsp salt
  • 1/4 tsp pepper
  • 1 2 1/2 lb pork loin
  • 1 clove garlic, minced
  • 1/2 C pineapple juice or pineapple puree
  • 1 C barbecue sauce
  • hamburger buns

Steps:

  1. In a small bowl combine brown sugar, chili powder, paprika, S+P. Rub over pork.
  2. Place pork in a lightly greased slow cooker.
  3. In a small bowl combine garlic, pineapple, and barbecue sauce. Pour over pork.
  4. Cook on LOW for 6-8 hours. (If you’re home, flip pork loin halfway through cooking time)
  5. Shred pork and serve atop hamburger buns.

*This recipe is adapted from Danelle at http://www.letsdishrecipes.com/2013/08/slow-cooker-pineapple-barbecue-pulled-pork-sandwiches.html*

BBQ-Pineapple Pulled Pork

#BundtBakers: Breakfast

BundtBakers

I had fun with this month’s #bundtbaker’s recipe. #BundtBakers is a group of bundt loving bakers who get together once a month to bake bundts with a common ingredient or theme. We take turns hosting each month and choosing the theme or ingredient. This month’s theme is breakfast and our lovely host is Kelly from Passion Kneaded.

Even though our post comes the week after Mother’s Day, I used Mother’s Day brunch as my inspiration. I thought it would be fun to do a take on the classic brunch cocktail – the mimosa. I may have been a little liberal with the assignment as I wouldn’t actually eat this cake at breakfast.

IMG_8767
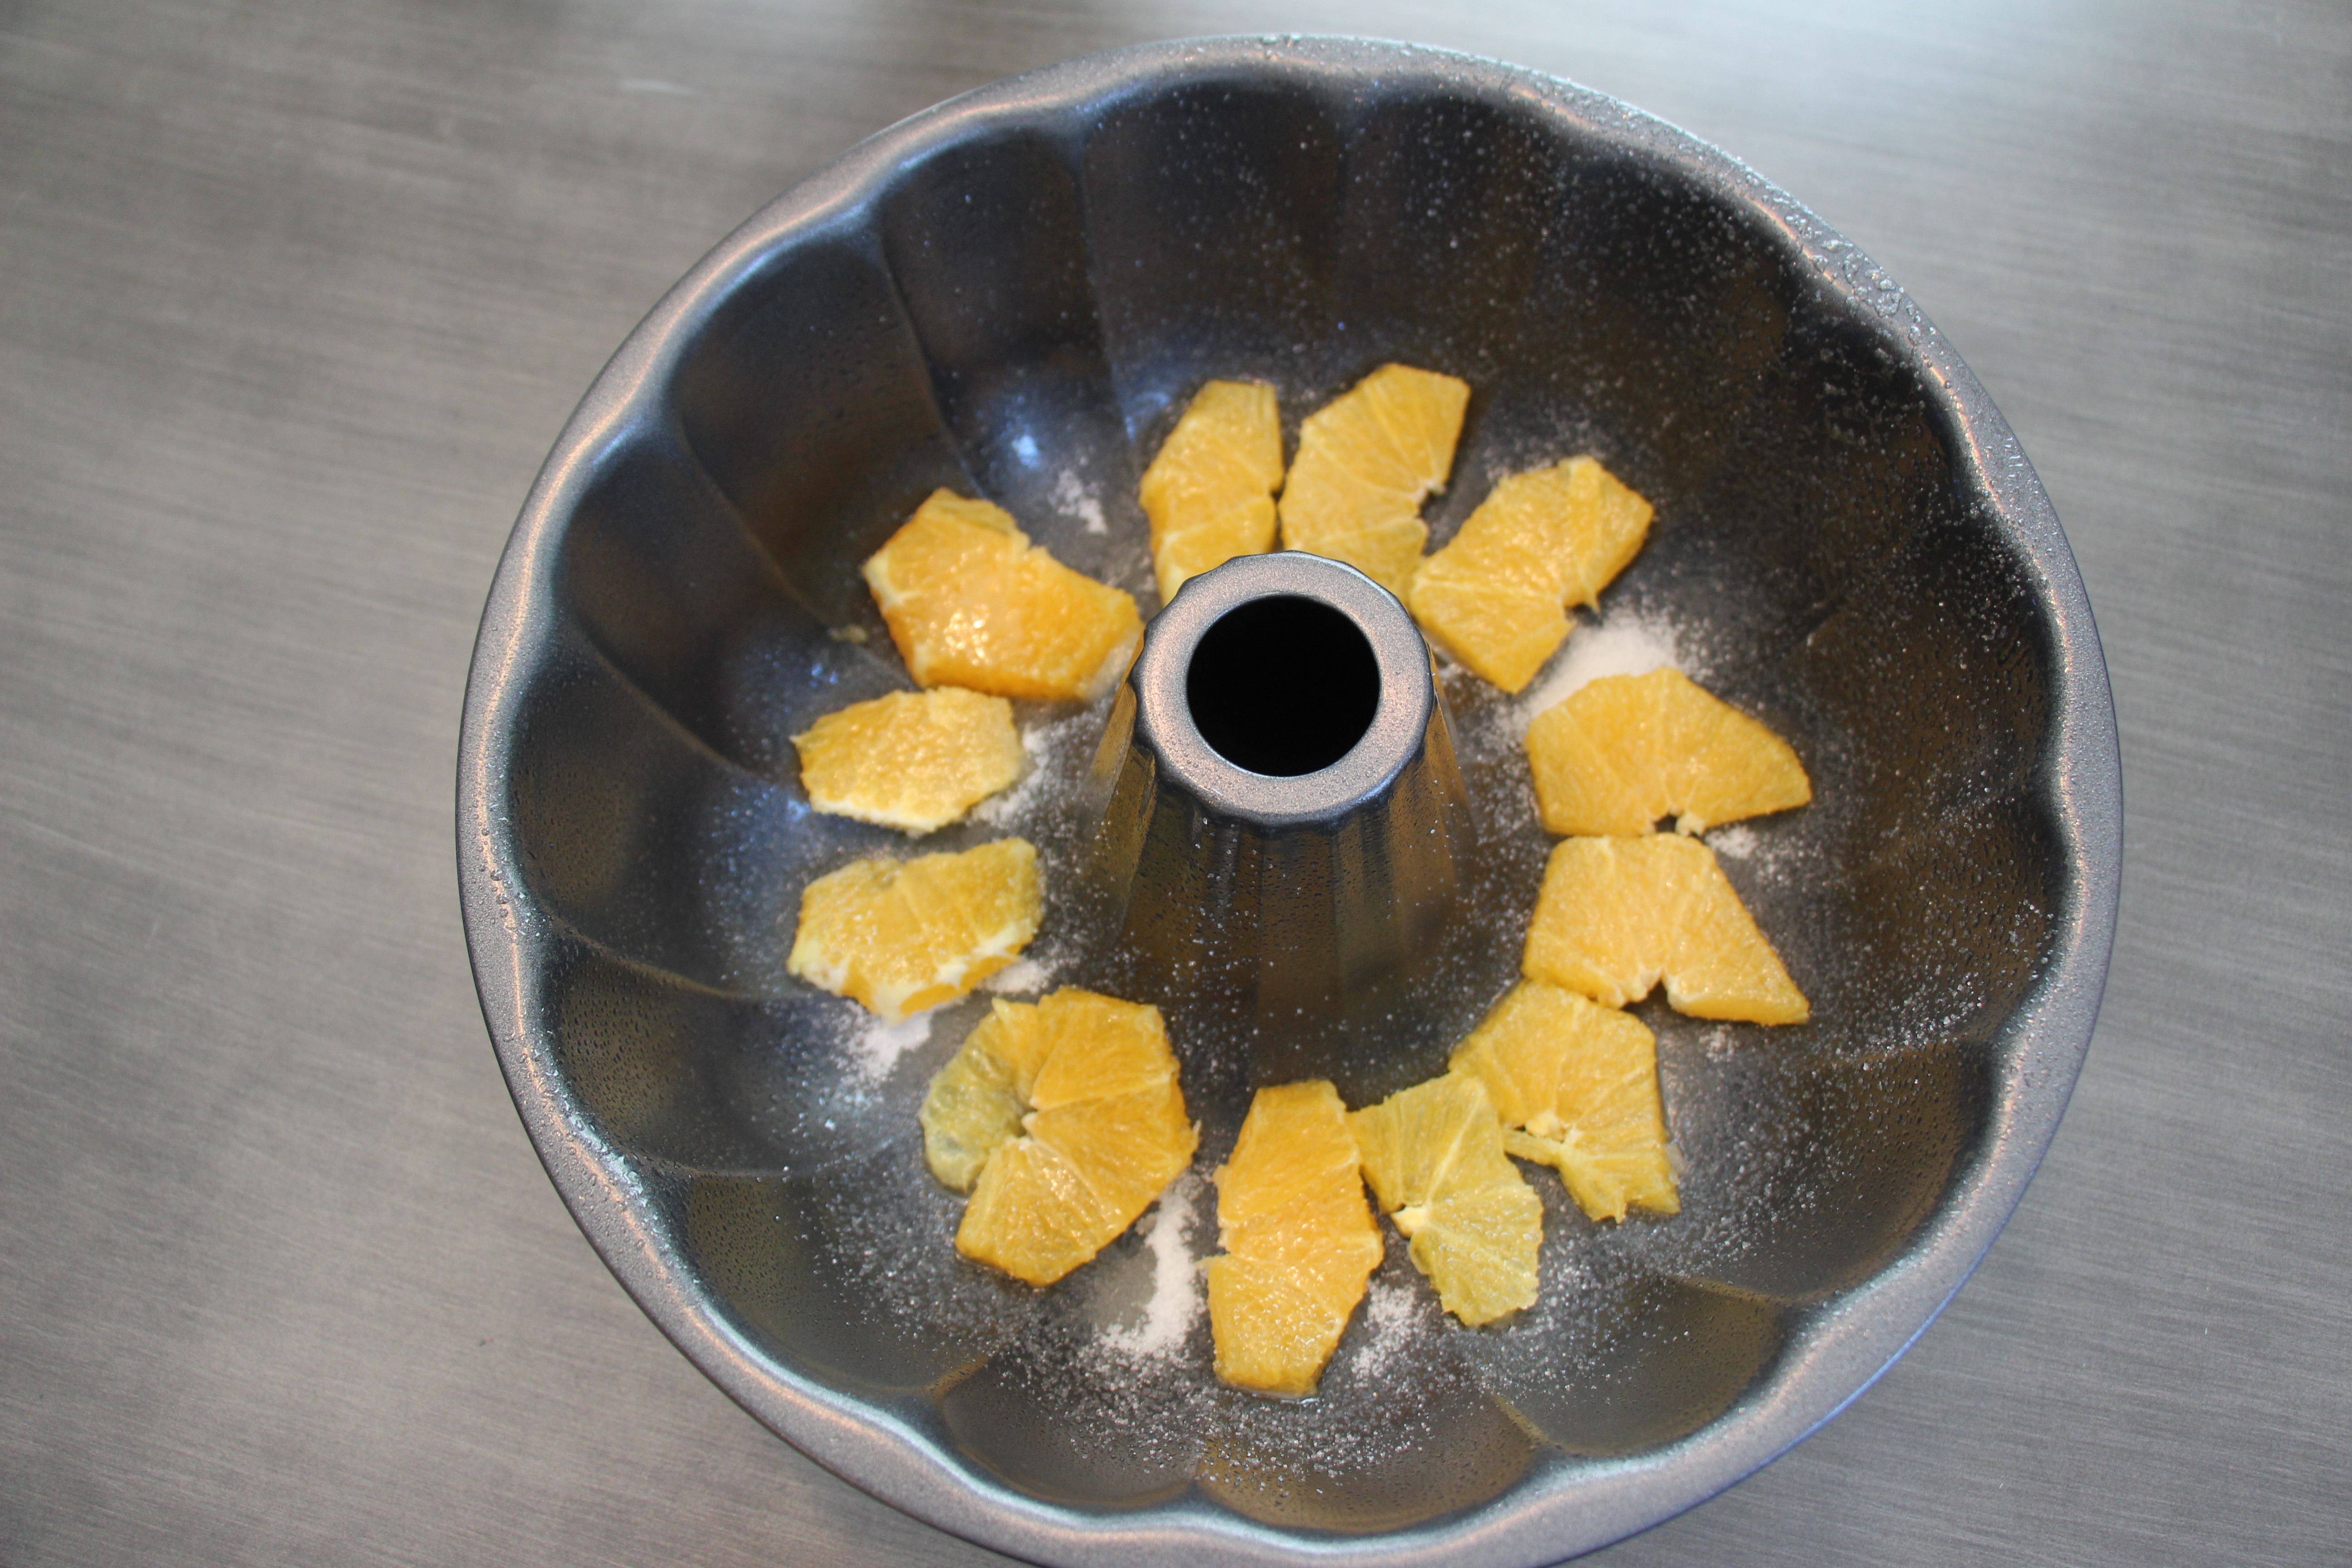
My plan was to do an orange upside down cake with champagne cake batter and an orange glaze. I had visions in my head of how beautiful my cake would be when I pulled it out of the pan. Turns out a bundt pan isn’t the best vessel for an upside down orange cake – the cake batter puddled underneath the orange slices so I didn’t have the beautiful caramelized oranges on top. And even more curious, the oranges floated to the top of the batter – aka the bottom of the bundt. But hey, I tried!

Mimosa Bundt Cake

Ingredients:

  • 1 orange, peeled and sliced in half moons
  • 2 C + 1 tbsp sugar, divided
  • 1 1/2 sticks unsalted butter, at room temperature
  • 6 egg whites, at room temperature
  • 1 tsp vanilla extract
  • 3 C cake flour
  • 1 1/2 tsp baking powder
  • 3/4 tsp baking soda
  • 3/4 tsp salt
  • 2 C champagne, at room temperature
  • 3 tbsp orange juice
  • 1/2 C powdered sugar

Steps:

  1. Preheat oven to 350 degrees F. Grease bundt pan.
  2. Layer half of the tbsp sugar in bottom of bundt pan, place orange slices on top of sugar, and top with remaining tbsp sugar.
  3. In a large bowl, sift the cake flour, baking powder, baking soda, and salt.
  4. In a stand mixer, cream together remaining 2 C sugar with butter.
  5. Slowly incorporate the egg whites into the creamed butter. Add the vanilla.
  6. Alternate adding the dry ingredients and the champagne, ending with the dry ingredients.
  7. Pour batter over orange slices and bake 40-50 minutes, or until a knife come out clean. Let cool ten minutes before removing from bundt pan.
  8. Make the glaze: whisk together the orange juice and powdered sugar. Add more powdered sugar if needed to reach desired consistency.

*This cake recipe is adapted from Joanne at http://joanne-eatswellwithothers.com/2013/01/recipe-pink-champagne-cake.html*

Stuart took the cake to work and returned home with an empty tray!

Mimosa Bundt Cake

If you are a food blogger and would like to join us, just send an email with your blog URL to foodlustpeoplelove@gmail.com. All recipes and photographs can be found on our individual blogs, on our Pinterest board, and the #bundtbakers homepage.

And don’t forget to take a peek at what other talented bakers have baked this month:

Banana Breakfast Bundt Cake by Varada at Varada’s Kitchen

Blackberry Chocolate Coffee Cake by Lauren at From Gate to Plate

Breakfast Bundt by Jane at Jane’s Adventures in Dinner

Callaloo & Saltfish Mini Bundt by Kelly at Passion Kneaded

Cheesy Bacon Sausage Brioche Bundt by Tara at Noshing With The Nolands

Cheesy Breakfast Sausage Bundt by Stacy at Food Lust People Love

Feta Cheese and Sundried Tomato Breakfast Bundt by Maria at Box of Stolen Socks

French Toast Bundt Cake with Maple-Bacon Glaze by Felice at All That’s Left Are The Crumbs

Granola Cake by Renee at Magnolia Days

Individual Breakfast Banana & Ginger Oatmeal Nutella Glazed Bundt Cakes by Laura at Baking in Pyjamas

Maple Bacon Bundt Cake with Bacon Pecan Streusel Swirl by Tux at Brooklyn Homemaker

Orange Blueberry Bundt Cake by Kathya at Basic N Delicious

Sausage and Potato Bundt by Margaret at Tea and Scones

Whole Grain Mini Blueberry Breakfast Bundts by Laura at The Spiced Life

Perfect Corn on the Cob Every Time

I am so excited that corn is back in season (at least in FL). I think it’s my favorite thing about summer produce.

And I have the perfect way to cook it. I honestly don’t do it any other way. It keeps the corn in all it’s natural glory.

And my favorite way to eat it is simply with salt and butter.

Perfect Corn on the Cob

Ingredients:

  • corn on the cob, husks still on

Steps:

  1. Preheat oven to 400 degrees F.
  2. Place corn, with the husks on directly on the oven rack. Alternatively, you can remove the husks and silks and wrap the corn in aluminum foil.
  3. Bake for 35 minutes.
  4. When cool enough to touch, fold back the husks and remove the silks. I prefer to leave the husks attached to the corn as it provides for an natural handle!

Image

Raspberry Coffee Cake

Last month I made a Nutella Coffee Cake using Food Network Magazine’s Mix & Match recipe. I had mentioned that I was questioning my Nutella decision in lieu of raspberries so this month I went with raspberry!

I followed the same recipe, actually using sour cream this time, and put lemon zest and oats in the topping.

I didn’t notice a difference in the finished cake using sour cream vs yogurt, but the cake batter was much thicker with the sour cream. And the 8×8″ baking dish was actually perfect for it. I started out using a 9×9″ pan but the thick batter didn’t as easily spread so I relocated it to 8×8″. This cake didn’t puff as much as the yogurt version either.

I did halve the topping recipe, and that provided with the perfect amount!

The combination of raspberries and lemon is a great way to say hello to spring. And would be great for a Mother’s Day brunch!

With up to 21 possibilities, I might just make a coffee cake each month. It provides us with a 4 days’ worth of breakfast, and it always makes for a fun change from cereal in the morning.

Raspberry Coffee Cake

Ingredients for topping:

  • 3/8 C flour
  • 1/3 C brown sugar
  • 1/2 tsp cinnamon
  • pinch of salt
  • 2 1/2 tbsp butter, at room temperature
  • zest of 1 lemon
  • 1/4 C rolled oats

Ingredients for cake:

  • 2 C flour
  • 1 tsp baking powder
  • 1/2 tsp baking soda
  • 1/2 tsp salt
  • 1 stick butter, at room temperature
  • 1 C sugar
  • 2 eggs
  • 2 tsp vanilla
  • 1 C sour cream
  • 1 C thawed frozen raspberries

Steps:

  1. Make the topping: whisk together the flour, sugar, cinnamon, and salt. Using your fingers, break the butter into small pieces and combine with the topping. After combined add the lemon zest and oats. Set aside.
  2. Preheat oven to 350 degrees F. Line an 8×8″ square cake pan with foil and grease.
  3. Make the cake: In a large bowl whisk together flour, baking powder, baking soda, and salt.
  4. In a the bowl of a stand mixer beat butter and sugar until fluffy. Add eggs one at a time. Add in the vanilla.
  5. Incorporate a third of the dry ingredients into the wet ingredients. Once combined add 1/2 C of sour cream. Add another third of the dry ingredients. Once combined add the last 1/2 C of sour cream. Add in the final third of the dry ingredients.
  6. Assemble the cake: Place half of the cake batter in the prepared cake pan. Evenly distribute the raspberries and top with remaining batter. Top the cake with the topping from step 1.
  7. Bake for 65 minutes, or until a knife comes out cleanly.
  8. Allow cake to cool for 5 minutes and remove the cake from the pan by the foil. Serve your cake with  a cup of coffee!

Raspberry Coffee Cake

Strawberry Pork Roast

I had planned to make this beautiful pork roulade for Easter supper, but it just never happened. After getting back to the house from church it was almost 1pm and I knew there wasn’t any wiggle room in making my SRC pizza! So by 3:30 we were full and without any company we were content to have waffles for dinner around 8.

The only pork loin Publix had left was a 5lb bone-in so the thought of having to debone this beast wasn’t exactly calling my name either. But I did pull out the meat cleaver (first time I’ve used that monster!), halved it, and placed one half in the freezer for another day and the other in the fridge to figure out something more simple to do with during the week.

While perusing recipes I decided on this Marmalade Pork Loin, but I didn’t have orange marmalade or rosemary (that reminds me to add it to my grocery list!). I followed Linda’s cooking method and used strawberry jam and parsley. The result was a perfect spring dish – might I even suggest it for Mother’s Day? I served it with mashed potatoes and fresh corn on the cob.

Strawberry Pork Roast

Ingredients:

  • 2.5 lb pork roast
  • 1 tsp parsley
  • 2 tbsp vegetable oil
  • 1/2 C strawberry jam
  • 1 cinnamon stick
  • 1 tbsp corn starch

Steps:

  1. Rub pork with salt, pepper, and parsley.
  2. In a dutch oven, heat vegetable oil over medium-high heat. Sear pork for 2-3 minutes on all sides.
  3. Add 1 C water to the pot with the strawberry jam. Bring to a boil, add the cinnamon stick. Lower the heat to medium low and simmer for 55 minutes.
  4. Turn pork over and cook another 45-50 minutes, or until pork is cooked through.
  5. Remove pork from dutch oven and wrap in foil. Discard cinnamon stick.
  6. Whisk together cornstarch with 2 tbsp water. Pour into the dutch oven to create a gravy. Bring to a boil and allow to cook until you’re desired thickness is reached.

*This recipe is modified from Linda at http://www.rotinrice.com/2013/08/marmalade-pork-loin/*

Strawberry Pork Roast


Blender Salsa

For Cinco de Mayo, which conveniently falls on a Monday, I wanted to do something traditional. If you’re a returning reader to Sew You Think You Can Cook you know that almost every Monday I feature a Mexican-inspired recipe for Mexican Mondays. How authentic my recipes are is very debatable, and I don’t pretend that they are. Most of what I make spins from the American version of Mexican cuisine. But for Cinco de Mayo I thought I’d pay tribute to the holiday.

Cinco de Mayo is not Mexican Independence Day like most Americans believe. (Fun fact: Mexico’s Independence Day is September 16th) Cinco de Mayo is not a national Mexican holiday or even celebrated throughout the country. Oddly enough, the largest Cinco de Mayo celebration occurs in Los Angeles!

Cinco de Mayo commemorates the Battle of Puebla when the Mexican army defeated the French in 1862. Puebla is considered the melting pot of Mexico – Spanish, French, and the Oriental flavors were given to native Aztec and Mayan foods. While Puebla is known for it’s Mole Poblano I planned to prepare Chiles en Nogada (stuffed chiles in a walnut cream sauce), even it it’s not typically served until the fall when walnuts and pomegranates are in season.

Note I said planned to prepare?

Life got in the way. Weekends were spent out of town and Stuart was on travel (I wasn’t about to spend so much time and effort on a dish just for me). So my Plan B was to create a sweet traditionally found in Puebla – Jamoncillo Pinion.  The [translated] recipe looked simple enough. And then I was placed on bed rest. My mom generously offered to give it a shot. Somewhere along the way we failed at candy making. Whether something was lost in the translation or we were simply too impatient I’m not sure. But the candy never set – even after putting it in the freezer overnight. (Before I get in trouble, I am in no way blaming her! I’d be posting the same story if I were the one standing at the stove.)

So now what? I can’t NOT have a post on Cinco de Mayo!

With Cinco de Mayo being widely popular in the states and salsa being the number one condiment in America, why not a simple salsa?

Spicy Blender Salsa

Ingredients:

  • 1 can (14 oz) diced tomatoes
  • 1 can (10 oz) diced tomatoes and green chiles
  • 1/4 yellow onion, chopped
  • 1 clove garlic, smashed and peeled
  • 1 small jalapeno, ribs and seeds removed
  • 3/4 tsp salt
  • 1/4 tsp cumin
  • 2 tsp honey
  • 1/4 C fresh cilantro
  • juice of 1 lime

Steps:

  1. Place all ingredients in a blender and pulse until combined. Taste and adjust any seasonings if needed.

*This recipe is adapted from Kelley at http://www.mountainmamacooks.com/2012/01/quick-and-easy-blender-salsa/*

Spicy Blender Salsa

Stuart has now put a ban on all grocery store salsas and demands this be made every time instead.

Cinco de Mayo Recipe Round Up

With it still being my blog’s first year I’ve never been able to do a Recipe Round Up for a holiday before. But thanks to my Mexican Mondays I have plenty of suggestions for your Cinco de Mayo celebration!

Cinco de Mayo

Featured above:

  1. Mexican Stuffed Shells
  2. Honey Lime Chicken Enchiladas
  3. Three Bean Nachos
  4. Baby Baked Beef Burritos
  5. Chorizo Carbonara
  6. Protein Packed Southwestern Salad
  7. Slow Cooker Chicken Tacos
  8. Corn Pepper Salsa Chicken Quesadilla

Other favorites:

  1. Turkey Enchilada Meatloaf
  2. Chorizo Mac and Cheese
  3. Chipotle Chicken Tortilla Salad
  4. Spicy Taco Cheese Soup

And my most popular Mexican Monday recipe: Healthy Chicken Tacos

Healthy Tacos

Grilled PB&J

Last week I was home sick from work. Which was great because I slept until 10:45 and then got to catch up on some of my favorite Food Network shows while curled on the couch drinking orange juice and water. But the biggest problem with being home during the day is what to do for lunch.

I have a confession to make.

I hate making lunch. I don’t know why. Sandwiches are always easy to put together, but I just hate doing it! Pulling out so many ingredients to simply place between bread for a not-so-spectacular sandwich just doesn’t seem worth it! When it comes to packing lunches for work, it’s usually leftovers or PB&J. And always a serving a fruit or vegetable.

My usual go to at home lunch is a grilled cheese sandwich. But I just wasn’t feeling it. So I decided to try grilling a peanut butter and jelly sandwich.

One question: Why haven’t I done this before?!

The crispiness of the bread and the ooey-gooey warmth of the peanut butter make for a completely different sandwich. This sandwich is almost bordering on breakfast – it reminded me of a stuffed french toast.

And the possibilities are endless – use Nutella, any flavor jam or jelly you like, marshmallow cream, fresh fruit…

Grilled PB&J

Ingredients:

  • 2 slices of sandwich bread
  • butter or margarine, for spreading
  • peanut butter, for spreading
  • jam or jelly, for spreading

Steps:

  1. Heat a small skillet over low to medium heat.
  2. Butter one side of each slice of bread. Spread peanut butter on the opposite side of one slice and jam on the other. Sandwich together so that both buttered sides are facing out.
  3. Place sandwich butter side down in warm skillet. Cook over medium heat until bottom piece of bread is golden.
  4. Flip sandwich to toast the 2nd side until the bread is golden and the filling warm.
  5. Slice on a diagonal and serve.

Grilled PB&J

SRC: Candied Tomato Pizza

newsrcbanner

Today is another Secret Recipe Club Reveal Day! In the secret recipe club, each participating blogger is assigned a blog from another participating blogger and secretly searches their site for something to recreate. The accompanying blog post then goes live on reveal day! So while I was immersed in my assigned blog, someone else was picking through mine! I’m so excited to be part of this group, to see what on my blog peaks other’s interests and to stumble upon new blogs and new recipes.

This month I was assigned Jaime’s blog Mom’s Test Kitchen. I know it sounds silly, but my favorite thing about her blog is her tagline “What the Fork’s for Dinner.” Her About Me section is very well written and makes me laugh in all the right places. Particularly the part about the unexpected arrival of Princess P. Being pregnant, it’s fun to feel connected to Jaime as she shares her loving frustrations with pregnancy. (But sorry, Jaime, I actually LOVE being pregnant! But it probably helps that I still have yet to be touched by complete strangers – 9 weeks to go!) After becoming a stay-at-home-mom, Jaime started her blog as a way to keep organized and reawaken her adult self. Since then her “corner of the blog world” has boomed into the very impressive blog that she currently runs; Jaime participates in multiple Link Parties and features guest posts!

Pregnancy cravings have had me wanting to run to the nearest Dunkin (thankfully that’s 20 miles away and the efficiency-lover in me prevails) so I am very impressed that I didn’t recreate her Cinnamon Sugar Donut Muffins for this blog post (there’s still a good possibility I’ll end up making them). Due to Lent no-meat Fridays I was drawn to this Easy Vegetable Pot Pie, but it turned out that I don’t think I ever ended up cooking on Fridays – strange. But then a recent post on April 3rd sealed the deal: Candied Tomato Margherita Pizza.

I made this pizza after church on Easter Sunday (so her Empty Tomb Buns were a big contender too; but I’ll save them for when my future child is old enough to understand). Because I made this on Easter Sunday, a day when grocery stores were closed, my shopping fail in forgetting to buy fresh basil couldn’t be remedied. So naturally, I substituted bacon.

I used my pizza dough recipe and made 3 personal pizzas for Stuart and me to share. (The fourth ball of dough is now living in my freezer for another day.) The first I topped with the candied tomatoes and some crispy bacon. But it really was needed that something. That something was the basil I didn’t have. At least one of us had a head on our shoulders and Stuart suggested using the dried basil out of the spice cabinet. Perfect! Being the meat eater that he his, Stuart enjoyed the bonus bacon but I don’t feel it really added anything to the pizza so one of our 3 pizzas didn’t have any on it.

If you’ve never candied tomatoes – I hadn’t before this – I urge you to make some now. Put them on this pizza, put them in a sandwich, or eat them plain, I don’t care. But I do insist that you add tomatoes and brown sugar to your grocery list.

IMG_8523 IMG_8526

Candied Tomato Pizza

Ingredients:

  • 4 firm roma tomatoes, thickly sliced
  • 1/2 – 1 C brown sugar
  • 3 strips bacon, chopped (optional)
  • 1 pizza crust, store bought or homemade
  • 3-4 tbsp olive oil
  • Kosher salt
  • 1 – 2 C shredded mozzarella cheese
  • basil, dried or fresh
  • cornmeal

Steps:

  1. Preheat oven to 350 degrees F. Line a baking sheet with parchment paper.
  2. Starting with 1/2 C of brown sugar, coat both sides of the tomatoes with sugar. Use more sugar if needed. Place tomatoes in a single layer on the baking sheet.
  3. Bake for 30 minutes. Flip the tomatoes and bake another 15 minutes.
  4. Place pizza stone in the oven and preheat to 450 degrees F (or follow instructions for your particular dough).
  5. Roll pizza dough out and place on pizza peal (or rimless cookie sheet) that has been sprinkled with cornmeal. Brush entire crust with olive oil, sprinkle with salt, top with cheese, basil, candied tomatoes, and bacon.
  6. Bake for 9 minutes (or follow instructions for your particular dough).

*This recipe is adapted from Jaime at http://momstestkitchen.com/2014/04/candied-margherita-pizza.html*

Candied Tomato Pizza

To see the other bloggers who participated in the Secret Recipe Club this month click here:

Pork Chops with Onion Gravy

I have one more tried and true recipe from April’s edition of Food Network Magazine for this month.

It comes from their “Weeknight Meals” section.

In fact, it looked so good and so easy that I actually made it the same week I received my magazine in the mail!

They suggested serving it with grits, but I went with the more classic mashed potatoes. So I know that my nutrition facts are different from theirs, which indicated this meal is only 483 calories with 45 grams of protein and 18 grams of fat. (To achieve their numbers serve the pork chops and onion gravy with 3/4 C quick-cooking grits and 1/2 C shredded cheddar cheese.)

I am not a huge fan of gravy, and only ever “indulge” in it on Thanksgiving, but I have to admit this onion gravy was spot on. I do love onions so I’m sure that had something to do with the happy dance my taste buds were doing.

Pork Chops with Onion Gravy

Ingredients:

  • 4 3/4″ thick pork chops
  • 2 tsp vegetable oil
  • 2 red onions, thinly sliced
  • 1 tbsp flour
  • 1 C chicken broth
  • 1 bay leaf
  • 1 1/2 tsp balsamic vinegar
  • fresh parsley, for garnish

Steps:

  1. Season pork chops with S+P. In a large skillet over medium-high heat, brown both sides of pork chops in vegetable oil, 3 minutes per side. Remove from the pan and set aside.
  2. Add onions to the skillet and cook, stirring, for 3 minutes. Reduce heat to medium and stir in the flour, cook another 2 minutes. Add the broth and bay leaf until thickened. Add the vinegar.
  3. Return pork chops to the pan and cook until the pork is cooked through.
  4. Serve pork smothered in the onion gravy and garnished with fresh parsley.

IMG_8133-2