BBQ-Ranch Pork Pizza

Do you remember that Carolina BBQ Pulled Pork we enjoyed during the not-so-enjoyable Super Bowl? (It’s okay, Cam, I still heart you.) And do you remember how I said we had a LOT of pork? Seriously, we ate pork for a full week. As much as I love pork, we needed a good break from it after that.

One of the leftover ideas I had was to make pizza. Seriously, this pizza might be my favorite pizza I’ve made at home. I used a store bought crust to make life a little easier but made my own sauce using the Carolina BBQ as a base. It was fun!

An Original Recipe

BBQ-Ranch Pork Pizza

 Ingredients:

  • 3/8 C Carolina BBQ sauce
  • 1/8 C buttermilk ranch dressing
  • 1 tbsp tomato paste
  • 1 tsp molasses
  • 1 (11 oz) refrigerated pizza crust
  • 1 C Carolina pulled pork
  • 8 oz shredded mozzarella cheese
  • 1 tbsp diced red onion
  • 1 tsp fresh parsley (I used Gourmet Garden lightly dried herbs)
  • 1 scallion, green parts only

Steps:

  1. Preheat oven to 425 degrees F. Place pizza dough on a baking sheet.
  2. Make sauce: In a small bowl whisk together BBQ sauce, ranch, tomato paste, and molasses.
  3. Spread sauce on pizza dough, leaving a 1″ crust. Top with cheese, pork, onion, and parsley.
  4. Bake 10 minutes. Allow pizza to cool 5 minutes. Garnish with chopped scallions.

BBQ-Ranch Pork Pizza  Sew You Think You Can Cook

Homemade Enchilada Sauce

Did you know that it is incredibly easy to make your own enchilada sauce? The process is quite simple and will be completed in under 15 minutes.

It’s actually cheaper, too! A 19 oz can of enchilada sauce will cost you around $2.50. A 15 oz can of tomato sauce will cost you between $1 and $2 depending on your brand preference. If you have a well stocked spice cabinet, you’re looking at less than $2 for approximately 2 C of enchilada sauce.

Another big benefit? No ingredients you can’t pronounce and you can adjust the spiciness to your perfect palate!

I haven’t purchased a single can of enchilada sauce since discovering this recipe! If I’m making enchiladas I can make the sauce quickly during the day and have it ready to go when it’s time to assemble the enchiladas. It can even be made a few days in advance, too. Or, if you’re proficient at canning, go ahead and make a big batch! Bonus points if you grow your own tomatoes to make your own tomato sauce. (You won’t find my black thumb winning those bonus points any time soon.)

Homemade Enchilada Sauce

Ingredients:

  • 1 tsp olive oil
  • 1/2 minced onion (any variety will do)
  • 1 1/2 tbsp chili powder, or to taste
  • 1/2 tbsp cumin
  • 1/2 tsp garlic powder
  • 1/4 tsp salt
  • 1 can (15 oz) tomato sauce
  • 1/2 C water

Steps:

  1. Heat olive oil in a small pot over medium-high heat. Saute the onions until tender, about 3 minutes. Add the spices and stir to coat. Add in the tomato sauce and water. Bring to a gentle boil, reduce the heat, and simmer 5 minutes, or until desired consistency is reached.

*This recipe is adapted from Kristine at http://kristineskitchenblog.com/homemade-enchilada-sauce/*

Homemade Enchilada Sauce  Sew You Think You Can Cook

The enchiladas pictured above include mashed sweet potato, pulled pork, and shredded cheese.

Greek Salad

Do you experience a big gravitational pull towards salads that happens every January?

Eating salads as a main meal isn’t something we do as often as we probably should. And when we do it comes in waves. Maybe we’ll make it a whole month having a salad night once a week and then all of a sudden you’d be hard pressed to find lettuce in the fridge.

This Greek Salad is one that we made in the beginning of the year. There were a good deal of moving parts but it still came together quickly and easily. While homemade pita chips are baking in the oven, the rest of the dish can come together. And don’t forget to let your meat rest before slicing it, allowing you the perfect amount of time to pull together the dressing.

Greek Salad (assembly)  Sew You Think You Can Cook

To use up the leftovers, I stuffed everything inside a pita pocket as a perfect lunch.

Greek Salad

Ingredients:

  • 1 1/2 lb sirloin steak
  • 3 tbsp olive oil, plus more for brushing pita
  • 4 pitas
  • red pepper flakes
  • dried oregano
  • 1 C Greek yogurt
  • 1/2 C crumbled Feta cheese
  • 1/2 tsp minced garlic
  • 1/2 tsp cumin
  • juice of 2 lemons, divided use
  • 2 hearts of romaine, chopped
  • 6 plum tomatoes, chopped
  • 1/2 cucumber, chopped
  • 1 small red onion, diced
  • 1 bell pepper, chopped
  • 1 C loosely packed fresh parsley

Steps:

  1. Preheat oven to 400 degrees F.
  2. Rub 1 tbsp olive oil over the steak and season both sides with S+P. Grill 3-4 minutes on each side, or until desired temperature is reached. Allow meat to rest 10 minutes. Thinly slice.
  3. Tear pitas and place on a baking sheet, brush with a little olive oil and sprinkle with salt, oregano, and pepper flakes. Bake 10-12 minutes, or until crispy but not burnt.
  4. Put the yogurt, Feta, garlic, cumin, and juice of 1 lemon in a food processor. Process until smooth and a pour-able consistency is reached. Add a little water if needed.
  5. In a large bowl, toss the lettuce with the juice of 1 lemon and the remaining 2 tbsp olive oil. Season to taste with S+P.
  6. Assemble the salad: Top lettuce with pita, veggies, dressing and parsley, and meat.

*This recipe is adapted from Rachael Ray’s Look + Cook*

Greek Salad  Sew You Think You Can Cook

Blender Waffles

By happy coincidence I am sharing another waffle recipe on a Wednesday!

I have a friend who started doing Waffle Wednesdays with her kids in 2016 and I love seeing her posts on Facebook. It’s such a fun idea and I really think I might “steal” it and start doing the same thing once we get settled in California.

Waffles are always a hit in our house and I just love how versatile they are! And the batter usually lasts us two days which makes mornings that much easier.

I’ve had this recipe for blender waffles saved on my Pinterest account for a very long time, but I never have cottage cheese. Confession time: I’ve never actually tried cottage cheese. Still haven’t! I bought some to try it in a smoothie and it worked really well as an alternative to Greek yogurt, but I wouldn’t be able to tell you what cottage cheese itself really tastes like. And I used it in these waffles. A great way to “hide” some bonus protein!

Blender Waffles

Ingredients:

  • 1 C cottage cheese
  • 2/3 C whole wheat flour
  • 1/3 C milk
  • 1/3 C canola oil
  • 4 eggs
  • 1/2 tsp cinnamon
  • 1/2 tsp vanilla extract
  • 1/4 tsp salt

Steps:

  1. Put all ingredients in a blender and process until combined. Scrape the sides of the blender, if needed.
  2. Pour batter into a hot waffle iron and cook until golden.

*This recipe is adapted from Becca at http://www.itsyummi.com/whole-wheat-blender-waffles-recipe/*

blender waffles  sew you think you can cook

SRC: Cappuccino Crinkle Cookies

newsrcbanner

It’s Secret Recipe Club Reveal Day! In the Secret Recipe Club, each participating blogger is assigned a blog from another participating blogger and secretly searches their site for something to recreate. The accompanying blog post then goes live on reveal day! So while I was immersed in my assigned blog, someone else was picking through mine! I’m so excited to be part of this group, to see what on my blog peaks other’s interests and to stumble upon new blogs and new recipes.

This month I was assigned the blog Cook with Sara. To say I enjoyed this blog written by a fellow Midwesterner is an understatement. My secret Pinterest board has over 20 recipes on it, from Cherry Bread and Pineapple Sorbet to Creamy Brussels Sprouts Dip and Beef and Asparagus Stir Fry. I couldn’t decide if I wanted breakfast, dinner, a snack, or dessert. Everything looked so good! Not to mention Sara cooks with every day ingredients, making my decision process that much more difficult.

And that’s before I even got through her entire recipe index! While I was perusing Sara’s blog I received a request for cookies. My husband will be graduating with his Masters Degree in Systems Engineering this week! The spouse organization wanted to provide cookies to all of the professors who helped support our husbands. Of course I signed up to help out! But what to bake? I have two separate cookie cookbooks but it seemed like a much better idea to see what Sara had cooking in the blogosphere. I was on the hunt to try and empty out my carton of cocoa powder before the move next week. These Cappuccino Crinkle Cookies were just the ticket! I just had to wait for naptime to bake them and photograph them because there’s no way my toddler needs a chocolate cookie filled with caffeine! But do you know who does need cookies studded with caffeine? Parents and teachers!

This recipe makes approximately 30 cookies.

Cappuccino Crinkle Cookies

Ingredients:

  • 1/3 C butter, at room temperature
  • 1 C brown sugar
  • 2/3 C cocoa powder
  • 1 tbsp espresso powder
  • 1 tsp baking soda
  • 1 tsp cinnamon
  • 2 egg whites
  • 1/3 C buttermilk
  • 1 1/2 C flour
  • 1/4 – 1/2 C sugar, for rolling

Steps:

  1. In the bowl of  a stand mixer fitted with the paddle attachment, bet the butter until smooth. Mix in the brown sugar, cocoa powder, espresso, baking soda, and cinnamon. Beat until combined.
  2. Add in the egg whites and buttermilk until fully incorporated. Add in the flour until the dough comes together.
  3. Wrap the dough in plastic wrap and chill in the fridge for at least 30 minutes.
  4. Preheat oven to 350 degrees F.
  5. Place sugar in a bowl. Drop heaping teaspoons of cookie dough into the sugar. Roll the dough into balls and then roll the balls in the sugar again. Place on an ungreased cookie sheet and bake 8-11 minutes until the edges are firm and the cookies have crackled. Transfer cookies to a cooling rack.

*This recipe is adapted from Sara at http://cookwithsara.blogspot.com/2012/06/cappuccino-crinkles.html*

cappuccino crinkle cookies for Secret Recipe Club from Sew You Think You Can Cook

To see the other bloggers who participated in the Secret Recipe Club this month click here:

Triple Berry Spinach Smoothie

We have been in a “picky eating” stage of toddler-hood for a few months now and it’s been a little less than frustrating on a daily basis. Baby food jars and pouches seemed to be the only way to get him to eat his vegetables and I’m happy to report that version of feeding is definitely on its way out. (Though squeeze applesauces are still a great snack.) The only downfall of not spending oodles of money on baby food is that I can’t figure out how to give Firecracker his veggies!

One of my best friends met this battle, too, when her son was this age and their solution was smoothies. It took a little more time, but then a miracle happened and smoothies definitely were the answer. He gets a great hit of protein from Greek yogurt and milk as well as a generous handful or two of spinach or kale. I’m definitely open to trying more veggie-fied smoothie recipes, maybe some with carrot? (Speaking of, I’m about to make a batch of muffins with carrots in them after naptime! You’ll see them in next month’s #MuffinMonday assuming they’re a success.) If you have any great healthy smoothie recipes to share, leave me a comment below!

Triple Berry Spinach Smoothie (toddler)  Sew You Think You Can Cook

I’m not an expert in smoothie making and always struggle to get the perfect consistency, but making 2-3 smoothies a week has definitely improved my game! I decided to write down my proportions and this smoothie was a hit enough to create a post from it!

I used an individual serving size container of blueberry Greek yogurt that Firecracker tricked me into wanting to eat. Added frozen fruit, spinach,  and finished it with some milk. You’d never know there was spinach in it and with no added sugar it’s definitely a healthy smoothie.

This recipe makes 1 serving.

An Original Recipe

Triple Berry Spinach Smoothie

Ingredients:

  • 1 container (5.3 oz) blueberry Greek yogurt
  • 4 frozen whole strawberries
  • 20 frozen raspberries
  • 1/2 C baby spinach
  • 1/2 C milk

Steps:

  1. Put all ingredients in a blender. Blend until smooth. Add 1-2 tbsp more milk if needed.

Triple Berry Spinach Smoothie  Sew You Think You Can Cook

#BundtBakers: Tropical Vacation

4ae7b-bundtbakerspostIt’s that time of month for me to share a bundt cake with you alongside #BundtBakers. #BundtBakers is a group of bundt loving bakers who get together once a month to bake bundts with a common ingredient or theme. We take turns hosting each month and choosing the theme or ingredient. This month Christiane of Taking on Magazines is hosting and selected the theme of Tropical Vacation.

What a perfect theme for this time of year! I think we can all use a little slice of sunshine right about now. Spring is almost here but Winter doesn’t want to quite let go just yet. Maybe with a cake inspired by the tropics we can force the cold out for good!

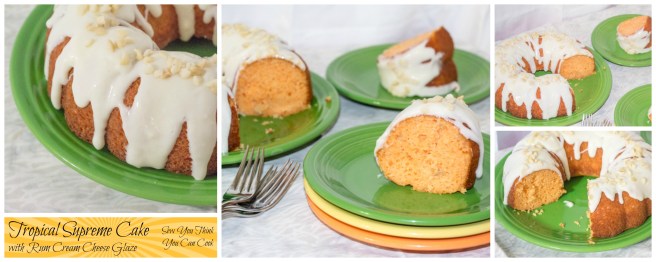
We will be moving in under two weeks and I have been in a “use all the food” frenzy! I had an Orange Supreme Cake Mix in the pantry that my mother-in-law gave me. She wanted me to make a bundt cake from her friend’s daughter’s blog, Southern Plate, which called for that particular cake flavor. (Apparently, it’s not a flavor carried in all stores.) I looked at the recipe for Christy’s Grandmama’s Orange Supreme Cake and headed to the store to check out the nectar varieties available to me. There weren’t any that I could consume so I scratched the idea. Instead, I decided to turn that boxed cake mix into a tropical inspired bundt cake! I replaced the water called for in the recipe with pineapple juice and added some macadamia nuts. (To really go all out with the tropical theme I bet you could use melted coconut oil instead of the vegetable/canola oil!) But because this theme was Tropical Vacation and not just Tropical I felt a pull towards alcohol so I created a rum glaze, using rum extract so it’s still family friendly. I’m definitely happy with the resulting creation, and if you close your eyes you can almost forget you’re not sitting on the beach drinking a cocktail.

An Original Recipe

Tropical Supreme Cake with Rum Cream Cheese Glaze

Ingredients:

  • 1 box (16.5 oz) Orange Supreme Cake Mix
  • 3 eggs
  • 1 C pineapple juice
  • 1/3 C canola (or vegetable) oil
  • 1/4 C chopped macadamia nuts (plus more for garnish)
  • 1 C powdered sugar
  • 4 oz cream cheese, at room temperature
  • 2 tbsp milk
  • 1/4 tsp rum extract

Steps:

  1. Preheat oven to 325 degrees F. Grease a bundt pan.
  2. In a large bowl, combine the cake mix, eggs, juice, and oil. Beat using a hand mixer until batter is smooth. Fold in the nuts.
  3. Pour batter into prepared bundt pan. Bake 35 minutes, or until a knife inserted comes out cleanly.
  4. Allow cake to cool in the pan at least an hour before unmolding. Transfer to a cooling rack to cool completely.
  5. Make the glaze: In a large bowl, beat the cream cheese, powdered sugar, milk, and extract using a hand mixer until smooth. Pour glaze over the cake. Garnish with extra macadamia nuts.

Tropical Supreme Cake with Rum Cream Cheese Glaze for #BundtBakers from Sew You Think You Can Cook

You can see all our of lovely Bundts by following our Pinterest board. Updated links for all of our past events and more information about #BundtBakers, can be found on our home page.

And don’t forget to take a peek at what other talented bakers have baked this month:

Banana Coconut Pineapple Bundt by Food Lust People Love

Banana Pineapple Mini Bundt Cakes by I Love Bundt Cakes

Banana Rum Cake by Jane’s Adventures in Dinner

Bounty Bundt Cake by Baking in Pyjamas

Bundt Cake Tropical by La mejor manera de hacer …

Chocolate Coconut Tres Leche Bundt Cake by The Whisking Bowl

Drømmekage (Danish Dream Cake) Bundt Cake by Brooklyn Homemaker

Golden Tropical Coconut Bundt Cake by Faith, Hope, Love & Luck Survive Despite a Whiskered Accomplice

Key Lime Bundt Cake by Taking On Magazines

Lava Flow Bundt Cake by All That’s Left Are The Crumbs

Lime-Coconut Bundt Cake by Palatable Pastime

Piña Colada Rum Bundt Cake by Making Miracles

Pineapple Upside Down Coconut Cake by Adventures in All Things Food

Speckled Tropical Bundt Cake by I Camp in my Kitchen

Tequila Sunrise Bundt Cake by Los Chatos Chefs

Tres Leche Bundt with Pineapple and Strawberry Whipped Cream by A Day in the Life on the Farm

Tropical Hummingbird Bundt Cake by Tartacadabra

Classic Waffles

One of my first cookbooks was given to me by one of my best friends as a wedding gift. We went to Anthropolgie together and she let me pick out my presents! She got me a beautiful spoon rest, some ice cream bowls, and The Illustrated Kitchen Bible. Every time I use any of these items I always think back to that day. Shopping with a best friend is always good therapy.

These are also the only things I own from that fabulous store! It’s one of my favorite places to go in and window shop as I can never justify the spending that kind of money. But let me tell you, if I ever won the lottery my kitchen collection would be transformed! And probably my closet, too!

The Illustrated Kitchen Bible is an incredible collection of over 1000 recipes! As you can imagine based on the title of the cookbook, every recipe has an accompanying photograph. I think my favorite thing about the book is that the back and inside covers contain crucial bits of culinary information such as measurement conversions, meat internal temperatures, and how to store things in the freezer.

I found it most surprising that there’s only one waffle recipe in the entire book! Though it does provide notes on how to alter it for buttermilk and adding some spice. (A fair number of recipes include variations to the base recipe.)

Classic Waffles

Ingredients:

  • 1 C plus 2 tbsp flour
  • 2 tbsp sugar
  • 1 tsp baking powder
  • 2 eggs, separated
  • 1 1/4 C milk
  • 5 tbsp melted butter
  • 1 tsp vanilla extract

Steps:

  1. In a large bowl, whisk together the flour, sugar, and baking powder.
  2. In another bowl, beat the egg yolks and whisk in the milk, butter, and vanilla.
  3. Add the wet ingredients into the dry and stir until combined.
  4. Using an electric mixer, beat the egg whites until stiff peaks form. Gently fold the egg whites into the waffle batter.
  5. Pour batter into a hot waffle iron and cook until golden.

classic waffles  sew you think you can cook

*Disclaimer: This post contains affiliate links.

#SundaySupper: Meatballs

I’m pretty excited about today’s #SundaySupper theme. Meatballs! The meatball varieties are almost endless and I can’t wait to see what everyone has cooked up. You can check out the extensive list by scrolling past my recipes. Thanks to Sue of A Palatable Pastime for hosting today.

I didn’t know which direction I was going to go with my recipe and decided to look to my bookshelf instead of the internet. I had a few good contenders from Alex Guarnaschelli, Amanda Freitag, and Giada De Laurentiis, but when I saw Chili Meatballs with Cheese Dipping Sauce from Rachael Ray I was sold. I thought, “Well that’s different!” And they were. However, they were not very photogenic meatballs (which is probably why it wasn’t one of the photographed recipes in her cookbook). When scrolling through photos on my camera my husband thought they were a healthy no-bake granola-ball type of thing. They were definitely delicious though and I was already thinking about how I could improve the meatball and try again. I was going to put the crushed tortilla chips in the meatball instead of coating them in the chips and I was going to pulse the kidney beans so they’d be more incorporated with the meat. Firecracker pointed at them, but wouldn’t give them a second glance to try any. Chili Meatballs

When I got around to making Chili Meatballs v2 I ran into some issues. Number one being that I accidentally donated the can of kidney beans during Chick-fil-A’s Leap Day food drive. Number two being some unwelcome ants hanging out by my stove. (Thank goodness for an awesome Terminix guy who could show up on his way home that day!) I needed to cook my ground sirloin lest risk it going bad, so it was on to Plan B.

Plan B had to be something that allowed me to get everything done on the “safe” side of the kitchen and didn’t require a trip to the store. (I feel like that latter condition pops up a lot, but hey, when it’s cold out who wants to bundle up two babies for a trip to the grocery store?!)

I created my meatball mixture during naptime and baked 5 of them just to be sure they tasted good enough to share and attempt photography during daylight hours. Question: How in the world does one take photos of balls of meat?! I couldn’t come up with anything and will not be submitting my photos for this week’s Readers Choice Awards. More dedicated planning probably would have helped to add some fun garnishes and background props. Lighting, time, and skill would also be beneficial.

The result was a Lauren original that Firecracker devoured! He spied the plate of meatballs sitting on the counter. I’d venture to guess that he thought they were a sweet because I’d not seen the “Can I eat it?” reaction for anything else. I completely expected him to run away when I offered him a bite, but to my surprise he took that bite! And then came back for another. And another. I put the plate down on his table and watched in awe while he ate a total of 4 (cold) meatballs. I was sure to tell him what he was eating (“meatballs”) so that he could associate the word to the food and hopefully eat meatballs again. He ate another 3 for lunch the next day.

Bourbon Baked Bean Meatballs  Sew You Think You Can Cook

I served these alongside some steamed broccoli and “creamettes”. Creamettes are a wonderful creation of my grandmother’s – cooked pasta (usually elbow macaroni, but I used shells because that’s what I had) sauteed in butter until lightly crispy and seasoned with salt. Simplicity at its most delicious.

An Original Recipe

Bourbon Baked Bean Meatballs

Ingredients:

  • 1 1/2 lb ground sirloin
  • 2/3 C canned bourbon baked beans, smashed
  • 1/2 C panko breadcrumbs
  • 1 egg
  • 1 tsp onion powder
  • 1 tsp garlic powder
  • 1 tsp Kosher salt
  • 1/2 tsp ground mustard
  • 1/4 tsp black pepper
  • 1/8 tsp cayenne pepper

Steps:

  1. Preheat oven to 400 degrees F. Lightly grease a large casserole dish.
  2. In a large bowl, mix all ingredients until combined, using your hands. Form 20 golf ball sized meatballs.
  3. Arrange meatballs in the prepared casserole dish. Bake 12-15 minutes, until cooked through.

Bourbon Baked Bean Meatballs for #SundaySupper from Sew You Think You Can Cook

Meatball Appetizers:

Meatball Soups:

Main Dish Meatballs:

Meatball Desserts:

8387592742_f6164fd5a8_oJoin the #SundaySupper conversation on twitter on Sunday! We tweet throughout the day and share recipes from all over the world. Our weekly chat starts at 7:00 pm ET. Follow the#SundaySupper hashtag and remember to include it in your tweets to join in the chat. To get more great Sunday Supper Recipes, visit our website or check out our Pinterest board.

Would you like to join the Sunday Supper Movement? It’s easy. You can sign up by clicking here: Sunday Supper Movement.

Dislcaimer: This post contains affiliate links.

Orange Ricotta Pancakes

orange ricotta pancakes 2  Sew You Think You Can Cook
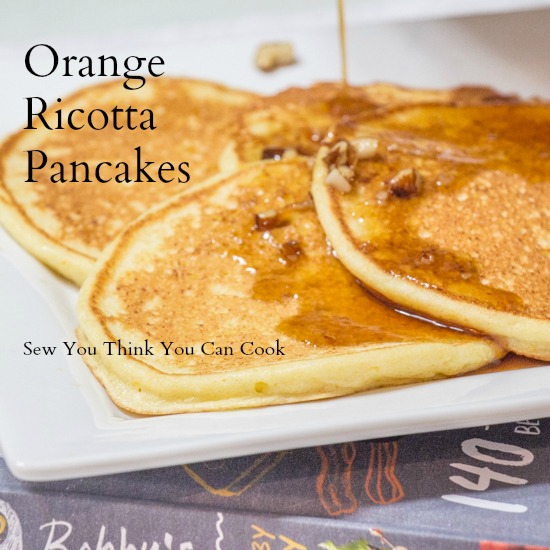
I love finding new ways to use ricotta cheese. I almost always have leftover ricotta cheese whenever I cook with it, and that tub makes its way to the back of the fridge to be completely forgotten. Instead of letting that ricotta go to waste I add it to the weekend’s breakfast menu!

These pancakes were the first recipe we made from our favorite Brunch at Bobby’s. We served them with Almond Butter Syrup. Bobby suggested serving these pancakes with a fig compote and some pistachios.

Just like all breakfast sweets, Firecracker ate these up, so I loved getting the extra punch of protein from the ricotta.

*If you can find fresh ricotta, use that. However, allowing the more commonly found ricotta cheese to drain through a fine strainer for an hour is an acceptable substitute. (That’s definitely what I did!)

Orange Ricotta Pancakes

Ingredients:

  • 1 C fresh ricotta, or see note* above
  • 3/4 C milk
  • 3 eggs, separated
  • 1/2 tsp vanilla extract
  • zest of 1 orange
  • 3/4 C flour
  • 2 tbsp sugar
  • 1/2 tsp baking powder

Steps:

  1. In a bowl, whisk together the ricotta, milk, egg yolks, vanilla, and orange zest.
  2. In another large bowl, whisk together the flour, sugar, baking powder, and a pinch of salt.
  3. Using a handheld electric mixer, whip the egg whites until stiff peaks form.
  4. Combine the wet ingredients into the dry. Gently fold in the egg whites.
  5. On a hot buttered griddle drop 1/4 C of batter into pancakes. When bubbles form and start to pop flip the pancakes and cook until golden on both sides.

orange ricotta pancakes 1  Sew You Think You Can Cook

Disclaimer: This post contains affiliate links.