Brown Sugar Tomato Pasta

Kelli

Today is Kelli’s birthday. Kelli is my brother’s fiance and has been featured on Sew You Think You Can Cook a few times before. Her parents are passionate cooks and Kelli has shared some of their recipes with me. (Black Beans & Buffalo Chicken Dip)

I can’t wait until she officially becomes a member of the family – having been with my brother for longer than I’ve known Stuart, she’s already a sister to me. Kelli is beautiful both inside and out and is the most fashionable person I know! Every time I spend time with her I’m inspired to refresh my wardrobe, paint my nails, wear makeup and accessorize with fun jewelry. Unfortunately that urge never lasts long enough to become habit and I’m back in t-shirts and jeans, feeling frumpy before I know it. Kelli is incredibly smart and a hard worker and is currently pursuing her dreams in dental school.

Kelli’s favorite dessert is pie. I believe pumpkin is her all time favorite with key lime coming as a close second. As key lime pie is my personal favorite, I featured it last year on my birthday. But, the first time I ever tried making key lime pie was for Kelli on her birthday 3 years ago. I actually squeezed juice from real key limes for it! It was the tartest pie EVER.

I couldn’t do another key lime pie post – my previous one yields the most perfect key lime pie so there isn’t anywhere to go but down from that one! And I just use the recipe on the can of pumpkin puree for pumpkin pie. So, I asked her what she’d like featured on her day. She gave me this simple but beautiful recipe for the pasta dish her mom would always make for her on her birthday.

I absolutely loved this recipe and it is a perfect, light pasta dish for summer. It would make a great side dish too.

Brown Sugar Tomato Pasta

Ingredients:

  • 6 roma tomatoes
  • 2 tbsp brown sugar
  • 2 tbsp extra virgin olive oil
  • 1/2 lb spaghetti

Steps:

  1. Preheat oven to 275 degrees F.
  2. Cut tomatoes into eighths and place on a parchment paper lined baking sheet. Sprinkle tomatoes with salt, pepper, brown sugar, and olive oil. Bake for 90-120 minutes.
  3. Cook pasta in boiling salted water.
  4. In a large bowl toss together tomatoes and pasta.

Brown Sugar Tomato Pasta

Honey Honey Layer Cake

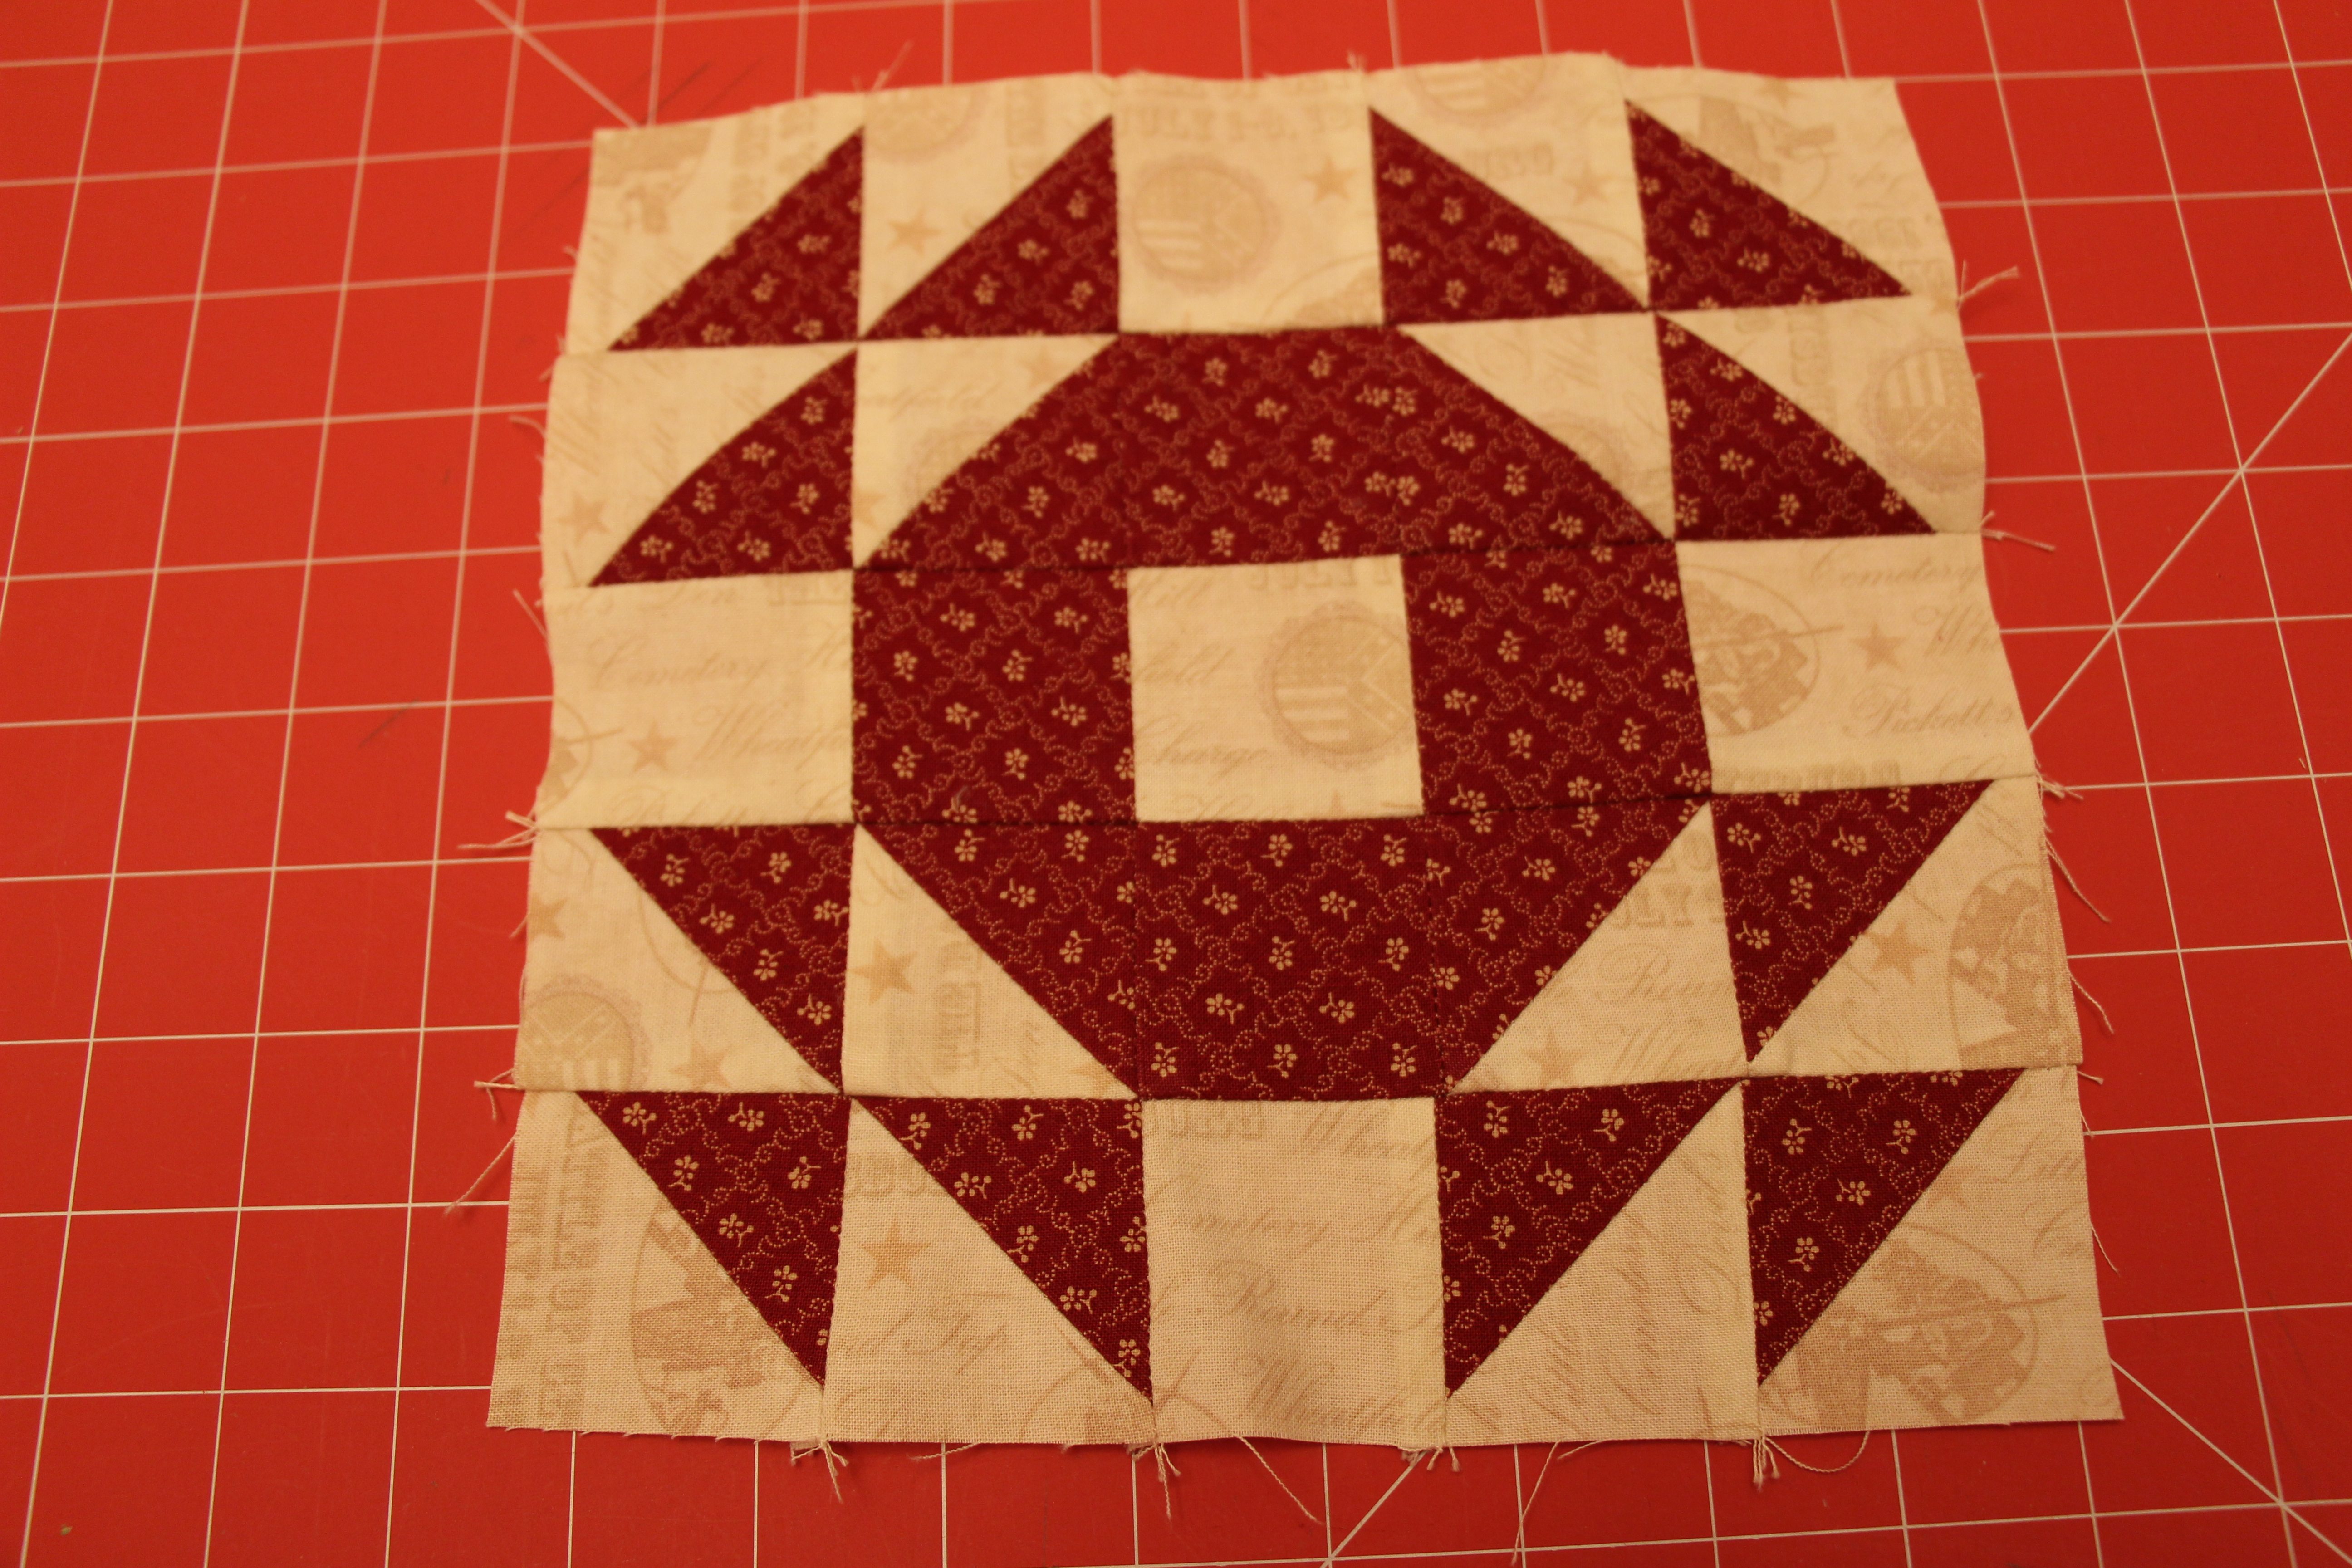
As I continued to make quilt blocks for my Old Glory Fourth of July quilt I traded out a few blocks for others that I felt worked better with the personality of the quilt. This particular block I found on Pinterest. You can see a whole quilt made with this block here, it’s stunning!

Honey Honey Layer Cake Quilt Block

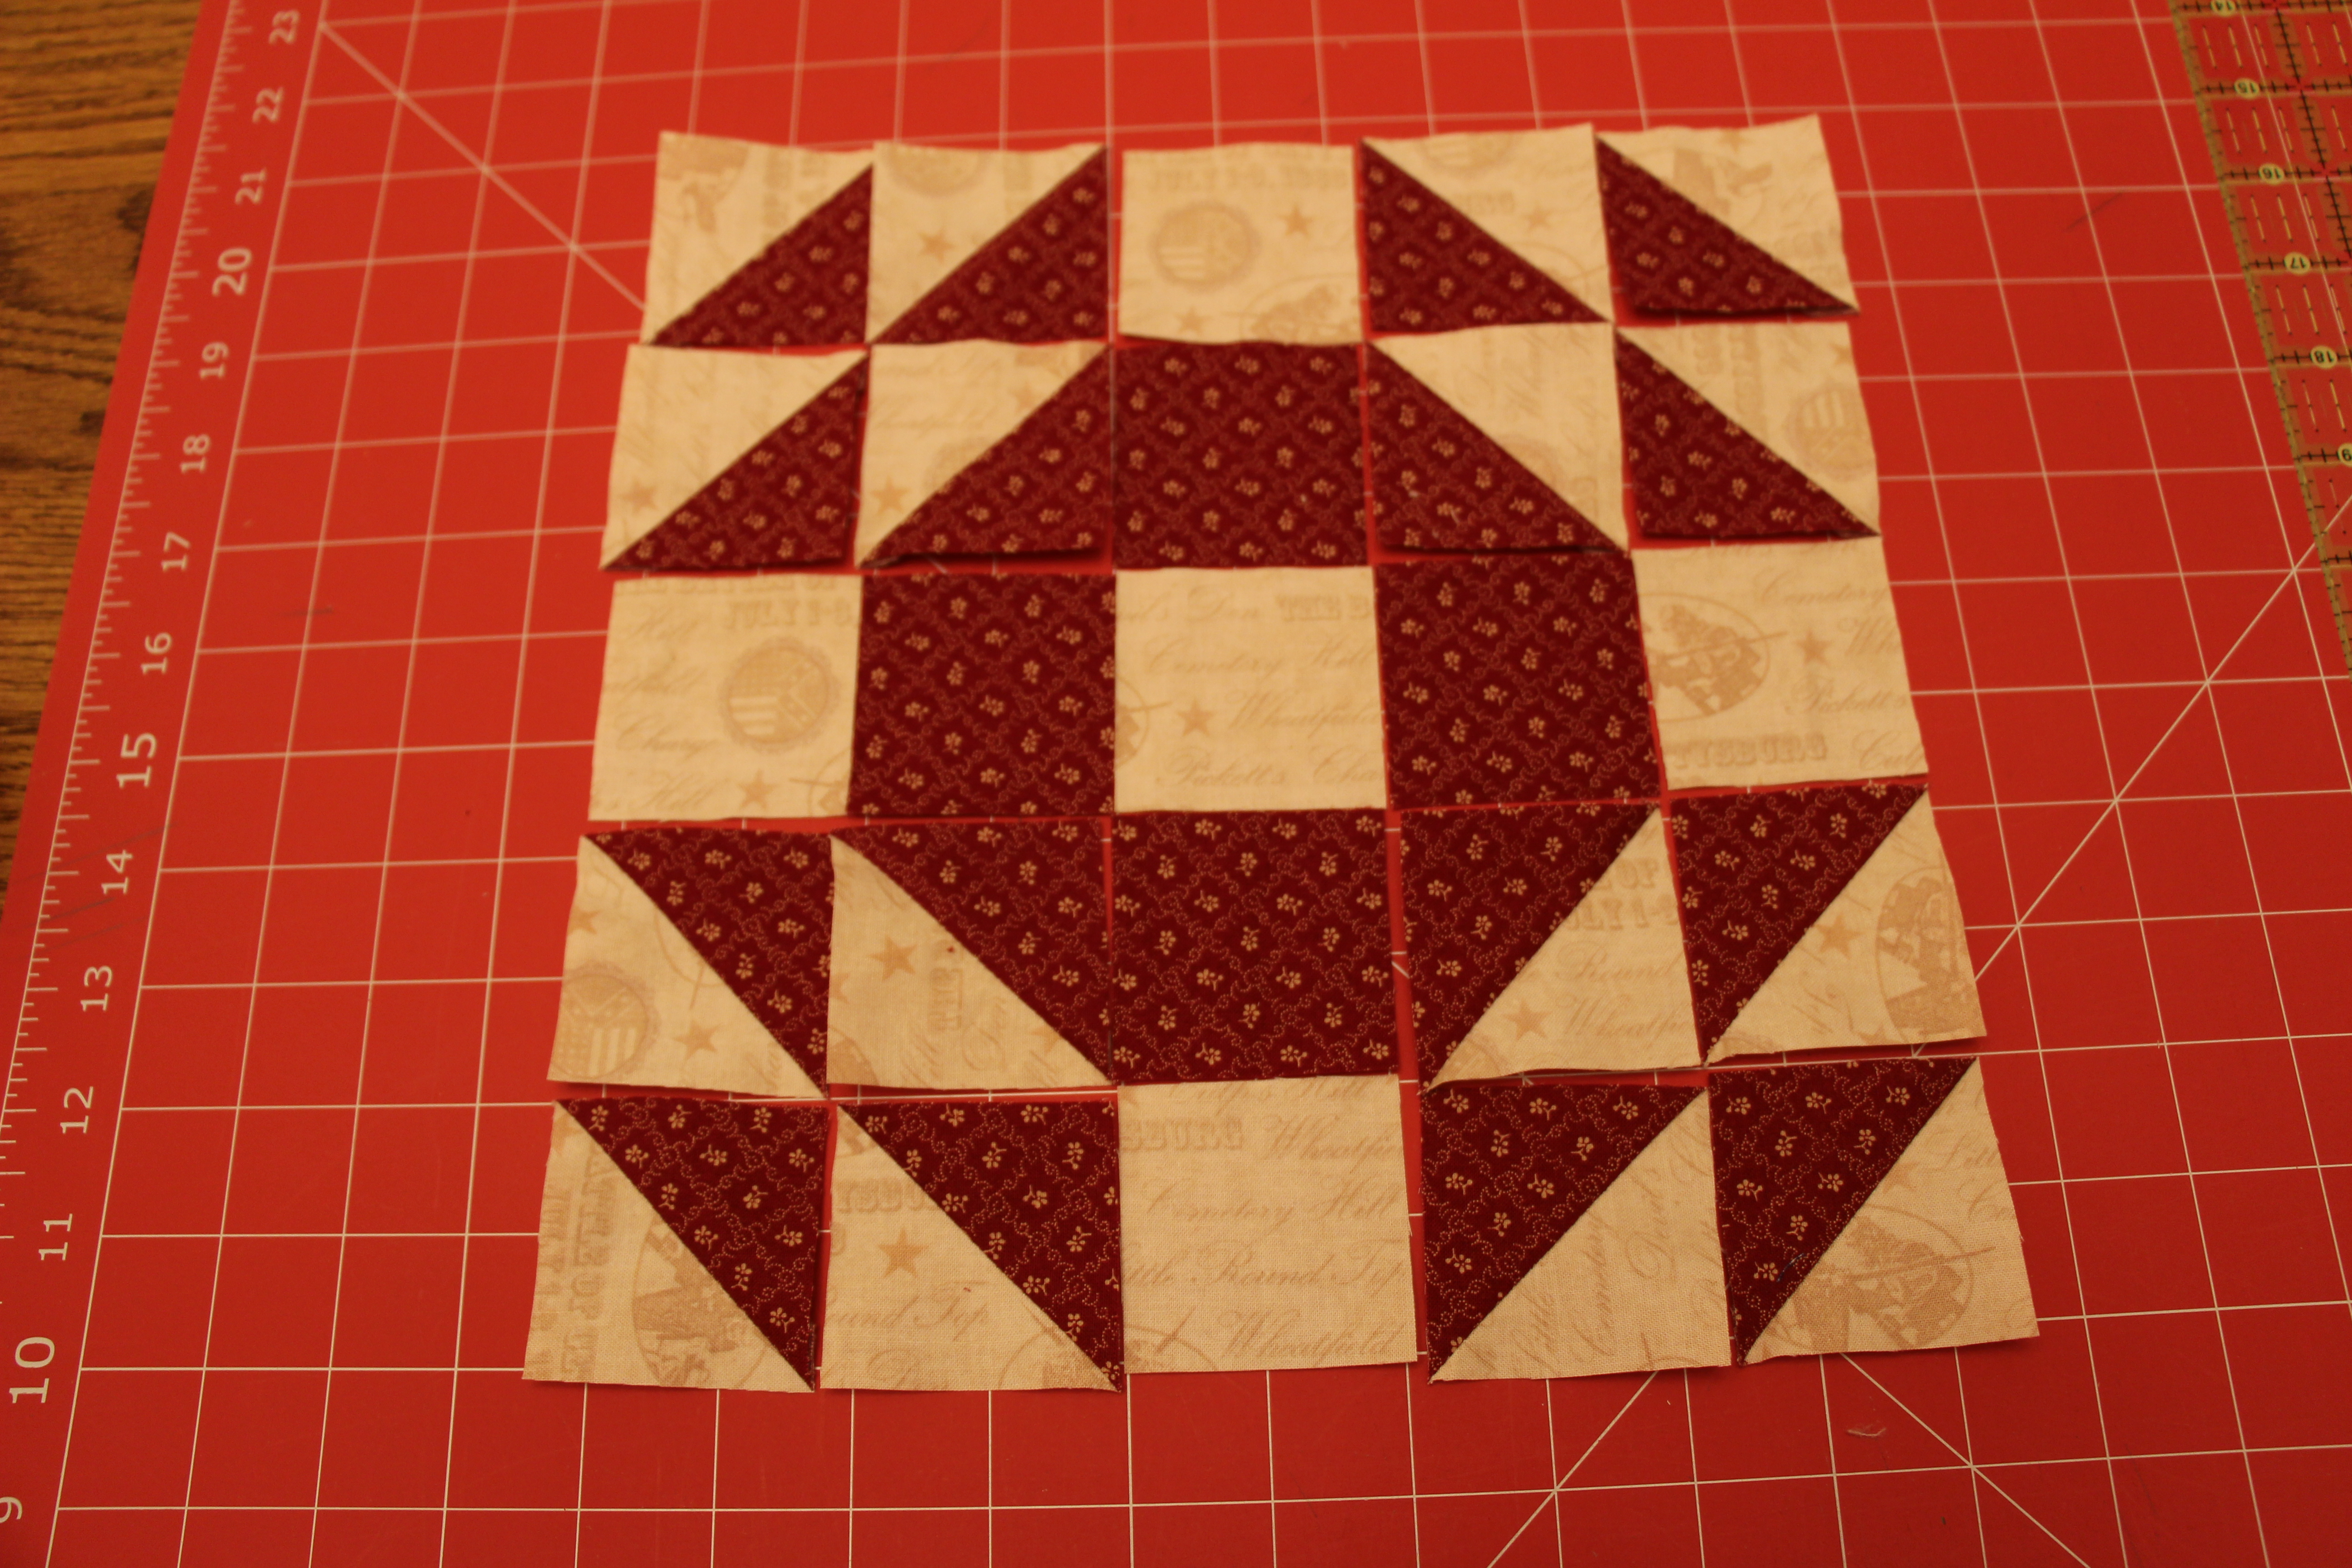
Here is the how-to for the Honey Honey Layer Cake Quilt Block:

Note: These measurements are for an 8″ block. Sew using a scant 1/4″ seam allowance. 

Cut fabric:

  • 8 squares 2 3/4″ red
  • 8 squares 2 3/4″ white
  • 4 squares 2 1/8″ red
  • 4 squares 2 1/8″ white

Use the 8 squares of 2 3/4″ red and white to create 16 Half Square Triangles (HSTs) trimmed down to 2 1/8″. Click here for my tutorial on how to make Half Square Triangles.

Lay out HSTs and solid blocks into the Honey Honey Layer Cake quilt block: Honey Honey Layer Cake Quilt Block Tutorial

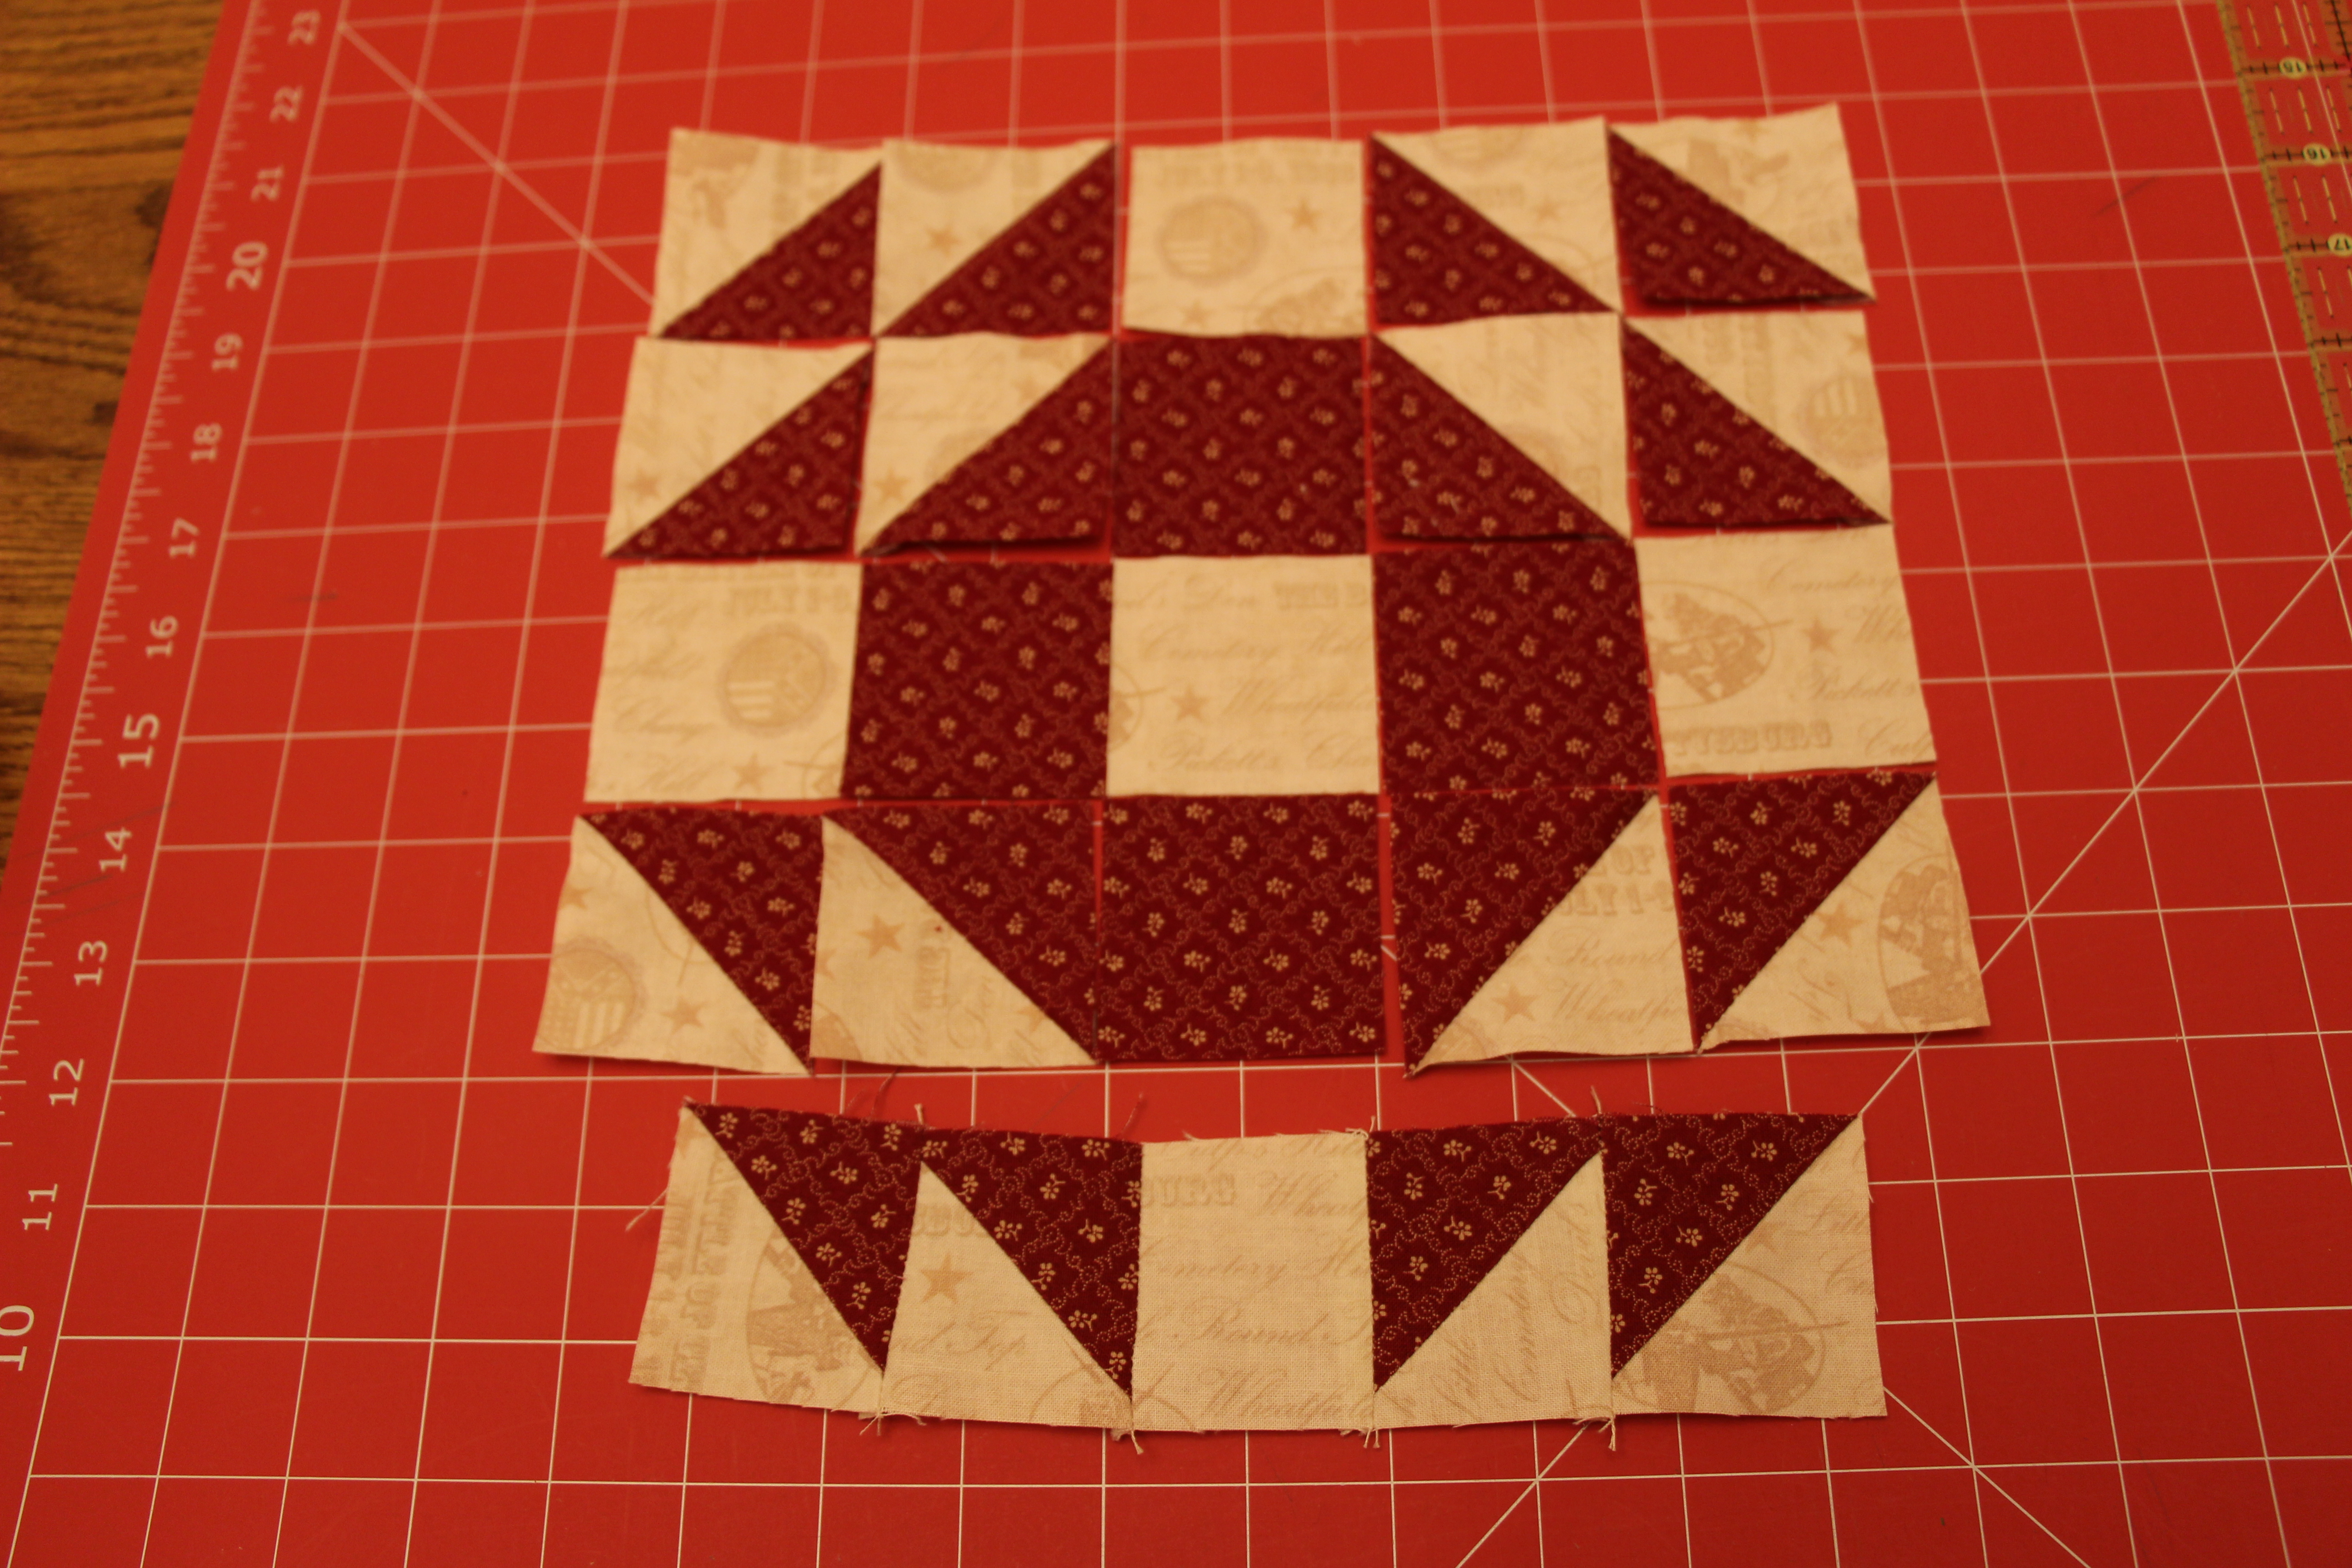
Assemble each row of five:

Honey Honey Layer Cake Quilt Block Tutorial

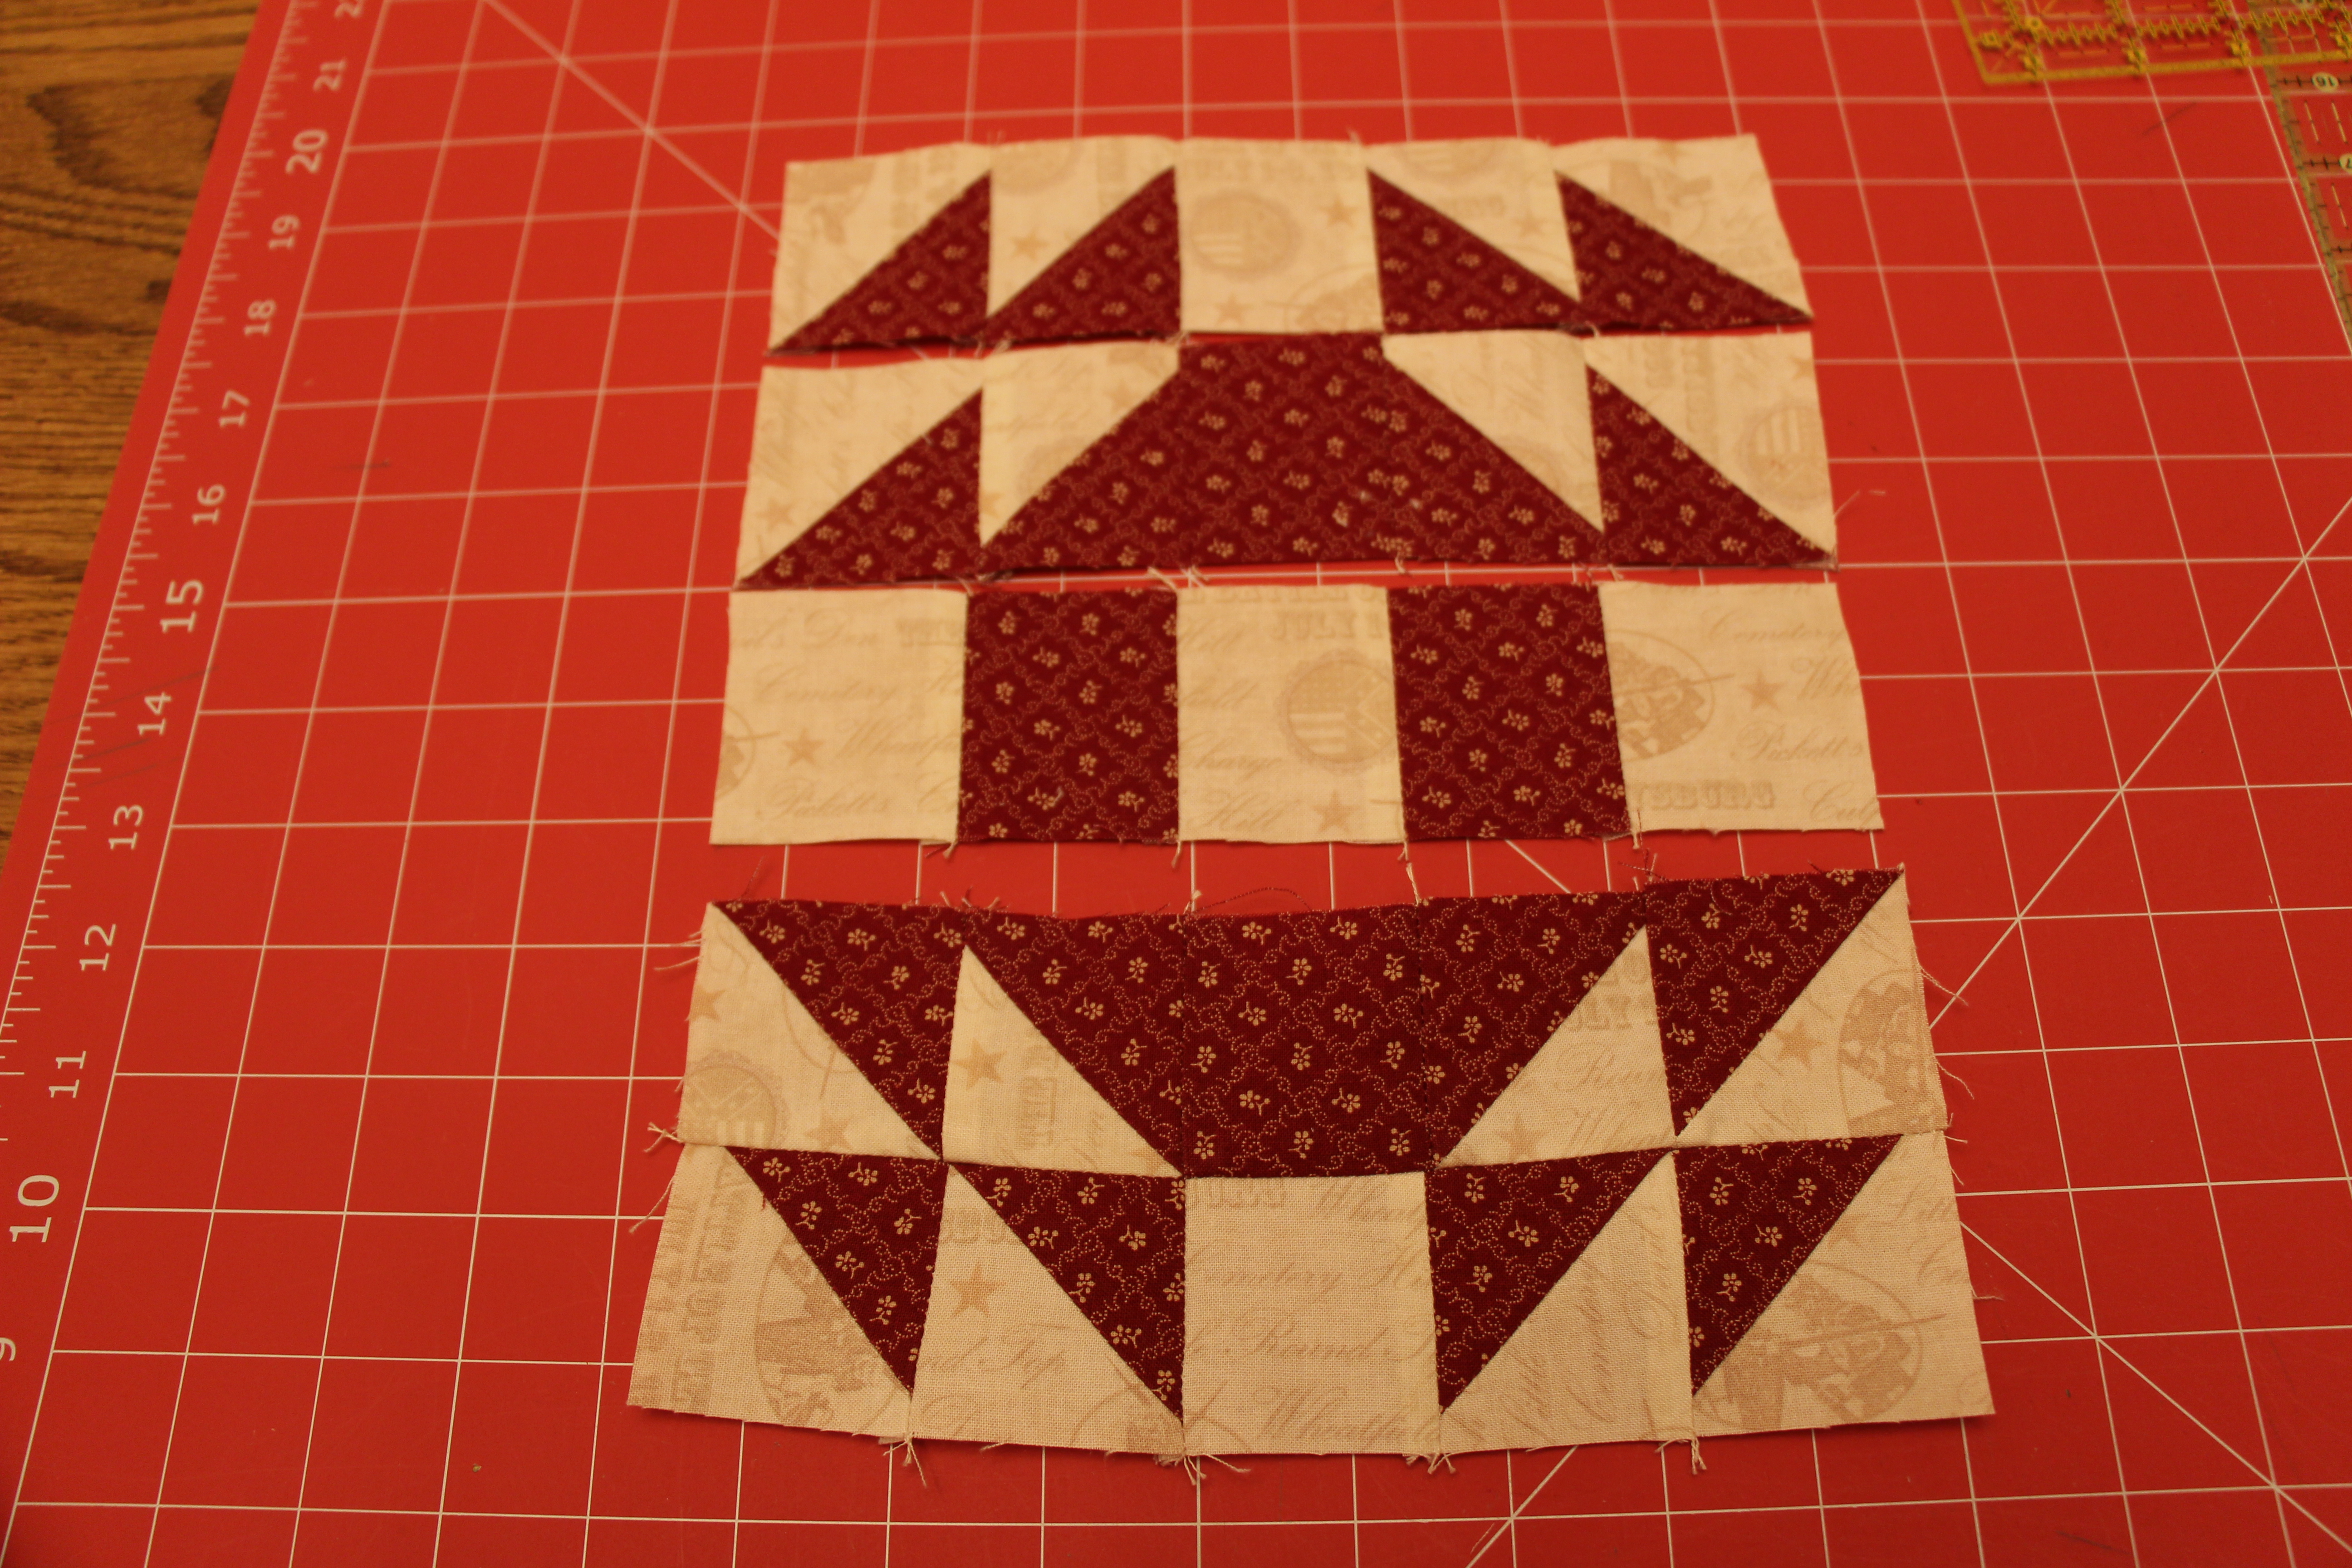
Attach the five rows together:

Honey Honey Layer Cake Quilt Block Tutorial

Thursday Thoughts #5

Thursday ThoughtsToday my perfect baby boy is one week old!

As I’ve posted a Thursday Thoughts about my pre-term labor scare, I thought it’d only be fair to share my true labor story.

On July third I was scheduled for inducement. That’s right, after multiple pre-term labor scares and one month on bedrest my little one was 5 days late! We joke that he follows “Stuart time” – my husband’s definition of “a couple minutes” is at least 15 and “soon” could mean anywhere from 10-60+ minutes.

I was so nervous about having a holiday baby. Because I tend to obsess over holiday parties and themes I knew that I would struggle with having to share a birthday and holiday. Especially one of my favorite holidays! With my arrival time at the hospital of 4am I had 20 hours. (Of course, I knew that whatever day I finally became a mom wouldn’t matter. It’s definitely my new favorite day of the year!)

Here is the story of how Wesley entered the world:

At 3:15am I was eating a homemade waffle. And I had a cinnamon donut from Dunkin in the car on the way. At 4:00 we were checking in to the hospital. I absolutely loved my nursing staff and an IV was placed effortlessly. Hundreds of forms were signed and my food allergies recorded.

Around 5:30am they started the Pitocin drip at a rate of 2 miliunits/minute. After an hour that rate was increased to 4 and at 7:30 a resident came in to break my water. It was now at this point when I could feel the contractions.

I allowed the majority of my fluids to leak before changing tactics. I left the bed and bounced on the birthing ball. My mom rubbed my back through almost every contraction and I couldn’t be more grateful. As I was most definitely experiencing back labor, her efforts did not go unnoticed.

My biggest desire for “D-day” was to labor in water. In discussing this wish with my doctor earlier in the pregnancy I was informed that I could labor in the tub, but that I couldn’t deliver there. After a quick cervical check, my nurse informed me that if I wanted an epidural now would probably be the time. (I declined.) Additionally, if I wanted to get in the tub I’d have to do it now and have only 30 minutes before being asked to get out. This moment might be my favorite of the labor process – I was elated at my progress and knew that my chances of needing a c-section were slim-to-none.

After the bath my Pitocin drip was decreased from 6 back to 4. My contractions were back to back and the hospital team didn’t want to “over heat” my uterus! I returned to the birthing ball and also tried a few different positions in bed. The Pitocin was yet again reduced to 2 miliunits/minute before being cut off entirely.

I went quickly from 8 to 10 centimeters dilated and it was time to push at 1:00pm. The Pitocin drip was restarted to provide my contractions that extra oomph to help me push.

Pushing was such a frustrating and rewarding experience. It took at least 30-40 minutes for me to learn the technique. But two hours later, at 3:07pm it was all worth it.

The doctors lifted my baby up towards my husband and had him discover and declare, “It’s a boy!” My son was then placed skin-to-skin on my chest and Stuart cut the umbilical cord. I had to ask for my glasses back just so I could see this tiny person we created! As elated and proud as I was, I could only imagine what that moment was like for the newest dad!

Induced, Natural Delivery

Blog-iversary

1yrToday is my blog’s anniversary! I can’t believe it’s been a year.  In my first year I have gained 132 followers and 113 Facebook friends. I’ve really enjoyed blogging. I will admit that I hit a spell in my first trimester of pregnancy when I was questioning my desire to continue with Sew You Think You Can Cook. Blame the hormones and exhaustion.

But I’m glad I stuck it out. I’ve met some great bloggers through The Crazy Ingredient Challenge, #BundtBakers, and Secret Recipe Club. I think joining in these link parties has brought me the most joy. It’s been nice to expand my horizons and get creative in the kitchen. In fact, I just joined another group – Foodie Extravaganza!

For my blog-iversary I decided to try something that’s always intrigued me. Using olive oil in baking. These cupcakes are beautiful – The olive oil gave them a nice golden color and the edges had a little bit of crisp to them which I adored. They’re not overly sweet so the cream cheese frosting accompanied them perfectly. I typically find icing to push cake over the top on sweetness level. I brought them to work and they were gone before lunch!

Olive Oil Cupcakes

Ingredients for cupcakes:

  • 1 1/4 C cake flour
  • 1 C sugar
  • 1/4 tsp salt
  • 1 tsp baking powder
  • 6 tbsp olive oil
  • 1 tsp vanilla extract
  • 2 eggs
  • 1/4 C sour cream
  • 1/4 C milk

Ingredients for frosting:

  • 1 stick butter, softened
  • 4 oz cream cheese, softened
  • 2 C powdered sugar

Steps:

  1. Preheat oven to 350 degrees F. Grease a cupcake tin, or line with cupcake liners.
  2. In the bowl of a stand mixer mix the flour, sugar, salt, and baking powder. Add the olive oil and vanilla and beat until combined. Add the eggs one at a time, until fully incorporated. Add the sour cream until combined. Add the milk. Mix until batter is smooth.
  3. Place cupcake batter into prepared cupcake tin. Bake 25-30 minutes, or until a toothpick comes out clean. Allow cupcakes to cool.
  4. Make the frosting: Cream together butter and cream cheese. Add the powdered sugar in two installments. Beat until smooth. Add milk 1/4 tsp at a time if needed (I didn’t need it).

*This recipe is adapted from Brita at http://www.bakingisascience.com/lemon-lime-olive-oil-cupcakes/*

Olive Oil Cupcakes

Ohio Star

For my Old Glory Fourth of July quilt I used two different blocks for the stars section of the flag. One of them, Sarah’s Choice, is a 16-patch of half square triangles and squares so I did not feel a tutorial was necessary for that block. The other star block, Ohio Star, is a little trickier. This 9-patch is a made up of squares and what I call hour glasses (quarter-square triangles). Ohio Star

Here is the how-to for the Ohio Star Quilt Block:

Note: These measurements are for an 8″ block. Sew using a 1/4″ seam allowance.

Cut fabric:

  • 1 square 3 1/8″ blue
  • 4 squares 3 1/8″ white
  • 2 squares 4 1/8″ blue
  • 2 squares 4 1/8″ white

Layer one white 4 1/8″ square atop a blue 4 1/8″ square. Mark the diagonal and 1/4″ on each side of the diagonal:

Ohio Star TutorialOhio Star Tutorial

Sew on each of the 1/4″ lines. Cut on the diagonal. Open up your half square triangles (HSTs) and iron to the dark:

Ohio Star Tutorial Ohio Star Tutorial Ohio Star Tutorial

Sandwich the HSTs so that blue and white are opposite each other. Mark the diagonal and 1/4″ on each side of the diagonal:

Ohio Star Tutorial

Sew on each of the 1/4″ lines. Cut on the diagonal. Open up your hour glasses and iron flat: Ohio Star Tutorial Ohio Star Tutorial IMG_7635

Trim down each hour glass to 3 1/8″ squares by treating one of the diagonals as a straight line and trim off the top and right side to just slightly larger than 3 1/8″. It is important that you line your ruler up so that the 3 1/8″ line is touching the edge of blue-on-white: Trimming an Hour Glass Flip the block and now align your ruler with the cut edges. Finish to 3 1/8″:

Ohio Star Tutorial Ohio Star Tutorial

Repeat the hour glass process for the other 4 1/8″ squares of fabric.

Now the Ohio Star is simply a 9-patch:

Ohio Star TutorialOhio Star

Old Glory

One of my favorite things about the Fourth of July is laying out a blanket and watching the fireworks with family and friends.

Once I learned how to quilt it became a goal of mine to have at least one quilt per holiday, but the one I most wanted to complete was one to spread out underneath the fireworks.

This is the plan for Old Glory.

Old Glory

Old Glory is what is considered a sampler quilt. So you will notice that, with the exception of the stars, not one block is repeated. I wasn’t sure the mathematical side of me would be able to handle this style of quilting, but in limiting the fabric choices I was able to find a little order.

Over the next month I will share with you tutorials for most of the blocks featured in my quilt. So hop on board and expand your quilt block knowledge!

Guest Post: Grilled Marinated Chicken with Tomato-Fruit Salsa

I am very excited to feature my first guest post on Sew You Think You Can Cook! This post is brought to you on behalf of Hunt’s by Julia. Her recipe is perfect for summer and the grilling season. Enjoy! -Lauren

When I think of summer I think of dinners out on the back porch with food fresh off the grill.   While there will always be a soft spot in my heart for hot dogs and burgers, my favorite grill-able is chicken breast simply because of the huge range of flavor possibilities.  Thanks to the science of marinating, there is a chicken breast for every taste, so preparing a light dinner for a picky family is a snap.

This grilled chicken recipe was a hit for my entire family, including my preteen who has recently become “too cool” to enjoy his mom’s cooking.  The marinade kept the chicken from becoming dry, and the tomato-fruit salsa on top added a unique dimension of flavor that really took the edge off a hot summer night.

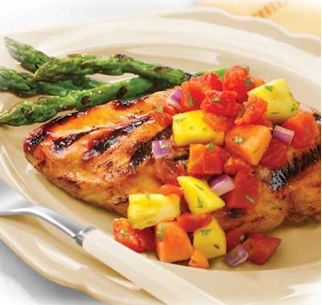
Grilled Chicken with Tomato-Fruit Salsa

 Grilled Marinated Chicken with Tomato-Fruit Salsa

 Ingredients for Chicken:

  • 1/4 cup Hunt’s® Tomato Ketchup
  • 1/4 cup Worcestershire sauce
  • 1/4 cup white wine vinegar
  • 1/4 cup honey
  • 2 tbsp light soy sauce
  • 2 cloves garlic, finely chopped
  • 6 boneless skinless chicken breast halves
  • PAM® Grilling Spray

Ingredients for Salsa:

  • 1 can (14.5oz each) Hunt’s® Petite Diced Tomatoes, drained
  • 1 cup finely chopped fresh pineapple
  • 1/4 cup finely chopped red onion
  • 1 tablespoon chopped fresh cilantro

Steps:

  1. Combine ketchup, Worcestershire sauce, vinegar, honey, soy sauce and garlic in large resealable plastic bag; blend well. Pound chicken with meat mallet to even out thickness for more even cooking. Add chicken to bag; seal. Turn to coat evenly with ketchup marinade. Refrigerate 2 hours or overnight.
  2. Remove chicken from bag; discard marinade.
  3. Combine drained tomatoes, pineapple, onion and cilantro in small bowl; set aside.
  4. Spray cold grill and utensils with grilling spray. Preheat grill to medium heat.
  5. Grill chicken about 10 minutes or until no longer pink in center (165°F), turning once. Serve chicken with salsa.

Pro Tips:

  • If you don’t want to us a grill, this chicken can also be cooked in a non-stick skillet over medium heat.  As always with chicken, be sure to cook all the way through until no longer pink in center (165°F).
  • Pineapple can be substituted for other favorite tropical fruits, like mango or papaya (or a combination!)

Author Bio: This is a guest post by Julia S. on behalf of Hunt’s. Visit our site at www.hunts.com to find tomato recipes, chili recipes, and easy meatloaf recipes.

Ginger Molasses Cookies

There are a lot of theories about foods to induce labor and while I don’t believe in any of them I’ve still used them as a nice excuse to indulge in hot wings.

And cookies.

A google search led me to a recipe for “labor inducing cookies” which are really gingersnaps with some cayenne. Except that I forgot to add the cayenne. I mean, really!? But, now I have a post perfect for National Gingersnap Day.

Quick question: Why is gingersnap day in July? Are we trying to go with the “Christmas in July” feel? The batter smelled like Thanksgiving to me!

These cookies are rich with molasses and spicy with ginger. (If you want to try to put someone into labor add the 1/2 tsp of cayenne I forgot about.)

Ginger Molasses Cookies

Ingredients:

  • 1 stick butter
  • 1/2 C sugar, plus extra for rolling cookies
  • 1 C brown sugar
  • 1/3 C molasses
  • 2 egg whites
  • 2 1/2 C flour
  • 1 1/2 tsp baking soda
  • 3/4 tsp cinnamon
  • 1 tsp ground ginger
  • 1/2 tsp ground cloves
  • 1/2 tsp salt

Steps:

  1. Preheat oven to 350 degrees F.
  2. In the bowl of a stand mixer fitted with the paddle attachment beat butter and sugars. When combined add the molasses. Add the egg whites.
  3. In a bowl whisk together the flour, baking soda, spices, and salt.
  4. Add dry ingredients to the butter and molasses mixture in two installments.
  5. Roll dough into 1″ balls. Roll balls in sugar. Place on a parchment paper lined baking sheet. Bake 10-12 minutes. Allow cookies to cool on the baking sheet.

*This recipe is adapted from http://www.justmommies.com/pregnancy/labor-and-childbirth/labor-inducing-cookie-recipe*

Ginger Molasses Cookies

P.S. – They didn’t work. Neither did spicy foods. Or pineapple.