#EasterWeek: Whipped Ricotta Salad

26685618_10155993373291948_4409902930968397778_o

Wait a minute.

Wasn’t it just Christmas?

Am I allowed to admit I feel like I haven’t reached a level of organization for 2018 yet?

And we’re talking Easter!?

Well, since we’re talking about it, might as well cook about it!

This year’s #EasterWeek, hosted by Christie of A Kitchen Hoor’s Adventures, convenes on Monday, Wednesday, and Friday and providing you plenty of time to come up with your perfect Easter menu. (Easter is April 1st – that’s 13 days from now!)

Disclaimer: This post contains affiliate links.

To start your menu, I propose a light and bright, spring-timey salad.

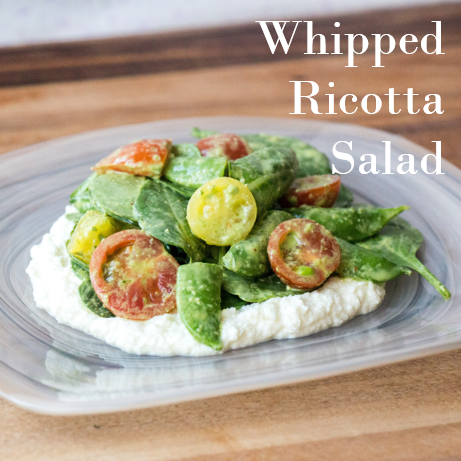
This salad comes from the cookbook Happy Cooking: Make Every Meal Count … Without Stressing Out by Giada De Laurentiis and is featured in her Las Vegas restaurant.

I quite like ricotta cheese, but when I have leftovers I never know what to do with it besides make some lasagna, ravioli, or pasta sauce. I have done muffins before, which is quite delicious.

With an almost full container of ricotta in my refrigerator, I selected one of Giada’s cookbooks hoping she’d know what to do.

Guess what.

She does!

This salad is both refreshing and satisfying.

The basil vinaigrette paired with the fresh tomatoes and the creamy ricotta reminded me of a caprese salad.

Whipped Ricotta Salad

Ingredients:

  • 1 C packed fresh basil
  • 2 tbsp pine nuts, toasted
  • 2 tbsp white balsamic vinegar
  • 1/2 tsp kosher salt
  • 1/4 tsp crushed red pepper flakes
  • 3 tbsp + 2 tsp extra-virgin olive oil, divided use
  • 1 C whole milk ricotta cheese, chilled
  • 3 C baby greens salad mix (I used a blend of kale and spinach)
  • 1 C cherry tomatoes, halved
  • 1/4 lb sugar snap peas, trimmed and halved

Steps:

  1. Make dressing: Place basil, toasted pine nuts, vinegar, salt, and red pepper flakes into a food processor and blend. Add in 3 tbsp of the olive oil until the dressing comes together. Set aside.
  2. Using an electric hand mixer, whip the ricotta with the remaining olive oil and a pinch of salt. Set aside.
  3. In a large bowl, gently toss the salad green, peas, and tomatoes with the dressing.
  4. Plate: Spoon whipped ricotta onto a plate and top with the salad. Serves 4-6 people.

Whipped Ricotta Salad for #EasterWeek from Sew You Think You Can Cook

Be sure to check out these other great Easter recipes:

Broccoli and Blue Cheese Gratin by A Day in the Life on the Farm

Bunny Cinnamon Rolls by Family Around the Table

Bunny Mary by Culinary Adventures with Camilla

Carrot Roll Cake by Cookaholic Wife

Chocolate Dipped Robin’s Egg Cookies by Amy’s Cooking Adventures

Crunchy Easter Bird Nest Granola Bites by Faith, Hope, Love, & Luck Survive Despite a Whiskered Accomplice

Deviled eggs with creme Fraiche and herbs by Simple and Savory

Easter M&M Blondies by Hezzi-D’s Books and Cooks

Easter Mini Chocolate Rum Cupcakes by Daily Dish Recipes

Egg Benedict Quiche by A Kitchen Hoor’s Adventures

Orange Ricotta Pancakes by Jolene’s Recipe Journal

Puff Pastry Eggs with Ham and Cheese by All that’s Jas

Sausage and Spinach Pie by Karen’s Kitchen Stories

Tsoureki – Greek Easter Bread by Caroline’s Cooking

Whipped Ricotta Salad by Sew You Think You Can Cook

#FantasticalFoodFight: BLT

unnamed

I took a bit of a break from blogging over the Easter holiday. But I’m back and ready for a food fight!

Blog-oshper-ically speaking of course. Don’t you dare throw food around my house. You’ll get a glaring look, scolding, and slap on the hand. Just ask my 17 month old. Not that any of those punishments seem to work. Who wants to give us advice on how to get the child to STOP THROWING HIS FOOD ON THE FLOOR!?

This month’s Food Fight is BLT. Recipe requirements were to share a sandwich that contains bacon, a green leafy veggie, and tomato.

With it being the Easter season, I immediately thought of trying to make egg salad with our colored eggs. My mini me loved helping peel the eggs.


This year was the first we colored eggs with our children and I am so incredibly, words cannot express how happy I am that they loved it! My husband had the genius idea to color eggs outside and it’s a good thing we did! Treat just kept wanting to drop eggs into the mugs of dyed water. The concept of being gentle is completely lost on him. The result of the splash the eggs into the water method was a dark puddle of water on the tray holding the mugs of dye.

I’m on the trend of starting to like eggs and I’m happy to report that I quite liked this egg salad. I’m confident it’s the yellow mustard that makes me enjoy it so. Putting egg salad on a BLT is probably the best way to eat it, too! The crunch from the bacon and the freshness from the tomato create the perfect bite.

This recipe makes 4-6 sandwiches.

Egg Salad BLT Sandwiches

Ingredients:

  • 1/2 C mayonnaise
  • 1 tsp yellow mustard
  • 1/4 tsp paprika
  • 1/4 tsp onion powder
  • 9 hard boiled eggs, peeled and chopped
  • 1 lb center cut bacon, cooked
  • 8 slices sourdough bread, toasted
  • 2 vine ripened tomatoes
  • 4 leaves romaine hearts

Steps:

  1. Make egg salad: In a bowl, whisk together the mayonnaise, mustard, paparika, and onion powder. Season to tastes with S+P. Fold in the chopped eggs.
  2. Assemble sandwiches: Spoon egg salad onto a slice of bread. Top with 2-3 slices tomato, 3-4 slices bacon, and one lettuce leaf. Add a second slice of toasted bread. Cut in half and serve.

*The egg salad recipe is adapted from Heather at http://missfrugalmommy.com/easy-egg-salad-recipe/*

Egg Salad BLT for #FantasticalFoodFight from Sew You Think You Can Cook

To check out the other Fantastical BLT sandwiches click here:

If you would like to join our Fantastical Food Fight, you can learn more on our informational page.

Roasted Tomato Tahini Dip

Once upon a time I tried my hardest to get my boys to nap at the same time.

Once upon a time I let tomatoes burn to ash.

And, once upon a time I gave up on nap time.

It’s been a few months, actually, almost half a year – Wait, can that be?! Man does time fly! – since my toddler has taken a nap at home in his bed.

You see, my son hates sleep. He always has. It’s one of the most frustrating things about the kid! I would spend anywhere from 30-90-120 minutes of my day desperately trying to get him to fall asleep. He’s never taken a nap willingly and I’ve always had to practically trick him into it – reading books, rocking, singing, stroking his hair/arm/face. Often there’d be screaming and tears coming from both of us. All of that effort for what would end up being a 45 minute nap. A nap from which he’d wake up grumpier than before!

I spent a lot of days trying to decide if it were time to give it up. But kids need naps, at least that what all the parenting literature says.

The day I tried making this dip was the final straw.

I tossed some tomatoes in the oven and went downstairs to get the kids ready for nap. With the door closed and kids screaming, I never heard the timer going off. I’d obviously forgotten about the tomatoes entirely and after 2 hours, I gave up! Opened the door and was hit with the smell of the oven and the sound of a beeping timer. Definitely didn’t help improve my mood!

I gave it a couple of weeks and tried again. And I’m so glad I did. This dip is a great way to change up your game day watching spread. Serve it with pita chips, fresh pita, pretzels, or veggies.

Roasted Tomato Tahini Dip

Ingredients:

  • 2 C grape tomatoes
  • 1/2 C roasted almonds
  • 1 tbsp tahini
  • 2 tsp red wine vinegar
  • 1/2 tsp cumin
  • 1/4 tsp cayenne
  • 1 tbsp olive oil, plus more for roasting

Steps:

  1. Preheat oven to 400 degrees F. Line a rimmed baking sheet with foil.
  2. Place tomatoes on the prepared baking sheet in an even layer. Drizzle with a little olive oil and season with S+P. Roast 45-50 minutes, or until the tomatoes burst. Let cool.
  3. When tomatoes have cooled slightly, put them and their juices in a food processor. Add the remaining ingredients, except for the olive oil. Pulse the tomatoes until combined, while the machine is running, pour in the olive oil until the mixture becomes smooth. Season to taste with S+P.

*This recipe is adapted from Tara at http://tarasmulticulturaltable.com/secretrecipeclub-roasted-tomato-almond-and-tahini-dip/*

Roasted Tomato Tahini Dip | Sew You Think You Can Cook | http://sewyouthinkyoucancook.com

Dominican Chimichurri Burgers

Did you enjoy watching the Olympics earlier this month?

I’m sorry to say that I wasn’t able to watch as much of the competition as I’d have liked. Being on the West Coast [for the first time] made watching Prime Time a little difficult as I saw everything on social media posted by my friends and family and NBC in the afternoon before it was finally broadcast out here.

And to add insult to injury, Prime Time happens to be bed time for my boys. I’d hit “record” on the DVR but by the time I sat back in front of the TV I was definitely falling asleep.

What does any of this have to do with the recipe I’m blogging about today?

For the Opening Ceremonies we were invited to an Olympics party. Everyone was to bring a dish representing a different country; the hosts were taking care of America.

I took on both the Dominican Republic and Poland – taking the opportunity to delve into my family’s heritage. (My dad is Dominican and my mom Polish.)

Unfortunately we had to back out the day of the event due to the hectic-ness that had been my husband’s work that week. I’d even had to take two attempts at my Polish dish (which I’ll share during the holidays)!

The dish representing the DR: Chimichurri Burgers! My dad thought I was insane when I told him what I was making. “The DR is not known for their burgers.” A Google search tends to disagree. The “chimi” is quite a popular street food burger.

The chimi, as it’s known, is also now quite popular in my house! As I do with all burgers now, 1/4 of the mixture was formed into meatballs for the boys. The remaining three patties were were devoured! Yes, I had a burger and a half myself. Yes, I want more.

Dominican Chimichurri Burgers

Ingredients for burgers:

  • 1 lb ground beef
  • 3 1/2 tbsp soy sauce, divided use
  • 2 tbsp Worcestershire sauce
  • 3 tsp garlic powder, divided use
  • 2 tsp onion powder
  • 1 tsp Kosher salt
  • 1/2 tsp black pepper
  • 2 tsp olive oil
  • 3 C sliced cabbage
  • 1 tomato, thickly sliced
  • sliced red onion
  • 4 hamburger buns, toasted
  • 1/4 C ketchup
  • 1/4 C mayonnaise

Steps:

  1. In a large bowl, mix ground beef, 1 1/2 tbsp soy sauce, Worcestershire sauce, 1 tsp garlic powder, onion powder, salt and pepper. Divide mixture into 4 patties.
  2. Grill burgers 4 minutes on each side, or to desired doneness.
  3. Heat in a large skillet over medium heat. Saute the cabbage with remaining soy sauce and garlic powder until tender, about 5 minutes. Remove from skillet and set aside.
  4. Add olive oil to the same skillet and sear tomato slices and onion slices for a minute on each side.
  5. In a small bowl, whisk together the ketchup and mayonnaise with a dash of soy sauce.
  6. Assemble burgers: Spread some of the ketchup mixture on the bottom hamburger buns. Top with a burger patty, tomato, onion, cabbage, and more ketchup mixture.

*This recipe is adapted from Erin at http://thecrumbycupcake.com/dominican-chimichurri-burger/*

"The Chimi" is a popular burger from the Dominican Republic, flavored with soy and Worcestershire, topped with sauteed cabbage, onion, and tomato. | Sew You Think You Can Cook | http://sewyouthinkyoucancook.com

#EVOOChallenge: Olive Oil Poached Eggs with Tomato Relish

It’s day 4 of the #EVOOChallenge. This challenge, in which we make foods with the only cooking fat being olive oil, was issued by Spartan Olive Oil. The goal is to highlight the benefits of using olive oil over its less healthy counterparts, I’m looking at you butter and vegetable oil. Search the hashtag on social media to see more great recipes!

While both olive oil and vegetable oil have 120 Calories and 14 grams of fat per tbsp, olive oil has 10 grams of monounsaturated fat (the good fat) whereas vegetable oil has only 3 grams of monounsaturated fat. Monounsaturated fat is actually good for your health; it reduces bad cholesterol and provides vitamin E. (Source: American Heart Association)

This unfiltered extra-virgin olive oil is made from the olives of 700 year old trees in Sparta, Greece. The flavorful oil has a rich golden color and smooth texture. I wanted to highlight the nutty, fruity flavor of the oil in my recipes this week.

Today’s recipe comes from Brunch at Bobby’s. This brunch is the 4th recipe we’ve made from this book and we’ve only had it since Christmas. (Remember that incredible Croissant French Toast? I feel like a spokesperson for this incredible cookbook. I should be getting paid!) How could I pass up the opportunity to stretch my culinary muscles by poaching eggs in olive oil?! I even went ahead and experimented with mustard seeds for the tomato relish recommended. I don’t even like eggs and I devoured two open faced sandwiches for lunch! As if the texture combinations between crispy pancetta and silky eggs isn’t enough, there’s a boost of flavor from the relish.

Olive Oil Poached Eggs with Tomato Relish

Ingredients:

  • 8 thin slices of pancetta
  • 4 thick slices of sourdough bread, toasted
  • 1 C plus 3 tbsp olive oil, divided use
  • 1 tsp yellow mustard seeds
  • 1/2 pt cherry tomatoes, quartered
  • pinch of sugar
  • splash of red wine vinegar
  • 2 tbsp chopped flat-leaf parsley (I used Gourmet Garden lightly dried herbs)
  • 2 tbsp chopped chives (I used Gourmet Garden lightly dried herbs)
  • 4 eggs

Steps:

  1. Preheat oven to 375 degrees F. Place pancetta on a rimmed baking sheet. Bake 8-10 minutes until crispy, flipping halfway through.
  2. Make the relish: Heat 3 tbsp olive oil in a pan over medium heat, add the mustard seeds and cook until they start to pop. Add the tomatoes, sugar, and vinegar. Mix in the parsley and chives. Transfer to a bowl.
  3. Heat the remaining 1 C of olive oil in a small skillet over medium heat, until it reaches 140 degrees F. Crack each egg into a ramekin and slide them into the oil, one at a time. Poach until the yolks are almost set, 3-5 minutes.
  4. Assemble: Place each egg on a slice of toasted sourdough, sprinkle with S+P. Top with 2 pieces of crispy pancetta and some of the tomato relish. Garnish with fresh parsley.

*This recipe is adapted from Brunch at Bobby’s*

Olive Oil Poached Eggs with Tomato Relish for the #EVOOChallenge from Sew You Think You Can Cook

Disclaimer 1: By participating in this 5 day challenge I received a bottle and pouch of Spartan Olive Oil. 

Disclaimer 2: This post contains affiliate links. 

Tomato and Bean Salad

Late spring and summer this year have been fairly wet. All of the rain yielded quite the tomato crop over in my neighbor’s yard. Which means just about every week I’m being given fresh homegrown tomatoes! (Black cherry tomatoes, heirloom tomatoes, and roma tomatoes) I’ve even been handed two quarts of homemade tomato sauce.

This pregnancy I’ve found that I adore tomatoes. BLTs have been shamelessly scarfed down for lunch at least once a week, and those cherry tomatoes turned into my favorite salad (tomatoes, thinly sliced onion, balsamic vinegar, olive oil, S+P).

I took a play on that aforementioned salad and added beans and basil to make a heartier potluck contribution at a church function.

Tomato and Bean Salad

Ingredients:

  • 1 can (15 oz) white beans, drained and rinsed
  • 1 very large heirloom tomato, chopped
  • 1 tbsp chopped fresh basil (I used Gourmet Garden lightly dried basil)
  • 1 heaping tbsp minced red onion
  • 2 tbsp red wine vinegar
  • 1 tbsp apple cider vinegar
  • 2 tbsp extra virgin olive oil
  • 1 tbsp agave
  • 1/2 tsp minced garlic

Steps:

  1. In a large bowl, gently toss together beans, tomatoes, basil, and onion.
  2. In a small bowl, whisk together vinegars, oil, agave, and garlic. Season to taste with S+P.
  3. Dress salad and keep in refrigerator until ready to serve (at least 30 minutes).

*This recipe is adapted from Rebekah at http://rebekahrose.blogspot.ca/2015/07/bloggerclue-white-bean-tomato-and-basil.html*

tomato bean salad | sew you think you can cook

Braised Chicken Thighs with Cinnamon and Tomato

Alex Guarnaschelli is one of those Food Network stars that I would just love to meet. I stalk her instagram account and Facebook page to see everything she’s cooking up in the kitchen. My favorite posts are those in which she states her cravings – from bacon and pancakes, to ice cream and salad. I even follow the instagram account for her restaurant Butter. As if eating at her establishment wasn’t already on my bucket list, seeing photos of gourmet burgers, elegant breakfasts, and creative desserts makes me wish I could hop on a plane to NYC at the drop of a hat.

Two Christmases ago I received her first cookbook, Old-School Comfort Food: The Way I Learned to Cook. I’ve already shared her Breaded Chicken with Mustard and Sherry. Today I’m sharing another chicken dish. Alex titled this recipe Braised Chicken Legs with Ginger and Tomato. I’ve renamed it as you can see in today’s post title. I bought only thighs for this dish as a combination of thighs and drumsticks wasn’t available at my grocery store. I also found that the cinnamon flavor profile was stronger than the ginger. You might think it’s weird to cook chicken with cinnamon, but trust me on this one. No, trust Alex! She says:

“[My mom] edited an amazing Indian cookbook that made her revise the chicken tomato combo and add hauntingly flavorful spices like cinnamon, which evokes the sweetness of the tomatoes.”

I hardly ever cook with chicken thighs. My mom is a bone-less, skin-less chicken breast kind of girl and so that’s what I am also accustomed to, and what I usually buy when chicken is on my list. It’s easy. Because using dark meat isn’t something I’m exactly comfortable with, I’m never convinced I’ve cooked it completely. White meat is more obvious – zero pink and juices run clear. Dark meat doesn’t turn white. And when there’s a bone involved there’s usually some red/pink close to the bone which always makes me paranoid that I didn’t really cook it through all the way. I bought a giant pack of chicken thighs though, so there’s lot of practice in my future.

For this dish, I was really excited when my chicken skins were crispy after browning them. But then they get braised and that crispy skin is no more. Keeping the skin on the chicken though helps ensure that the meat won’t dry out.

Braised Chicken Thighs with Cinnamon and Tomato

Ingredients:

  • 2 tbsp canola oil
  • 4 bone-in, skin-on chicken thighs
  • 1/2 tsp red pepper flakes
  • 1 white onion, diced
  • 1/4 tsp cumin
  • 1″ piece of ginger, grated
  • 2 cloves garlic, minced
  • 1 cinnamon stick
  • 1 bay leaf
  • 3/4 C white wine
  • 1 can (14 oz) peeled whole tomatoes
  • 1 tbsp butter

Steps:

  1. In a large, high-sided skillet heat oil over medium-high heat.
  2. Season both sides of chicken with S+P and red pepper flakes. Add to the hot oil skin-side down. Brown for 8 minutes, flip and cook another 5 minutes. Remove and set aside.
  3. Add the onions and stir in the cumin. Cook 5 minutes. Stir in the ginger and garlic, cinnamon stick, and bay leaf. Add in the white wine and cook until reduced by half, about 8 minutes. Add the canned tomatoes and cook simmer 10 minutes.
  4. Gently break up the tomatoes. Return the chicken to the pan. Cook over low heat for 30 minutes, or until chicken is cooked through.
  5. Stir in butter and remove cinnamon and bay leaf. Serve with wild rice.

Braised Chicken Thighs with Cinnamon and Tomatoes

Disclaimer: This post contains affiliate links.

Caprese Steak

As previously promised, here’s another steak recipe on Sew You Think You Can Cook. This one features a beautiful cut of steak, seared, topped with tomato and fresh mozzarella and baked to perfection. Top it with fresh basil and balsamic vinegar reduction and you have a restaurant quality dinner right in your own home.

I found this idea while perusing Foodgawker and thought it looked simple enough for my handy kitchen helpers to do. Funnily enough, neither of them actually read the recipe, or apparently listened to me when I told them how to prepare the meat. Mom declared that this one was Stuart’s to make because it involved grilling. It does not. And Stuart kept trying to go outside to the grill!

I guess when they think steak, they think grilling. Most probably do. But this recipe sears it off in a skillet to get a beautiful crust and then finishes in the oven. This cooking method creates perfectly juicy steaks.

Caprese Steak

Ingredients:

  • 1/2 C balsamic vinegar
  • 3 steaks
  • 1 beefsteak tomato
  • fresh mozzarella cheese
  • fresh basil

Steps:

  1. Preheat oven to 400 degrees F.
  2. In a small skillet reduce balsamic vinegar until reduced by half.
  3. Season steak with S+P.
  4. In a cast iron skillet over high heat cook both sides of the steak, 2-3 minutes until an even sear is achieved.
  5. Top steak with slice of tomato and mozzarella cheese. Bake until the reach a desired internal temperature.
  6. Garnish with fresh basil and top with balsamic.

*This recipe is adapted from K at http://www.onthewoodside.com/2013/11/seared-filet-with-tomato-and-fresh.html*

Caprese Steak


SRC: Candied Tomato Pizza

newsrcbanner

Today is another Secret Recipe Club Reveal Day! In the secret recipe club, each participating blogger is assigned a blog from another participating blogger and secretly searches their site for something to recreate. The accompanying blog post then goes live on reveal day! So while I was immersed in my assigned blog, someone else was picking through mine! I’m so excited to be part of this group, to see what on my blog peaks other’s interests and to stumble upon new blogs and new recipes.

This month I was assigned Jaime’s blog Mom’s Test Kitchen. I know it sounds silly, but my favorite thing about her blog is her tagline “What the Fork’s for Dinner.” Her About Me section is very well written and makes me laugh in all the right places. Particularly the part about the unexpected arrival of Princess P. Being pregnant, it’s fun to feel connected to Jaime as she shares her loving frustrations with pregnancy. (But sorry, Jaime, I actually LOVE being pregnant! But it probably helps that I still have yet to be touched by complete strangers – 9 weeks to go!) After becoming a stay-at-home-mom, Jaime started her blog as a way to keep organized and reawaken her adult self. Since then her “corner of the blog world” has boomed into the very impressive blog that she currently runs; Jaime participates in multiple Link Parties and features guest posts!

Pregnancy cravings have had me wanting to run to the nearest Dunkin (thankfully that’s 20 miles away and the efficiency-lover in me prevails) so I am very impressed that I didn’t recreate her Cinnamon Sugar Donut Muffins for this blog post (there’s still a good possibility I’ll end up making them). Due to Lent no-meat Fridays I was drawn to this Easy Vegetable Pot Pie, but it turned out that I don’t think I ever ended up cooking on Fridays – strange. But then a recent post on April 3rd sealed the deal: Candied Tomato Margherita Pizza.

I made this pizza after church on Easter Sunday (so her Empty Tomb Buns were a big contender too; but I’ll save them for when my future child is old enough to understand). Because I made this on Easter Sunday, a day when grocery stores were closed, my shopping fail in forgetting to buy fresh basil couldn’t be remedied. So naturally, I substituted bacon.

I used my pizza dough recipe and made 3 personal pizzas for Stuart and me to share. (The fourth ball of dough is now living in my freezer for another day.) The first I topped with the candied tomatoes and some crispy bacon. But it really was needed that something. That something was the basil I didn’t have. At least one of us had a head on our shoulders and Stuart suggested using the dried basil out of the spice cabinet. Perfect! Being the meat eater that he his, Stuart enjoyed the bonus bacon but I don’t feel it really added anything to the pizza so one of our 3 pizzas didn’t have any on it.

If you’ve never candied tomatoes – I hadn’t before this – I urge you to make some now. Put them on this pizza, put them in a sandwich, or eat them plain, I don’t care. But I do insist that you add tomatoes and brown sugar to your grocery list.

IMG_8523 IMG_8526

Candied Tomato Pizza

Ingredients:

  • 4 firm roma tomatoes, thickly sliced
  • 1/2 – 1 C brown sugar
  • 3 strips bacon, chopped (optional)
  • 1 pizza crust, store bought or homemade
  • 3-4 tbsp olive oil
  • Kosher salt
  • 1 – 2 C shredded mozzarella cheese
  • basil, dried or fresh
  • cornmeal

Steps:

  1. Preheat oven to 350 degrees F. Line a baking sheet with parchment paper.
  2. Starting with 1/2 C of brown sugar, coat both sides of the tomatoes with sugar. Use more sugar if needed. Place tomatoes in a single layer on the baking sheet.
  3. Bake for 30 minutes. Flip the tomatoes and bake another 15 minutes.
  4. Place pizza stone in the oven and preheat to 450 degrees F (or follow instructions for your particular dough).
  5. Roll pizza dough out and place on pizza peal (or rimless cookie sheet) that has been sprinkled with cornmeal. Brush entire crust with olive oil, sprinkle with salt, top with cheese, basil, candied tomatoes, and bacon.
  6. Bake for 9 minutes (or follow instructions for your particular dough).

*This recipe is adapted from Jaime at http://momstestkitchen.com/2014/04/candied-margherita-pizza.html*

Candied Tomato Pizza

To see the other bloggers who participated in the Secret Recipe Club this month click here:

CIC: Coconut & Tomato

CIC-header

I interrupt my recount of Hawaiian food to bring you this month’s Crazy Ingredient Challenge! This month the task was to combine Coconut and Tomato. Upon seeing the ingredient list I thought I was going to sit this one out as I am allergic to coconut. But then I got an idea and decided, why not! Just because I can’t eat it doesn’t mean my friends can’t be my taste buds.

My original idea was to do a play on the Bloody Mary – either make a virgin version substituting vodka for coconut water, or simply adding coconut water to the cocktail, or even making a “creamy” version with coconut milk, garnished of course with toasted coconut.

This idea was altered slightly when I searched Food Network’s website for Bloody Mary recipes. I’d never had one before! I found Rachael Ray’s recipe for Bloody Mary Shrimp Cocktail and thought, that’s a better idea! And I can serve it with coconut shrimp instead of typical shrimp cocktail. This way also prevents my husband from trying multiple Bloody Marys before I came up with the right recipe. I also bought cocktail shrimp so I could dip in too!

I served this appetizer during last weekend’s football game. We had some friends over and I was given the “this is addicting” nod of approval. I hope this boozy dip makes it to your next tailgate!

Coconut Shrimp with Bloody Mary Dip

Ingredients for Shrimp:

  • Canola oil, for frying
  • 1 lb peeled, deveined shrimp
  • 1 C flour
  • 1/2 tbsp onion powder
  • 1/2 tbsp garlic powder
  • 4 eggs
  • 1 C panko breadcrumbs
  • 1 C shredded sweetened coconut

Ingredients for Dip:

  • 28 oz can crushed tomatoes
  • 2 tbsp horseradish
  • 2 tbsp Worcestershire
  • 2 tsp hot sauce
  • 2-3 shots of vodka, to taste

Steps:

  1. Bring oil to 350 degrees.
  2. In a large bowl combine flour, garlic powder, and onion powder. In another bowl beat eggs and season with S+P. In a third bowl combine coconut and panko. Season shrimp with S+P and dredge in flour, egg, and panko. Fry shrimp 2 minutes on each side. It’s best to do this in batches so as not to decrease the oil temperature too much.
  3. Combine dip ingredients. Serve with celery sticks!

*The shrimp is adapted from The Neelys and the dip is modified from Rachael Ray*

Coconut Shrimp and Bloody Mary Dip 2Coconut Shrimp and Bloody Mary Dip 1

Click the link below to see other blogs that participated in this month’s Crazy Ingredient Challenge!

recreatedbysrc