Carrot Cake Cinnamon Rolls #EasterRecipes

What do you do when you can’t sleep?

Do you just toss and turn, stare at the dark ceiling and hope for rest to return?

Well, today (yesterday) I decided to do something productive with my restlessness. Maybe I’ll be regretting that later, but I was tired of feeling like I was keeping the hubs awake. (Pun unintended.)

So what did I do?

Wash dishes.

Everyone washes dishes at 2am, right?!

I don’t know why I couldn’t sleep. I have a slight head cold, but it’s nothing to write home about. (Hopefully this “just wake up” decision doesn’t come back to bite me with that cold. I’m off to get some Nyquil tomorrow!) I keep having these parenting dreams that seem all too real, involving unplanned pregnancy and horrible mothering.

I think the real culprit has something to do with the first of three preschool tours lined up this month in the morning. All yesterday, while he was playing with his trains and talking up a storm, I just looked at him and thought, “When did you get so big?”

We aren’t looking to start Firecracker in school until the Fall – he’ll be 3 and {hopefully} potty trained by then. He is definitely interested in going to school. My boy is such a social butterfly, it’s just something we need to do for him. He’ll be attending VBS at our church this summer, so it’ll be a great test! (Yep, typing that reminded me to go register him now. Look at all of the productive things one can get done in the 2 o’clock hour!)

Who knew picking a preschool would be such a big decision!? I have a spreadsheet on my computer with our top choices, breaking down stats, including the insane cost that is preschool. We’re only considering 2 or 3 times a week, and half days. Yikes!

Maybe typing out these thoughts will help calm my mind and I’ll be able to go back to sleep soon. Odds are I’m going to end up asleep on the couch, computer in lap!

17760916_10155147498601948_7213568015100808130_o

Absolutely none of that intro story has to do with the Carrot Cake Cinnamon Rolls I’m sharing with today’s Holiday Fun with our Blogging Friends group. Except that I have to write this post and might as well do it at 2:45 in the morning, right? That way I don’t have to pull out my computer during playtime with my growing boys!

This week, 13 bloggers are sharing 46 recipes and tips to help you serve up deliciousness this Easter. Follow #EasterRecipes on social media to see what we’re serving up!

Yesterday, I shared Carrot Cake Pancakes that came with a confused maple cream cheese topping. All of that leftover maple mixture didn’t go to waste. I simply made cinnamon rolls the next day! Carrot Cake Cinnamon Rolls, of course.

Carrot Cake Cinnamon Rolls

Ingredients for the dough:

  • 1 packet active dry yeast
  • 1 C warm water
  • 3 tbsp room temperature butter
  • 1/2 C sugar
  • 3 – 4 C flour, plus extra for rolling
  • 1 egg
  • 1/2 tbsp salt

Ingredients for filling:

  • 4 tbsp. butter, softened
  • 3/4 C brown sugar
  • 1 tbsp cinnamon
  • 1/4 tsp ginger
  • 1/8 tsp nutmeg
  • 1 large carrot, grated
  • 1/2 C raisins
  • 1/2 C chopped walnuts

Ingredients for frosting:

  • 1 block (8 oz) cream cheese, softened
  • 1 C real maple syrup

Steps:

  1. Stir yeast into the warm water. Let bloom for 5-10 minutes.
  2. Using a stand mixer fitted with the paddle, beat butter, sugar, and salt. Add eggs one at a time, beating until combined. Slowly pour in the yeast and water. Beat until combined. Add the flour about one cup at a time, beating until combined after each addition. Once the dough starts to form switch to the dough hook attachment. After all the flour has been added knead the dough for 3 minutes.
  3. Turn dough out onto a floured surface and knead by hand until smooth.
  4. Place dough in a greased bowl, cover, and let rise to double in size (about 30 minutes) in a warm place. (In the microwave or turned off oven)
  5. Roll out dough onto a floured surface.
  6. Roll into a rectangle. Spread the dough evenly with the softened butter. In a small bowl whisk together the brown sugar, cinnamon, ginger, and nutmeg. Sprinkle the mixture over the dough. Add the grated carrot, raisins, and walnuts, pressing into the dough slightly. Roll the dough into a log, lengthwise. Cut the dough into 2″ cinnamon rolls. Place cut side down in a 9×13 casserole dish.
  7. Cover dough with a towel and let rise for 30 minutes before baking. The rolls should have doubled in size again. (Or you can freeze the rolls and after thawing let rise until doubled in size.)
  8. Bake at 425 degrees for 10 minutes. Reduce heat to 350 and bake another 7 minutes, until golden brown. Let cool, slightly.
  9. Meanwhile, make frosting. Using a hand mixer, beat together the cream cheese and syrup. Frost the cinnamon rolls!

Carrot Cake Cinnamon Rolls Sew You Think You Can Cook #EasterRecipes

Be sure to check out these other Easter Recipes:

Cinnamon Crescent Rolls by Tip Garden

Individual Easter Breads by Cooking With Carlee

Tomato Asparagus Quiche by Caroline’s Cooking

Peeps Whoopie Pies by Palatable Pastime

Rosemary Garlic Herb Rib Roast by Family Around The Table

Honey butter Peas and Carrots by Jolene’s Recipe Journal

Pea and Pasta Salad by A Kitchen Hoor’s Adventures

Roasted Eggplant Salad by A Day in the Life on the Farm

In case you missed them, here are the recipes from Monday and Tuesday:

Monday

Deviled Ham Bites by A Kitchen Hoor’s Adventures

30 Minute Dinner Rolls by Amy’s Cooking Adventures

Easy Pecan Sticky Buns by Corn, Beans, Pigs & Kids

Easy Citrus Ham by Jolene’s Recipe Journal

Sausage and Vegetable Strata by A Day in the Life on the Farm

Prosciutto Wrapped Asparagus With Lemon Herb Sauce by Tip Garden

Dipped Strawberry Carrots by Family Around The Table

Easter Malted Milk Dip by Hezzi-D’s Books and Cooks

Sharadan’s Lemon Blueberry Parfaits by Cooking With Carlee

Easter Egg Cooking and Dyeing Tips and Tricks by Palatable Pastime

Tuesday

Italian Easter Bread by Palatable Pastime

Carrot Cake Pancakes by Sew You Think You Can Cook

Torta Salata Pasquale by A Day in the Life on the Farm

Dill Roasted Radishes by A Kitchen Hoor’s Adventures

Roasted Parmesan Asparagus by Family Around The Table

Praying Arm Pretzels by Amy’s Cooking Adventures

Creamy Coconut Mini Tarts by Making the Most of Naptime

#FoodieExtravaganza: Maple Syrup

foodieextravaganza-300

The Foodie Extravaganza is a monthly party hosted by bloggers who love food! Each month we incorporate one main ingredient or theme into recipes to share with you. We take turns hosting and this month it’s my turn!

December 17th is National Maple Syrup Day and I challenged the crew to bake with, cook with, or make a beverage with maple syrup. (For some international bloggers who can’t find maple syrup, they’ll be joining the fun with honey as a substitute.)

With the hectic holiday season, I managed to forget to make something for this event. Before I scrambled to add extra maple syrup to my grocery list, I scrolled through my camera to see if I had anything that would satisfy my call for this maple syrup extravaganza.

Happily enough, I did! Unhappily enough, the photos made want to curl up into a ball and hide. Alas, that’s just the way it is.

I made this turkey breast in January. (Hey, at least it was January of this year!) In January we were living in Ohio. It was cold. I assume it was snowing. And it most definitely was dark at an unacceptable early hour. Those are the excuses I give for the awkward glare of the glaze. It’s a bummer, too, because as I pulled it out of the oven, my husband (and I remember this vividly) declared that it was almost too pretty to eat and that it belonged on the cover of a magazine.

This Rosemary Maple Glazed Turkey is perfect for your holiday table and pairs nicely with Roasted Pears and Parsnips.

Rosemary Maple Glazed Turkey Breast

Ingredients:

  • 1 turkey breast, 4-6 lb
  • 4 onions, halved
  • 6 cloves garlic, smashed
  • 6 stalk of rosemary
  • 2 C chicken stock
  • 2 C balsamic vinegar
  • 1 C maple syrup

Steps:

  1. Preheat oven to 325 degrees F.
  2. Season the turkey breast with S+P, inside and out. Stuff the cavity with 2 onions, 2 cloves of garlic, and 1 stalk of rosemary.
  3. Arrange the remaining onions, garlic, and 2 stalks of rosemary in the bottom of a roasting pan. Place the prepared turkey on top. Pour the stock into the pan.
  4. Roast turkey for 2 – 2 1/2 hours (or according to turkey instructions) until an internal temperature of 165 degrees F is reached.
  5. Make the glaze: In a small saucepan over medium heat bring vinegar, syrup, and remaining rosemary to a boil. Reduce heat to medium-low and allow to reduce 30 minutes, stirring often.
  6. Brush the glaze over the turkey every 30 minutes. Reserve any remaining glaze and keep warm for serving with the finished turkey.

*This recipe is adapted from Erin at http://www.5dollardinners.com/real-food-holiday/*

Rosemary Maple Glazed Turkey Breast for #FoodieExtravaganza from Sew You Think You Can Cook

And don’t forget to check out all these other maply recipes:

Basbousa – Egyptian Semolina Cake from Sneha of Sneha’s Recipe

Bangin’ Breakfast Potatoes from Rebekah of Making Miracles

Gluten-Free Maple Chestnut Cookies from Caroline of Caroline’s Cooking

Maple Pecan Bars from Nichole of Cookaholic Wife

Maple Sugar Cookies from Sue of Palatable Pastime

Maple Walnut Vinaigrette from Tara of Tara’s Multicultural Table

Momiji Tempura from Camilla of Culinary Adventures with Camilla

Overnight French Toast Casserole from Elaine of Cookin and Craftin

Roasted Maple Glazed Carrots from Wendy of A Day in the Life of the Farm

The Back Forty Cocktail from Stacy of Food Lust People Love

If you are a blogger and would like to join our group and blog along with us, come join our Facebook page Foodie Extravaganza. We would love to have you! If you’re a spectator looking for delicious tid-bits check out our Foodie Extravaganza Pinterest Board! Looking for our previous parties? Check them out HERE.

#CranberryWeek: Cranberry Glazed Pork Loin

cranberry-week-logo

Welcome to #CranberryWeek, hosted by Caroline’s Cooking and A Kitchen Hoor’s Adventures. We’ll be sharing cranberry-inspired creations all week long in celebration of national cranberry day. Search #CranberryWeek to keep up to date and follow the #CranberryWeek Pinterest board for more cranberry inspiration.

When I made this glazed pork, I was hoping to find a turkey breast to serve with the cornbread dressing I shared yesterday.

Actually, I had a couple ingredient finding hurdles to overcome.

I’ve been in a grocery store loyalty crisis. Now that Treat is too big for the Baby Bjorn (not impossible, but highly uncomfortable), I prefer to shop with him in the cart. That leaves Firecracker to walk beside me. There isn’t enough magnetic force in the world to keep that kid by myside for more than three minutes! That energetic 2 year old is off running up and down the aisles as soon as I let go of his hand. Or, he’s touching every single item at arms level when he is staying near. My patience with him wanes thin and I have to load him up into the basket. As I try to start each grocery trip with a positive attitude, by the time I “give up” I have a cart full of groceries. And to add to the frustration, Treat has a habit of screaming at an insanely high pitch. He’s not upset or crying, just screaming to scream. It’s a happy and excited sound, but one that deafens ears. Naturally, his older brother follows suit and I’m standing in the grocery store pulling out my hair half laughing half crying and all about yelling at my children.

The solution is to find a grocery store with “car carts” so both of my boys can be buckled into a cart. The bonus of a steering wheel definitely helps. Unfortunately, there aren’t many option for that out here in SoCal.

I do a decent amount of shopping at the commissary on base, particularly for yogurt as it’s about half the price of the local grocery stores. Being tax free means that processed foods end up being a tad cheaper, too. Only problem, is that I don’t quite trust their meat and seafood department, and the fresh produce is hit or miss on quality.

For small trips, I love walking to the local Whole Foods, but I’m limited to the space under the stroller. And while the meat quality is fantastic, it’s a bit pricy.

One Monday morning, I decided to try another store about a mile away. Took the kids on a walk and did some recon. Yogurt was the same marked up cost as the other stores. THe produce department was beautiful, and their bulk foods section to die for. Their meat departement looked fine, but was small; there wasn’t a turkey breast in sight (I assume that changed closer to the holiday?). I settled on a beautiful looking pork loin instead.

Another missing ingredient? Apple cider.

I knew one of the grocery stores I like sells it, but did I really want to get in the car for one item? Nope. Instead, I popped into the local coffee shop and ordered a cup of cider to go. Mission accomplished. I’m sure that 12 oz cup cost the same as a half gallon at a grocery store, but you can’t underestimate the price of my time, energy, and sanity!

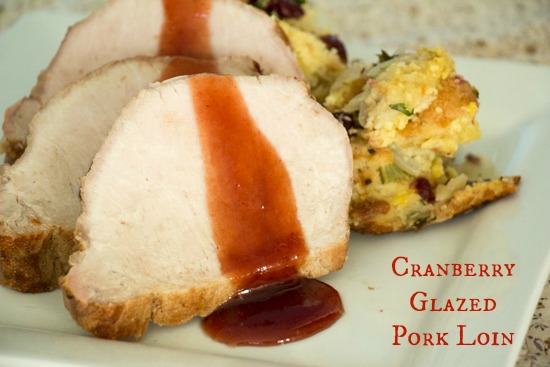
Cranberry Glazed Pork Loin

Ingredients:

  • 2 tbsp butter, divided use
  • 1/2 shallot, chopped
  • 1 tsp whole juniper berries
  • 1 C fresh cranberries
  • 2/3 C apple cider
  • 2/3 C maple syrup
  • 1/2 C red currant jelly
  • 1/4 tsp Kosher salt
  • pork loin, trimmed

Steps:

  1. Melt 1 tbsp butter in a small saucepan over medium heat. Saute shallot until translucent. Add the juniper berries, and cook one minute. Add cranberries, cider, syrup, jelly, and S+P. Simmer 3-5 minutes, until cranberries burst.
  2. Transfer glaze to a blender and puree until smooth. Return to the saucepan after passing through a sieve.
  3. Bring glaze to a simmer over medium heat and cook until reduced to about 1 1/4 C, 10-15 minutes. Keep warm.
  4. Preheat oven to 375 degrees F.
  5. Melt butter in a large oven safe skillet, sear pork abour 2 minutes on all sides. Brush with glaze and put in oven until an internal temperature of 145 degrees F is reached. Brush with glaze every 10 minutes or so. Cook time will depend on thickness of pork loin.
  6. Be sure to bring any extra glaze back to a boil to prevent contamination before serving alongside pork.

*This glaze recipe is adapted from Martha Stewart at http://www.marthastewart.com/261237/cranberry-glaze*

Cranberry Glazed Pork Loin for #CranberryWeek from Sew You Think You Can Cook

Be sure to check out all the other cranberry recipes being shared today:

Braised Short Ribs with Hoisin-Cranberry Sauce and Asian Coleslaw from Culinary Adventures with Camilla

Cranberry & Cornbread Stuffed Pork Chops from Books n’ Cooks

Cranberry Borscht from Palatable Pastime

Cranberry Glazed Pork Loin from Sew You Think You Can Cook

Cranberry Lemon Curd Tart (No Bake, GF) from Caroline’s Cooking

Cranberry London Broil from Cindy’s Recipes and Writings

Cranberry Mustard from A Kitchen Hoor’s Adventures

Cranberry Vanilla Bean Donuts from Hostess At Heart

Grilled Brie with Cranberries from Full Belly Sisters

Honey Roasted Cranberry Ricotta Crostini from Take Two Tapas

Orange Cranberry Turnovers by The Bitter Side of Sweet

Panko Crusted Chicken with Maple Cranberry Sauce from Family Around The Table

Sweet Heat Cranberry Spread from Cooking With Carlee

Maple Walnut Vinaigrette

Now that we’ve closed the door on Halloween, it’s comfort food season.

You totally thought I was going to make some joke regarding Christmas.

Nope!

There won’t be a hint of Christmas (well, except for getting a start on my Christmas gift shopping) happening in my house until after Thanksgiving! That’s right people, there’s another holiday (at least in the US) before putting up that tree. (You hear me, Mom?!)

Sorry for that little rant there….

Back to salad.

Salad? What?

Yes. Salad.

Even amid the sea of hearty baked casseroles, you still need to eat something a bright and fresh and a salad with hints of fall is the perfect way to break up your weekly menu.

I served this walnut dressing over a salad of Brussels sprouts, spinach, and romaine lettuce. The “mix-ins” included walnuts, bacon, and apple. Dried cranberries or cooked chicken would work great, too!

Maple Walnut Vinaigrette

Ingredients:

  • 1/2 C maple syrup
  • 1/2 C walnuts
  • 1/4 C apple cider vinegar
  • 1 tsp salt
  • 1 tsp ground mustard
  • 1/2 tsp white pepper
  • 1/8 tsp garlic powder
  • 2 tbsp extra virgin olive oil
  • 2 tbsp canola oil

Steps:

  1. Place all ingredients except oils into a blender. Blend until smooth.
  2. With the blender running, pour in the oils. Add a little water, if needed.

*This recipe is adapted from Monica at http://www.theyummylife.com/recipes/38*

Maple Walnut Vinaigrette | Sew You Think You Can Cook | http://sewyouthinkyoucancook.com

SRC: Breakfast Quinoa

newsrcbanner

It’s Secret Recipe Club Reveal Day! In the Secret Recipe Club, each participating blogger is assigned a blog from another participating blogger and secretly searches their site for something to recreate. The accompanying blog post then goes live on reveal day! So while I was immersed in my assigned blog, someone else was picking through mine! I’m so excited to be part of this group, to see what on my blog peaks other’s interests and to stumble upon new blogs and new recipes.

I almost didn’t participate this month. My husband has been gone for a month. Not gone gone, just on the other side of the country thanks to a 5 week course for work. We’re in the final stretch and will be reunited Friday! It’s been a long 4.5 weeks so far, but with visits from the boys’ aunt and grandmothers we’ve been making it through.

Cooking has been very minimal around here, limiting my culinary output to things I know the boys will eat. Aka cheese. We’ve been living off of cheese. Grilled cheese sandwiches, quesadillas, nachos, and pizzas – all good means for “hiding” protein into their diets.

I knew signing up for SRC this month would force me to cook something other than waffles and sweets. I’m glad I did, too, because this month I was assigned The Gluten-Free Foodsmith written by Tina Marie. Tina Marie made the switch to gluten-free living after discovering it made a huge impact in restoring her to health following an illness. Tina Marie made the best of her gluten-free lifestyle and has developed an impressive arsenal of delicious recipes that everyone can enjoy!

Limiting my search of her blog to recipes I knew my kids would actually help me eat and that were healthy wasn’t too difficult! Apple Pineapple Muffins were going to be the winner until I found Warm Plum and Blueberry Quinoa Salad. Also added to my possibility list were: Pecan Walnut Chicken Salad (but I haven’t introduced nuts to Treat yet), Black Bean Salsa Wraps, and Lentil Chili Stew.

I had to make some adjustments to Tina Marie’s recipe due to dietary restrictions. I had to substitute agave for honey due to Treat being under one. I used butter instead of coconut oil because I’m allergic to coconut. And used regular cow’s milk instead of almond milk because I haven’t tested a nut allergy with Treat yet and was/am too anxious and nervous about doing so while I’m parenting solo. Obviously, I left the raw almonds out, too. Sounds like a lot, but it’s really not.

We loved this quinoa! I even made it again with strawberries when my mother-in-law was visiting. It was her first introduction to quinoa and she quite enjoyed it, too. What I love best is that it doesn’t take any longer than making oatmeal in the morning and is arguably healthier! Quinoa has almost double the amount of protein as oats do.

Treat loved the change in his breakfast from Greek yogurt to this quinoa. Firecracker, who does enjoy the seed, wasn’t as interested and simply picked out all of the fruit. I guess for him quinoa is supposed to stay savory. I enjoyed the sweet take to it and will continue explore its sweeter applications – I know Tina Maria had a couple cookie recipes on her blog using the seed!

Breakfast Quinoa

Ingredients:

  • 1/2 C uncooked quinoa
  • 2 tbsp butter
  • 1 tbsp agave
  • 1 tbsp milk
  • 1 tsp cinnamon
  • 1 tsp real maple syrup
  • 1 plum, pitted and chopped
  • 1/4 C blueberries (I used frozen)

Steps:

  1. Cook quinoa according to package instructions.
  2. Add butter, agave, milk, cinnamon, and syrup to the cooked quinoa. Stir in the plum and blueberries. Keep over low heat until butter is melted, quinoa is evenly coated, and fruit is warmed through.

*This recipe is modified from Tina Maria at http://glutenfreefoodsmith.com/2015/05/warm-plum-and-blueberry-quinoa-salad/*

Breakfast Quinoa for Secret Recipe Club from Sew You Think You Can Cook

To see the other bloggers who participated in The Secret Recipe Club this month click here:

#ChoctoberFest: Chickpea Cocoa Dip

#Choctoberfest

It’s hard to pick a favorite, but I think today’s offering might be my favorite recipe of my #ChoctoberFest menu.
Friends of ours brought this chocolate hummus dip to Firecracker’s birthday party and it was a huge hit. Kids and adults alike couldn’t get enough of it! I’d been dying to make it at the house and here was my perfect opportunity.
I was a little nervous that Firecracker wouldn’t go for it, as homemade hummus is not “real” hummus and he won’t touch it if it’s not out of a store bought container. However, as this dip doesn’t have tahini it’s not technically a hummus variation anyway, it’s simply a sweet bean dip.
I got him to help me in the kitchen and simply told him we were making chocolate. He couldn’t be more ecstatic. He absolutely loves to help in the kitchen and his current favorite phrase is “need any help?” almost to the point of annoyance, but I do want and need to encourage this helpful attitude!
I broke out the step stool and had him push the buttons on the food processor. (Treat looked on in anticipation.) He kept informing me it was ready in his impatience to eat some chocolate. He did a fabulous job waiting until after I took some photos before I handed him his own little snack kit of dip, pretzels, and apple slices.
chickpea-cocoa-dip-for-choctoberfest-so-easy-a-kid-can-make-it
chickpea-cocoa-dip-for-choctoberfest-kid-approved
If you’re looking for a guilt-free way to satisfy that chocolate craving, I encourage you to break out the food processor for this snack.
Chickpea Cocoa Dip
Ingredients:
  • 1 can (15 oz) garbanzo beans, drained and rinsed
  • 5 tbsp maple syrup
  • 2 tbsp cocoa powder
  • 1 tsp vanilla extract
Steps:
  1. Place garbanzo beans in a food process and pulse a few times. Add the remaining ingredients and puree until smooth, scraping down the sides of the bowl as needed.
  2. Enjoy with pretzels and fruit.
Chickpea Cocoa Dip for #ChoctoberFest from Sew You Think You Can Cook
Don’t forget to enter our giveaway and be sure to check out the other bloggers who posted more chocolate recipes today:

#MuffinMonday: Apple Blackberry Muffins

fb5cd-muffin2bmonday2bcrop#MuffinMonday is a group of muffin loving bakers who get together once a month to bake muffins to brighten their Mondays. There isn’t a theme to #MuffinMonday posts so anything goes, as long as it’s a muffin!

You can see all our of lovely muffins by following our Pinterest board. Updated links for all of our past events and more information about Muffin Monday can be found on our home page.

I am sharing with you this month a muffin I made way back in May after one of our weekly trips to the Farmers Market. I had picked up some blackberries from one of my favorite vendors for my husband. I am not the biggest blackberry lover mainly due to their texture. I didn’t think my husband would actually eat the entire carton of berries before they started to spoil so I decided to make muffins with about half of them. While assembling all of the baking supplies and getting my little helper situated, he started eating all of the berries! I knew I couldn’t use the fruit in the muffins, now; anything healthy my picky eater will willingly eat is all his! We had frozen blackberries for smoothie making, so I carried on with my muffin plan.

You’ll notice the recipe doesn’t call for any butter or oil, making them a little bit healthier than most breakfast treats I bake. I mean, there’s still sugar and syrup involved so it balances out, right? The downfall to not having butter or oil in the recipe means they’ll stick to muffin liners, so be sure to spray them as you would a non-lined muffin tin.

Apple Blackberry Muffins (toddler)  Sew You Think You Can Cook

Firecracker really enjoyed these muffins. I’m pretty sure he had 3 in one day.

I froze half of the muffins and had a quick morning snack throughout the month, I simply popped them in the microwave for 20-30 seconds.

This recipe makes 2 dozen muffins.

Apple Blackberry Muffins

Ingredients:

  • 3 C whole wheat flour
  • 3 1/2 tsp baking powder
  • 1 tbsp cinnamon
  • 1/2 tsp salt
  • 1/8 tsp baking soda
  • 1 large apple, peeled and finely diced
  • 2 eggs
  • 1/2 C brown sugar
  • 1 C milk
  • 1/2 C Greek yogurt
  • 1/2 C cinnamon applesauce
  • 1/4 C maple syrup
  • 2 tsp vanilla extract
  • 1 C blackberries, chopped

Steps:

  1. Preheat oven to 425 degrees F. Grease a muffin tin, even if using liners.
  2. In a large bowl, whisk together the flour, baking powder, cinnamon, salt, and baking soda. Add the apples and toss to coat until evenly distributed.
  3. In another bowl, whisk together the eggs and brown sugar. Mix in the milk, yogurt, applesauce, syrup, and vanilla.
  4. Add the wet ingredients into the dry ingredients, mixing until just combined. Gently fold in the blackberries. Fill muffin cups 3/4 of the way.
  5. Bake muffins for 5 minutes. Reduce oven temperature to 375 degrees F and bake another 15 minutes, or until a toothpick comes out cleanly.

*This recipe is adapted from Sally at http://sallysbakingaddiction.com/2013/10/14/sky-high-blackberry-apple-muffins/*

Apple Blackberry Muffins for #MuffinMonday from Sew You Think You Can Cook

And don’t forget to check out these other muffin recipes:

Cappuccino Chip Muffins by Palatable Pastime

Cheesy Chile Corn Muffins (Gluten Free) by Farm Fresh Feasts

Cinnamon Swirled Muffins by Passion Kneaded

Fresh Peach Muffins by Karen’s Kitchen Stories

Lemon Meringue Muffins by Making Miracles

Phase 3 Muffins by A Day in the Life on the Farm

Raspberry Mini Muffins by Food Lust People Love