Buttermilk Coffee Cake with Jam

Last Fall I joined Mothers of Preschoolers (MOPS). Young moms – check out that link to see if there’s a MOPS near you! You won’t regret it, I promise. And no, I’m not being paid to say that.

I’d not actually realized that MOPS was a real organization, I just thought it was a group of women who had toddlers running around their homes gathering together.

And really, that’s kind of what it is. But it’s so much more than that.

It is a Christian organization developed to inspire moms and their kiddos in faith and companionship. Each meeting we have a fabulous speaker and our group has been seriously blessed with incredible, real women who have come to share their stories on friendship, parenting, faith, and freedom.

Joining MOPS is probably the best thing I’ve done as a mom! I just love the women I get to gather with every other Wednesday morning. Having breakfast provided is a huge perk, too!

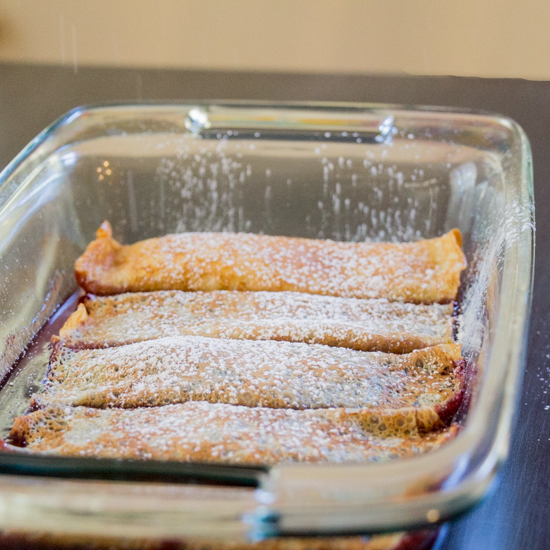
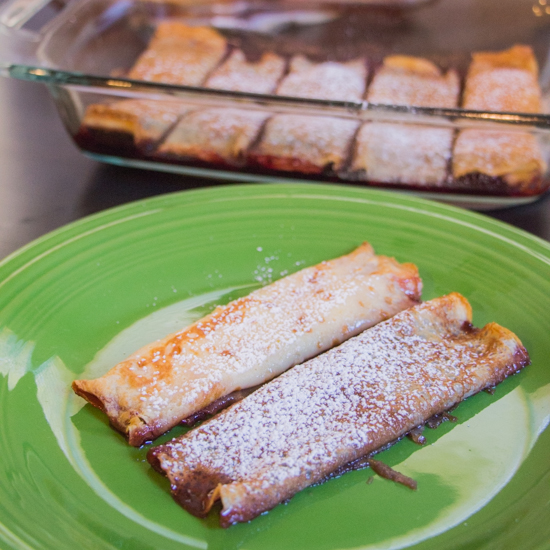
Each meeting, the different tables take turns providing breakfast for the entire group. During our table’s turns I’ve brought Homemade Biscuits and Rolled Pancakes.

At our last meeting it was a “free for all” sign up sheet amongst everyone. I signed up to bring some sort of breakfast sweet.

Coffee cake.

Now, you all know I have a favorite coffee cake recipe that I mix up fairly often, changing out the Nutella filling for various fruits and adjusting the topping slightly to coordinate.

Today, I’m sharing with you a completely different coffee cake! WHAT!?!

IMG_6342

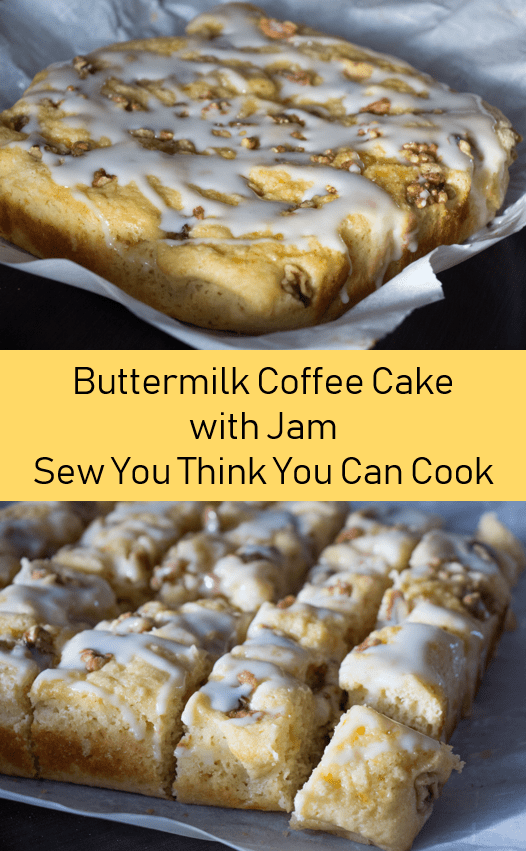
This recipe comes from Magnolia Days, a blog formerly written by my virtual friend Renee. She’s since handed over the reigns to Katie and I’m so glad she did because this Buttermilk Coffee Cake recipe gets to remain on the internet!

Buttermilk Coffee Cake with Jam

Ingredients:

  • 2 C flour
  • 1 tbsp baking powder
  • 1/2 tsp baking soda
  • 1/4 tsp salt
  • 2 eggs
  • 1 C + 2 1/2 tbsp buttermilk, divided use
  • 1/2 C sugar, plus more for sprinkling
  • 1/2 stick butter, melted
  • 1/4 jam (I used apricot-pineapple)
  • 1/4 C chopped walnuts
  • 1 C powdered sugar, sifted

Steps:

  1. Preheat oven to 350 degrees F. Line a 9″ x 9″ cake pan with parchment paper. Lightly spray with cooking spray.
  2. In a large bowl, whisk together the flour, baking powder, baking soda, and salt.
  3. In another bowl, whisk the eggs with 1 C buttermilk, and 1/2 C sugar. Add to the dry ingredients, stirring until combined.
  4. Pour batter into prepared cake pan. Top with spoonfuls of the jam and gently swirl into the batter. Sprinkle with walnuts and a little extra sugar.
  5. Bake 35-40 minutes, until a toothpick inserted comes out cleanly. Let cake cool 5-10 minutes in the pan before removing to a cooling rack.
  6. Before serving, mix together the powdered sugar and 2 1/2 tbsp buttermilk until smooth. Drizzle over the cake.

*This recipe is adapted from Renee at https://magnoliadays.com/apricot-buttermilk-coffee-cake*

Buttermilk Coffee Cake with Jam for #CoffeeCakeDay from Sew You Think You Can Cook

Be sure to check out these other great coffee cake recipes:

Blueberry Lemon Buttermilk Coffee Cake by Girl Abroad

Blueberry Sour Cream Coffee Cake by Jolene’s Recipe Journal

Busy Day Blueberry Ginger Coffee Cake by A Day in the Life on the Farm

Butter Crumb Coffee Cake by Karen’s Kitchen Stories

Buttermilk Coffee Cake with Jam by Sew You Think You Can Cook

Chocolate Espresso Bundt Coffee Cake by Daily Dish Recipes

Cinnamon Nut Coffee Ring by Family Around the Table

Coffee Cake Donuts by Hezzi-D’s Books and Cooks

Cookie Butter Coffee Cake by Strawberry Blondie Kitchen

Crumble Topped Nutty Coffee Cake by Culinary Adventures with Camilla

Meyer Lemon Coffee Cake by Cindy’s Recipes and Writings

Strawberry Rhubarb Coffee Cake by House of Nash Eats

Thank you, Wendy of A Day in the Life on the Farm, for hosting this Coffee Cake Day event.

#EasterWeek: Peeps Cookie Bars

26685618_10155993373291948_4409902930968397778_o

Disclaimer: This post contains Amazon affiliate links.

Earlier this year Firecracker wanted to make some cookies. My husband grabbed one of my cookie cookbooks (Cookies: Over 300 Step-By-Step Recipes For Home Made Baking). They selected more of a bar than a cookie, but we ran with it. Little tip for ya: Don’t try cutting out train shaped cookies from this bar, just let it be and cut it into rectangles.

The cookie bars were an almond cookie base, topped with jam, and marshmallows.

Now, my kids LOVE marshmallows. I’m talking bribery-status treat level here!

The cookies were quite fun and incredibly sweet. I had used a huckleberry jam from Knott’s Berry Farm.

I knew I had to try them again for Easter using Peeps!

I can’t recall having Peeps since making my famous (hey, the recipe was published in the Chicago Tribune last year!) Peeps Lemon Drop Martini FOUR years ago.

Peeps seem to get a bad rap (wrap?) these days. They’re one of those “love ’em or hate ’em” types of foods. Whatever. They’re delicious, and my kids, no surprise, quite enjoyed them. I’ll be sure to grab a small pack for their Easter baskets this year.

I used the bunny shaped Peeps because once cut in half, they’re thin enough to layer on the cookie bars. And to avoid any gruesome looking cookies, I used a pineapple and apricot jam instead of strawberry.

To make the cookies you first make the cookie base and let it cool. Then you top it with your jam before layering on sliced marshmallows. You need to cut them in half and place the cut side down to ensure they’ll stick. You then pop them back in the oven under the broiler.

Now, our oven has been busted pretty much since we moved into this home two years ago. The oven is older and runs into an “overheating” error that fails at a mere 350 degrees F. To work around the error we have to have the fan on the microwave running and the kitchen window open. Additionally, anything over 375 degrees F requires that nothing be on top of the stove, too. That means, I don’t get to use my broiler, so my marshmallows don’t get the toasty golden look to them (the Peep bunny faces did melt creating the allusion of toasted marshmallows). Ah well.

Peeps Cookie Bars for #EasterWeek from Sew You Think You Can Cook (1)

Peeps Cookie Bars

Ingredients:

  • 1 stick butter, at room temperature
  • 1/2 C superfine sugar
  • zest 1 lemon
  • 2 tsp vanilla extract
  • 3/4 C ground almonds
  • 1 egg
  • 1 C flour
  • 1 1/2 tsp baking powder
  • 1/4 tsp salt
  • approx. 1/2 C jam
  • 1 pkg (3 oz) bunny Peeps

Steps:

  1. Preheat oven to 350 degrees F. Grease a 9″x9″ cake pan (option to also line with parchment paper/foil).
  2. In a large bowl, beat together the butter, sugar, and lemon zest with an electric hand mixer. Add in the vanilla, almonds, and egg until combined. Mix in the flour, baking powder, and salt until a dough is formed. Spread dough evenly in prepared pan. Bake 20 minutes. Let cool.
  3. Spread jam over the baked cookie base.
  4. Cut Peeps in half horizontally and place, cut side down, on top of the jam. Return to oven and broil until marshmallows are golden.

Peeps Cookie Bars for #EasterWeek from Sew You Think You Can Cook

Be sure to check out these other Easter recipes:

Brussels Sprout Potato Cakes by Cindy’s Recipes and Writings

Candied Lemon Zest Jalapeño Deviled Eggs by Faith, Hope, Love, & Luck Survive Despite a Whiskered Accomplice

Carrot Cake Cookies by Daily Dish Recipes

Curried Deviled Eggs by A Kitchen Hoor’s Adventures

Dried Cherry and Almond Scones by Family Around the Table

Easter Egg Sugar Cookies by The Redhead Baker

Eggs Benedict Breakfast Bake by Cookaholic Wife

Greek Lamb Keftiko by Caroline’s Cooking

Ham and Cheese Breakfast Casserole by Karen’s Kitchen Stories

Roasted Pork Loin with White Wine Sauce by A Day in the Life on the Farm

Maple Apple Baked Oatmeal by Jolene’s Recipe Journal

Peeps Cookie Bars by Sew You Think You Can Cook

Easter Bread Cheesecake – Pasca by All that’s Jas

Spring Veggie Crudités with Fresh Pea Hummus by Culinary Adventures with Camilla

Vanilla Bean Mocha Biscotti by Amy’s Cooking Adventures

Vegetable Breakfast Casserole by Simple and Savory

Blackberry Chocolate Thumbprint Cookies #DarkRecipes #SolarEclipse

Are you in the path of totality for the solar eclipse today? If you are, I am so incredibly jealous!

The pastor of our church actually headed out of town back to her home state of Nebraska where her family farm will experience the magic and wonder. I’m kind of wondering why we didn’t think to make a vacation out of the once-in-a-lifetime event.

I’ve been nervous though about protecting my children.

the boys

I know the approved solar eclipse glasses are not exactly kid approved – definitely not toddler approved! My children don’t exactly keep things on their faces anyway.

My mom shared some great pinhole projector ideas, one of which involves making one of out a box large enough to stick your head into. That definitely seems like the safest bet for my rascals – just stuff their head in a box and that should protect their eyes!

The local library has an event going on and I was super pumped to go to it. But the more I thought about it, the more I figured it probably wouldn’t be the safest idea. Could I really keep an eye on my two high-energy boys amidst a sea of over 100 people and get a chance to view the eclipse through glasses? I have to go with the non-selfish vote of “no.”

Our balcony doesn’t get sunlight in the morning, when the partial eclipse is supposed to happen for us in SoCal, so using a colander to project the shadows onto the ground isn’t going to work well, either.

We might be able to go to the playground. It’s not like my children look up at the sun on a regular basis anyway. And they are so young that they’re not going to understand the beauty of the event. Only problem for me is that I won’t have glasses (I was counting on using those provided by the library!).

Watch it be cloudy anyway and all my fretting is for nothing.

If you haven’t caught the eclipse frenzy you can fake it with some dark recipes. Kind of like that big football game you pretend to care about just for the food. Thanks to Sue of Palatable Pastime for coming up with and hosting this event!

Blackberry Chocolate Thumbprint Cookies

Ingredients:

  • 1 stick butter, at room temperature
  • 1/2 C powdered sugar
  • 1 tsp chocolate extract
  • 1/4 tsp salt
  • 1 1/2 C flour
  • 1/2 C cocoa powder
  • milk, if needed
  • blackberry jam

Steps:

  1. Preheat oven to 350 degrees F. Line two baking sheets with silicone mats.
  2. In the bowl of a stand mixer fitted with the paddle attachment, cream together the butter, sugar, chocolate extract, and salt until smooth.
  3. Add in the flour and cocoa powder and beat until the dough comes together. If it is too dry, add in a tablespoon or two of milk.
  4. Roll 1 tablespoon of dough into a ball, place on a prepared baking sheet, flatten slightly, and press your thumb (or a small spoon) in the center.
  5. Bake 15-17 minutes, until set. Transfer cookies to a cooling rack. Once cool, fill thumbprints with blackberry jam.

*This recipe is adapted from Grishma and Vikas at http://www.feastie.com/recipe/zaika-zabardast/blackforest-thumbprints*

Blackberry Chocolate Thumbprint Cookies for #DarkRecipes #SolarEclipse

Be sure to check out these other Dark Recipes for the Solar Eclipse:

Chinese Mooncakes (Snow Skin Mooncakes) by Caroline’s Cooking

Deep Dark Chocolate Brownies by Palatable Pastime

Eclipse Pizza by Amy’s Cooking Adventures

Homemade Moon Pies by Family Around the Table

Ramen and a Martini from the Abyss by Culinary Adventures with Camilla

Sweet Dark Cherry Crepes by A Day in the Life on the Farm

Triple Chocolate Cookies by The Freshman Cook

Kumquat Jam

I think my favorite thing about living in the Los Angeles area are the farmers markets. My son loves them, too! I have an adorable conversation saved on my phone of him saying “farmers market. blueberries. home. mouth.” I’m not sure what we’re going to do when berry season is over, he’s not yet two so “in season” is going to be quite a feat to explain.

While there is a farmers market across the street from our place every week, I had to take a trip to a larger one. Just to explore. There was more citrus at that location and I picked up some kumquats for my husband. Kumquats were one of the first “adventurous” items we picked up at the grocery store and he’s grown quite a fondness for them.

This particular batch was turned into jam! The resulting condiment has a bitter tartness. I think it’s the first time I’ve understood bitter as being a positive flavor component. The bitterness from the kumquat peels provides a balance with their natural sour edge.


Kumquat Jam

Ingredients:

  • 16 oz kumquats, sliced and seeds removed
  • 1 C sugar
  • 1/2 C orange juice
  • 1/2 C water
  • 1 tsp vanilla extract

Steps:

  1. Combine all ingredients in a large pot over medium heat. Bring to a boil and then reduce to a simmer. Simmer over medium-low heat for 35 minutes or until thickened, stirring frequently.

*This recipe is adapted from Nicole at http://wonkywonderful.com/kumquat-jam-recipe/*

Kumquat Jam  Sew You Think You Can Cook

#Cookielicious Exchange Party

It’s that time of year

When the world falls in love

Every song you hear

Seems to say….

bake some cookies!

The opening lyrics are to The Christmas Waltz, a not as popular holiday song that was my first ever solo in middle school and a song that I hold dear.

But seriously, it’s that time of year for holiday parties and cookie exchanges and who better to have a cookie exchange than a wonderful group of food bloggers?! Today’s particular cookie exchange is with the Sunday Supper Movement. Be sure to scroll past my recipe for an incredible selection of cookie recipes to brighten your holiday season.

After the birth of my baby boy my mom was here for a couple weeks helping me adjust to life with two children. It was then that we decided to bake cookies, one of the culinary tasks my mom enjoys doing. We picked something of Polish origin – kolaczki. Mom remembers having these jam filled cookies as a kid. While the majority of the recipes online show a “rolled” cookie, Mom remembers having them as more of the typical “thumbprint” cookie. We decided to try the rolled cookie form – only 5 held their shape, so we made small circles from the remaining dough.

This recipe makes 4-5 dozen cookies.

Kolaczki

Ingredients:

  • 3 sticks butter, softened
  • 8oz cream cheese, softened
  • 3 C flour
  • jam for filling
  • powdered sugar for rolling
  • sugar for rolling

Steps:

  1. In the bowl of a stand mixer fitted with the paddle attachment cream together the butter and cream cheese. Add the flour, one cup at a time, and mix until incorporated. Refrigerate dough at least one hour.
  2. Preheat oven to 350 degrees F. Lightly grease baking sheets.
  3. Combine equal parts powdered sugar and sugar for rolling the cookie dough.
  4. For rolled form: Roll dough out to 1/6″ thickness, cut into 2×2″ squares, place jam diagonally down the center, fold two opposing corners over the filling. For thumbprint form: Make small balls from the dough and roll in the sugar mixture. Press flat and create a well for the jam.
  5. Place cookies on prepared baking sheets. Bake 15 – 20 minutes, or until the edges are lightly golden.
  6. Sprinkle with powdered sugar before serving.

*This recipe is adapted from Barbara at http://easteuropeanfood.about.com/od/polishdesserts/r/kolaczki.htm*

Kolaczki for #Cookielicious Exchange Party from Sew You Think You Can Cook #SundaySupper

Plus, 20 Cookie Baking Tips and Holiday Cookie recipes from Sunday Supper

8387592742_f6164fd5a8_oJoin the #SundaySupper #Cookielicious Exhange Party conversation on twitter on Tuesday December 1st! Our chat starts at 7:00 pm ET. Follow the #SundaySupper hashtag and remember to include it in your tweets to join in the chat. To get more great Sunday Supper Recipes, visit our website or check out our Pinterest board. Would you like to join the Sunday Supper Movement? It’s easy. You can sign up by clicking here: Sunday Supper Movement.

#handcraftededibles: Delicious Jams & Jellies

#handcraftedediblesIn an effort to make all of her holiday gifts this year, Camilla at Culinary Adventures with Camilla invited some of her favorite foodie bloggers to share recipes for hand-crated edibles. Over the course of twelve weeks, we’ll be sharing recipes for all your homemade holiday gifts. Hope you’ll follow along for inspiration. You can find out more information, including the schedule here.

Today’s theme is jams and jellies. Homemade jam or jelly makes for a great gift that lasts the whole year – except odds are it won’t.

I am re-sharing the recipe for Concord Grape Jelly that my mom and I made last year. This jelly was the best jelly I’ve ever had! It definitely didn’t last a year – it only last a couple of months. And this year there weren’t grapes to be plucked from the vine. Are grapes an every-other-year type of crop?

I promise you, if you give someone a jar of homemade jelly they’ll say a big “thank you” every morning.

This recipe made 12 4oz Jars and 4 8oz jars.

Grape Jelly

Ingredients:

  • 5 lb concord grapes
  • 7 C sugar, divided use
  • 1 pkt pectin(or 8 tbsp)

Equipment:

  • blender or juicer
  • cheesecloth
  • jelly jars with lids and rings
  • jar funnel
  • jar grabber
  • magnetic lid grabber
  • large stock pot(s)

Steps:

  1. Sanitize your jelly jars. I did this by running my dishwasher on a very hot cycle. Keep jars warm until ready to fill to prevent the glass cracking. If you do this in a dishwasher, simply don’t open the door until you’re ready to fill the jars. If you sanitize jars by washing with soapy water and boiling in water for 10 minutes,keep the jars in warm water until you’re ready to fill them.
  2. Place jar lids in a shallow skillet over low heat (do not boil) to get the seal gummy, remove lids from water.
  3. Place grapes in a blender (this will need to be done in batches) and pulse until juiced. Pour and press the juice through a cheesecloth lined strainer and strain into a large measuring cup. Squeeze cheesecloth to extract all the juice. Do this until you have 5 C of juice. (Any extra juice is a delicious tart treat for you to enjoy!)
  4. In a small bowl, combine the pectin with 1/4 C of the sugar.
  5. Warm the juice, but do not boil (yet). Stir in the pectin. Bring to a full boil.
  6. Add the rest of the sugar and return to a boil. Boil for 1 minute.
  7. Fill jars with jelly, cover with lids and rings. Seal by placing the filled jars in a boiling water bath for 5 minutes. Remove and allow to cool in a dry place over night. (I did this in my oven.)

*This recipe is adapted from http://www.pickyourown.org/grapejelly.htm#.VELDzfl4ofg*

Homemade Grape Jelly

To give homemade jelly as a gift, place it in a nice basket with a loaf of fresh bread.

Here are some other jam and jelly treats:

Next week, check back for our recipes for pickles. Or check out our #handcraftededibles pinterest board.

Disclaimer: This post contains affiliate links.

Rolled Pancakes

This meal was always Mom’s request for her birthday dinner. (Maybe I get my love of breakfast for dinner from her!) She sent me Busia’s recipe and I got to cooking. I am excited to report that I only lost two pancakes during the process – the first I forgot to spray the pan and it stuck and ripped, the second was my last one and I used too much batter because I misjudged what was left in the bowl.

I wasn’t sure if this recipe was an actual Polish dish or simply one of my family’s creations. Turns out, these rolled crepes are called Nalesniki!

Nalesniki are Poland’s version of a crepe. The batter is thin and cooked in the same method you’d use for making crepes. You fill the pancake with whatever filling you like – I used cream cheese, orange marmalade, raspberry jam, and blackberry jam. The pancakes are rolled around the filling, placed in a casserole dish and baked. Top them with powdered sugar and you’re in for a delectable breakfast.

Or dinner.

Rolled Pancakes

Ingredients:

  • 1 C flour
  • 1/2 tsp salt
  • 2 tbsp sugar
  • 2 eggs
  • 1 C milk
  • 1/2 C water
  • 1 tsp vanilla
  • whatever fillings you want

Steps:

  1. In a large bowl combine the dry ingredients. In another bowl whisk together the wet ingredients. Pour wet into dry until combined – it will be a thin batter.
  2. Pour 1/4 C batter into a small greased skillet. (I used non-stick cooking spray between each pancake) Swirl the pan around to create an even pancake. Once the pancake browns flip and cook another minute. Remove from skillet and fill with 1 tbsp of your filling. Fold pancake like you would an enchilada. Place seam side down in greased casserole dish.
  3. Preheat oven to 350 degrees while you make the remaining pancakes. If you’re an impatient cook like me, I found that the amount of time it takes to fill and roll one pancake your next will be ready to flip! Don’t forget to respray the pan after each pancake. If you don’t lose any pancakes during the process, you should get 12 rolled pancakes.
  4. Bake 20 minutes. Sprinkle with powdered sugar and serve.

Rolled Pancakes 1 Rolled Pancakes 2

Happy Birthday, Mom!

CIC: Gingerbread Spice & Onion

CIC-header

This month Jutta challenged us with combining gingerbread spice and onion into one dish.

Gingerbread Spice & Onion

I found myself more stumped than I thought I’d be. I considered going in a sweet direction by caramelizing the onions and putting them in a muffin. But I wasn’t sure how the texture would work out. I considered making a warm and hearty soup or stew. And then I decided on a savory bread pudding and mixing in the spice with the custard. But I was really hesitant – I’ve never had bread pudding before and for some reason I fear I won’t like the texture. Maybe I’ll get over this someday and give it a try. So, bread pudding without the eggy custard is essentially a dressing (or stuffing). That would be a perfect fit with Thanksgiving fast approaching.

I procrastinated on making my dish for weeks, blaming allergies that turned into a head cold that turned into a cough. (Which also explains the lack of posts lately) Turns out procrastination isn’t all bad. I was then handed a beautiful, perfect solution to November’s Crazy Ingredient Challenge.

Red Onion Jam Grilled Cheese

Sunday morning after church I turned on Food Network and caught the end of Southern at Heart, Food Network’s newest star Damaris Phillips’ beautiful show. She was making an onion jam with ginger and coriander. Perfect! I substituted the spices for Gingerbread Spice and used red onion instead of Vidalia to add a beautiful holiday color. This jam is perfectly sweet and an excellent accompaniment to your holiday cheese platter. You could even add it to a grilled cheese sandwich or any sandwich for that matter!

Red Onion Jam

Ingredients:

  • 1/2 tbsp butter
  • 1 red onion, thinly sliced
  • zest of 1 lemon
  • juice of 1/2 lemon
  • 1/4 C brown sugar, divided
  • 1/4 tsp gingerbread spice

Steps:

  1. Saute onions in butter with salt and lemon zest until onions are translucent. Stir in gingerbread spice. Add 1/8 C brown sugar and lemon juice. Cook 10 minutes until liquid has evaporated. Stirring occasionally.
  2. Add a little less than 1/4 C water to onions and cook another 10 minutes. Stirring occasionally.
  3. Repeat step 2 three more times. (A total of 40 minutes)
  4. Stir in remaining 1/8 C brown sugar until melted.

Red Onion Jam

To see the other blogs that participated in this month’s challenge click the link below: