Grecian Square

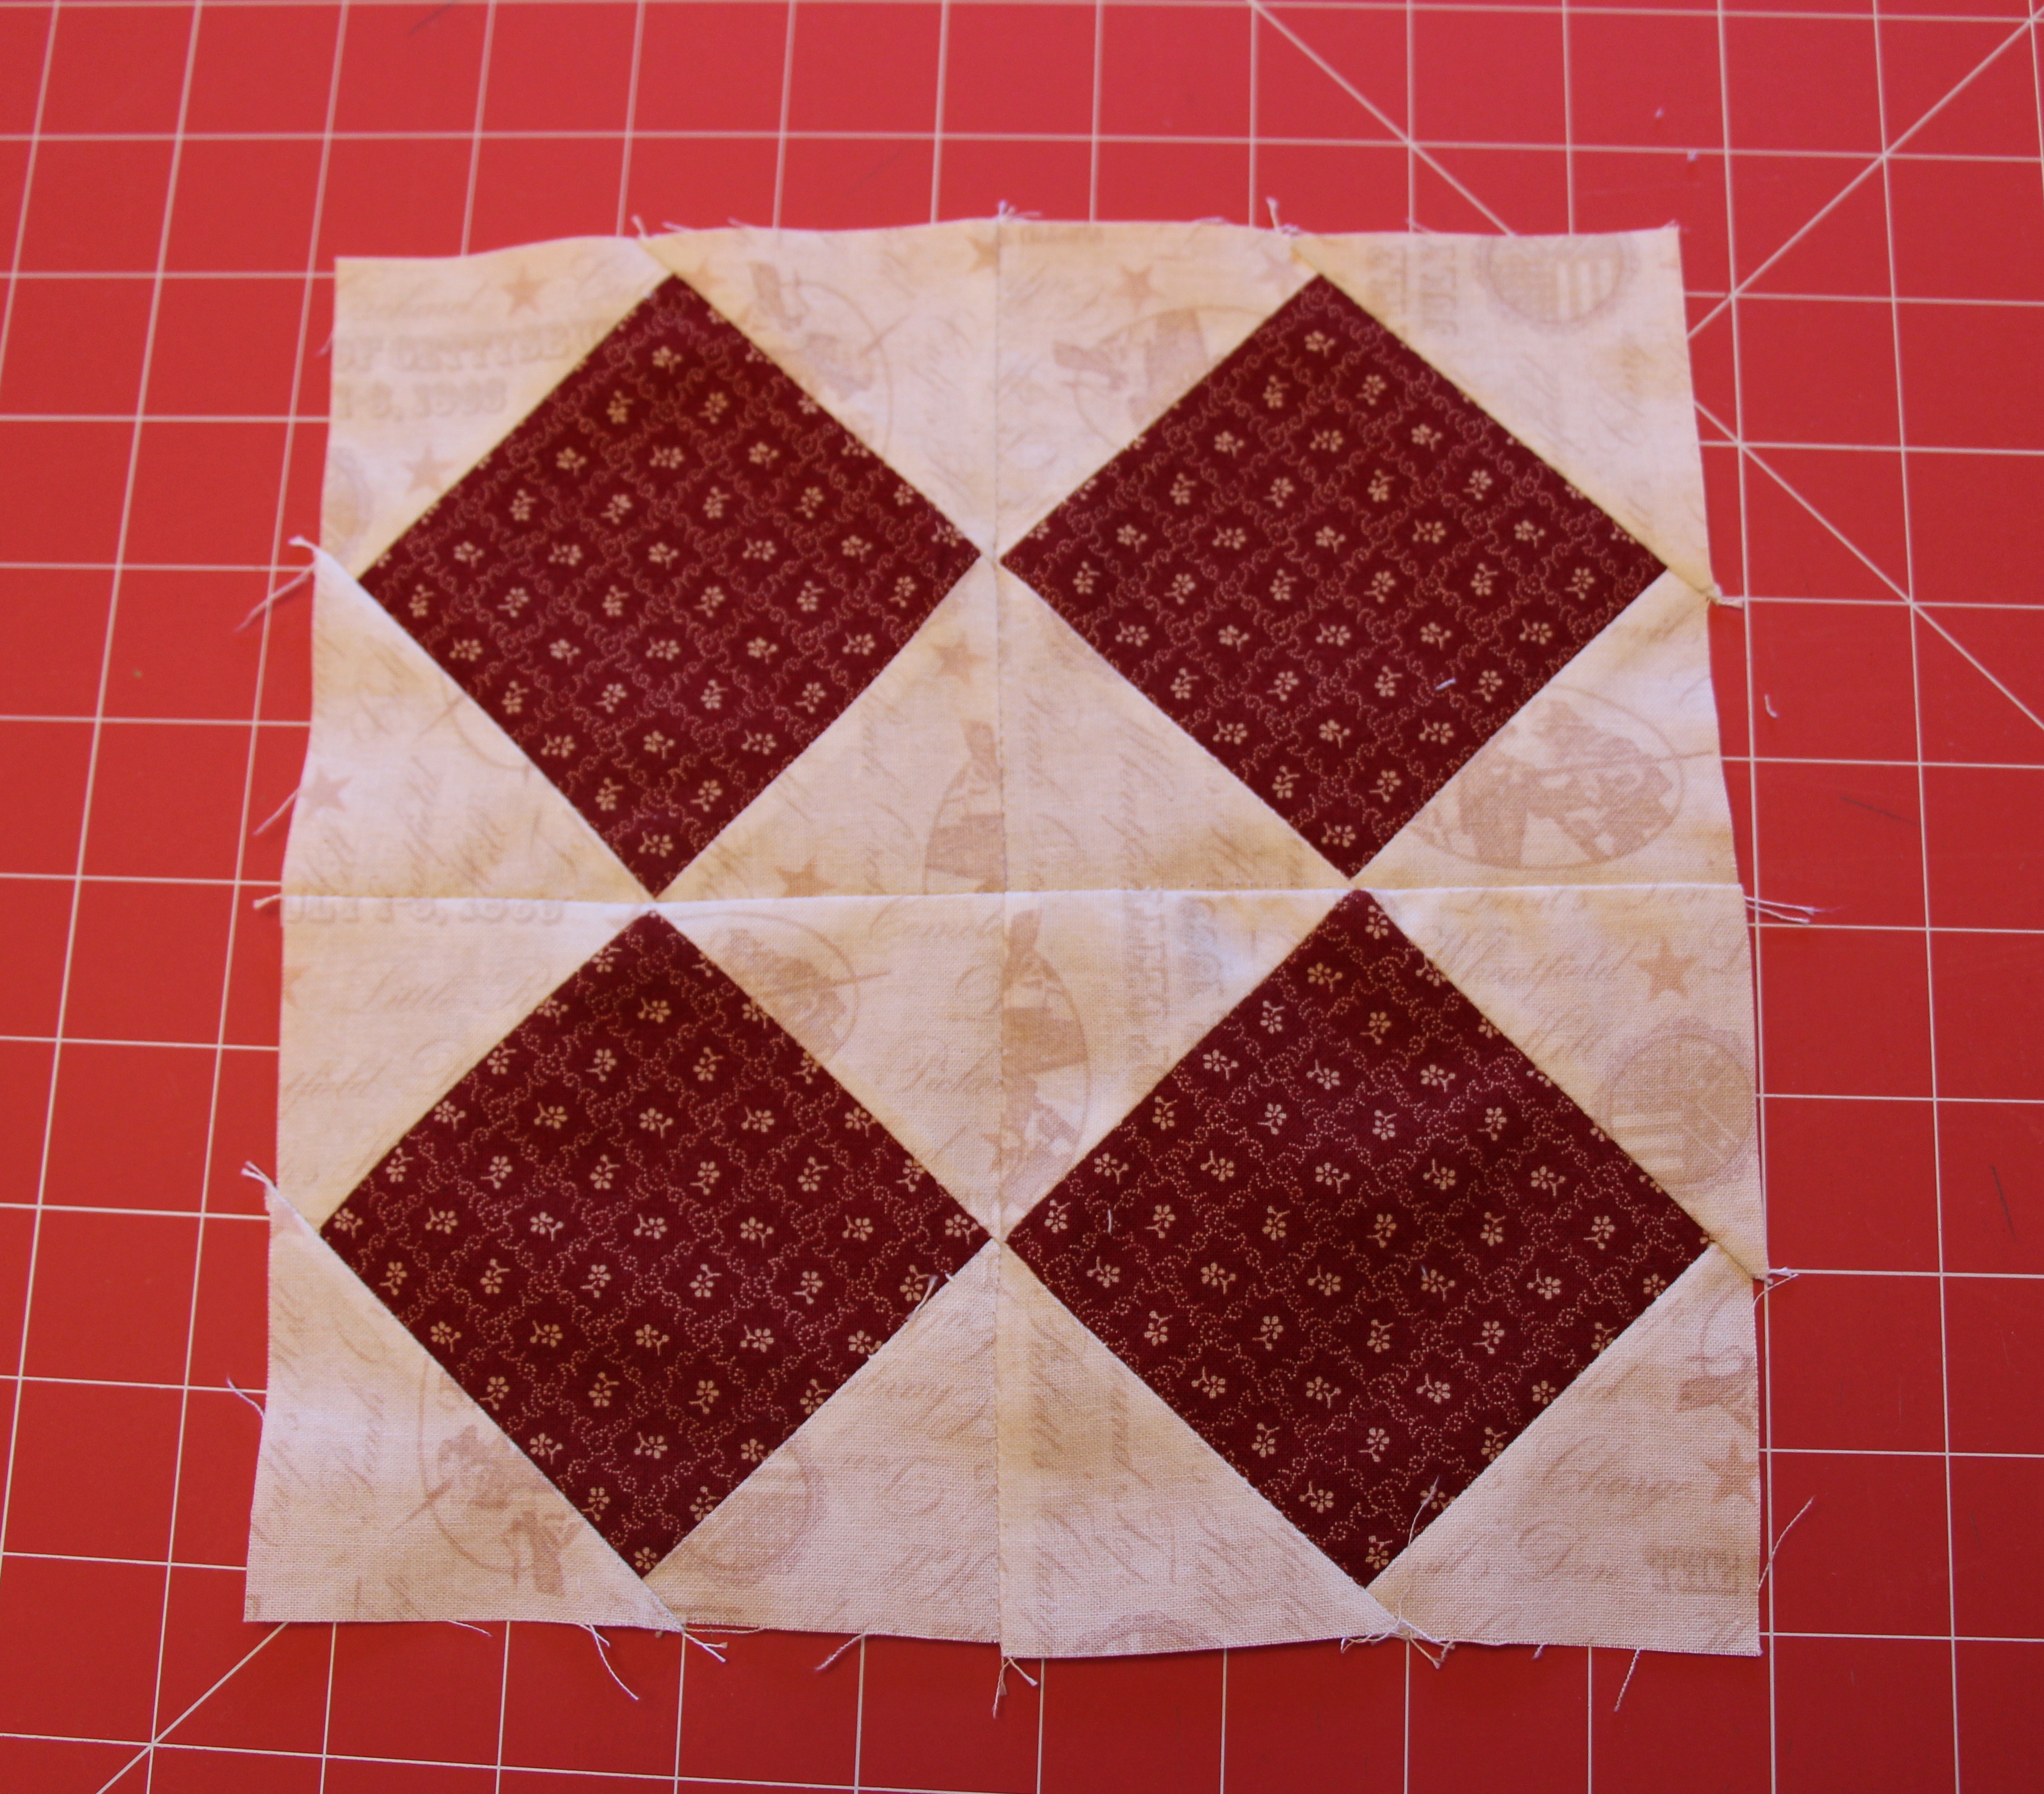
I used the Grecian Square quilt block before. It is also known as the Monkey Wrench. I used it in the quilt I made in honor of my grandmother. But this tutorial will look a little different. Simply reversing the neutral and color creates a very different look.

Grecian Square Quilt Block Tutorial

Here is the how-to for the Grecian Square Quilt Block:

Note: These measurements are for an 8″ block. Sew using a 1/4″ seam allowance.

Cut fabric:

  • 2 squares 3 7/8″ red
  • 2 squares 3 7/8″ white
  • 4 rectangles 1 7/8″ x 3 1/8″ red
  • 4 rectangles 1 7/8″ x 3 1/8″ white
  • 1 square 3 1/8″ red

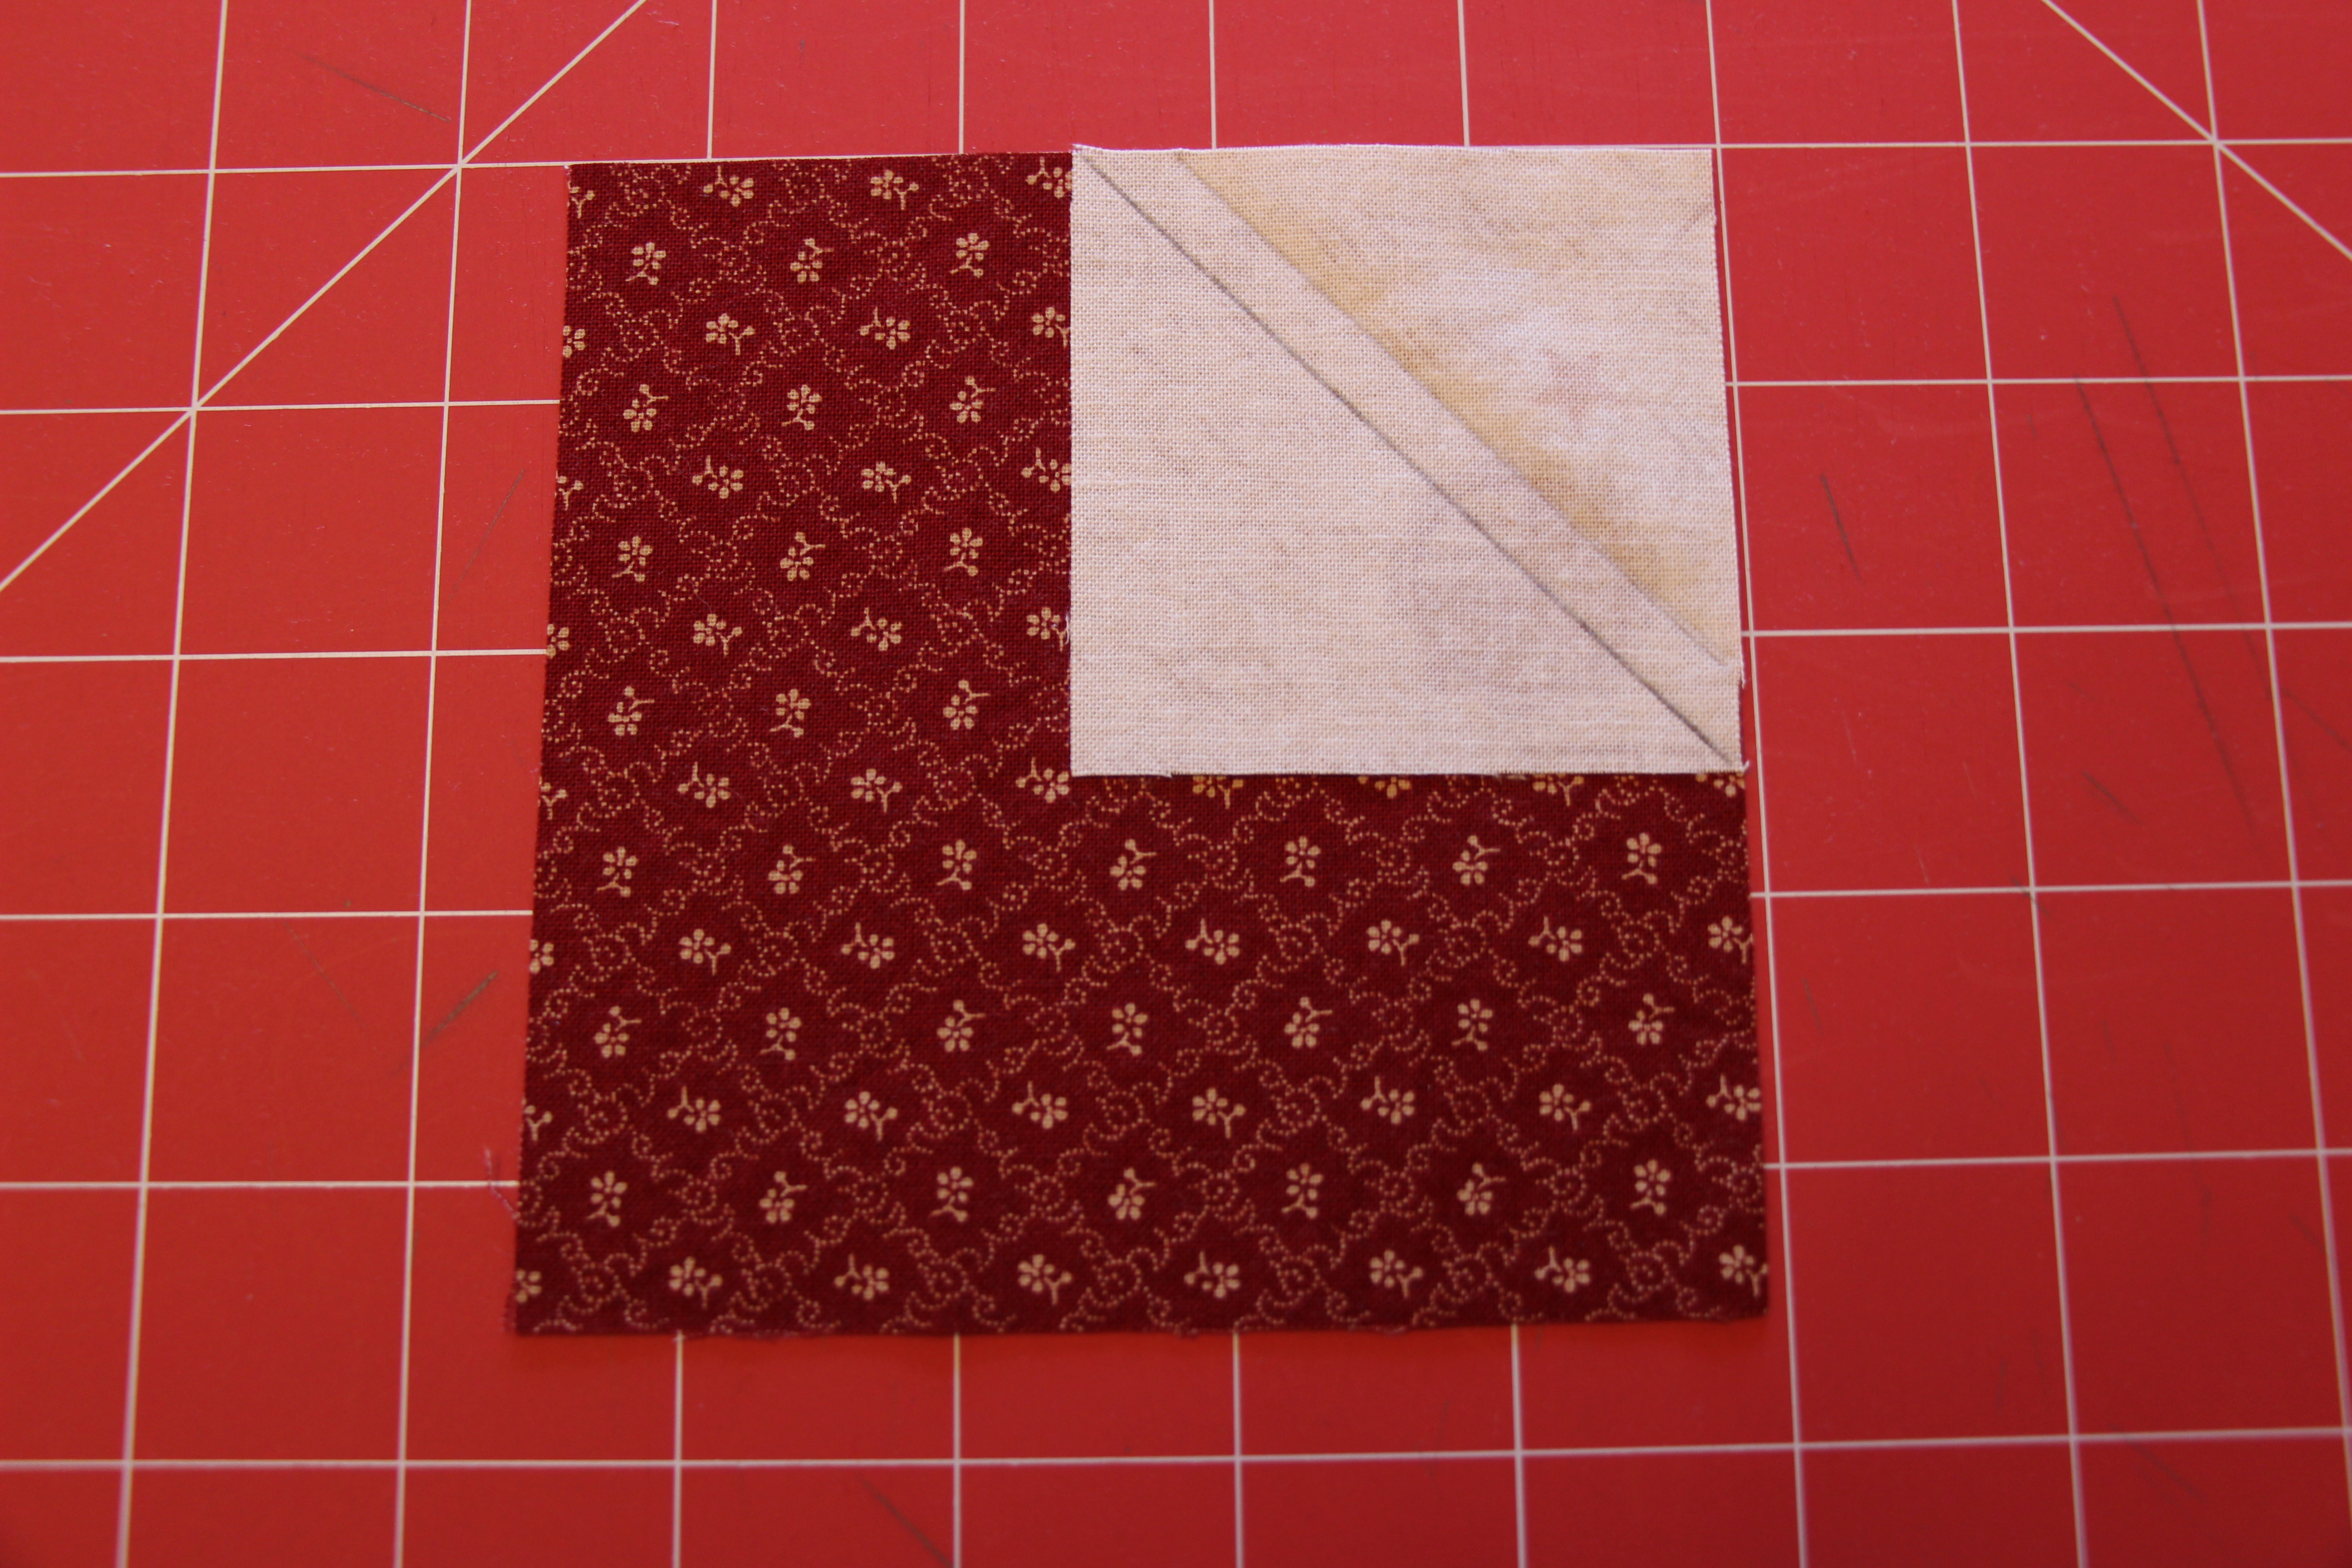
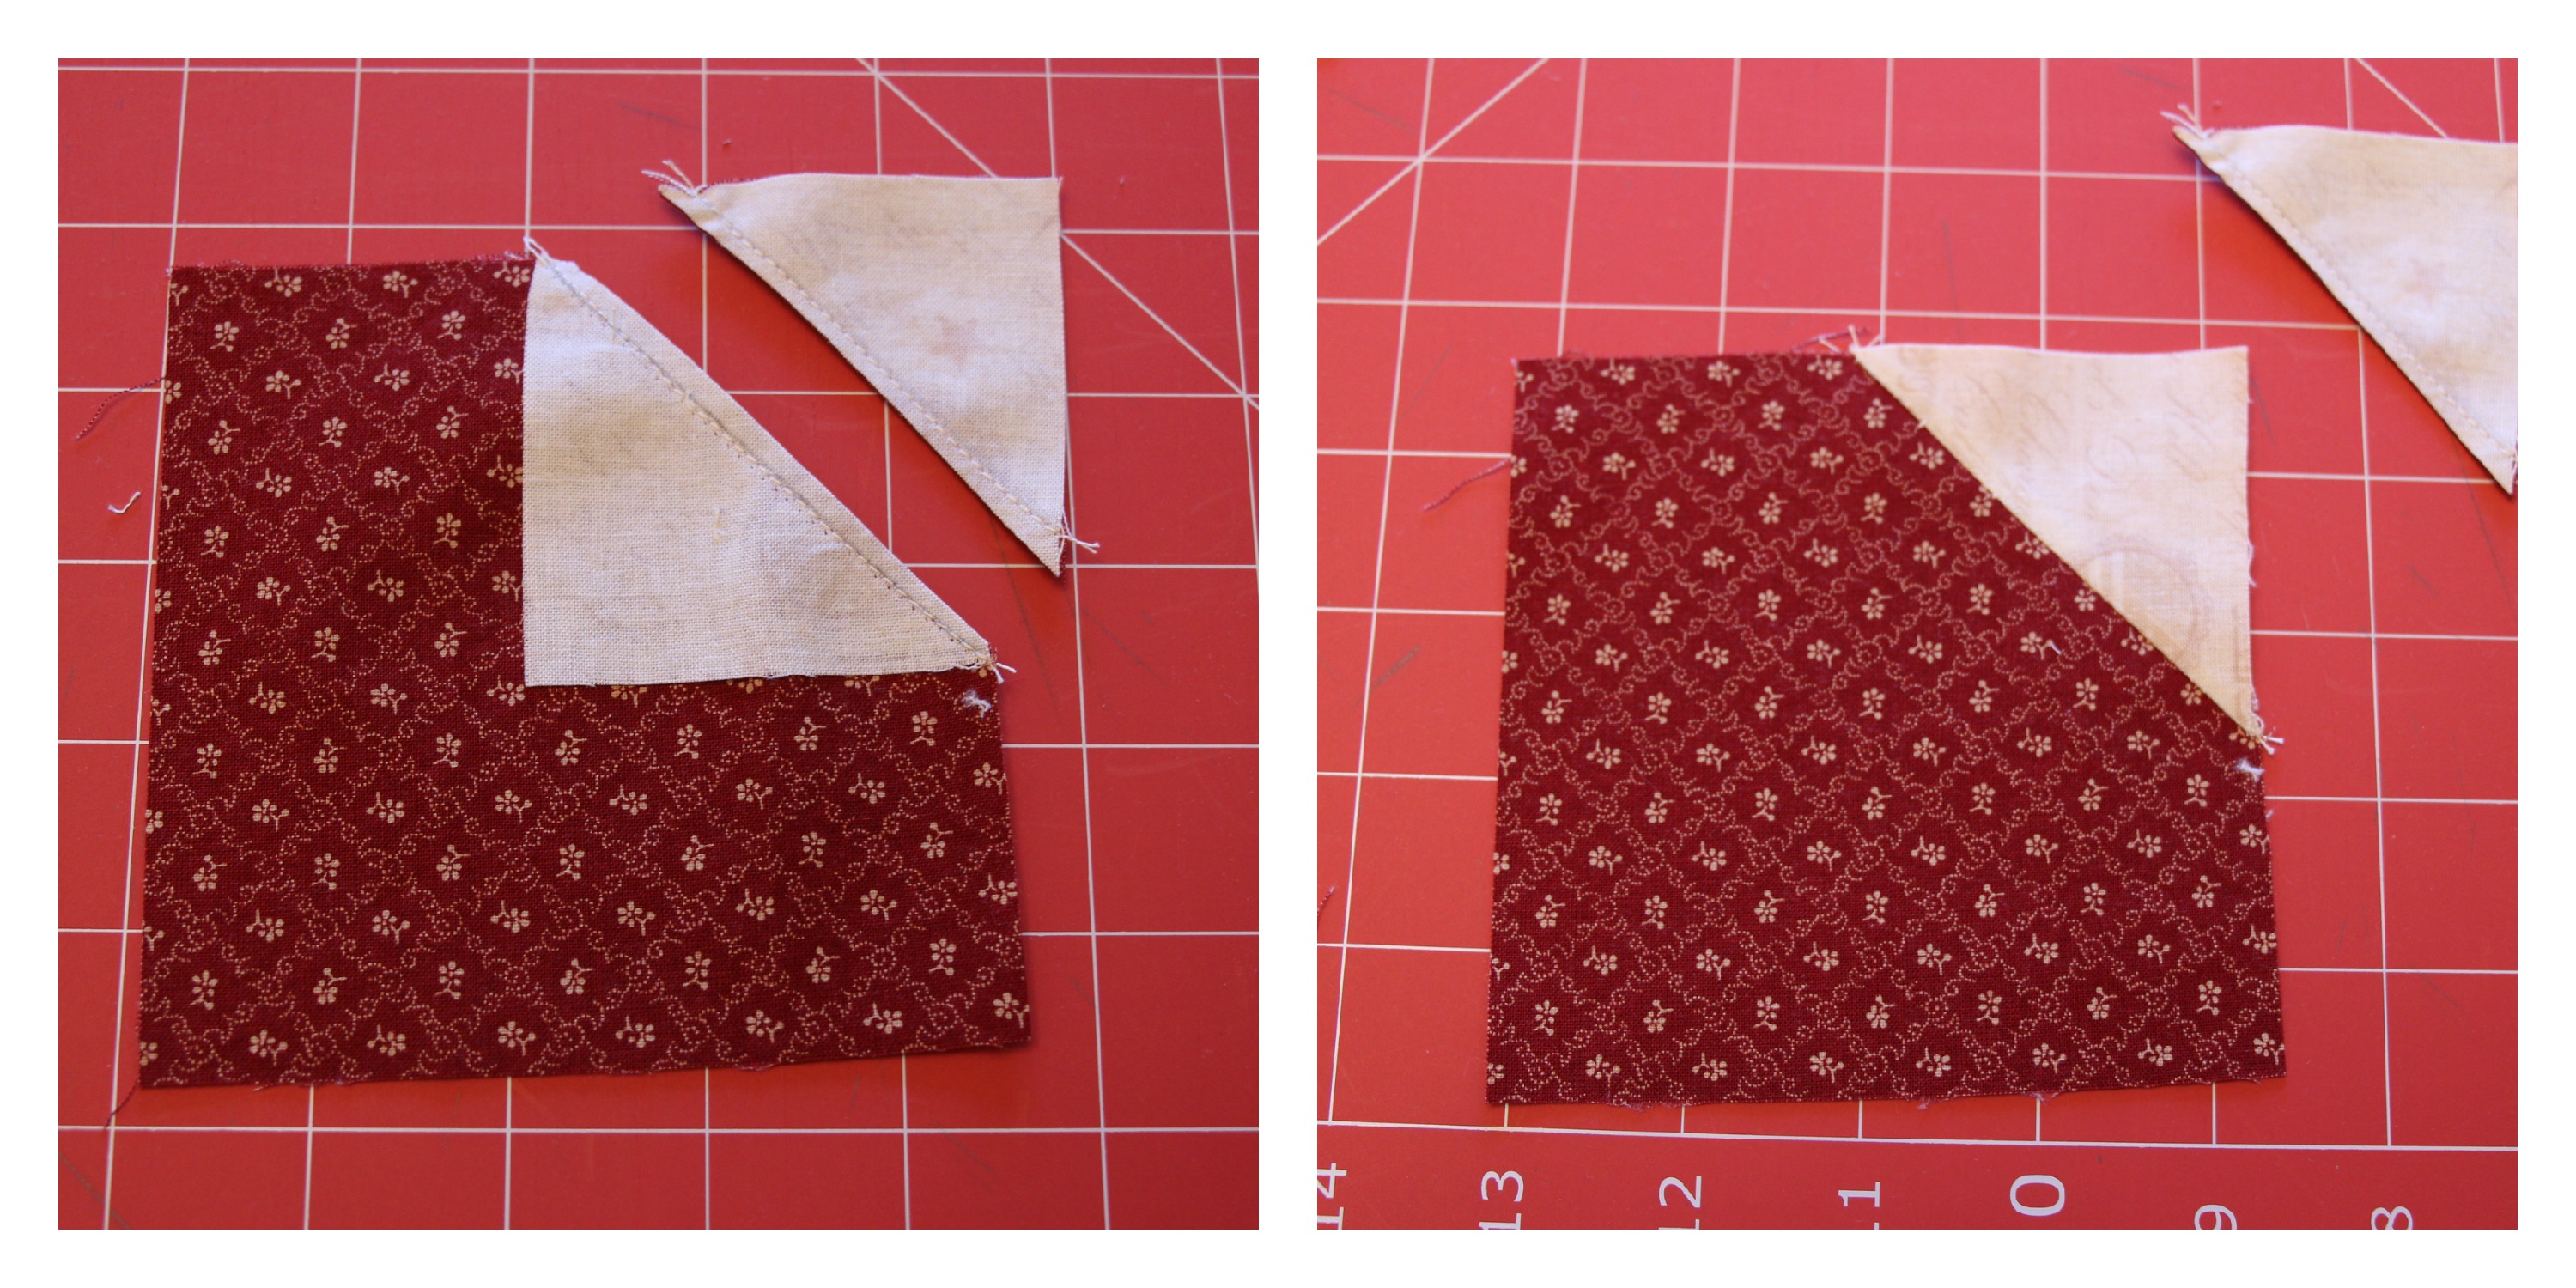
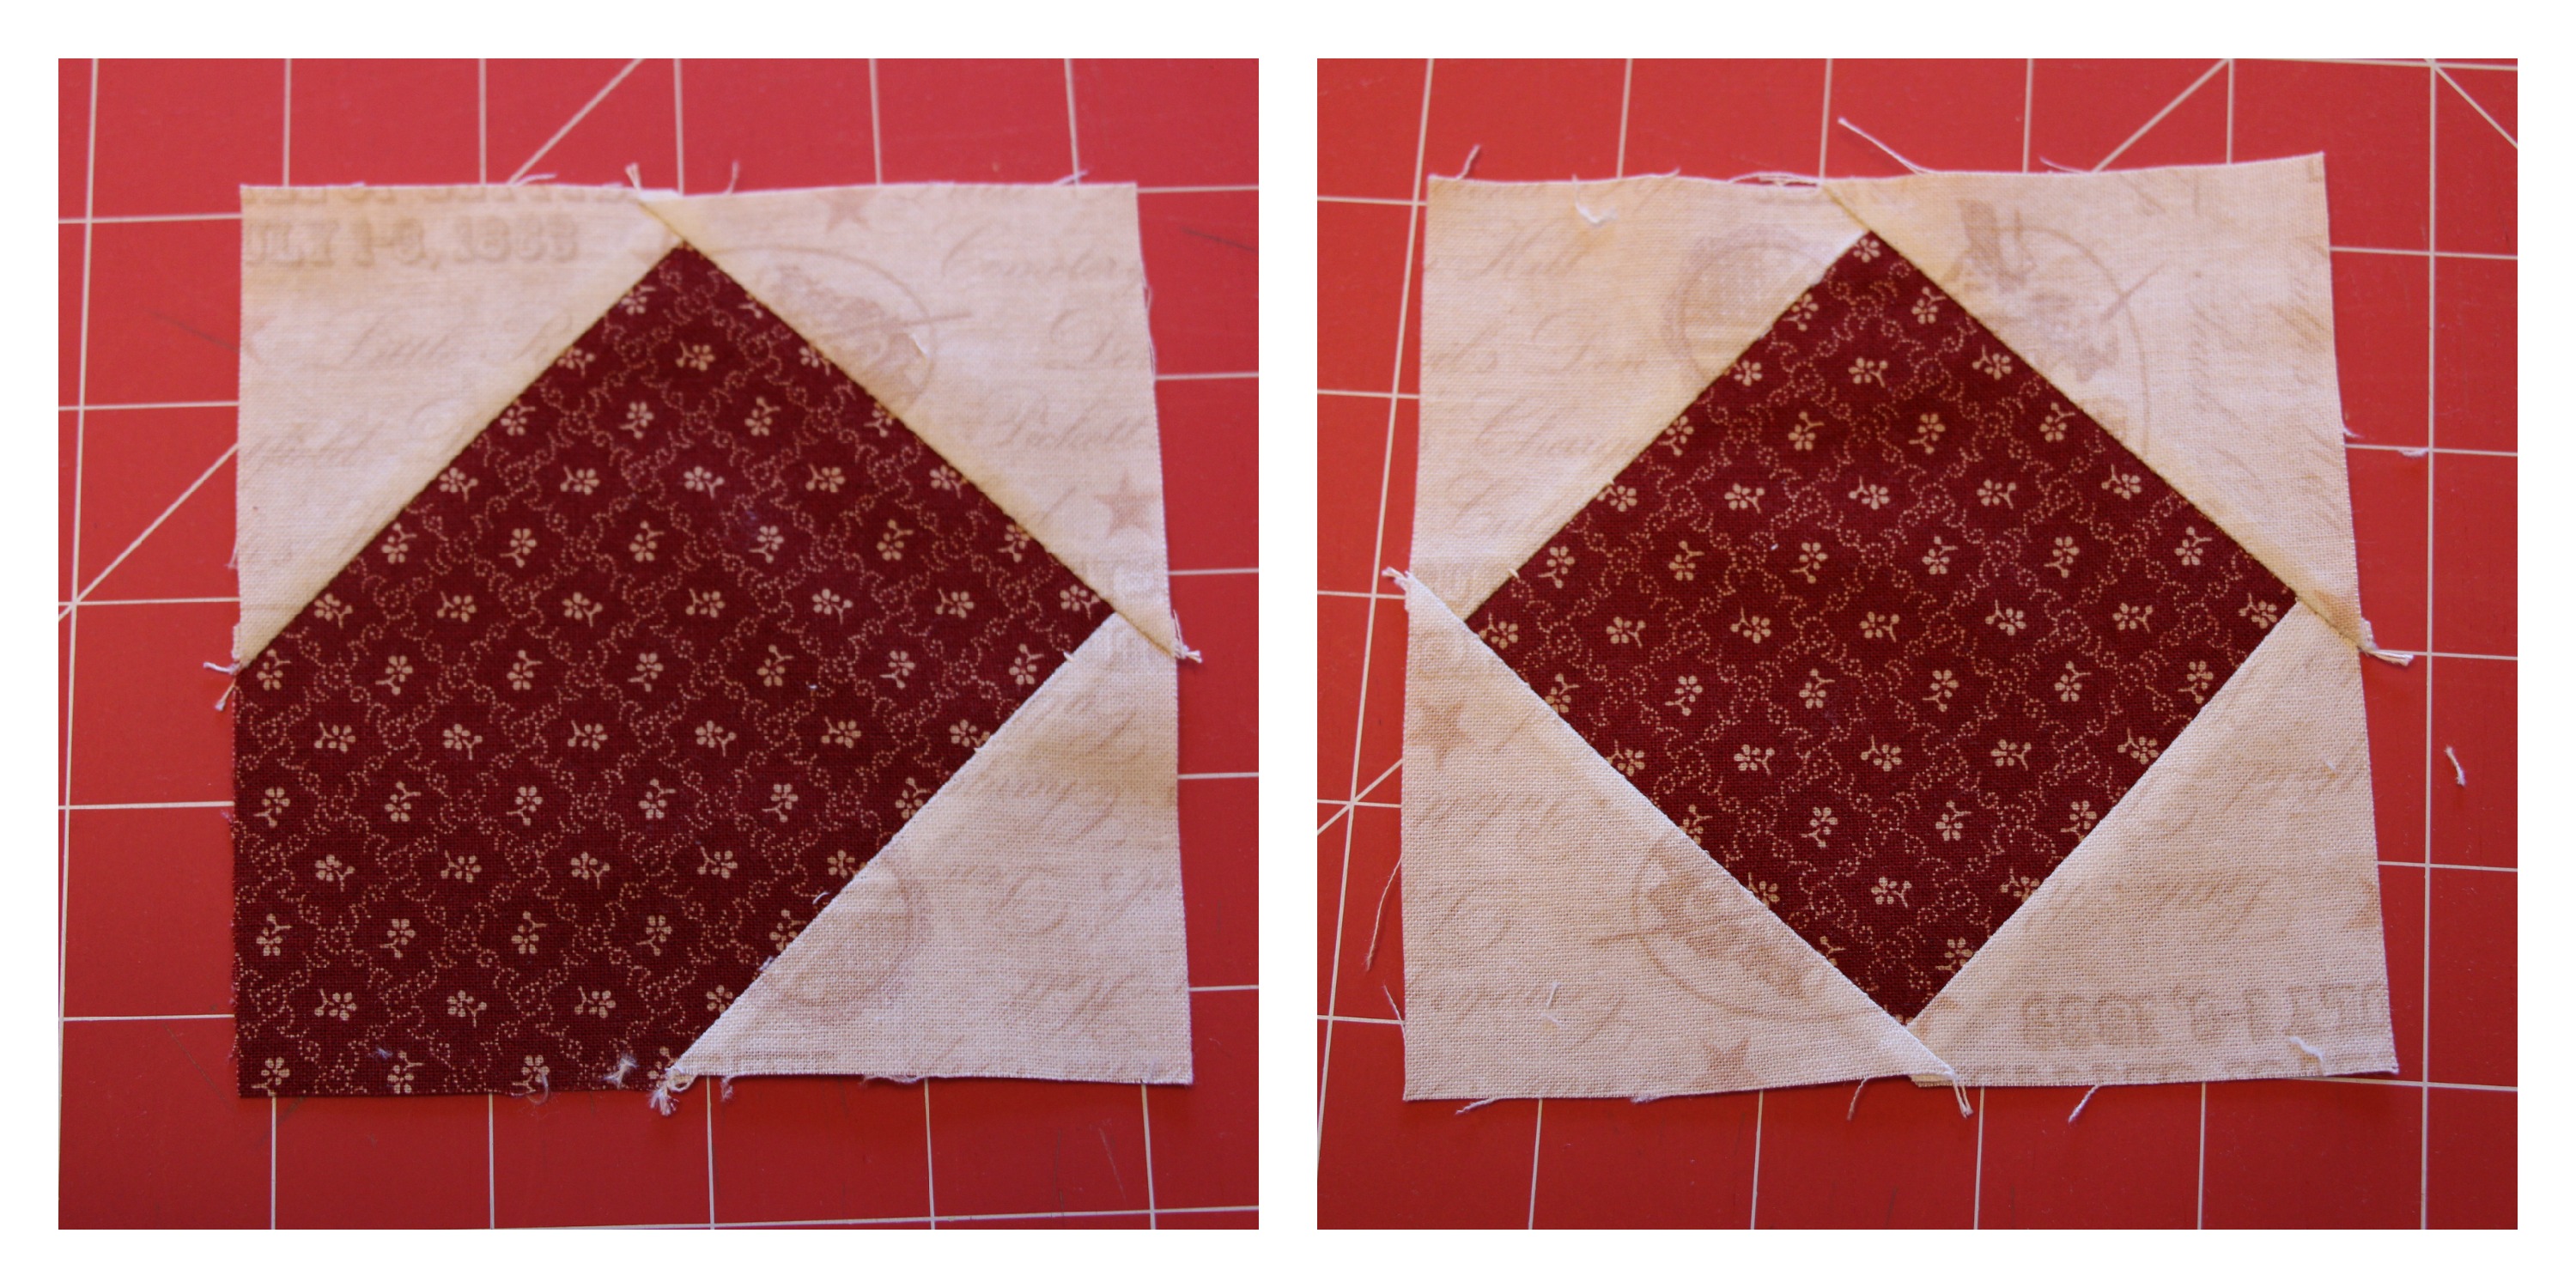
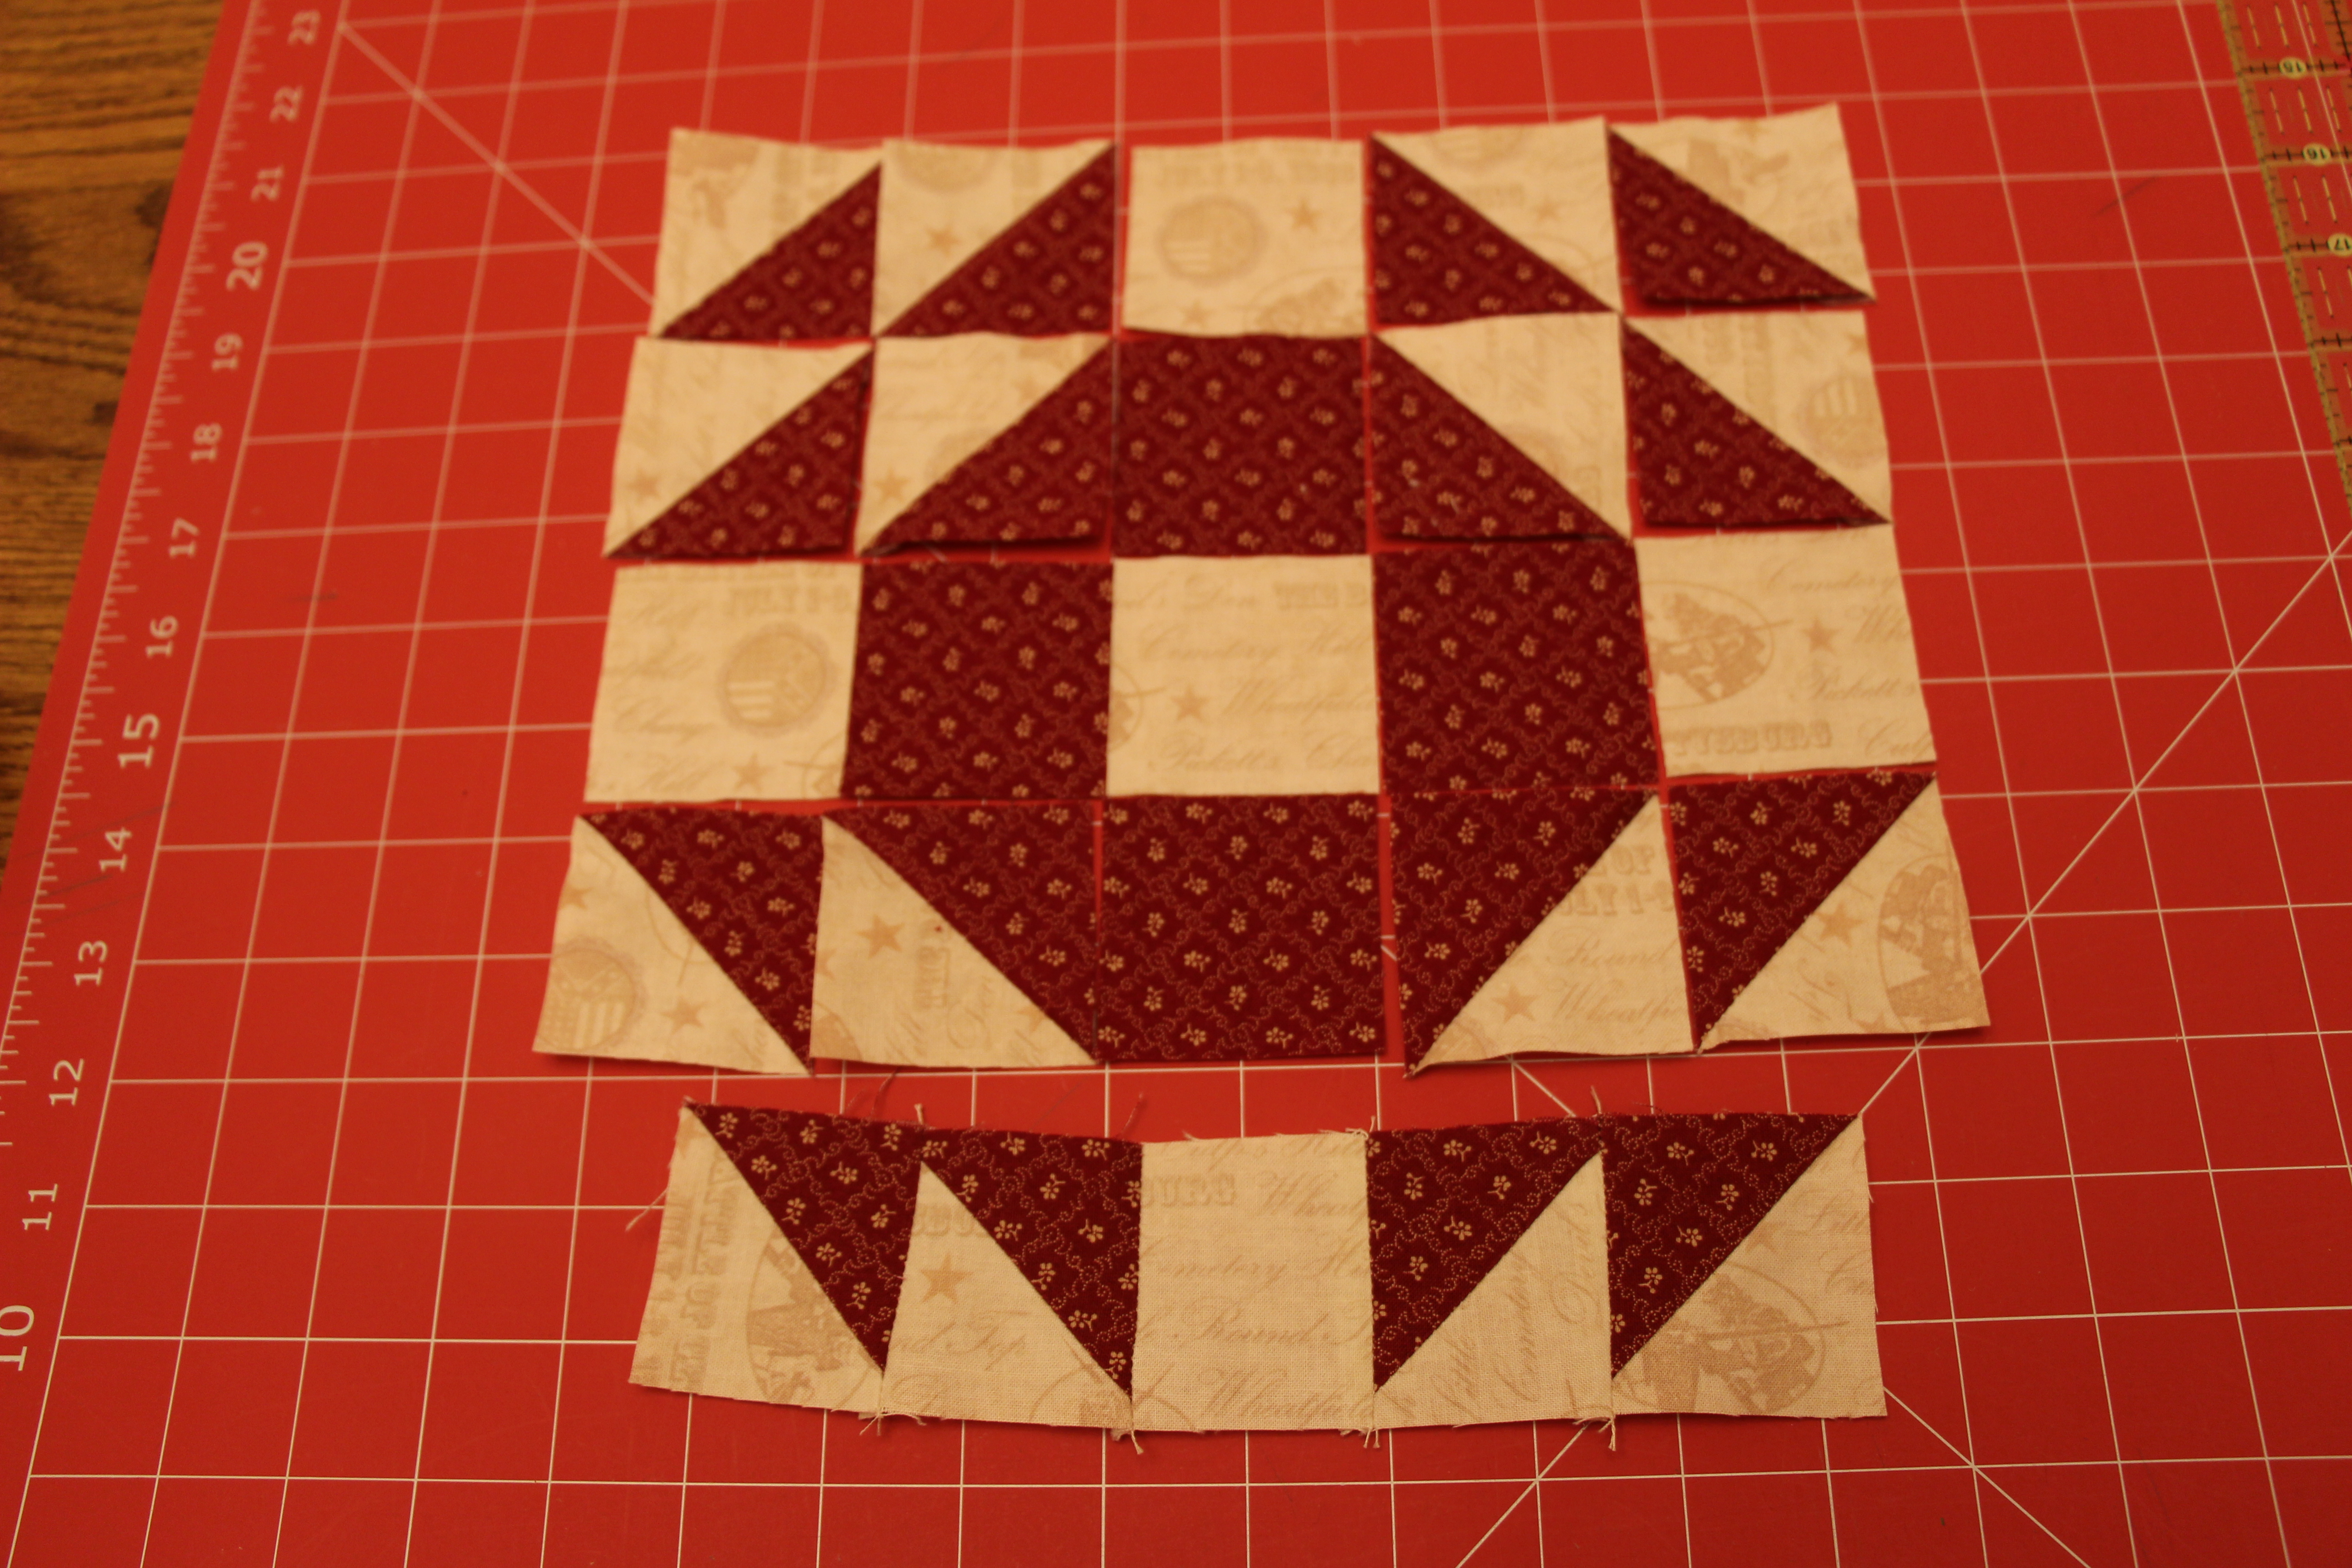
Use the 2 squares of 3 7/8″ red and white to create 4 Half Square Triangles (HSTs) trimmed down to 3 1/8″. Click here for my tutorial on how to make Half Square Triangles.

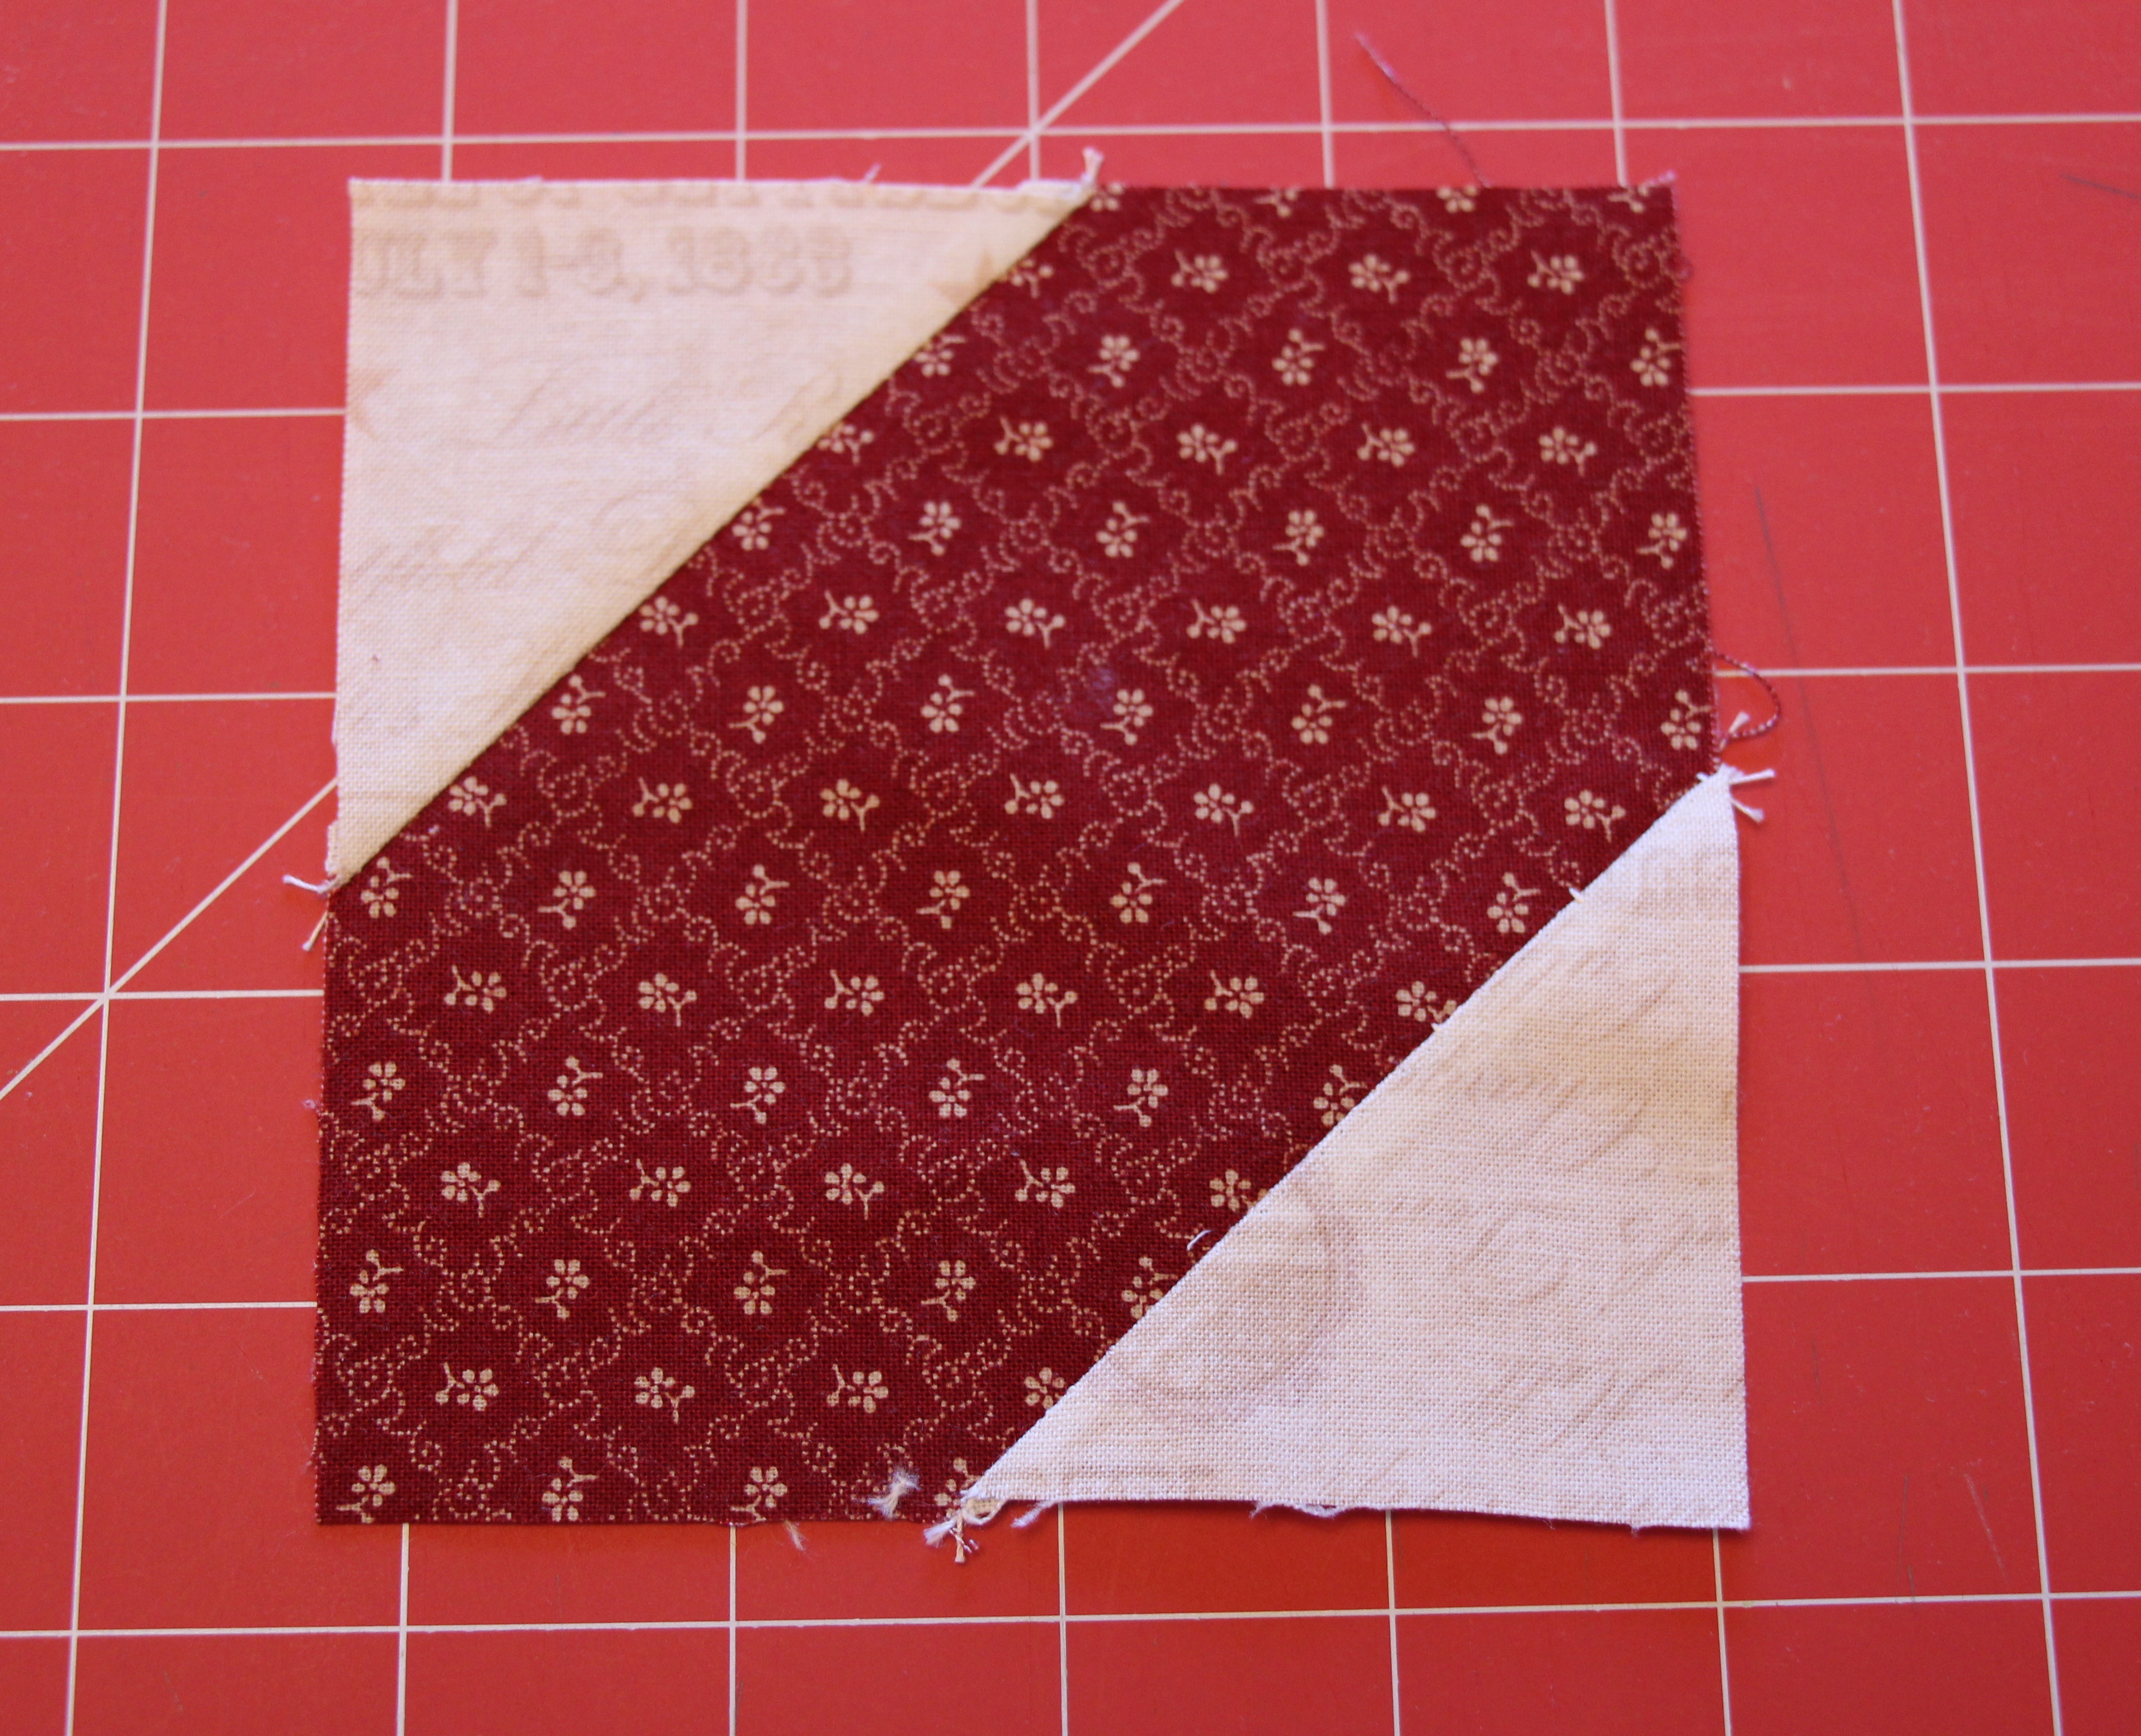
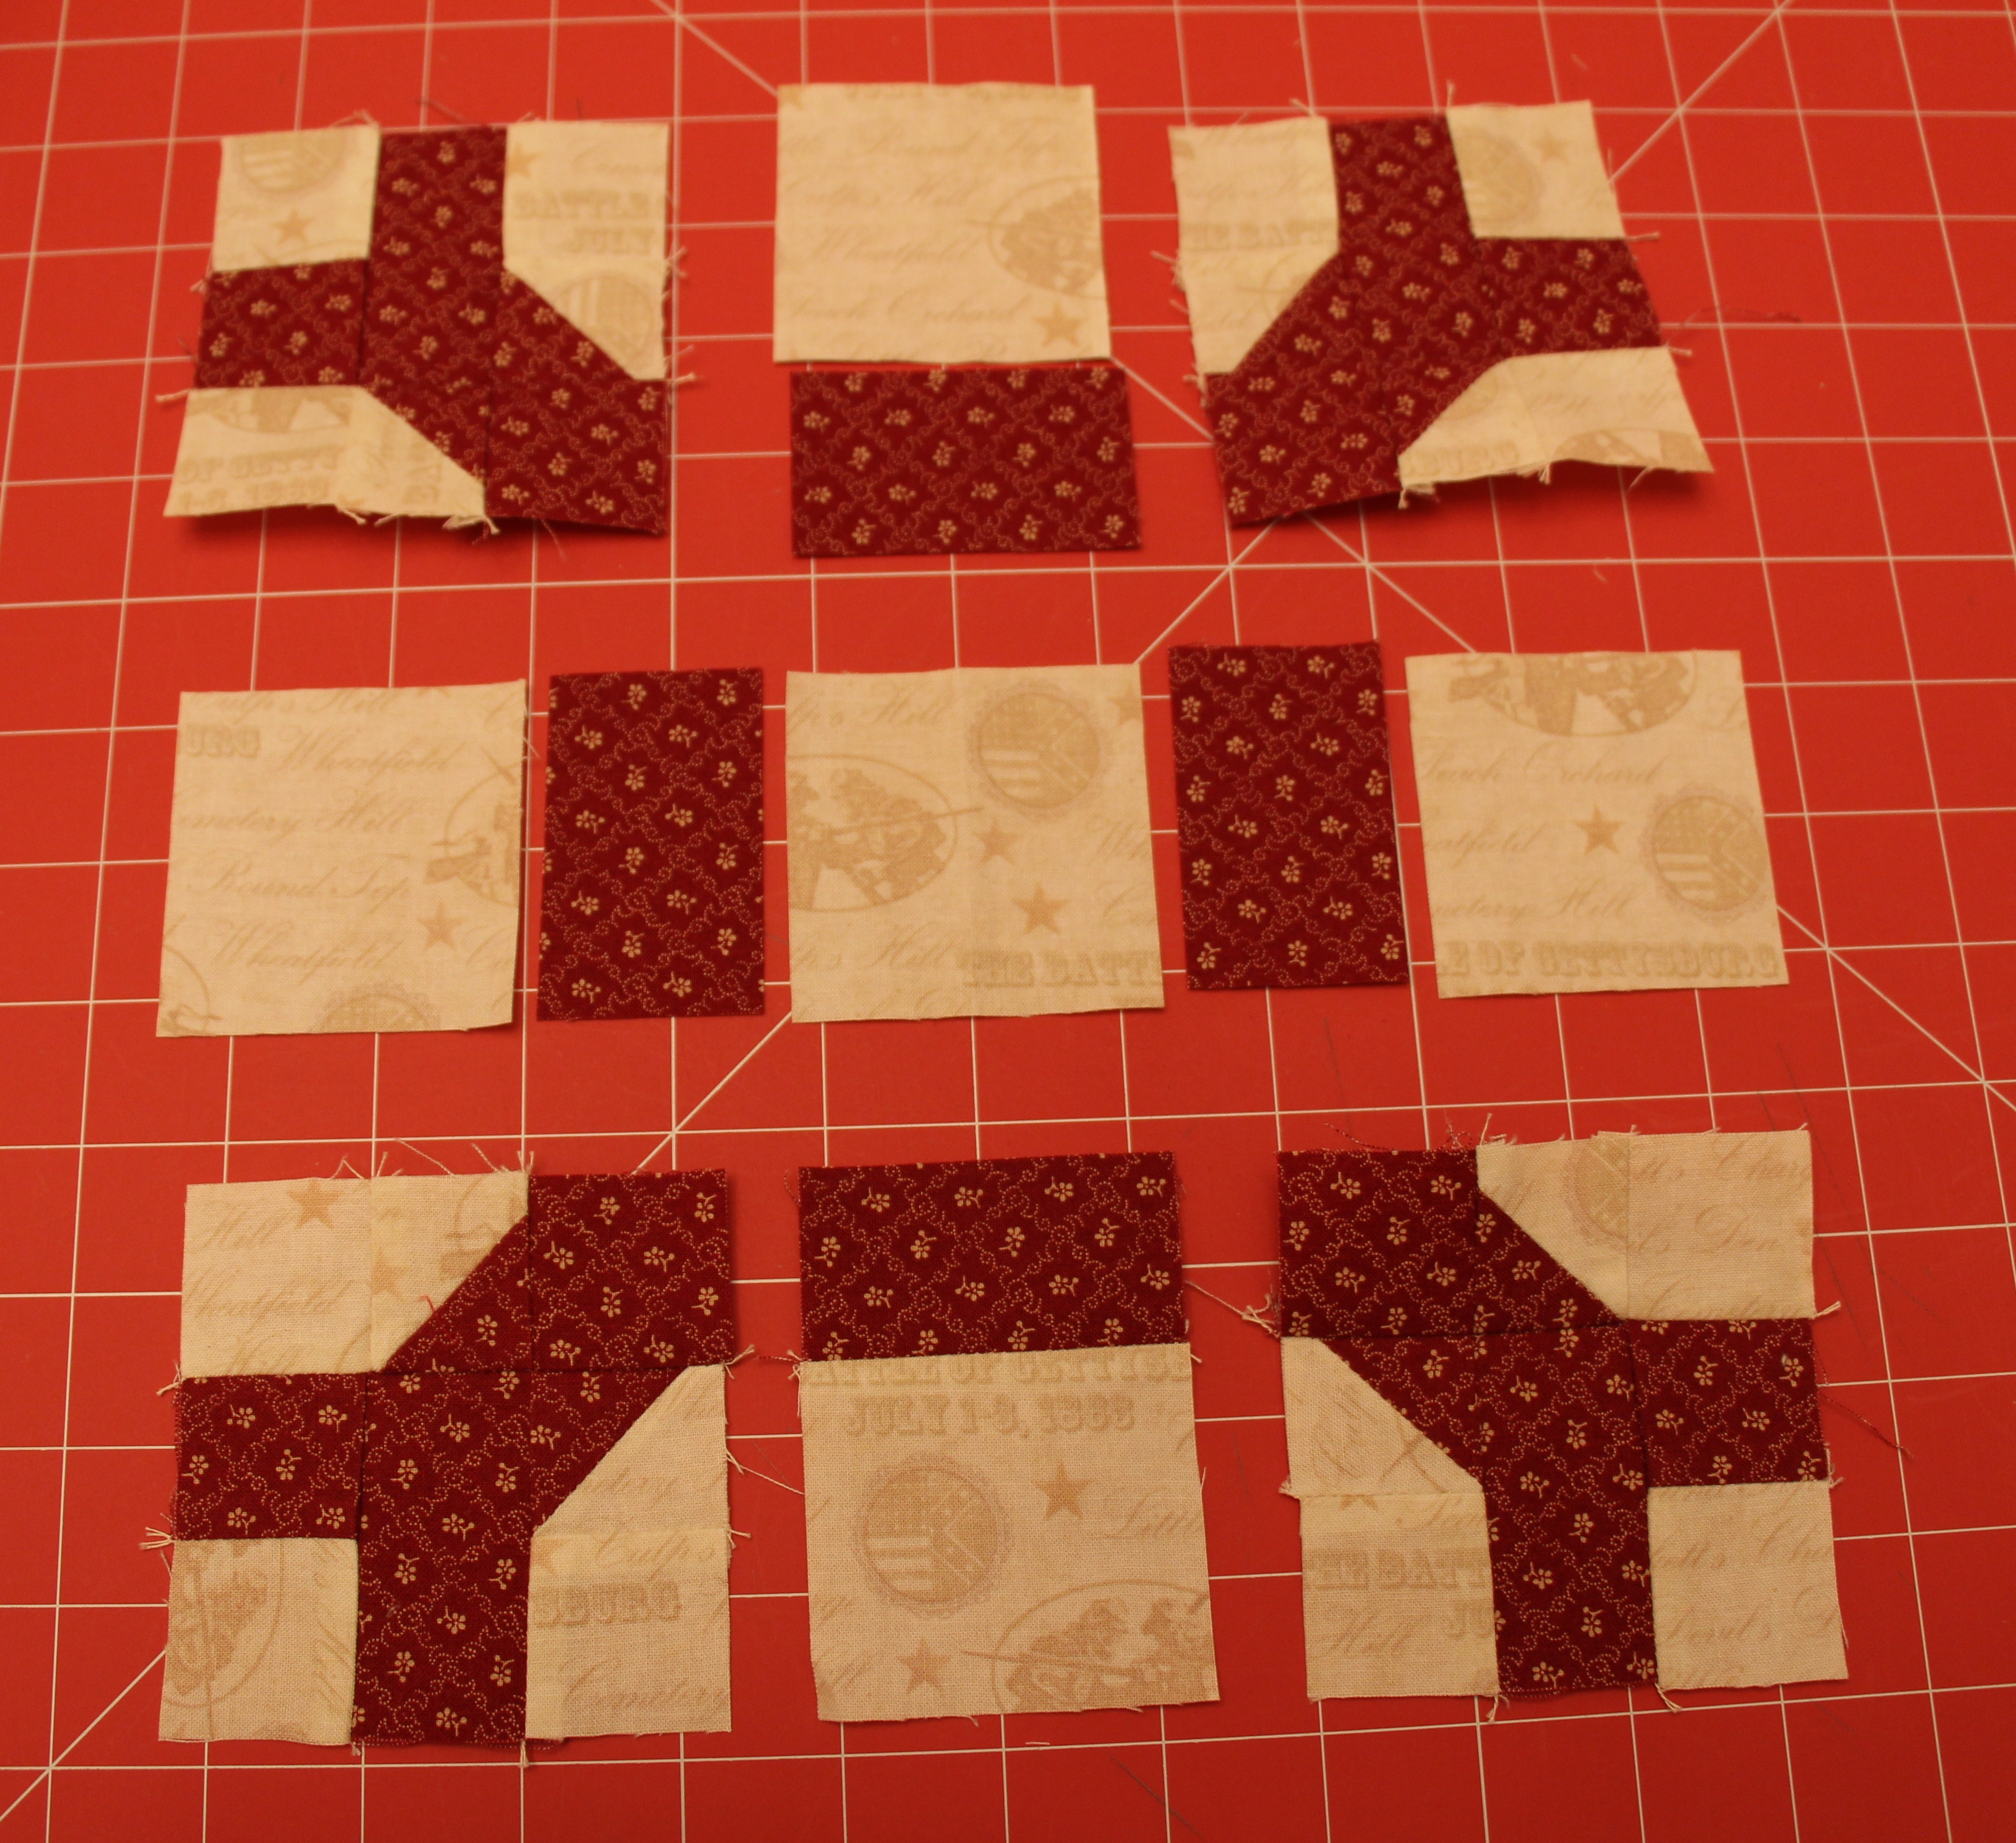
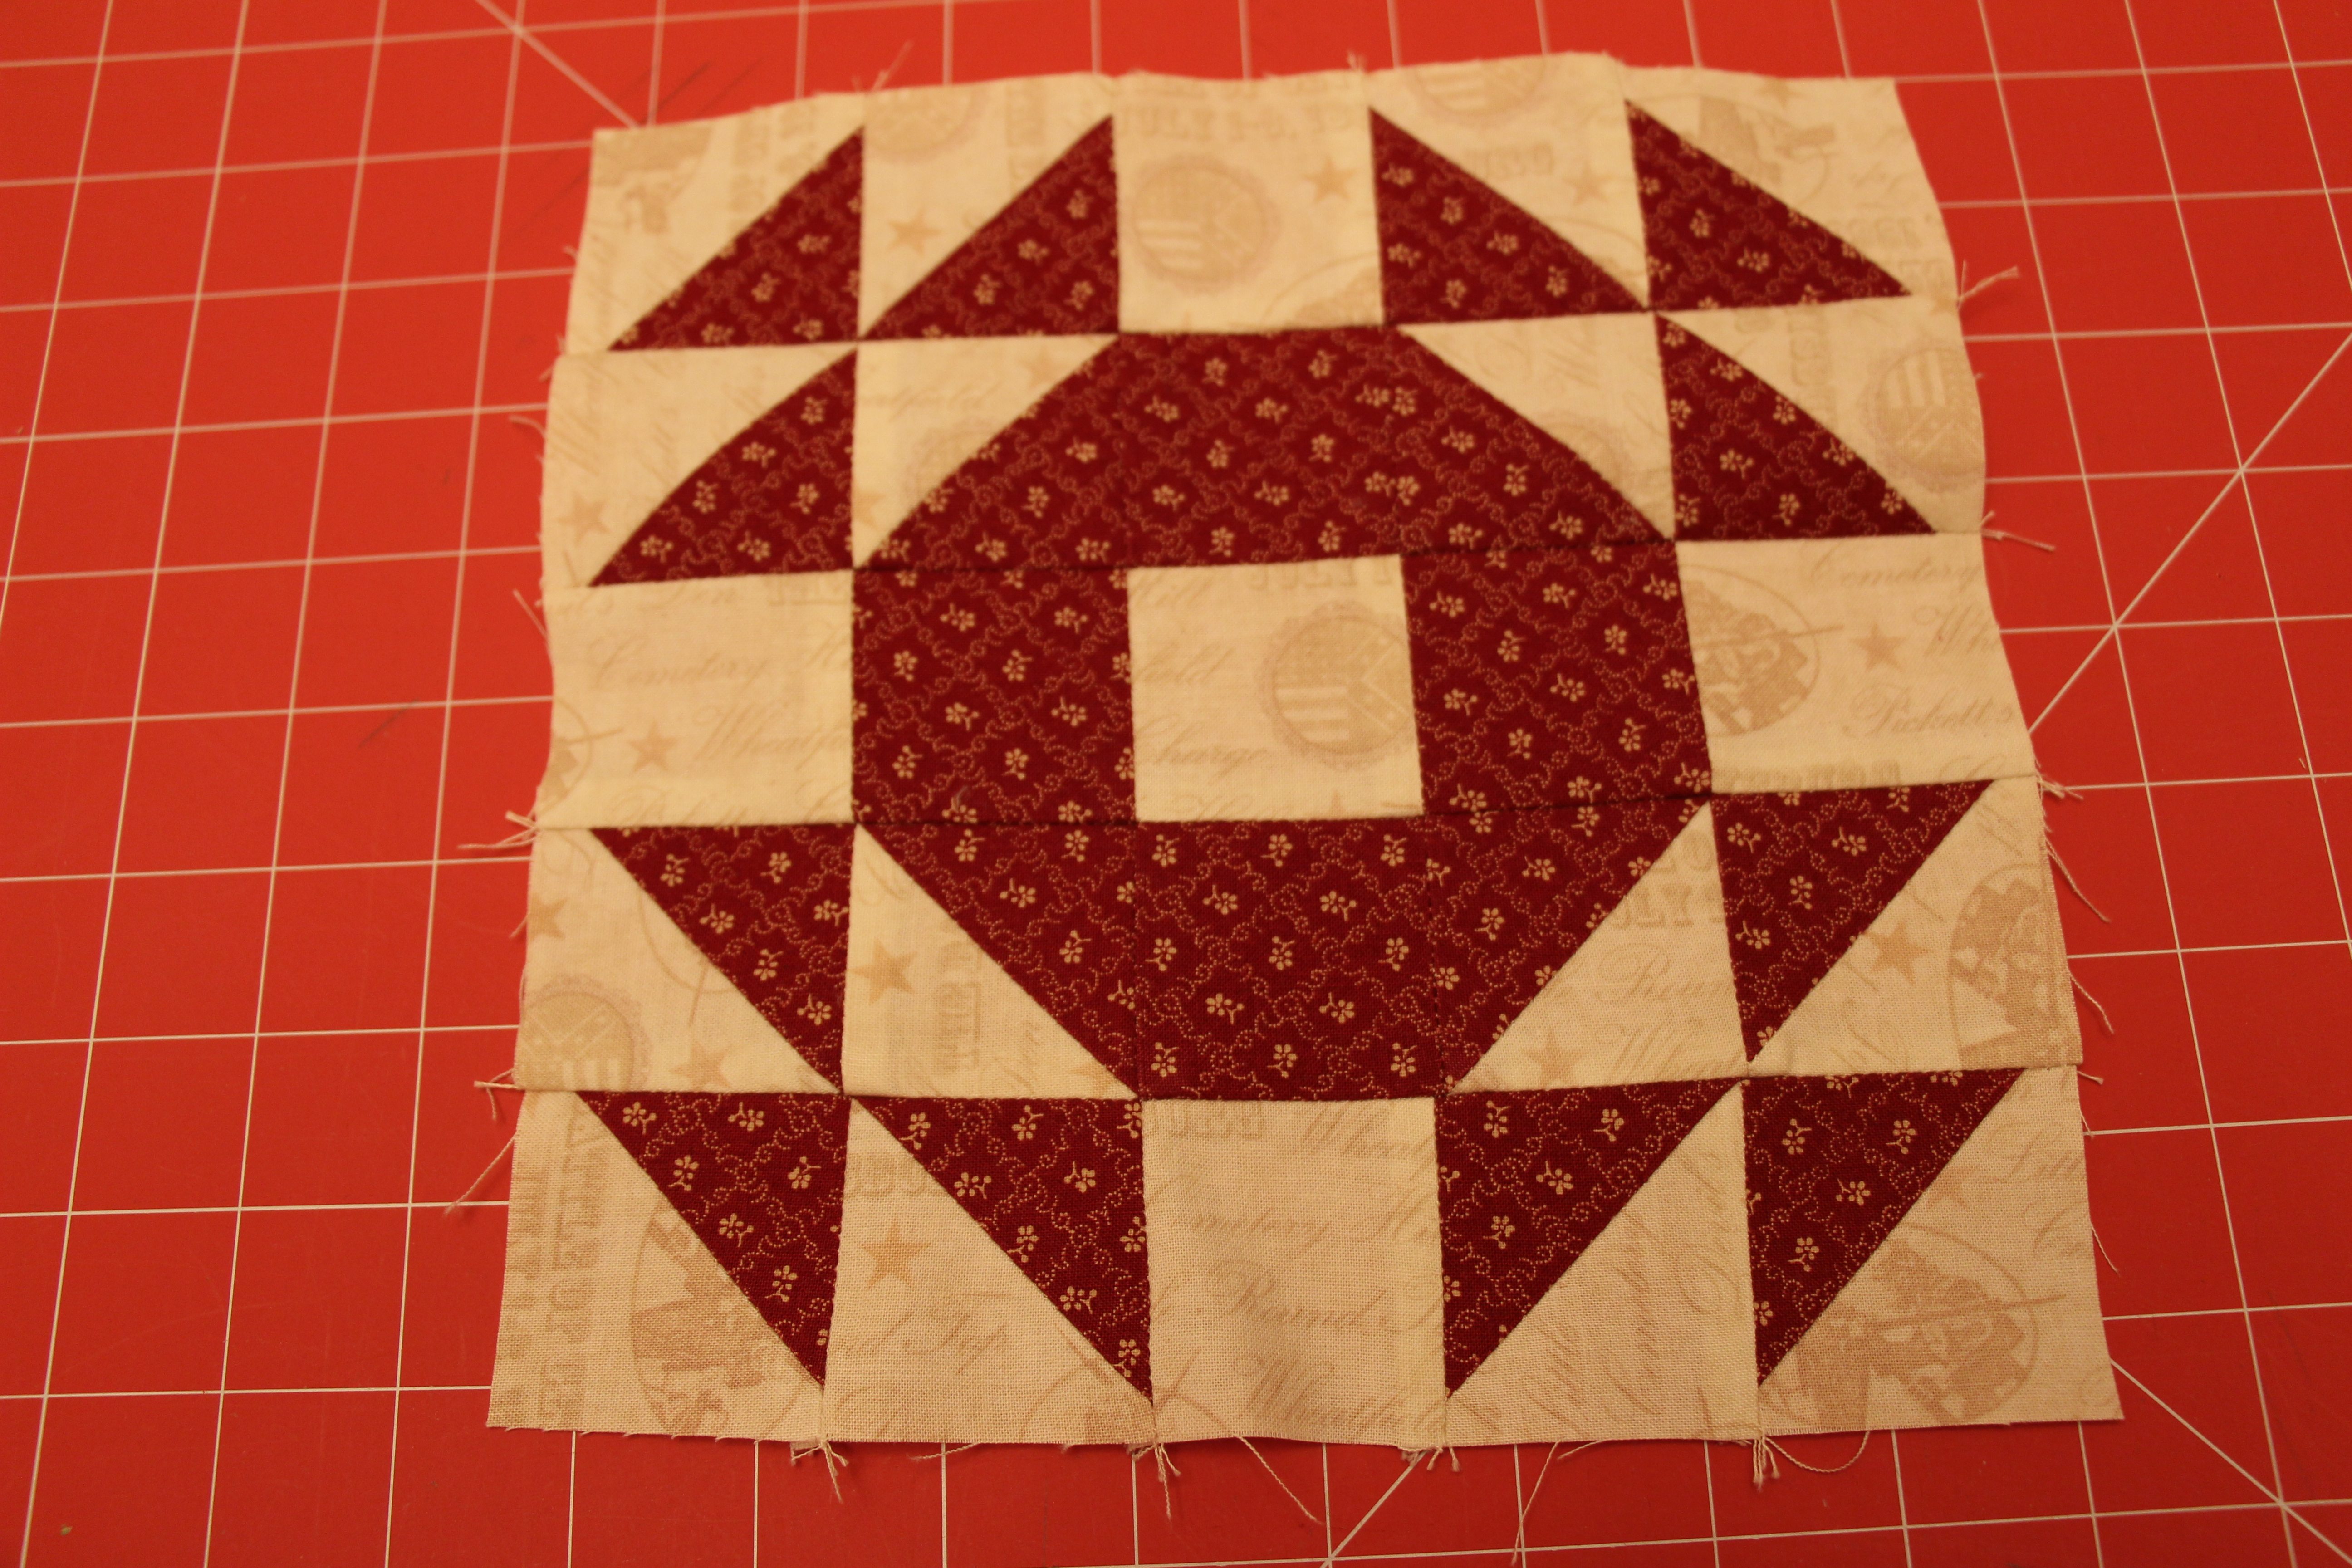
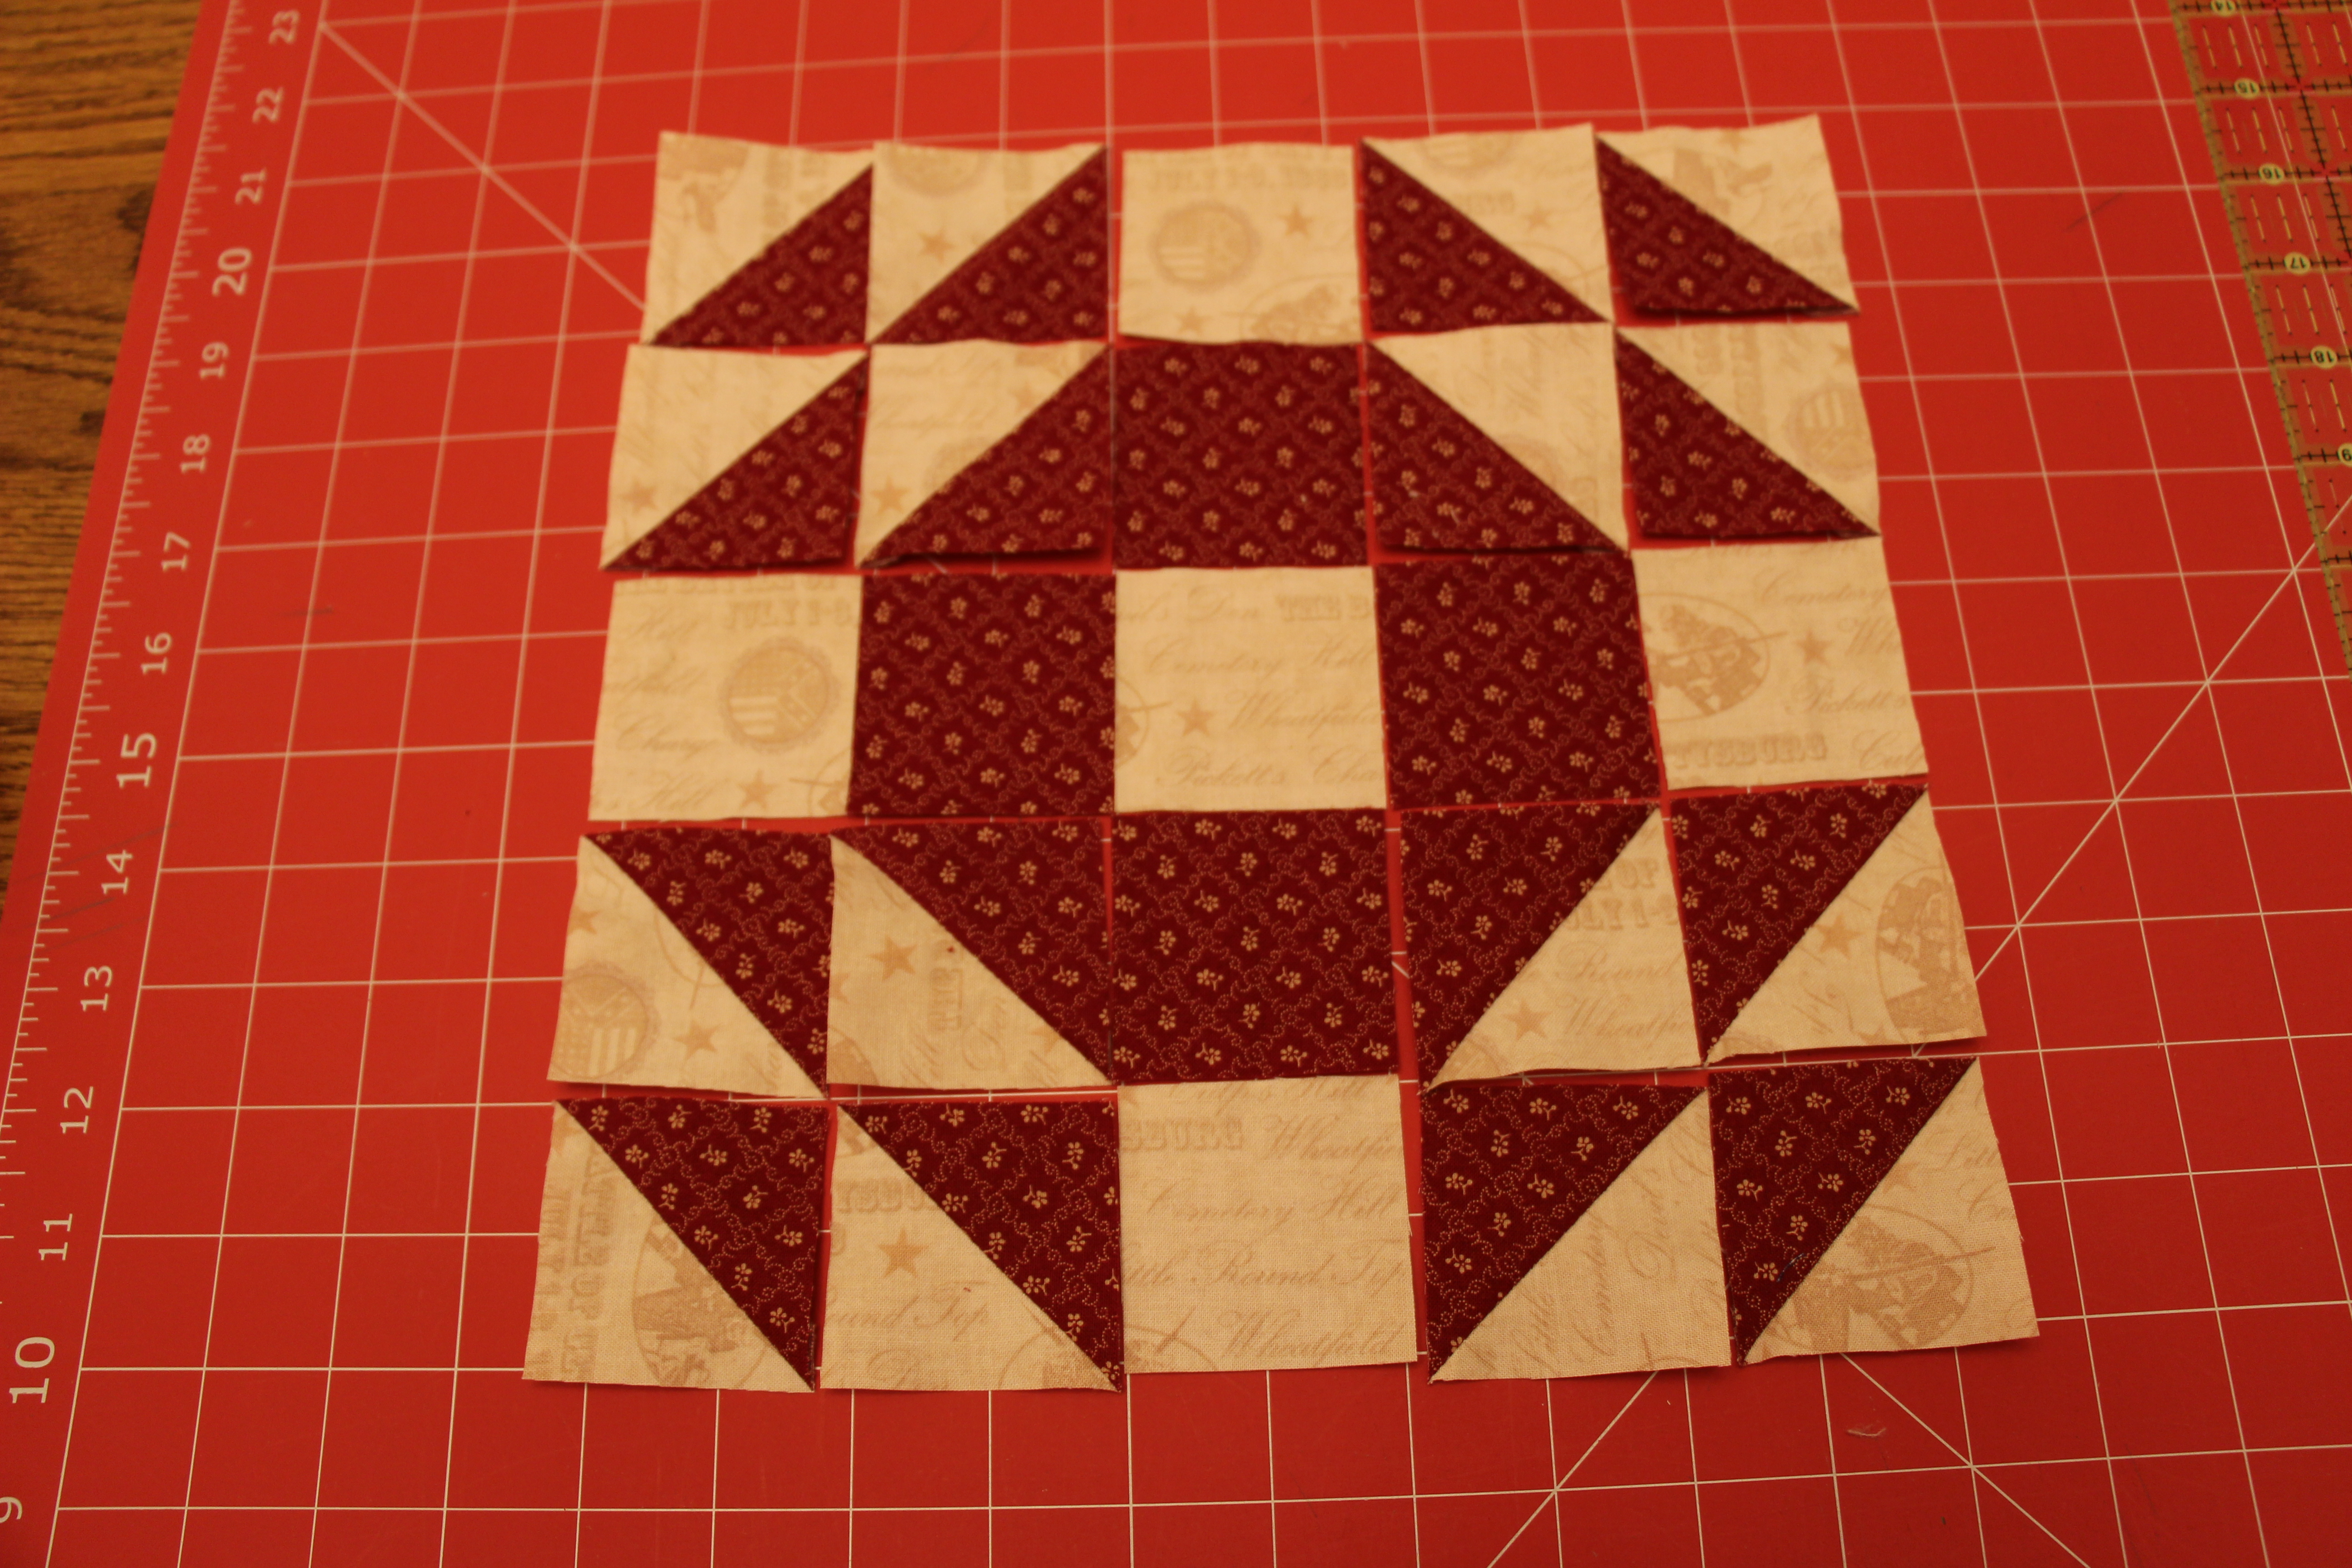
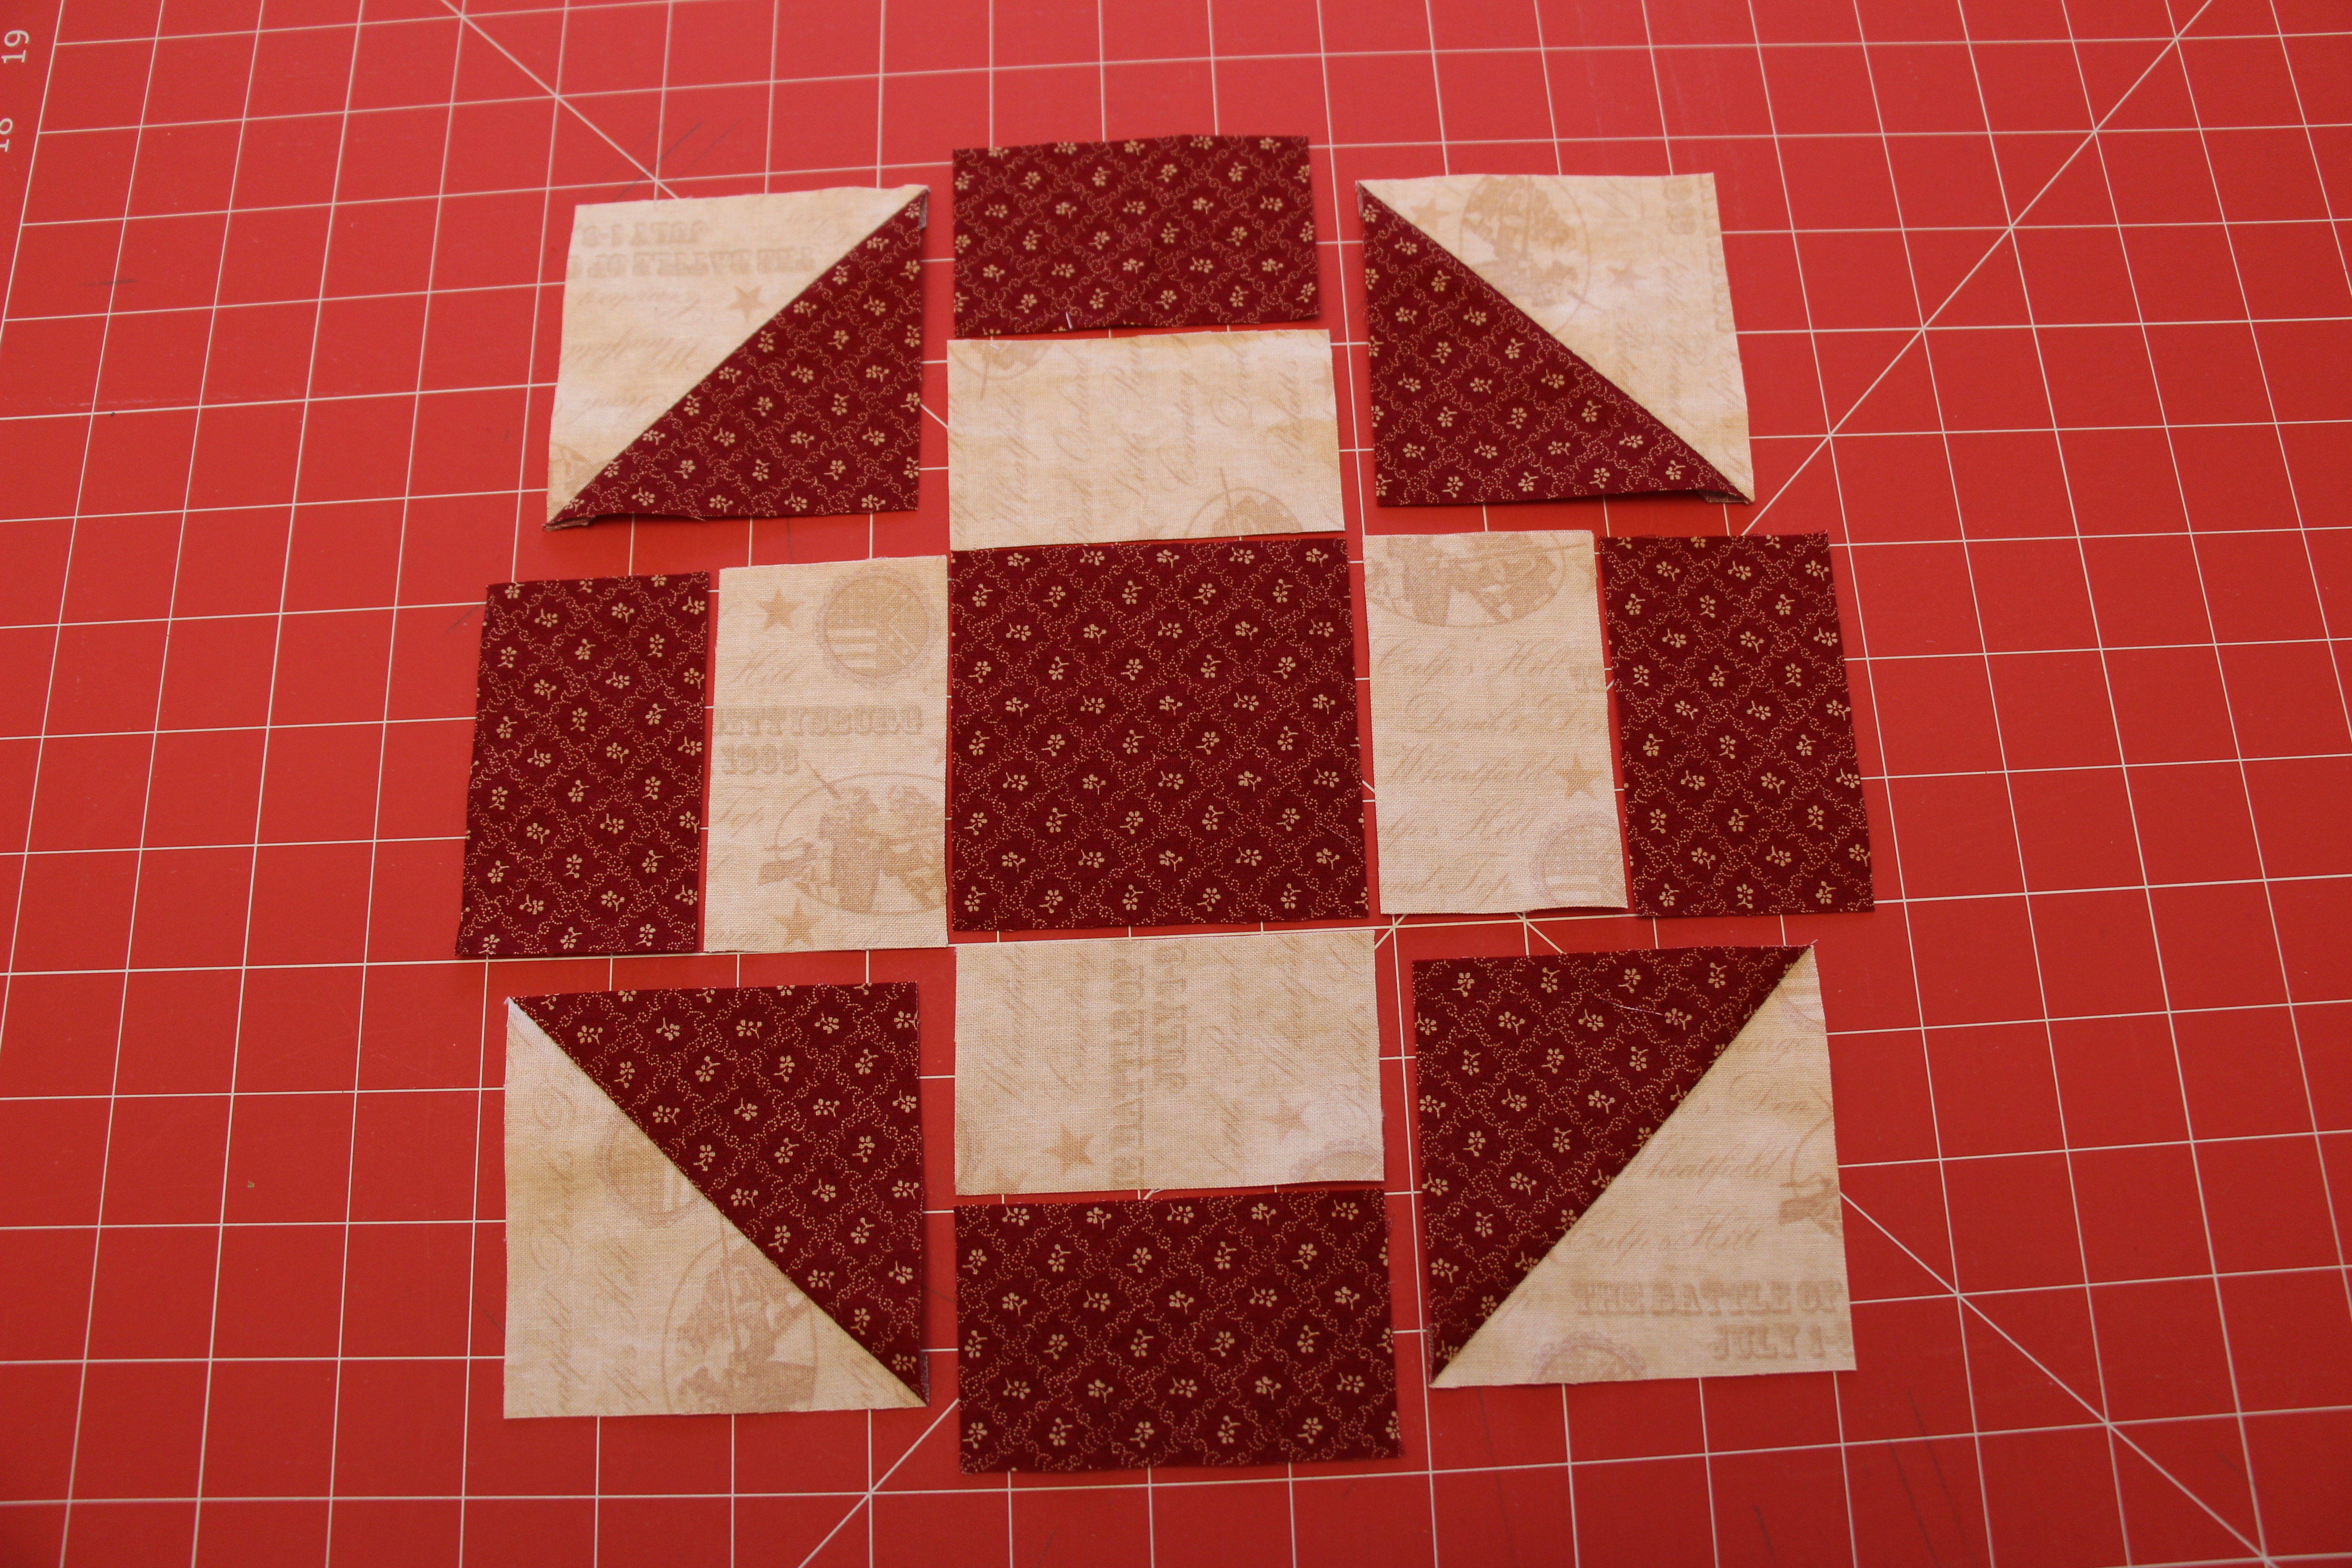
Lay out the Grecian Square Quilt Block:

Grecian Square Quilt Block Tutorial

Sew the red and white rectangles together:

Grecian Square Quilt Block Tutorial

Now the Grecian Square is simply a 9-patch.

Bear’s Paw

The Bear’s Paw is a classic quilt block. While not the most difficult block in my Fourth of July quilt Old Glory, it requires a lot of baby steps.

Bear's Paw Quilt Block Tutorial

Here is the how-to for a Bear’s Paw Quilt Block

Note: These measurements are for an 8″ block. Sew using a scant 1/4″ seam allowance.

Cut fabric:

  • 8 squares 2 1/4″ white
  • 8 squares 2 1/4″ red
  • 4 squares 1 5/8″ white
  • 1 square 1 5/8″ red
  • 4 rectangles 1 5/8″ x 3 7/8″ white
  • 4 squares 2 3/4″ red

Use the 8 squares of 2 1/4″ red and white to create 16 Half Square Triangles (HSTs) trimmed down to 1 5/8″. Click here for my tutorial on how to make Half Square Triangles. If you’ve been following my previous tutorials you’ll now know why I went through the time to create bonus HSTs from Flying Geese and Square in a Square!

Lay out your HSTs and remaining pieces of fabric into the Bear’s Paw:

Bear's Paw Quilt Block Tutorial

Looking at one paw print at a time, sew the two horizontal HSTs together and sew the vertical HSTs to the white square:

Bears Paw Quilt Block Tutorial

Then sew the horizontal HSTs to the red square before sewing the vertical to the paw print:

Bears Paw Quilt Block Tutorial

Complete the remaining three paw prints and then follow my tutorial for sashing to complete the block:

Bear's Paw Quilt Block Tutorial

Square in a Square

Square in a SquareThe Square in a Square block is essentially a diamond. Diamonds can be made by 4 Half Square Triangles (HSTs) or you can follow this latest tutorial for a Square in a Square. Using this method will create a cleaner diamond. As it is very similar to my previous tutorial covering Flying Geese bonus small HSTs can come from the Square in a Square! The block I used in Old Glory is comprised of 4 Square in a Squares.

Here is the how-to for a Square in a Square:

Your first step will be to determine what size block you’ll be working with. This diamond simply replaces a square! Take the size of that square and add your 1/4″ seam allowance. That value will be the base. You will also need four squares cut to 1/2 of the base square plus the 1/4″ seam allowance. Example: 4″ x 4″ finished Square in a Square will require one 4 1/2″ x 4 1/2″ square and four 2 1/2″ squares. Don’t forget to ALWAYS make a practice block with scrap fabric before committing.

Draw on the diagonal of each square and if you want the bonus HST draw a line 1/4″ off center in one direction. Place one small square face down in one corner of the base. If making a HST that bonus 1/4″ line needs to be on the side of the block towards the corner:

Square in a Square Block Tutorial

Sew on both drawn lines, cut between the seams, and iron open:

Square in a Square Block Tutorial

Repeat on the opposite corner:

Square in a Square Block Tutorial

Now do the last two corners. (The white squares will overlap in the center, but that will be taken care of in the seam allowance.):

Square in a Square Block Tutorial

Flying Geese

Flying Geese Block

Flying Geese, just like Half Square Triangles (HSTs) are very versatile. Some people create entire quilts of Flying Geese, they look great strung together and used as the border of a project, and they can be arranged in an endless amount of combinations to make individual blocks.

An added benefit of making Flying Geese is that each “goose” creates two bonus HSTs! The size of your Flying Geese might influence your decision in if you want to take the extra steps to get that bonus block. Because I made small 4″ finished Flying Geese for my 8″ finished block within Old Glory I knew that very small HSTs would come in handy with other blocks in the sampler quilt!

Here is the how-to for Flying Geese:

Your first step will be to determine what size block you’ll be working with. Think of the Flying Geese as simply replacing a solid rectangle. Take the size of that rectangle and add your 1/4″ seam allowance. That value will be the base. You will also need two squares cut to 1/2 of the rectangle plus the 1/4″ seam allowance. Example: 2″ x 4″ finished Flying Geese will require one 2 1/2″ x 4 1/2″ rectangle and two 2 1/2″ squares. Don’t forget to ALWAYS make a practice block with scrap fabric before committing.

Cut your fabric:

Flying Geese tutorial

Draw on the diagonal of each square and if you want the bonus HST draw a line 1/4″ off center in one direction:

Flying Geese tutorial

Place one square on the rectangle, corner to corner. The diagonal line needs to run from corner to center of the rectangle. If making a HST that bonus 1/4″ line needs to be on the side of the block towards the corner:

Flying Geese tutorial

Sew on both drawn lines, cut between the seams, and iron open:

Flying Geese tutorial

Repeat with the other square. (It will overlap the center of the rectangle, but that will be taken care of in the seam allowance.):

Flying Geese tutorial

Again, sew on the diagonal and the bonus HST seam if using. Cut between the seams and iron open:

Flying Geese tutorial

Plaited Block

I think this block uses the smallest pieces of fabric I’ve ever cut, but the effect of it is so worth it, and it’s one of my favorites in my Fourth of July quilt Old Glory. Because of my finished quilt product, I only used two colors for this Plaited Block quilt block, I highly encourage you to look at this “twist” using three colors! Please note, if you do opt to use three colors, fabric amounts and sizes you’ll need to cut will be different, and the sewing plan will be slightly altered from what I did as well.

Plaited BlockHere is the how-to for a Plaited Block Quilt Block:

Note: These measurements are for an 8″ block. Sew using a scant 1/4″ seam allowance. 

Cut fabric:

  • 4 squares 2 1/8″ red
  • 4 squares 2 1/8″ white
  • 8 squares 1 1/2″ red
  • 12 squares 1 1/2″ white
  • 8 rectangles 1 1/2 x 2 1/2″ red
  • 5 squares 2 1/2″ white

Use the 8 squares of 2 1/8″ red and white to create 8 Half Square Triangles (HSTs) trimmed down to 2 1/2″. Click here for my tutorial on how to make Half Square Triangles.

Lay out the HSTs and other pieces of fabric into the Plaited Block quilt block.

Break off the “arrows” in the four corners to piece together. Sew the red square on the left to the the white square below it and the HST on the right to the white square below it:

Plaited Block Tutorial

Sew the new rectangles to the red rectangle. Sew the remaining three squares together:

IMG_7700

Sew the two pieces from the previous step together.

Repeat with the remaining three “arrows”.

Sew the large white squares to the red rectangles above/below it. Then create the top and bottom rows:

Plaited Block TutorialPlaited Block Tutorial

Sew the middle section together and then sew together your three rows to create your Plaited Block:

IMG_7705

Yankee Puzzle

What better name for a quilt block than Yankee Puzzle for my Fourth of July quilt Old Glory.

Yankee Puzzle Quilt Block

Here is the how-to for the Yankee Puzzle Quilt Block:

Note: These measurements are for an 8″ block. Sew using a scant 1/4″ seam allowance. 

Cut fabric:

  • 8 squares 3 1/8″ red
  • 8 squares 3 1/8″ white

Use the 8 squares of 3 1/8″ red and white to create 16 Half Square Triangles (HSTs) trimmed down to 2 1/2″. Click here for my tutorial on how to make Half Square Triangles.

Lay out HSTs into the Yankee Puzzle quilt block.

Working in quadrants, sew four 4-patch blocks then sew the four 4-patch blocks into one 4-patch Yankee Puzzle:

Yankee Puzzle Quilt Block Tutorial

Honey Honey Layer Cake

As I continued to make quilt blocks for my Old Glory Fourth of July quilt I traded out a few blocks for others that I felt worked better with the personality of the quilt. This particular block I found on Pinterest. You can see a whole quilt made with this block here, it’s stunning!

Honey Honey Layer Cake Quilt Block

Here is the how-to for the Honey Honey Layer Cake Quilt Block:

Note: These measurements are for an 8″ block. Sew using a scant 1/4″ seam allowance. 

Cut fabric:

  • 8 squares 2 3/4″ red
  • 8 squares 2 3/4″ white
  • 4 squares 2 1/8″ red
  • 4 squares 2 1/8″ white

Use the 8 squares of 2 3/4″ red and white to create 16 Half Square Triangles (HSTs) trimmed down to 2 1/8″. Click here for my tutorial on how to make Half Square Triangles.

Lay out HSTs and solid blocks into the Honey Honey Layer Cake quilt block: Honey Honey Layer Cake Quilt Block Tutorial

Assemble each row of five:

Honey Honey Layer Cake Quilt Block Tutorial

Attach the five rows together:

Honey Honey Layer Cake Quilt Block Tutorial

Ohio Star

For my Old Glory Fourth of July quilt I used two different blocks for the stars section of the flag. One of them, Sarah’s Choice, is a 16-patch of half square triangles and squares so I did not feel a tutorial was necessary for that block. The other star block, Ohio Star, is a little trickier. This 9-patch is a made up of squares and what I call hour glasses (quarter-square triangles). Ohio Star

Here is the how-to for the Ohio Star Quilt Block:

Note: These measurements are for an 8″ block. Sew using a 1/4″ seam allowance.

Cut fabric:

  • 1 square 3 1/8″ blue
  • 4 squares 3 1/8″ white
  • 2 squares 4 1/8″ blue
  • 2 squares 4 1/8″ white

Layer one white 4 1/8″ square atop a blue 4 1/8″ square. Mark the diagonal and 1/4″ on each side of the diagonal:

Ohio Star TutorialOhio Star Tutorial

Sew on each of the 1/4″ lines. Cut on the diagonal. Open up your half square triangles (HSTs) and iron to the dark:

Ohio Star Tutorial Ohio Star Tutorial Ohio Star Tutorial

Sandwich the HSTs so that blue and white are opposite each other. Mark the diagonal and 1/4″ on each side of the diagonal:

Ohio Star Tutorial

Sew on each of the 1/4″ lines. Cut on the diagonal. Open up your hour glasses and iron flat: Ohio Star Tutorial Ohio Star Tutorial IMG_7635

Trim down each hour glass to 3 1/8″ squares by treating one of the diagonals as a straight line and trim off the top and right side to just slightly larger than 3 1/8″. It is important that you line your ruler up so that the 3 1/8″ line is touching the edge of blue-on-white: Trimming an Hour Glass Flip the block and now align your ruler with the cut edges. Finish to 3 1/8″:

Ohio Star Tutorial Ohio Star Tutorial

Repeat the hour glass process for the other 4 1/8″ squares of fabric.

Now the Ohio Star is simply a 9-patch:

Ohio Star TutorialOhio Star