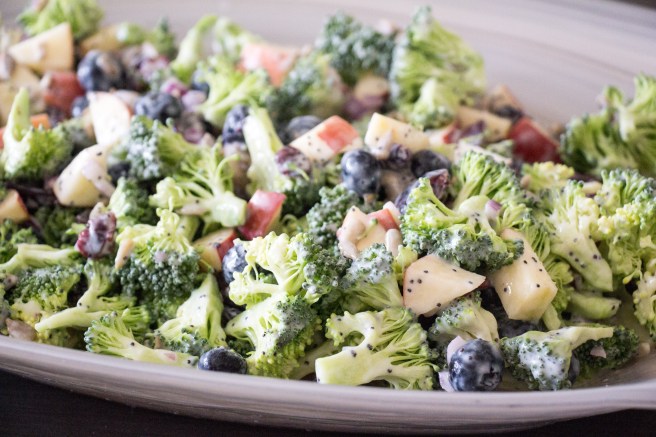
I love a good broccoli salad and I am not afraid of mayo.
But I know many people who aren’t as in love with the condiment as I am. And that’s okay.
I settled on bringing broccoli salad to Easter dinner as my contribution. I was going to use my go-to recipe, which involves pasta, but then I found a non-mayo recipe on Pinterest. Those stalkers knew just what I would like!
My favorite thing about this broccoli salad is that there’s lots of fruit involved – apples, blueberries, and cranberries! The poppy seed dressing is sweet and tangy and a perfect compliment to both veggie and fruit. It gets bonus points for sunflower seeds.
I’m sharing the recipe today with some other Festive Foodie bloggers in honor of National Picnic Day, which is today April 23rd. I think this salad would be great for any picnic or potluck!
Broccoli Salad with Poppy Seed Dressing
Ingredients:
2 small heads broccoli, cut into bite size pieces
1 large apple, cut into bite size pieces
1 C blueberries
1/2 C dried cranberries
1/4 C sunflower seeds
1/4 C diced red onion
2 tbsp lemon juice, divided use
1 C plain Greek yogurt
1/4 C honey
1 tbsp poppy seeds
2 tsp apple cider vinegar
Steps:
In a large bowl, toss together the broccoli, apple, blueberries, cranberries, sunflower seeds, and red onion with 1 tbsp lemon juice.
In a small bowl, whisk together the yogurt, honey, remaining lemon juice, poppy seeds, and vinegar.
Pour dressing over salad to taste (I had a little dressing leftover) and serve.
I’m {finally} back with another Crazy Ingredient Challenge!
This month’s mission: to combine pineapple and sweet potato. Two of my husband’s favorite ingredients.
At first I was thinking of some sort of savory/sweet empanada, which does still sound insanely delicious. But as things have their own way of developing, pizza became the final answer.
I made slow cooker pineapple barbecue pulled chicken on one of our 100 degree days when preheating the oven seemed like the worst idea on the planet. We served that chicken over rice. The leftovers had gone to work with my husband for 3 days. Firecracker and I loved it re-purposed as nachos, too.
As I sat there with still an insane amount of chicken in my fridge, the light bulb went off. (Not the one in my fridge.) I had half of the CIC challenge done! Now to incorporate the sweet potato. Ding! Pizza!
I made a gluten free pizza dough out of a white sweet potato. (Hello sneaky veggies!) Topped it with barbecue sauce, cheese, the leftover chicken, and some extra pineapple for good measure. The pizza dough was incredible easy to make and held up to the heavy toppings I layered on top. Maybe I’ll make it again using an orange sweet potato for Halloween!
This recipe makes 2 servings.
Pineapple Barbecue Chicken Pizza with Sweet Potato Crust
Peel potato. Cube. Place in a pot covered with salted water. Boil 10-15 minutes, until potato is fork tender. Drain and allow to cool.
Preheat oven to 400 degrees F. Line a baking sheet with parchment paper.
Place cooled potato in a food processor along with the rolled oats and the egg. Process until smooth.
Using wet hands, transfer the pizza dough to the prepared baking sheet. Form into a circle, 1/4-1/2″ thick. Bake 25-30 minutes. Allow crust to cool. Flip the crust, peel off the parchment, and brush with olive oil. Bake another 5-10 minutes.
Top pizza crust with barbecue sauce, cheese, chicken, and pineapple. Bake another 5-10 minutes until the cheese is melted and the toppings are warmed through.
When my mom was here in April, I asked her if there was anything in particular she wanted for dinners during her visit.
Her answer, not surprisingly, was “something light!”
My brother and his wife recently bought a house in my parents’ neighborhood and are doing some remodeling. While the construction is taking place, they’re living with my parents.
My dad travels a lot for his job so my mom doesn’t tend to cook much when he’s gone. Simple salads, high protein snacks, and lots of fruits and veggies are usually enough.
My brother and sister-in-law do cook, and enjoy doing so. (From what I hear I’m going to be insanely jealous of the kitchen they’ll have once their first home is complete.) The food they cook is delicious, too! But the diet change had her craving “something light.”
“Something light” isn’t usually in my wheel house, so I took to Pinterest hoping to find something in my long list of saved pins to satisfy. I sent Mom a link for a Superfoods Salad and was met with a resounding “yes, please!”
If you’re feeling the tug to healthier eating as the summer draws near, be sure to scroll past my recipe for some more great dinner salad options from the Sunday Supper crew.
This salad was so fantastic, that I made it again the following week when my in-laws were visiting! Even my “meat and potatoes” father-in-law enjoyed the salad.
I know I’ll be making the salad again. It’s satisfying and filling without leaving you feeling weighed down. As a salad with a bunch of ingredients, it’s easy to assemble. Particularly if you have some leftover quinoa in the fridge already! Because kale is a hearty green, the salad will keep in an air tight container in the refrigerator up to a week.
When my in-laws were here we cooked up some chicken and had pita bread, too. I forgot the Greek yogurt/sour cream in the dressing the second time around and it works just beautifully. Literally. While I preferred the touch of creaminess to the dressing it’s not necessary, and does make for a more photogenic salad.
The recipe below feeds 2-3 people. (I tripled it to serve a party of 5, which was an over estimation.)
Kale Superfoods Salad
Ingredients:
1/2 C frozen edamame, cooked according to package instructions
1/2 bunch kale, stems removed and torn
1/2 C cooked quinoa
1/2 C blueberries
1/2 C red grapes, halved
1/2 C dried cranberries or dried cherries
1/3 C shredded Parmesan cheese
1/4 C sunflower seeds
1/4 C walnuts, chopped
1/4 C orange juice
2 tbsp olive oil
1 clove garlic, minced
1 tsp sugar
1/2 tsp salt
1/4 tsp pepper
1 tbsp sour cream or Greek yogurt
Steps:
Toss kale, quinoa, edamame, fruits, cheese, and sunflower seeds in a large bowl.
Make the dressing: Whisk together the orange juice, olive oil, garlic, sugar, and Greek yogurt/sour cream in a small bowl. Season to taste with S+P.
Pour dressing over the salad and carefully toss to evenly coat.
Join the #SundaySupper conversation on twitter on Sunday! We tweet throughout the day and share recipes from all over the world. Our weekly chat starts at 7:00 pm ET. Follow the #SundaySupper hashtag and remember to include it in your tweets to join in the chat. To get more great Sunday Supper Recipes, visit our website or check out our Pinterest board.
Would you like to join the Sunday Supper Movement? It’s easy. You can sign up by clicking here: Sunday Supper Movement
Today is my last post as part of the Easter Week with “Holiday Fun with our Blogging Friends.” This week, 13 bloggers are sharing 46 recipes and tips to help you serve up deliciousness this Easter. Follow #EasterRecipes on social media to see what we’re serving up! I’ll be taking the Holy Weekend off from my computer and spending it with my family and friends.
Our brunch menu consists of those Carrot Cake Cinnamon Rolls I shared with you yesterday, eggs, and bacon. Our dinner menu will be my Parmesan Pork Tenderloin, a corn and green bean casserole from one of my cookbooks, and some crescent rolls on the side. For dessert, as is tradition, I’ll be making my grandmother’s Easter Pound Cake in her lamb mold.
To round out my carrot cake related offerings this week I provide you with a healthy option. These energy balls even qualify as raw vegan (assuming you leave off the drizzle of cream cheese icing)!
If you love carrot cake, you absolutely must stop everything you’re doing and make these energy balls. You won’t feel guilty in the slightest indulging in a couple.
Firecracker helped me make them – aka he dumped ingredients into and pushed the buttons on the food processor – so he knew there were a bunch of carrots in these treats. Even if I called it a cookie he wouldn’t actually try a bite.
Treat on the other hand, inhaled two of them with his lunch! He had two more of the bunch later in the week, too.
I brought them to Bible study, as I knew one of the moms follows a raw vegan diet. I brought that Caramel Apple Dip as planned, but as we’d made these carrot cake bites the day before, the lightbulb went off and I knew I had to leave cream cheese icing off half of them. They were greatly approved and appreciated.
You can customize these balls to suit your tastes, too. Use any nut you like and any nut or seed butter in your pantry. I actually used a honey sunflower butter!
Pulse carrots in a food processor until finely shredded. Remove and set aside.
Place the dates and pecans in the food processor and pulse until combined. Return the carrots to the food processor along with the remaining ingredients. Pulse until the mixture starts to come together.
Form into balls. If the mixture is too thin, add a little more oats; if it’s too dry, add a little extra sunflower butter.
Optional: Thin out the icing with milk. Drizzle over the energy balls.
As cauliflower continues to gain in popularity, I’m excited to say that we’re finally on that bandwagon. Though to be honest, I still haven’t been able to convince myself to try it raw. Don’t ask me why, it makes no sense.
I decided to delve into that cauliflower enjoyment and search my Pinterest account for any previously saved recipes that I’d forgotten about. Immediately this pin for Honey Garlic Baked Cauliflower called out to me with its stunningly mouth-watering photography.
I made the recipe as directed the first time and while we enjoyed it, it was missing something. I kept thinking, “This needs veggies!” which is hilarious as the entire dish was veggies. That, right there, should tell you that you won’t be missing the meat at all.
We were forced to eat the prepared cauliflower cold as we were dealing with some child(ren) meltdown(s) while simultaneously waiting for the brand new rice cooker to cook some rice.
I determined that the breading wasn’t necessary and decided to try again for lunch later that week. I know it’s “honey garlic” cauliflower, but the garlic was too strong so I toned that flavor down a touch, too. And to get that “desire for something green” I added some frozen edamame to the dish.
My version is perfect for lunch or a weeknight dinner. It serves 2.
Honey Garlic Baked Cauliflower
Ingredients:
1/2 head cauliflower, cut into florets
6 tbsp honey
1 1/2 tbsp soy sauce
1/2 tbsp sriracha
3 cloves garlic, minced
1 tsp onion powder
6 tbsp water
2 tsp cornstarch
1/3 C frozen shelled edamame, thawed
cooked rice, for serving
Steps:
Preheat oven to 400 degrees F.
Place cauliflower on a lightly greased baking sheet in an even layer. Bake 20 minutes.
In a small saucepan over medium heat the honey, soy sauce, sriracha, garlic, and onion powder until combined and warmed through.
In a small bowl, whisk together the water and cornstarch. Slowly pour into the sauce, whisking continuously. Bring to a simmer and cook a couple of minutes until sauce is thickened. Remove from heat.
Toss cauliflower and edamame in as much of the sauce as desired. Serve immediately over cooked rice.
When the opportunity arose to review The Migraine Relief Plan by Stephanie Weaver I jumped on it. While I’ve been lucky enough, at least in these first 28 years of life, to not be a sufferer of migraines, migraines do run in my family. My grandmother, great uncle, aunt, uncle, and mom have all dealt with varying versions of them. As a young child even my brother would suffer from headaches! Thankfully he’s outgrown them. I hope that means our family history of migraine attacks ends with our generation.
My mom’s headaches seem to be the least severe of the group, but I remember not even being allowed to utter the word “headache” around her, resorting to simply calling them an “H” when I was younger. I don’t know if that’s still the case, but I won’t use the word in her presence to this day. My aunt seems to suffer the most of the bunch and continues to get severe migraine attacks. These migraine attacks would result in days spent in bed and helped contribute to an early retirement. I can’t wait to share this book with her. As a doctor, I know she would appreciate the amount of research Stephanie put into developing the Plan. When I asked if it’d be okay to mention her in this blog post, I discovered that she’s already heard of the book and I look forward to giving her more information about it.
Disclaimer: I received a copy of The Migraine Relief Plan in exchange of my honest review. This post also contains Amazon affiliate links.
The Migraine Relief Plan: An 8-Week Transition to Better Eating, Fewer Headaches, and Optimal Health is an incredible resource for anyone living with migraines. Stephanie is an author, blogger, and certified wellness and health coach. She has a Master of Public Health in Nutrition Education from the University of Illinois. Her recipes have been featured in Cosmopolitan, Bon Appétit, Cooking Light, Parade, and more. She lives in San Diego, CA.
The book is broken down into 5 parts: Creating the Plan, The Plan, Maintaining the Plan, Creating a long-term lifestyle, and Migraine-friendly recipes and meal plans.
In Part I you’ll read about Stephanie’s story. Part II explains the 8 week Plan. Stephanie’s 8 week plan is a perfect way to completely change your eating habits and lifestyle without “quitting cold turkey.” Even as a non-migraine patient I can look to her plan for ways to improve my own lifestyle. While near every processed grocery item contains “triggers” Stephanie’s well thought out way of eating and cooking is a fantastic guide for cutting out those boxed and packaged foods. (Something we said we were going to do when we moved back in April that still hasn’t happened…) Part III takes you through months 3-6 on the Plan, focusing on adjusting your lifestyle to reduce the onset of migraine attacks. Part IV is all about how to maintain your new lifestyle by slowly, thoughtfully, and carefully introducing potential trigger foods into your diet. Part V contains over 75 recipes to make your journey along the migraine relief plan delicious. Each recipe includes nutrition facts, helpful cook’s note, budget friendly indicator, and diet indicators.
I think the biggest game changer is cooking without salt. I’ve already tried 4 recipes from this book and not once did my husband comment on a lack of salt. Honestly, I was shocked! Stephanie has really succeeded in creating recipes that are full of flavor and healthy.
I made Herbed Cheese Spread (which I used as a pasta sauce for a quick dinner), Firehouse Turkey Chili, and Peachy Pulled Pork. All three were adult and kid approved!
The recipe I’m featuring today is Wild Rice and Carrots. We served this side dish next to simply sautéed fresh tilapia for a great weeknight dinner. I had the leftover rice for lunch the next day. It’s been a while since I’d cooked with carrots and we found them to be delectable! They’re perfectly tender and subtly sweet. Wild rice was fun to work with, too! I think I’d only ever had the grain once before and I’m looking forward to utilizing it more as a side dish option.
Recipe photography copyright 2016 by Laura Bashar
Wild Rice and Carrots
Ingredients:
2 C (500 mL) filtered water or unsalted chicken or vegetable stock
1 C (150 g) wild rice, rinsed and drained
1 tbsp organic extra virgin olive oil or unsalted grass-fed butter
2 large carrots, thinly sliced on the diagonal
2 ribs celery, finely minced
1 handful fresh Italian flat-leaf parsley, finely chopped
1/2 tsp freshly ground black pepper
Steps:
In a medium saucepan set over high heat, combine the filtered water and rice. Cover and bring to a boil, then reduce the heat to low and cook for 45 minutes. Turn off the heat and leave the cover on for at least 10 minutes.
In a large skillet set over medium heat, warm the olive oil. Add the carrots and celery and cook, stirring frequently, for 6 to 8 minutes, or until tender. Stir in the rice, parsley, and black pepper. Cook 1 minute more until everything is warmed through.
Serve right away or refrigerate, covered, for up to 5 days.
Vegan/Vegetarian, Dairy-free, Egg-free
Cook’s Note: Wile rice is only grown in North America and may not be available overseas. You could substitute a hearty brown rice instead. I wash the parsley, then roll it up in a clean kitchen towel to help absorb extra moisture. Finely chop just before adding to the recipe.
Budget friendly: Very
Per serving: 6 g protein, 35 g carbohydrates, 4 g fat, 0.5 g saturated fat, 54 mg sodium, 381 mg potassium, 4 g fiber
*This recipe is reprinted with permission from The Migraine Relief Plan, copyright 2016 Stephanie Weaver. Published by Surrey Books, an imprint of Agate Publishing, Inc.*
Because my carrots were smaller than the ones photographed by Laura Bashar, I used 5 little colorful organic carrots instead of 2 large ones. Otherwise, I followed the recipe exactly to very happy reviews. I used water to cook my rice and olive oil for sautéing the veggies.
Firecracker just turned 2.5 and I don’t know if there’s some cognitive leaping happening, physical growing, or it’s those 2 year old molars working their way in but his ability to listen and obey has taken a turn in the wrong direction. It’s been highly frustrating and our patience levels keep getting lower by the hour. It doesn’t help that he doesn’t nap and when he’s tired he becomes destructive and a bit of a Tasmanian devil. His ability to sleep through the night, a skill he’s never conquered, has reverted back to coming to our bed 2-4 times meaning none of us are getting the sleep we need!
Treat meanwhile is definitely working on teeth, he’s constantly hungry, and the cough he had at the end of the year has crept its way back into our lives. He’s following his brother around like a hawk and has developed quite the skills for climbing and “jumping.” There’s no room for a lapse in childcare with that one!
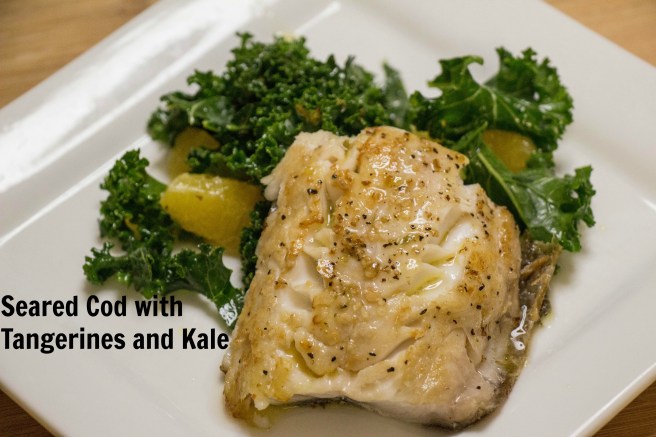
With two tired and hungry boys on my hands, my husband deserves a lot of credit on the execution of this recipe. I quickly made them a blue box of macaroni and cheese in the middle of trying to make our dinner. I pull out the freshly purchased cod from Whole Foods while my husband feeds the boys and I discover that one of the fillets was not deboned. And we don’t have proper fish cleaning tools. The adults switched places.
In a mode of determination, my husband grabbed a clean pair of pliers, washed them, and got to pulling. We’d definitely be “chopped” for execution skills as that fillet looked a bit mangled. He then proceeded to season the fish with S+P and sear it in olive oil while I get the kids cleaned up, put in pajamas, and started the bed time routine. I even stuck him on photography duty while I sat with Firecracker until he fell asleep.
He was able to eat his fish and accompanying salad warm while watching Treat and then getting him to fall asleep.
By the time I made my way back upstairs I had a cold plate waiting for me. And you know what, the fish was delicious cold! It was such a light, refreshing, and healthy meal.
The dish was inspired from a recipe in Giada de Laurentiis’ cookbook Happy Cooking. We followed her method for cooking the fish, but the salad co-star was changed. I omitted the olives, used dried oregano instead of fresh, and the main difference, used kale from the farmer’s market instead of arugula.
I prepared the salad first, allowing the kale to marinate in the dressing while the rest of the meal was prepared. It’d been a long while since I’d last had kale and it was a nice surprise to realize how much I like the dark green!
Seared Cod with Tangerines and Kale
Ingredients:
2 tangerines
1 tsp Dijon mustard
1/4 tsp dried oregano
2 tbsp + 4 tsp olive oil, divided use
4 C chopped kale, stems removed
4 6-oz filets cod
Steps:R
Using a paring knife, cut of the top and bottom of each tangerine. Follow the curve of the fruit to cut off the entire peel. Place a strainer over a small bowl. Segment the tangerines over the bowl then squeeze the juice out of the remaining flesh.
To the tangerine juice, whisk the mustard, oregano, and 4 tsp olive oil. Reserve 1/4 C of the dressing. Toss the kale and tangerine segments in the dressing. Set aside.
Season cod with S+P. Heat remaining olive oil in a large skillet over medium-high heat. Sear cod, flesh side down, for three minutes. Flip, an cook another three minutes. Serve alongside kale salad and drizzle with reserved dressing.
This month’s #FoodieExtravaganza theme is popcorn. TheFoodie Extravaganza is a monthly party hosted by bloggers who love food! Each month we incorporate one main ingredient or theme into recipes to share with you. Thanks to Camilla of Culinary Adventures with Camilla for hosting this poppin’ party.
There wasn’t any question about whether I’d participate in the first Foodie Extravaganza of 2017.
Popcorn is one of my favorite snacks. Or meals… Truth be told, one of my favorite things to do with my mom is have a dinner of popcorn while watching movies (or catching up on Once Upon a Time).
The thing I miss most about movie theater dates is 80% the movie theater popcorn and 20% getting lost in a movie plotline. We got the chance to see Fantastical Beasts and Where to Find Them in early December when my parents were visiting and while the theater was great with insanely comfy seats, the popcorn was a letdown. I’d be way more upset about it if it weren’t a Harry Potter franchise movie.
The at-home popcorn snack I’m sharing today is spicy and savory. It utilizes za’atar, an herbal spice blend popular in Middle Eastern cuisine. I’d heard of the seasoning watching Food Network and when my sister-in-law asked if there was a spice I wanted to try, I instantly had an answer for her. I’m looking forward to exploring more uses for it, but this popcorn pretty much hits it out of the park.
Spicy Za’atar Popcorn
Ingredients:
canola oil
1/2 C popcorn kernels
2 tbsp olive oil
2 tbsp za’atar
1/2 tsp salt
1/4-1/2 tsp cayenne
Steps:
Put canola oil in pot over medium high heat along with 2-3 kernels of popcorn. Cover and stand by. Once you hear the kernels pop, add the 1/2 C of popcorn. Cover and cook over medium heat until popping slows. Gently shake the pot during the popping process so as not to burn the popcorn at the bottom. Remove from heat and remain covered until popping has ceased, unless you want to be pelted with popcorn. (If you have another method of popping popcorn, feel free to use it.) Place popcorn in a large bowl.
While popcorn is still hot, add the remaining ingredients and mix to distribute flavors evenly.
If you are a blogger and would like to join our group and blog along with us, come join our Facebook page Foodie Extravaganza. We would love to have you! If you’re a spectator looking for delicious tid-bits check out our Foodie Extravaganza Pinterest Board! Looking for our previous parties? Check them out HERE.
Now that we’ve closed the door on Halloween, it’s comfort food season.
You totally thought I was going to make some joke regarding Christmas.
Nope!
There won’t be a hint of Christmas (well, except for getting a start on my Christmas gift shopping) happening in my house until after Thanksgiving! That’s right people, there’s another holiday (at least in the US) before putting up that tree. (You hear me, Mom?!)
Sorry for that little rant there….
Back to salad.
Salad? What?
Yes. Salad.
Even amid the sea of hearty baked casseroles, you still need to eat something a bright and fresh and a salad with hints of fall is the perfect way to break up your weekly menu.
I served this walnut dressing over a salad of Brussels sprouts, spinach, and romaine lettuce. The “mix-ins” included walnuts, bacon, and apple. Dried cranberries or cooked chicken would work great, too!
Maple Walnut Vinaigrette
Ingredients:
1/2 C maple syrup
1/2 C walnuts
1/4 C apple cider vinegar
1 tsp salt
1 tsp ground mustard
1/2 tsp white pepper
1/8 tsp garlic powder
2 tbsp extra virgin olive oil
2 tbsp canola oil
Steps:
Place all ingredients except oils into a blender. Blend until smooth.
With the blender running, pour in the oils. Add a little water, if needed.
It’s hard to pick a favorite, but I think today’s offering might be my favorite recipe of my #ChoctoberFest menu.
Friends of ours brought this chocolate hummus dip to Firecracker’s birthday party and it was a huge hit. Kids and adults alike couldn’t get enough of it! I’d been dying to make it at the house and here was my perfect opportunity.
I was a little nervous that Firecracker wouldn’t go for it, as homemade hummus is not “real” hummus and he won’t touch it if it’s not out of a store bought container. However, as this dip doesn’t have tahini it’s not technically a hummus variation anyway, it’s simply a sweet bean dip.
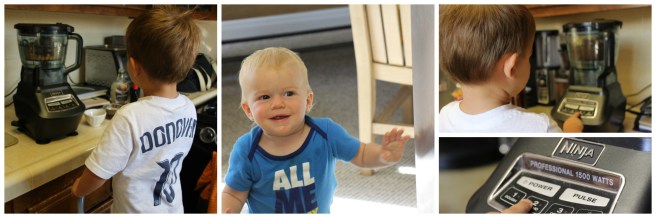
I got him to help me in the kitchen and simply told him we were making chocolate. He couldn’t be more ecstatic. He absolutely loves to help in the kitchen and his current favorite phrase is “need any help?” almost to the point of annoyance, but I do want and need to encourage this helpful attitude!
I broke out the step stool and had him push the buttons on the food processor. (Treat looked on in anticipation.) He kept informing me it was ready in his impatience to eat some chocolate. He did a fabulous job waiting until after I took some photos before I handed him his own little snack kit of dip, pretzels, and apple slices.
If you’re looking for a guilt-free way to satisfy that chocolate craving, I encourage you to break out the food processor for this snack.
Chickpea Cocoa Dip
Ingredients:
1 can (15 oz) garbanzo beans, drained and rinsed
5 tbsp maple syrup
2 tbsp cocoa powder
1 tsp vanilla extract
Steps:
Place garbanzo beans in a food process and pulse a few times. Add the remaining ingredients and puree until smooth, scraping down the sides of the bowl as needed.


 When my in-laws were here we cooked up some chicken and had pita bread, too. I forgot the Greek yogurt/sour cream in the dressing the second time around and it works just beautifully. Literally. While I preferred the touch of creaminess to the dressing it’s not necessary, and does make for a more photogenic salad.