Pecan Pie

I had planned on providing you with a healthy shrimp and avocado pesto recipe to start your new year off right. But unfortunately the avocados at the grocery store weren’t anywhere near ripe and they were completely out of basil. So that recipe will have to wait for another day.

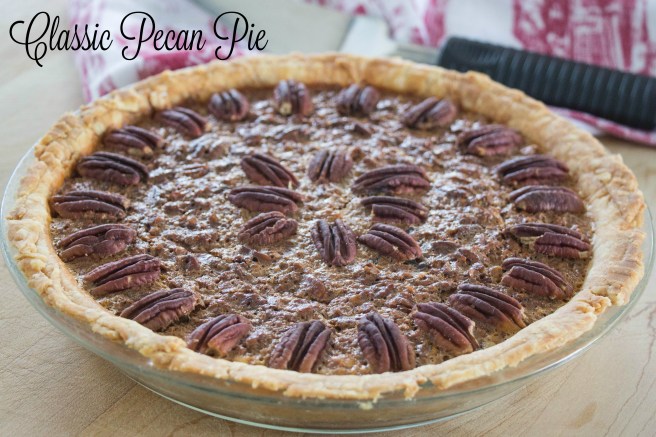
Instead I’m going to switch gears entirely and give you a sweet, rich dessert. Stuart’s holiday favorite. Pecan pie. My mom makes this pie just for him – and it amuses me greatly that the woman married to a man with nut allergies provides the only nutty dish of the holidays.

Pecan Pie Steps

Pecan Pie

Ingredients:

  • 1 C light corn syrup
  • 3 tbsp butter
  • 1/2 C brown sugar
  • 2 tbsp flour
  • 1/4 tsp salt
  • 3 eggs
  • 1 1/2 tsp vanilla
  • 1 1/2 C chopped pecans
  • 1 pie crust

Steps:

  1. Over medium heat combine corn syrup, butter, brown sugar, flour, and salt. Stir until the butter melts. DO NOT BRING TO A BOIL. Remove from heat.
  2. In a small bowl beat the eggs. While constantly stirring the syrup mixture, slowly add in the eggs. Stir until smooth. Add in the vanilla and chopped pecans.
  3. Pour pecan pie filling into a ready-to-bake, thawed pie crust. If desired, place 5 halved pecans in a small circle/star in the center of the pie.
  4. Bake 1 hour at 350 degrees until the filling no longer jiggles.

*This recipe is adapted from http://www.mrfood.com/Pie/Perfect-Pecan-Pie-685/*

Pecan Pie

Update December 2016: I’ve been dying to re-photograph this pecan pie and every Christmas I say I’m going to. It’s taken three years for that to happen, but hey! My parents remodeled their home in 2016 and all of the yellow tones of the kitchen were replaced by modern and timeless whites, greys, and deep cherry. Even with the new open concept I was surprised at how little natural light penetrated the bright space. I had to take mom’s pie out to the lanai to snap the new photo. It’s amazing what natural lighting can do to the beauty of a pie!

Classic Pecan Pie | Sew You Think You Can Cook | http://sewyouthinkyoucancook.com

Cranberry Cinnamon Rolls

Christmas morning is the most magical time of the year. Kids wake up to the discovery that Santa arrived – cookies eaten and gifts under the tree. Parents are overjoyed by the wonder upon their kids’ faces. Families come together to celebrate. And breakfast is always perfect. I don’t know if it’s the same as the theory that “everything tastes better on vacation”, but on Christmas morning the breakfast is sweeter.

Cinnamon rolls have always been one of my favorite treats, and I can never pass up a Cinnabon at the airport. My favorite part isn’t the gooey, cinnamony center that everyone desires, I save that bite for someone else to savor. I love the dough and the frosting. To me the cinnamon simply adds a nice depth to the flavor profile.

Always wanting to make my own, I’ve gone through many trial-and-error attempts at baking cinnamon rolls from scratch. Either the yeast didn’t bloom properly or the flavor was just lacking. I couldn’t give up though, I kept searching for the perfect recipe. And a few years ago I found it with these Orange Cranberry Cinnamon Rolls by The Novice Chef.

Making the cinnamon rolls does take about an hour and a half so Mom and I would made them on Christmas Eve after church, covered them, kept them in the fridge, and then baked them in the morning while presents are being opened. Another option is to make them in advance, freeze them, and let them thaw Christmas Eve night. Let them rise and then bake in the morning.

Making Cinnamon Rolls

Cranberry Cinnamon Rolls

Cranberry Cinnamon Rolls

Ingredients for the dough:

  • 2 packets active dry yeast
  • 2 C warm water
  • 6 tbsp room temperature butter
  • 1 C sugar
  • 7 1/2 C flour, plus extra for rolling
  • 2 eggs
  • 1 tbsp salt

Ingredients for filling:

  • 8 tbsp room temperature butter
  • 1 1/2 C brown sugar
  • 8 oz fresh cranberries, chopped
  • 2 tbsp cinnamon

Ingredients for frosting:

  • 4 tbsp room temperature butter
  • 2 C powdered sugar
  • 2 tbsp milk

Steps:

  1. Stir yeast into the warm water. Let bloom for 5-10 minutes.
  2. Using a stand mixer fitted with the paddle, beat butter, sugar, and salt. Add eggs one at a time, beating until combined. Slowly pour in the yeast and water. Beat until combined. Add the flour about one cup at a time, beating until combined after each addition. Once the dough starts to form switch to the dough hook attachment. After all the flour has been added knead the dough for 3 minutes.
  3. Turn dough out onto a floured surface and knead by hand until smooth.
  4. Place dough in a greased bowl, cover, and let rise to double in size (about 30 minutes) in a warm place. (In the microwave or turned off oven)
  5. Divide dough in half and roll out onto a floured surface.
  6. Roll one half into a rectangle. Spread the dough evenly with 4 tbsp of softened butter. Sprinkle with 3/4 C brown sugar, half of the cranberries, and 1 tbsp of cinnamon. Roll the dough into a log, lengthwise. Cut the dough into 2″ cinnamon rolls. Place cut side down in a 9×13 casserole dish.
  7. Repeat step 6 for the other half of the dough.
  8. Cover dough with a towel and let rise for 30 minutes before baking. The rolls should have doubled in size again. (Or you can freeze the rolls and after thawing let rise until doubled in size.)
  9. Bake at 425 degrees for 10 minutes. Reduce heat to 350 and bake another 7 minutes, until golden brown. Let cool, slightly.
  10. Meanwhile, make frosting. Whisk together all of the ingredients for the frosting. Frost the cinnamon rolls!

Cinnamon Roll

Pierogi

Image

Every Christmas Eve we have the traditional Polish meal of Pierogi. I have so many memories of helping my mom and grandma (Busia) assemble the pierogis. Busia would always make the dough and together the three of us would fill, pinch, boil, and fry. Eventually my mom took over the intimidating process of making the dough. And last year, it was my turn.

I followed tradition and made the dumplings about a week or two early and stored them in the freezer. Doing so takes off the stress during Christmas week. Making pierogi is an all day job! Because they freeze well, you don’t have to limit these to Christmas Eve. Make a batch and you have a great homemade freezer meal throughout the year.

Last year I recruited the help of Kate. I turn to Kate whenever I have baking to do, and making a dough is close enough! It’s also great to have extra hands when it’s time to assemble. This year, family friends helped Mom make hers two weeks ago.

The most common pierogi filling known to Americans is potato. But honestly, I’ve never had a potato pierogi. We fill ours with different canned fruits, cheese, and sauerkraut. And we serve them with salt and melted butter. Stuart actually broke the mold and used maple syrup!

Pierogi Dough 1 Pierogi Dough 2Cooked Pierogi 2 Cooked Pierogi 2

Pierogi

Ingredients for dough:

  • 1 1/2 C skim milk
  • 3/4 C fat free half-and-half
  • 5 C flour, divided plus more for rolling
  • 1 tbsp butter
  • 1 tsp salt
  • 1 XL egg
  • 3 L egg yolks

Ingredients for filling:

  • Cheese: 8 oz soft farmers cheese, 3 oz cream cheese, 1/4 – 1/3 tsp salt
  • Fruit options: canned peaches, canned cherries (not pie filling), canned blueberries (not pie filling), canned strawberries (not pie filling), plums, figs
  • Sauerkraut: cook 1 can drained, chopped onion, chopped cooked bacon, caraway seeds, water, little bit of flour to thicken if needed, 1 tbsp brown sugar (This can be made ahead of time and frozen)

Steps:

  1. Spray the bottom of a large pot. (I used my dutch oven)
  2. Over medium heat, bring milk and half-and-half almost to boiling point.
  3. Whisk in 1 C flour. Switch to a flat bottomed wooden spoon and stir often for 20 minutes over low heat until almost smooth.
  4. Remove from heat and add butter and 1 tsp salt. Let stand, partially covered, for 1+ hour.
  5. In a small bowl, gently whisk egg and egg yolks.
  6. Add eggs to dough along with 1 C flour. Stir until combined. Add another 1 C flour. Stir until combined. Add another 1 C flour. Stir until combined.
  7. Turn dough out onto a clean table or cutting board and knead in the last 1 C of flour.
  8. Refrigerate dough for 1+ hour.
  9. In batches roll out dough to 1/4″ thickness. (Leave dough in fridge) Flour the board, dough, and rolling pin as needed.
  10. Place filling on dough and fold over. Cut pierogi with a round glass. Squeeze dough shut and pinch the rims. They’ll look like half suns!
  11. Cook pierogi in boiling salted water for 10-12 minutes. They will float to the top. Remove with a slotted spoon and set aside. Refrigerate. At this point you can freeze the pierogi once cooled.
  12. Fry pierogi in butter before serving.

Final Pierogi

 recreatedbysrc

Snowman Door Hanger

For The Year of the Snowman 2013 my mother-in-law and I made burlap snowman door hangers for the girls in the family. We found an example on Pinterest, but it led only to a photograph.

Luckily my mother-in-law is a genius when it comes to crafts! I have created for you a simple tutorial.

How-to make a Burlap Snowman Door Hanger

Start first with a template of your snowman (or whatever else you want to create!) and trace it onto folded burlap. Pin the two piece of burlap together.

Burlap Snowman Door Hanger Tutorial Burlap Snowman Door Hanger Tutorial

Using a zig-zag stitch follow the outline of the snowman. (We used grey thread so it would show up in these photos. Make sure to use a thread that will easily be covered up with whatever paint you use.) At the bottom of the door hanger leave a 3″ gap, like you do with pillowcases.

Burlap Snowman Door Hanger Tutorial

Using pinking shears, cut just outside the seam. Lay out your door hanger on a trash bag or newspaper. It’s time to paint!

Burlap Snowman Door Hanger Tutorial

With the help from my father-in-law, holes were created at the top of the door hanger. A straw, cut to the width of the space between the holes was used to keep the door hanger sturdy. Thread your string/twine/jute through the holes and straw.

Burlap Snowman Door Hanger Tutorial Burlap Snowman Door Hanger Tutorial

Stuff your door hanger with paper or plastic bags.

Burlap Snowman Door Hanger Tutorial Burlap Snowman Door Hanger Tutorial

Using a thread to blend in with the paint, zig-zag stitch the door hanger closed. Garnish with a store bought accessory!

Burlap Snowman Door Hanger Tutorial

Gingerbread Man Waffles

I still have a holly, jolly smelling batch of Gingerbread Spice from November’s Crazy Ingredient Challenge and knew exactly what I wanted to do with it. I added it to waffle batter for a fantastic holiday twist to a classic breakfast. I even make Gingerbread Sugar (instead of Cinnamon Sugar) for sprinkling over top!

The pear syrup was a great compliment and when that ran out I used bottled Strawberry syrup. I liked the tartness it added instead of piling on more sweet from regular maple syrup.

Gingerbread Man Waffles

Ingredients:

  • 2 1/2 C flour
  • 1 tsp salt
  • 4 tsp baking powder
  • 2 tbsp sugar
  • 1 tsp gingerbread spice
  • 2 eggs
  • 2 1/2 C milk
  • 1/2 C vegetable oil
  • 1 tsp vanilla

Steps:

  1. In a large bowl sift together all dry ingredients.
  2. In a separate bowl whisk together the wet ingredients.
  3. Combine wet and dry ingredients and pour into a hot waffle iron and cook until golden. Serve with gingerbread spice sugar and syrup. Use a gingerbread man cookie cutter if desired.

*This recipe is adapted from Better Homes and Gardens*

Gingerbread Man Waffles

To make Gingerbread Sugar use a 4:1 ratio of sugar to gingerbread spice. (4 tsp granulated sugar and 1 tsp gingerbread spice)

A Two Year Project

Two years ago I embarked on a very ambitious Christmas gift for my mom. A beautiful cross stitched Christmas landscape designed by Thomas Kinkade.

There aren’t any good shops in my local area to get cross stitch patterns and kits so I had a friend stop at Hobby Lobby in Auburn for me. She sent me a couple of patterns and I selected “A Treasured Time“. She told me the size and price and brought it to me.

I greatly underestimated how large 12×16” is! I had never undertaken anything so big before, and greatly misjudged my ability to complete it in time. I didn’t start on the project until the family left my home Thanksgiving weekend. Needless to say, given the title of this blog post, I did not complete this masterpiece in 3 weeks. And Santa’s elves were too busy to lend me a hand.

I took this project on every work trip, spending hours in hotel rooms each night working on it. I would stitch every evening while Stuart played video games. It came with me on long car rides.

After two short, yet long, years I have finally completed this winter scene. I can’t even begin to tell you how relieved I am!

Image

It will probably be another year before I decide to tackle something so big again. I am used to doing ornament sized pieces that take me 2 days to complete. I will return to some quick fun pieces soon. Having my Christmas tree up puts me in the cross stitching spirit.


Let it Sew

As I mentioned in my Christmas Time is Here post, 2013 is The Year of the Snowman.

My mother-in-law taught my friend and me how to quilt last August and we knew we wanted to make her a thank you gift – once our skills improved a bit. We decided on creating a Christmas gift for it. When it was declared that there’d be a theme to the presents this year we started searching Pinterest for snowman ideas. There were a handful we liked, but most quilts were beyond our skill level or not in our style.

Using Electric Quilt we decided to design our own!

My MIL’s favorite fabrics are batiks so we knew we’d go with that for our fabric palate. My friend found some great snowman batiks at a local quilt shop and we spiraled off of that.

With the back of the quilt we decided to be more ambitious than a one-, two-, or three- paneled back and added some letters! We laid out our completed letter blocks until we decided on a layout and pulled out the graph paper to determine how to piece it all together.

Image

When we went to the fabric store to buy the backing material the sales associate said, “You must be engineers” when we told her we’d designed the front ourselves. We laughed and said, “We are!” We still haven’t settled on whether or not that was a compliment. 😉

Christmas Time is Here

Thanksgiving weekend brings with it not only family and food but it also starts the Christmas season.

I have always grown up decorating for Christmas on Black Friday, and I’ve continued doing so in my own home. I put the family to work – the boys put the lights up outside, the girls do the Christmas village and the mantle, and as a group we put the ornaments on the tree.

2013 is the “Year of the Snowman”. My mother-in-law always puts a theme to her gifts. Our first Christmas she made stockings for everyone, the year after that aprons for the girls, last year gifts were made with buttons – ornaments and Toomer’s Tree art. This year we agreed to do the “Year of the Snowman” and spent the year planning on gifts. (I’ll share my gift tutorial later this season!)

That long story was told because my family surprised me with a second Christmas tree! In my craft room there is now a beautiful tree decked out in snowman and snowman-related ornaments and topped with a top hat!

My Christmas Tree
My Christmas Tree
My Christmas Mantle
My Christmas Mantle
Charles Dickens Village
My surprise snowman tree!
Outdoor Christmas Lights