Portuguese Hawaiian Sweet Bread

I’ve admitted before that I’m not much of a baker but this blog has helped me expand my kitchen skills. One thing I’d never even attempted to do before is bake bread! The thought of blooming yeast and rising dough frightened me.

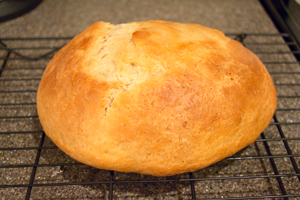
Leave it to a Hawaiian vacation to get me to enter the world of bread making. I wanted to try making the sweet bread we had half of our mornings. The amount of steps looked daunting, but I had my husband in the kitchen with me acting as my safety blanket. I am so proud and excited to tell you that our first attempt was successful!

We enjoyed fresh toast every morning before work our first week back on the mainland. Now if only there were a way to get the bread faster I’d do it every weekend! Now though I won’t be as timid when I come across a fresh bread recipe.

Prep 1 Prep 2

Portuguese Hawaiian Sweet Bread

Ingredients:

  • 1/2 C milk
  • 4 tbsp butter, cubed
  • 1/3 C sugar
  • 1 1/4 tsp salt
  • 3 1/4 C all-purpose flour
  • 1 tbsp active-dry yeast
  • zest of 1 lemon
  • 2 large eggs
  • 1 large egg, whites reserved
  • 2 tsp vanilla

Steps:

  1. In a microwave safe bowl heat milk, butter, sugar, and salt until warm. Stir to soften the butter.
  2. In a stand mixer, combine flour, yeast, and zest. Add the warm milk mixture (stir before adding if mixture separated). Mix to combine. Add in the two whole eggs and 1 egg yolk along with the vanilla. Use the paddle to mix until smooth for 3 minutes and then switch to the dough hook for an additional 5 minutes. Note: The dough will be sticky.
  3. Form the dough into a ball and place in a large greased bowl to rise for 2 hours.
  4. Gently punch the dough to deflate it and roll it back into a ball. Put the dough in a greased 9″ round cake pan. Cover the dough with a clean shower cap (or you can use plastic wrap). Allow dough to rise for another 2 hours.
  5. Preheat oven to 350 degrees F.
  6. Mix 1 tbsp of water with the reserved egg white and brush onto the dough.
  7. Bake bread for 15 minutes. Cover it lightly with aluminum foil and bake for an additional 25 minutes, until the crust is golden brown. Note: The bread should reach an internal temperature of 190 degrees.
  8. Let the bread cool on a cooling rack before breaking into it.

*This recipe is modified from the King Arthur Flour test kitchens at http://www.kingarthurflour.com/recipes/portuguese-sweet-bread-recipe*

Portuguese Hawaiian Sweet Bread 1 Portuguese Hawaiian Sweet Bread 2

Goat Cheese Cheesecake

July 30th is National Cheesecake Day! I have been dying to try baking my own cheesecake, but have never been brave enough. And with a husband who claims not to like cream cheese, there hasn’t been much incentive. (He loved this dessert and simply gave me a “yeah, whatever” when I teased him about his cream cheese aversion.)

And then I started this blog. Stuart has been really supportive with this newest hobby of mine and I think he’s enjoying the side effects of more homemade dishes. It wasn’t until “late” in life that I was aware of my love for cooking. I discovered the Food Network late my senior year of college, and parked myself in front of the TV with a notebook before finally becoming employed. I love trying new recipes and exploring the world of food blogs.

After working for 2 years, cooking every night started to seem more like a chore – well really the piles of dishes were deterrent enough. Making a home cooked meal 6 nights a week turned into 3 nights. But writing this blog has brought me back up to about 5 nights a week. So I have to say thank you to my readers for rekindling my love of cooking.

Baking isn’t something I feel I’ve particularly mastered. Which, being an engineer I find a little amusing because baking is a science; it’s following a recipe and measuring out ingredients properly. There’s more flexibility in cooking, and maybe I need the break from exact, and I get to find that in savory dishes. Regardless, baking a cheesecake seemed to be above my comfort level.

Until I found this recipe! On an episode of Food Network’s Best Thing I Ever Made, Anne Burrell said this cheesecake was the best thing she ever made with cheese. She walked through the steps and I thought to myself, “I could do that!” So, on National Cheesecake Day, I am enjoying a large slice of Goat Cheese Cheesecake.

I will apologize in advance for making your house smell like a gourmet bakery. And I don’t recommend tasting the filling before putting the eggs in because you might just give up on the final product and eat the entire bowl of cream cheesy goodness; taste at your own risk.

Nilla Wafer Crust 1 Nilla Wafer Crust 3

Cheesecake Filling 2 Cheesecake Filling 3

Cheesecake 1 Cheesecake 3

Goat Cheese Cheesecake

Ingredients for crust:

  • 6 tbsp butter, melted
  • 2 1/2 C Nilla wafers
  • 1/4 C sugar
  • 1/2 tsp cinnamon
  • 1/2 tsp ground ginger
  • pinch nutmeg

Ingredients for filling:

  • 16 oz cream cheese
  • 12 oz goat cheese
  • 1 1/2 C sour cream
  • 4 large eggs
  • 1 1/2 C sugar
  • 2 tsp vanilla extract

Steps

  1. Preheat oven to 350 degrees F.
  2. Put all ingredients for the crust in the food processor and pulse until you achieve the look and feel of wet sand. Press the crust into a buttered spring form pan, pressing it halfway up the sides.
  3. In a stand mixer, beat the cheeses. Add in the sour cream and beat until combined. Add in sugar and vanilla. Add the eggs one at a time. Pour filling into the crust.
  4. Bake 30 minutes. Rotate the cheesecake and bake another 30 minutes. Allow cheesecake to cool completely before serving or setting in the fridge overnight for best results.

Goat Cheese Cheesecake 1 Goat Cheese Cheesecake 2 Goat Cheese Cheesecake 3

Blueberry Bars

It’s PCS (permanent change of station) season here in the military community and a lot of our friends are packing up and moving on to their next great adventure.

I recently made these Blueberry Bars for a going-away party. We were celebrating after an indoor soccer game, and in retrospect I probably should’ve chosen cherry pie filling instead of blueberry because they wear red as a team. But, it’s July and July is National Blueberry Month. That’s my story and I’m stickin’ to it!

Blueberry Bars

Ingredients:

  • 1 C room temperature butter
  • 1 3/4 C sugar
  • 4 large eggs
  • 1 tsp vanilla extract
  • 2 1/2 C flour
  • 1 1/2 tsp baking powder
  • pinch of salt
  • 1 can blueberry pie filling, or whatever flavor you desire!

Steps

  1. Preheat oven to 350 degrees F.
  2. In a stand mixer, beat together butter and sugar until fluffy.  Add in eggs, one at a time, and the vanilla. Beat until combined. Mix in the dry ingredients until combined.
  3. Spread all but 1 1/2 C of batter into greased 9×13″ cake pan. Spread the pie filling on top and then spoon on the remaining batter.
  4. Bake 40 minutes.

*This recipe is adapted from Alicia at http://www.everydayhomecook.com/2011/08/fruit-squares/*

Blueberry Bars Blueberry Bars

Update May 2017: While this electronic update is occurring end of January 2018, these updated photos are from May 2017! Wow. I made these bars for a church picnic and they were a huge hit. These blueberry bars are incredibly easy to assemble and perfect for bringing to any potluck. You can change the filling with your favorite pie flavor or a fruit that better fits the season.

blueberry-bars-pin.png

A dusting of powdered sugar never hurts!

bb bars (sugar)