Fondue Recipe Round-Up

Disclaimer: This post contains Amazon affiliate links. 

When we got married we were given two electric fondue sets as wedding gifts. We decided to keep both of them. And for four years they were both used once a year, on Valentine’s Day. It became our Valentine’s tradition to have fondue that night, and because we had two pots, we could do one cheese fondue and one chocolate fondue without having to worry about clean up between courses.

After Firecracker was born we still managed to make fondue his first Valentine’s Day. That was three years ago.

Those poor fondue sets have been sitting at the top of cupboard in SoCal for two straight years. They’ll probably continue to sit there until we leave here in 2020. Maybe February 2021 (wow that looks weird!) the boys will be old enough to be trusted around warm devices?

Or maybe, this round-up I’ve created will inspire us to have a date night at home the next Parents’ Night Out hosted at our wonderful church!

Cheese Fondue

Cheese Fondue Round-Up | Sew You Think You Can Cook

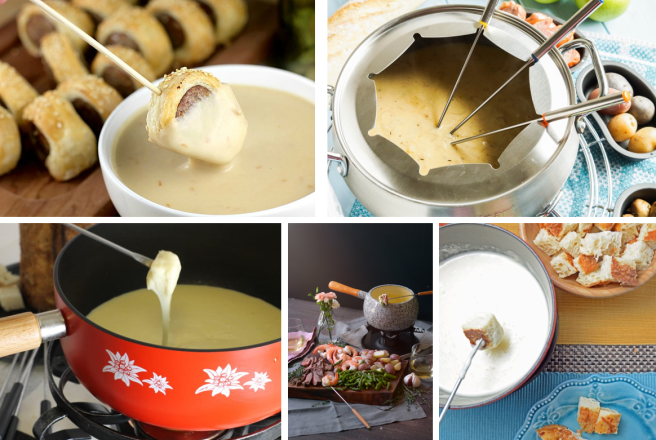
  • You know that fondue I mentioned having made back in 2015? It was this one from Tara’s Multicultural Table – Caramelized Shallot Gruyere Fondue. My photos of the night were lost in camera fiasco of 2018, but I assure you, Tara’s are much better anyway.
  • Chef Markus discoverd the secret to authentic Swiss Cheese Fondue and has shared it with his readers at Earth, Food, and Fire.
  • Traditional cheese fondue is typically made with gruyere cheese, which can tend to tip the grocery budget. Shari, of The Root Family Review, developed a Frugal Cheese Fondue using shredded Monterey Jack and Parmesan. I’m all for saving some money and still delivering on taste!
  • When I think about fondue I tend to think of a romantic candlelit dinner, typically geared towards the ladies. I know because, while my husband does enjoy fondue, he’s typically still hungry after the meal. Erica hit it out of the park with these Beer Brats in Blankets and Smoked Gouda Fondue!
  • Rachel pulled out all the stops for her Valentine’s Dinner with a Surf and Turf Cheese Fondue. I always pair cheese fondue with bread, chips, veggies, and apples. Why didn’t I think of using meat or even shrimp!?

Chocolate Fondue

Chocolate Fondue Round-Up | Sew You Think You Can Cook

  • Chocolate lava cake is a classic Valentine’s dessert, and Gretchen turned it into 3-Ingredient Chocolate Lava Dip. Seriously, I’m sold!
  • Even if you don’t like dark chocolate, you need to go read Mystique’s post about taking full advantage of all five of your senses while eating. It will make you want to make some Dark Chocolate Fondue for Two and shut out the world!
  • Can you even have a section about chocolate and not mention its soul mate peanut butter?! Michelle figured out a way to make fondue night happen with her kids with Chocolate Peanut Butter Fondue. Now, I don’t know how old her two boys are, but I’m definitely hopeful again!
  • White chocolate tends to be a sensitive topic when it comes to chocolate discussions, but I’m all for it! Especially if that white chocolate is paired with champagne and turned into fondue! Thank you, Blair, for sharing this White Chocolate Champagne Fondue with the Internet.
  • There can be fondue for everyone thanks to Laura’s Dairy-Free Chocolate Fondue – unless your Valentine can’t have coconut – but for all the rest of you out there, grab a strawberry and dig in!

M&M Cookies

I’ve been homeschooling Firecracker (and by proxy, Treat) this school year, which is why things have slowed down quite a bit around here in the blog-o-sphere.

But I’ve really been enjoying it!

I’ve been following a curriculum I purchased last summer, but mixing it up somewhat drastically to fit certain themes or occasions in our lives. For example: We actually started with units 9 and 16 instead of 1 and 2. We actually just did unit 2 in January!

And now that we have somewhat of a routine with how the units are organized, I’ve been venturing out and creating my own units, too! All of the units I’ve developed are centered around the holidays.

We’re currently on, you guessed it, Valentine’s Day!

And I’ve been getting really into this least favorite holiday of mine. I’ve been cutting their sandwiches and cheese slices into hearts for lunch and we’re crafting up a storm.

We even made Valentines for our long distance family members. (The photo below was sent from my beautiful sister-in-law and shared with her permission.)

img_2202

I found the idea for the Valentines on Pinterest. The boys loved having me paint their hands, saying it tickled. (Mega crafting milestone for my boys!) I cut the yarn to be the length of their arm span. The boys each picked the background color for each of their Valentines depending on who they were being sent to! It was fun to watch their little minds work in decision mode.

img_2158-2

Inside their Valentine boxes were a couple of appropriately colored M&M cookies. We sent so many cookies that there was only one cookie leftover for the 4 of us to share. (I ran out of brown sugar to make more – tragedy! Seriously. I have got to hit up a grocery store, like, ASAP, so I can make more of these cookies for us!)

M&M Cookies | Sew You Think You Can Cook | http://sewyouthinkyoucancook.com

I don’t think I’ve ever baked cookies that involved melted butter before, I was skeptical. But using melted butter made the mixing of these cookies insanely easy – no stand mixer required! I love the use of brown sugar in cookies, I think it gives the cookies a great depth of flavor. And of course, holiday colored M&Ms provide the perfect texture to these soft and chewy cookies.

This recipe makes approximately 21 cookies.

M&M Cookies

Ingredients:

  • 2 C flour
  • 1/2 tsp baking soda
  • 1/2 tsp salt
  • 1 1/2 sticks butter, melted
  • 1 C brown sugar
  • 1/2 C sugar
  • 1 egg
  • 1 egg yolk
  • 2 tsp vanilla extract
  • 1 C M&Ms

Steps:

  1. Preheat oven to 350 degrees F. Line two cookie sheets with silicone baking mats, parchment paper, or spray with cooking oil.
  2. In a bowl, whisk together the flour, baking soda, and salt.
  3. In another large bowl, whisk together the melted butter and sugars until combined. Add the eggs and vanilla, mixing until fully incorporated.
  4. Slowly add the flour mixture to the wet ingredients, switching to a spatula for easier mixing. Fold in the M&Ms.
  5. Spoon onto prepared baking sheets. Bake 10-12 minutes, until the edges are golden. Let cool on baking sheets.

*This recipe is adapted from Kristyn at https://lilluna.com/giant-chewy-mm-cookies/*

M&M Cookies perfect for Valentine's Day | Sew You Think You Can Cook | http://sewyouthinkyoucancook.com

Marshmallow Peanut Butter Cookies

A long time ago I made these peanut butter cookies studded with chocolate chips and marshmallows.

I took some photos.

Those photos stayed on my camera.

Those photos that stayed on my camera got deleted by my toddler. (You can read about that story here.)

I’d already signed up to share said cookies with my blogging friends in celebration of National Peanut Butter Day.

The real bummer silver lining here, is that I had to make these cookies again.

I remember wishing the cookies had more marshmallow and less chocolate, so I did just that.

These cookies are delicious.

I made them massive. No particular reason. Just because I could.

If you like peanut butter cookies, whip up a batch of these bad boys as soon as you have some marshmallows on hand. (Evidently not all grocery stores have marshmallows, but that’s a story for another day?)

Marshmallow Peanut Butter Cookies

Ingredients:

  • 1/2 stick butter, softened
  • 1 C creamy peanut butter
  • 1/2 C brown sugar
  • 1/2 C sugar
  • 2 eggs
  • 1 tsp vanilla extract
  • 1 1/2 C flour
  • 1 tsp baking soda
  • 2/3 C mini marshmallows

Steps:

  1. Preheat oven to 350 degrees. Line cookie sheet with parchment paper.
  2. In the bowl of a stand mixer fitted with the paddle attachment, cream together the butter, peanut butter, brown sugar, and sugar until fluffy. Add the eggs one at a time and vanilla until fully incorporated.
  3. Add in the flour and baking soda. Mix until combined and a cookie dough forms. Fold in the marshmallows with a wooden spoon or spatula.
  4. Roll cookie dough into balls and place onto the prepared cookie sheet. Bake 15 minutes, until cookies are browning and marshmallows melted. Let cool on the baking sheet 5 minutes before removing to a cooling rack to cool completely.

*This recipe is adapted from Julie at https://www.tablefortwoblog.com/fluffernutter-cookies/*

Marshmallow Peanut Butter Cookies for #NationalPeanutButterDay from Sew You Think You Can Cook | http://sewyouthinkyoucancook.com

Be sure to check out these other recipes for National Peanut Butter Day:

3 Healthy Peanut Butter Smoothies by Bear & Bug Eats

Chicken Satay with Spicy Peanut Dipping Sauce by Everyday Eileen

Marshmallow Peanut Butter Cookies by Sew You Think You Can Cook

Chocolate Peanut Butter Balls by The Freshman Cook

E.T. Cookies by Karen’s Kitchen Stories

Easy Peanut Butter & Chocolate Swirled Fudge by Cookaholic Wife

Easy Peanut Butter and Banana Croissants by Jonesin’ For Taste

Fluffernutter Macaron by A Kitchen Hoor’s Adventures

My Family’s Favorite Peanut Butter Cookie (recipe remake) by Family Around the Table

No Bake Peanut Butter Cup Pie by Soulfully Made

Nutter Butter Ice Cream Cone Cookies by Amy’s Cooking Adventures

Peanut Butter & Chocolate Chip Granola Squares by Faith, Hope, Love, & Luck Survive Despite a Whiskered Accomplice

Peanut Butter and Jelly Smoothie Bowl by Simple and Savory

Peanut Butter Banana Overnight Oatmeal by Frugal Pantry

Peanut Butter Chocolate Chip Sheet Pan Pancakes by Kate’s Recipe Box

Peanut Butter Cream Cheese Spread by Cindy’s Recipes and Writings

Peanut Butter Mocha Cupcakes by Strawberry Blondie Kitchen

Peanut Butter Mousse Parfaits by The Redhead Baker

Honey Peanut Butter Popcorn by The Gingered Whisk

Peanut Butter Snowballs by Culinary Adventures with Camilla

Peanut Ginger Pasta by Jolene’s Recipe Journal

Thai Inspired Noodles by A Day in the Life on the Farm


Thursday Thoughts #24

Thursday Thoughts

Most people like to take advantage of a new year to make a resolution to be a better version of themselves.

For most, that looks like some sort of diet. Or some new exercise plan.

For many, it looks like a big purge – time to clean out the closets!

And for some, it’s a new resolve to keep a journal, read more books, or find a better way to stay organized.

And sometimes new organizational methods simply come about due to necessity.

I like to think I’m an organized person. I’m a religious list maker and depend heavily on my planner, complete with color coordinated pens.

To be fair, my blog organization has always needed some sort of boost. My inspiration is strewn throughout Pinterest, Facebook videos, and physical cookbooks. My “what to blog when” is kept mostly in Facebook events (which are super helpful) that I never actually put in that beautiful planner of mine.

I had a decent system for my photos.

Or so I thought.

If a dish hadn’t yet been shared on Sew You Think You Can Cook, its photos simply stayed put on my camera’s memory card. (Like those Boston Creme Blondies I shared this month.)

I have now been forced to change that method of photo storage.

See. My kids broke my tripod a while back. For Christmas my husband surprised me with a new one. I had a renewed effort for food photography one afternoon. I made a beautiful salad for dinner that I look forward to sharing with you this spring. In wanting to take advantage of daylight I assembled a serving of salad, set up the tripod, and snapped some bright pics.

19665447_10105000553078411_1139445256985407919_n

Then my Firecracker wanted to help take some pictures. Afterwards I let him walk around the house and he took pictures, blurry I’m sure, of the floor and his toys and his brother. Then he plopped on the couch and watched some tv. I asked if he was done with the camera so that I could put it away so it doesn’t break.

My touch screen was on some weird systems setting so I backed on out of that. And to my sheer horror the memory card had been wiped.

I screamed (not at him), I cried, I crumpled onto the floor. Then he cried. And tried to find solutions. “We can hit the back button.” A lot of “why”s. “You can just take the pictures again.” (After calming down and talking to my mom, I did set up another salad plate and took another round of picture, though not as bright thanks to the setting sun.) “I know where they are! They’re on Netflix.” After a couple hours, when telling Daddy the story, I got a hug and an “I’m sorry.”

I guess I need to unload that camera more often and simply become better friends with the “File Explorer” on my computer! Who knows, maybe it’ll rekindle this blogging hobby a bit.

I want to know: What’s something your kid did on accident that made you wish there were some sort of insurance policy on them?

#FootballFoods: Chipotle Peach Meatballs

Here we are in the final month of American football season. A group of blogging friends are gathering together today to have a virtual couch-gating party.

I must admit, I’ve felt really out of the loop this (and last) football season.

Once upon a time I was way more into the sport than my husband (then boyfriend) was. Somewhere we’ve flipped roles into the more traditional ones.

I blame my toddlers. They don’t want to watch football (yet. I’m sure that’ll change before I know it) and if the TV is on they’re not sure why the channel is not set to PBS Kids or Nick Jr! Oh, they’ll tolerate small amount of early morning soccer and some cooking shows, but they’re little television bandits so it’s just plain easier to keep it off.

Parenthood also means the weekends become jam packed with running errands and tackling home projects instead of posting up at the local sports bar for 3 hours.

Truth be told, I also feel lost when there’s a game on and no one to host!

If I did have the opportunity to host some friends for some football watching, I’d definitely make these Chipotle Peach Meatballs. The best part about cocktail meatballs is that they can be kept warm in a slow cooker for the entirety of the game (assuming they last long enough!). Continue reading for the recipe and some other great game day recipe ideas.

chipotle peach meatballs 2

Chipotle Peach Meatballs

Ingredients:

  • 1 1/2 jars peach preserves (total of 18 oz)
  • 1/2 C ketchup
  • 2 chipotle peppers in adobo sauce, diced
  • 1 1/2 tsp Worcestershire sauce
  • 1/2 tsp kosher salt
  • 1/4 tsp pepeprs
  • 1/4 tsp garlic powder
  • 1 bag (12-16 oz) frozen meatballs

Steps:

  1. In a medium saucepan over medium-high heat combine peach preserves, ketchup, chipotle peppers, Worcestershire, S+P, and garlic powder. Bring to a gentle boil for 5 minutes. Add the frozen meatballs, cover, and cook on low heat for 25 minutes, until meatballs are warmed through.

*This recipe is adapted from Sam at http://www.theculinarycompass.com/chipotle-peach-meatballs/*

Chipotle Peach Meatballs (pin)

Be sure to check out these other great football foods:

Bacon Jalapeno Palm Poppers by Palatable Pastime

Baked Coconut Shrimp with Spicy Orange Dipping Sauce by Everyday Eileen

Buffalo Chicken Taquitos by The Redhead Baker

Butternut Squash Pizzettas by A Day in the Life on the Farm

Cheese Chili Tots by Frugal Pantry

Cheeseburger Bombs by Cookaholic Wife

Cheesy Buffalo Chicken Lasagna by Cooking With Carlee

Chipotle Peach Meatballs by Sew You Think You Can Cook

Fiesta Ranch Crispy Baked Wings by A Kitchen Hoor’s Adventures

Fried Chicken Sliders by Strawberry Blondie Kitchen

Ham and Swiss Sliders by Family Around The Table

Instant Pot Buffalo Chicken Dip by Hezzi-D’s Books and Cooks

Instant Pot Cheesy Southwestern Spinach Dip by Kate’s Recipe Box

Mini Zucchini Pizzas by Jolene’s Recipe Journal

Philly Steak Appetizer by The Freshman Cook

Slow Cooker Chicken Taco Chili by Karen’s Kitchen Stories

Texas Trash Party Mix by Amy’s Cooking Adventures

Tomatillo and Pork Chili by Simple and Savory

Warm White Bean Dip by Bear & Bug Eats


Boston Crème Blondies

Sometimes I’m really on top of it.

And sometimes I’m posting one year’s football fare the following January.

I’ll let you decide which way this post is leaning!

Do you even remember who played in THE pro football game of 2017?

I wouldn’t have if it weren’t for the food photos still stored on my camera.

The answer: New England Patriots and Atlanta Falcons. The winner: New England Patriots with a score of 34-28. No, I did not remember the result of the game, thankfully the Internet knows everything.

To celebrate the big game, I thought it’d be fun to cook something associated with each team. For Atlanta, I went with something peach. (Peach Chipotle Meatballs you’ll be seeing next week.) For New England, Boston Crème Blondies!

blondies (Wal)

Just look how little that baby boy is!!

Boston Crème Blondies

Ingredients:

  • 3/4 C brown sugar
  • 1/3 C softened butter
  • 1 1/2 tsp vanilla extract, divided use
  • 1 egg
  • 1 C flour
  • 1 tsp baking powder
  • 1/8 tsp salt
  • 3 egg yolks
  • 6 tbsp sugar, divided use
  • 4 1/2 tbsp cornstarch
  • 1 1/2 C milk
  • 1/4 C semisweet chocolate chips
  • 1/4 C heavy cream

Steps:

  1. Preheat oven to 350 degrees F. Line an 8″ x 8″ baking pan with parchment paper.
  2. In the bowl of a stand mixer fitted with the paddle attachment, cream together the brown sugar, butter, and 1 tsp vanilla. Add the egg and mix until combined.
  3. In a small bowl, whisk together the flour, baking powder, and salt. Add to the creamed butter mixture and mix until incorporated.
  4. Press blondie batter into the prepared pan and bake 20-22 minutes. Cool.
  5. In a small bowl, whisk together the egg yolks, 3 tbsp sugar, and 1/2 tsp vanilla. Add the cornstarch and whisk until smooth.
  6. In a small saucepan over medium heat, combine milk and 3 tbsp sugar. Bring to a gently boil.
  7. Temper the egg yolks by adding 1/2 C, slowly, to the egg yolks, stirring constantly. When warm, pour the eggs into the saucepan over medium heat, stirring constantly until thickened. The mixture should coat the back of a spoon. Remove from heat and let cool in the pan for 10 minutes, stirring halfway through. Spread over the blondie base. Refrigerate until completely cooled.
  8. Make the ganache: Put chocolate chips and heavy cream in a microwave safe bowl. Microwave in 20 second increments, stirring, until the chocolate is melted. Allow ganache to cool only slightly, pour over the blondies. Let set before cutting into bars. (Option to cut squares first and drizzle with the chocolate.)

*This recipe is adapted from Holly at https://www.spendwithpennies.com/boston-cream-bars/*

Boston Creme Blondies | Sew You Think You Can Cook | http://sewyouthinkyoucancook.com

Tuesday Tattles: 2nd Birthday

I hope everyone had a wonderful Christmas surrounded by loved ones. We’ve been enjoying the sunshine and time with grandparents. The kids were beyond spoiled and the joy and wonder of Christmas was evident everywhere.

Tuesday Tattles

My Treat turned TWO in October and we celebrated with a playground party in early November. (Little fun fact: shopping for birthday party decorations the week before Halloween is slightly insane.)

My guy has had an attraction to sports balls as early as I can remember, and he’s naturally athletic, coordinated, and too brave for his own good. A sports themed birthday would be a no-brainer. And then he had me second guessing my decision with an obsession with animals that rivaled anything to date! We celebrated his actual birthday with a trip to the zoo. If he continues his love of animals and zoo trips, you’ll be seeing an animal themed third birthday next year

As has become my birthday tradition, I made a banner for my birthday boy. I punched out circles of cardstock and decorated them to look like baseballs, tennis balls, basketballs, and a soccer ball. Even ovals for footballs. I used navy stickers for the lettering, to make it easier.

I stuck to the four “main” sports: football, soccer, basketball, and baseball. (If the Chicago Cubs had made it into the World Series a second year in a row I definitely would have adjusted to a Cubs only theme.)

IMG_5541

This birthday party was the first of the 4 we’ve previously thrown for the boys that did not include extended family. I am grateful for fantastic friends who offered their help in setting up and taking down the decorations at the park.

The décor included:

  • Green table cloths
  • Small white plates for the dessert table
  • Gold oval plates for the snack table (they looked like footballs!)
  • Red and yellow napkins
  • Blue spoons and forks
  • The party favor bags were simple black cellophane bags and stored in a large football shaped bowl
    • Inside the bags were bubbles, sports balls, chocolate candies, and dum-dums

My favorite part of any party décor are the balloons. Turns out this old soul of mine has a little kid in it, after all. Those wonderful friends I mentioned at the beginning of this post came over early to help us blow up about a dozen balloons, including the mega #2. The balloons got all tangled before even leaving our house, and my OCD self let it go, because it looked really cool! We didn’t even make it out of the front door before we lost 10 of the balloons, including the mega #2. The screams that emitted from my children were heard from the playground where daddy was setting up. He saw those balloons fly into the sky and came running to help console. Heck, I was a wreck, too! I hadn’t gotten a single picture of my guy with his #2 balloon.

IMG_5532

The food helped bring the sports theme to life, one dish for each sport:

  • I made the superfood layer dip again, arranging the layers with shredded cheese on top and decorating it with black beans to create the stripes of a basketball
  • My favorite display was the fruit tray to look like a baseball field. I used my largest rimmed baking sheet and arranged five small ramekins for the bases and pitching mound. Those were filled with pretzel sticks, toothpicks, chocolate hummus, and caramel yogurt dip. Different fruits were arranged to create the outfield, infield, and stands
  • I’d ordered a pull-apart cupcake cake from the local grocery store to look like a soccer ball and it turned out fantastically!
  • I made cocoa krispie treats in the shape of footballs and decorated the laces with melted white chocolate

Just like last year, we had a threat of rain, but the sky cleared and it was a beautiful, slightly windy day, perfect for a playground party.

IMG_5561

#BundtBakers: Christmas Bundts

4ae7b-bundtbakerspost#BundtBakers is a group of bundt loving bakers who get together once a month to bake bundt cakes with a common ingredient or theme. This month Sneha of Sneha’s Recipe asked us to bake a Christmas Bundt.

Every year my husband’s office has an all floor potluck the week of Thanksgiving.

This event is massive.

Every conference room gets transformed into a buffet of delicacies.

Employees and their families are all encouraged to attend and participate. Everyone is given a room to start in and after that you’re allowed to checkout the other rooms.

The rooms all have a theme, too. There are two traditional Thanksgiving rooms (last year I brought Papa’s Sweet Potato Casserole ). There’s an American room (thinks barbecue, wings, and chili), and Asian room (which is most popular and I’ve yet to even pop my head into it!), a European room, two dessert tables, a kids room with hotdogs and pizza, and more.

This year I told my husband to sign us up for a dessert so that I could share a bundt cake! He sent me the massive spread sheet and I searched for a dessert that I could fill with this month’s theme. Lemon bundt cake was my answer. I wasn’t originally thinking lemon, but I made it work!

I made a Cranberry Surprise Inside Lemon Bundt.

I unloaded about half a can of Pam into my beautiful bundt pan and it still stuck! I did my best to piece it together, crossed my fingers, and had my husband pick up a store bought lemon bundt cake as back up.

Come the morning, the cake had set together well enough that I figured, why not just bring it anyway. The boys and I, naturally, had to taste it first and it passed all approval ratings.

In my indecisiveness on bringing the cake or not I ran out of time to make a frosting, but, as you know by now, I don’t like frostings anyway.

Lemon Cran Bundt (kids)

Cranberry Surprise Inside Bundt Cake

Ingredients for the cake:

  • 1 bag (12 oz) fresh cranberries
  • 2 1/2 C sugar, divided use
  • 4 eggs
  • 2 egg yolks
  • 6 tbsp milk
  • 2 tbsp lemon zest
  • 2 tsp vanilla extract
  • 3 C cake flour
  • 1 1/2 tsp baking powder
  • 1/2 tsp salt
  • 3 1/4 sticks butter, cubed, at room temperature

Ingredients for syrup:

  • 1/4 C sugar
  • 1/2 C lemon juice

Steps:

  1. In a pot, heat cranberries and 3/4 C sugar over medium-high heat until it reduces down to 1 1/4 C, 15-20 minutes. Let cool.
  2. Preheat oven to 350 degrees F. Heavily grease a 10 C bundt pan.
  3. In a small bowl, whisk the eggs, yolks, milk, lemon zest, and vanilla. Set aside.
  4. In the bowl of a stand mixer fitted with the paddle attachment, mix the flour, remaining 1 3/4 C sugar, baking powder and salt. Beat in the cubed butter. Add the wet ingredients in 3 batches, mixing until incorporated, scraping the sides of the bowl.
  5. Fill bundt pan 2/3 full with batter. Spoon in the cranberry filling, making sure it doesn’t touch any of the edges. Top with remaining batter. Bake 60 minutes, until a toothpick inserted comes out cleanly.
  6. In a small saucepan, dissolve 1/4 C sugar in 1/2 C lemon juice over medium-low heat. Set aside.
  7. Poke the cooked cake, still in the pan, with a skewer and pour the syrup over the top. Let cool at least 10 minutes before unmolding onto a cooling rack. Let cool completely, wrap, and set overnight.

*This recipe is adapted from https://www.keyingredient.com/recipes/153248/lemon-cranberry-bundt-cake/*

Lemon Cranberry Inside Bundt Cake for #BundtBakers from Sew You Think You Can Cook

You can see all our of lovely Bundts by following our Pinterest board. Updated links for all of our past events and more information about #BundtBakers, can be found on our home page.

And don’t forget to take a peek at what other talented bakers have created this month:

Almond Nougat Bundt Cake by Nunca es demasiado dulce

Bundt de Noel by All That’s Left Are The Crumbs

Baileys Hot Chocolate Bundt Cake by Making Miracles

Cinnamon Bun Bundt by Living the Gourmet

Chestnut Praline Coffee Bundt Cake by The Queen of Scones

Christkindl Gluhwein Bundt Cake by I Love Bundt Cakes

Eggless Semolina Tutti Fruity Cake by Sneha’s Recipe

Gingerbread Bundt Cake by Faith, Hope, Love, & Luck Survive Despite a Whiskered Accomplice

Italian Cream Bundt Cake by Palatable Pastime

Mini Chocolate Ganache Bundts with Peppermint Crunch by Cookaholic Wife

Maple Walnut Bundt Cake by Bizcocheando

Pineapple Upside Down Bundt by A Day in the Life on the Farm

Polenta Bundt Cake by Katin špajz

Rich Chocolate Bundt Cake with Cake Truffles by Sweet Sensations

Sorrel Mini Bundts by Passion Kneaded

Spicy Gingerbread Bundt by Food Lust People Love

Xmas Bundt Cake by La mejor manera de hacer

Hot Cocoa Cookies

I was going to take my sweet time in writing the blog post for these cookies, until last Thursday happened.

Last Thursday I attended a cookie swap mom’s night out with my MOPS group. <link>

There were prizes awarded for best decorated and best tasting.

Guess who brought the best tasting cookie?

If you’re thinking, “Well if it wasn’t you than this is a terrible story.” You’d be right. It was me!

I had shared a Facebook video of some chocolate cookies with marshmallows and chocolate icing and sprinkles on my Facebook page with the caption “I know what I’m making for this year’s cookie exchange!”

And I did! And they were fantastic! They literally taste like a rich cup of hot chocolate, the real stuff.

So now I’m typing this post up on my phone in the Whole Foods parking lot while the boys take a late afternoon nap.

This recipe makes 39 cookies.

Hot Cocoa Cookies

Ingredients for cookies:

  • 1 stick butter
  • 1 bag (12 oz) semi-sweet chocolate chips
  • 1 1/2 C flour
  • 1/4 C cocoa powder
  • 1 1/2 tsp baking powder
  • 1/4 tsp salt
  • 3 eggs
  • 1 1/4 C brown sugar
  • 1 1/2 tsp vanilla extract
  • Mini marshmallows (2-3 per cookie) or 20 large marshmallows

Ingredients for icing:

  • 2 C powdered sugar
  • 1/4 C cocoa powder
  • 1/2 stick butter, melted
  • 1/4 C hot water
  • 1/2 tsp vanilla extract
  • Sprinkles

Steps:

  1. In a small saucepan over medium-low heat melt the butter and chocolate. Let cool.
  2. In a large bowl, whisk together the flour, cocoa powder, baking powder, and salt.
  3. In the bowl of a stand mixer fitted with the paddle attachment beat together the eggs, sugar, and vanilla until combined. Add in the melted chocolate and mix well. Slowly incorporate the dry ingredients. Refrigerate an hour to over night.
  4. Preheat the oven to 325 degrees F. Line cookie sheets with silipat mats.
  5. Using a tablespoon measure scoop batter and roll into balls. Place on the prepared baking sheets and gently flatten. Bake 12-15 minutes, until they just start to set.
  6. Meanwhile, cut marshmallows in half.
  7. Remove cookies from the oven and press 4-6 mini marshmallow halves or 1 large marshmallow half on top of each cookie, cut side down. Return to oven for 2-3 minutes.
  8. Allow cookies too cool on the baking sheets.
  9. Make the icing: Combine ingredients and spoon over cooked cookies. Decorate cookies with sprinkles before the icing sets. Allow the finished cookies to cool 30 minutes before storing and serving.

*This recipe is adapted from Glory at http://www.glorioustreats.com/2013/12/hot-cocoa-cookies.html*

Hot Cocoa Cookies | Sew You Think You Can Cook | http://sewyouthinkyoucancook.com

The Anything Bag

It’s FINALLY time for a sewing post!

This blog is titled SEW You Think You Can Cook after all.

My latest Thursday Thoughts post was about carving out some “me time” after the kids go to bed. One of the hobbies I wanted to get back to was sewing.

So how many times have I pulled out my sewing machine since September?

2. 2 times.

Sure, I’ve got excuses: husband’s travel, too many dishes, toys to be fixed, online shopping, birthdays and holidays, etc.

But! Bedtime (KNOCK ON ALL THE WOOD) has been going really well this month so it’s all good. In fact, my husband asked me if we could “cancel Christmas” to not mess with the magic that’s been happening.

With the holiday season right around the corner I knew I couldn’t procrastinate sharing this sewing tutorial any longer. You can give your gift in one of these bags and it’s a two-for-one!

The Anything Bag (1) | Sew You Think You Can Cook

This “anything bag” was given to Firecracker on his 2nd birthday from a friend who does manage to break out her sewing machine. The bag has been filled with wooden toy trains for the past year and a half.

As the Hotwheels car collection grew and grew I knew I needed more of these bags. My friend gave me the tutorial, I bought some fabric (actually, another friend found some Cars scrap fabric for me), and it sat there. For months.

I’d finally admitted confusion and defeat and sent the supplies to my mother-in-law. She returned the supplies in the format of a cars bag the following week! She assured me, as did my friend, that the bag is quite easy and quick to sew together – once you figure out how.

With the promise of teaching me in person on her next visit, we went to “the mother ship” as she calls it (Joann’s) to gather more fabric for some more bags. I now needed a large one for PAW Patrol toys (truth be told, I need a second large bag for PAW Patrol toys after Treat’s second birthday!).

The Anything Bag (2) | Sew You Think You Can Cook

I took step by step notes to develop a tutorial in my own words. We didn’t take pictures, though. We established, that for the purpose of a blog post, we needed to work with something smaller. Photos of large pieces of fabric simply don’t help the reader visualize each step. Additionally, I used two different fabric colors for the casing to make the steps easier to see. Using two different fabrics is not necessary as one side will not be visible in the completed bag.

My mother-in-law left. But only one or two weeks went by before I got my sewing machine back out and made the bag you’ll see here! It took just under an hour, but I’d uncovered some verbiage that confused me and I learned how better to describe this tutorial. The following week I made a second smaller bag (I do have two children after all!) and it only took me 30 minutes!

The Anything Bag (3) | Sew You Think You Can Cook

Here’s how to make The Anything Bag

Before you get started, you need to decide how big of a bag you want to make. You can do any size you want! The only things you need to do to ensure it’ll all work out are:

  • both bag fabrics are the same size
  • the casing is cut to a minimum 3″ width and a maximum length 1″ shorter than the width of your bag fabric
  • the drawstring is longer than the circumference of the bag

Examples:

  • The trains bag
    • bag fabric 22.5″ x 13″ (2)
    • casing 21.5″ x 4″ (2)
    • drawstring 45″ x 3″ (1-pieced)
  • The PAW Patrol bag
    • bag fabric 33″ x 13″ (2)
    • casing 32″ x 4″ (2)
    • drawstring 65″ x 3″ (1-pieced) *I actually find this drawstring to be way too long
  • The tutorial bag *I’m guestimating here as I used scrap fabric to piece everything together
    • bag fabric 9.5″ x 9.5″ (2)
    • casing 8.5″ x 3.5″ (2)
    • drawstring 18″ x 3″ (1-pieced)

Use a 1/4″ seam allowance unless otherwise stated.

Sew your two casing pieces together, right sides together, on the short end.

Casing step 1

Fold, right sides in, and sew the second short end. You now have a ring. Iron the seams and then flip it right side out.

IMG_4798

Fold the casing hotdog style and iron it flat.

IMG_4799

Lay out one piece of your bag fabric, right side up on the table. Place your folded casing, opening up, at the top of the bag fabric in the center, ensuring that there is a 1/2″ from each end. Place the second piece of bag fabric, right side down, on top, making a sandwich.

bag assembly

Pin, and sew along that top edge. Iron.

Open up the bag, and fold hotdog style, right sides in. The casing will be in the center of the bag.

bag assembly 2

Sew along the 3 open edges, leaving a 3″ gap on one side to pull the bag right side out. Option to trim the corners of excess seam fabric; doing so will reduce the bulk in the corners of the bag. Pull the bag right side out through your 3″ gap.

IMG_4803

Fold the opening edges of that 3″ gap in, iron, and top stitch closed. Press one side of the bag into the bag to create the reversible bag.

IMG_4804

Now, make the drawstring. (Option – to use a piece of nice ribbon, rope, or shoelace instead!)

Fold the ends 1/4″ in. Iron. Fold the entire fabric hotdog style. Iron. Tuck the length in on itself again. Iron.

Starting with the short ends first, top stitch with an 1/8″ seam allowance around the edges.

Thread the drawstring through the casing. Center it. Option to sew a straight line through the casing, holding the drawstring in place. Tie the ends for a finished look.

The Anything Bag Tutorial | Sew You Think You Can Cook | http://sewyouthinkyoucancook.com