Blog-iversary 3

3 yrsSew You Think You Can Cook is 3 years old!

This past year has been a whirlwind in my personal life between welcoming a second baby boy to our family and moving across the country.

Blogging-wise I have continued to grow. I have 43 more followers by e-mail and 270 more Facebook fans. I’ve become more active on Twitter and Instagram with a total following of 423 and 530, respectively.

In this fourth year I hope to find the time to delve into monetizing the blog and gaining some sponsored posts. That’s if my two busy boys allow me to do so! I did however, finally pay to own my domain name! As my “birthday gift,” take a look up at the top of your browser and you’ll notice something a little different. The “dot wordpress” is no longer there! I hope your finger memory (and mine!) adjusts quickly when you type in sewyouthinkyoucancook.com.

For Mother’s Day 2016 my husband got me a macro lens for my camera and I have enjoyed taking photos even more! I’m even breaking out the tripod these days. Now when I recreate a recipe from my blog for dinner, I try and reshoot the photos. Updated photographs can be found on Balsamic Glazed Beef Roast, Baby Baked Beef Burritos, and Sweet Potato Waffles.

I hope you’ll continue to follow along with my journey here on the internet.

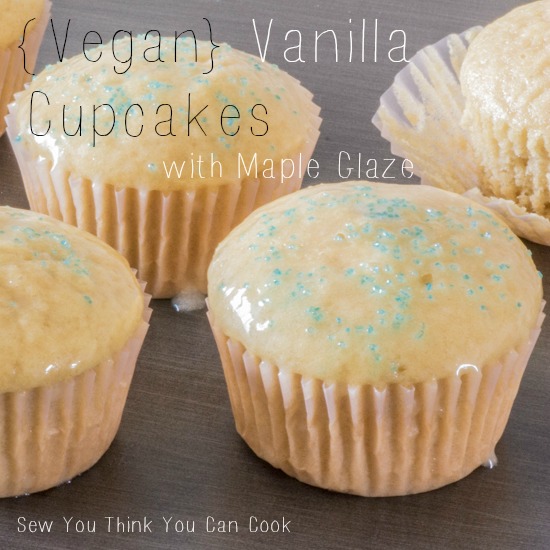
It has become my tradition to share something new to me on this milestone. For my 1st year, I baked with olive oil. For my second, I made marshmallow for a cheesecake. Keeping with the sweet side of experimentation, this year I’m sharing a vegan cupcake!

Why vegan?

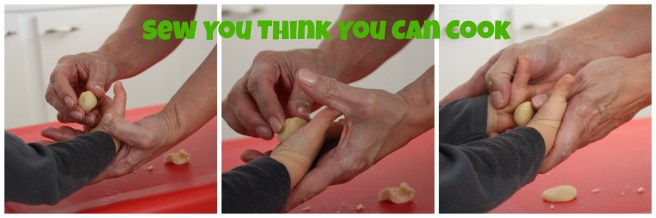
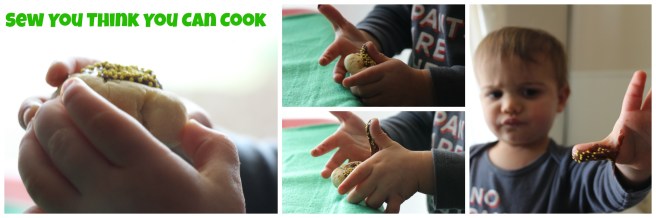
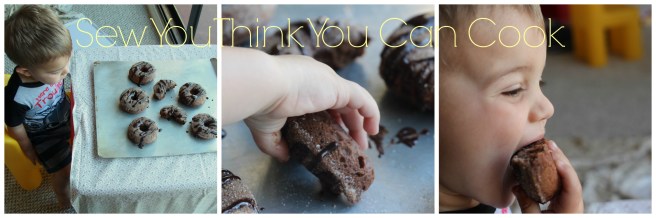
We have friends here in California that we knew in Ohio as well who follow a vegan lifestyle. They have a daughter who is 4, a son who is only 2 weeks younger than Firecracker, and are expecting a third child in a month-ish. We did a play date with them and Firecracker was insistent about wanting to bake cupcakes with “Emmer.” I found a recipe that didn’t require any strange ingredients (borrowing almond milk from them) or coconut. The kids did a fabulous job making these cupcakes and the dozen didn’t last long. Icing didn’t come to fruition though and instead I ended up with a glaze. But it’s a glaze that was fantastic! No one felt bummed or cheated by not having a beautiful frosting peaked top.

We will be having a joint birthday celebration for the 2 year olds next week and I’ll be remaking the cupcake base. Now to find an actual frosting – if you have a recipe for coconut free vegan frosting please share it with me in the comments!

This recipe makes 1 dozen cupcakes.

Vegan Vanilla Cupcakes

Ingredients:

  • 1 3/4 C flour
  • 1 C sugar
  • 1 tsp baking soda
  • 1/2 tsp salt
  • 1 C almond milk
  • 1/3 C olive oil
  • 1 tbsp white vinegar
  • 2 tsp vanilla extract

Steps:

  1. Preheat oven to 350 degrees F. Line cupcake tin with liners.
  2. In a large bowl, whisk together flour, sugar, baking soda, and salt. Add the almond milk, olive oil, vinegar, and vanilla. Mix until just combined.
  3. Divide batter in cupcake tin. Bake 18-20 minutes. Allow cupcakes too cool in the pan for 1 minute before removing to a cooling rack.

*This recipe is adapted from Alison at http://lovingitvegan.com/vegan-vanilla-cake/*

Vegan Maple Glaze

Ingredients:

  • 1 1/2 C powdered sugar
  • 1/2 C almond milk
  • 1/2 C canola oil
  • 1 tbsp maple syrup
  • 1/2 tsp vanilla extract

Steps:

  1. Using a hand mixer, whisk together all ingredients until smooth. Poor over cooled cupcakes.

Vegan Vanilla Cupcakes with Vegan Maple Glaze  Sew You Think You Can Cook

#FoodieExtravaganza: Doughnuts

foodieextravaganza-300

July has arrived and that means it’s time for another #FoodieExtravaganza! Each month we take turns hosting and selecting a foodie holiday associated with that month. Somehow in all the planning July was overlooked so in a mad dash in the second half of June Lauren of From Gate to Plate told us to celebrate the doughnut. If anyone is keeping score, National Doughnut Day is actually the first Friday in June, but none of us are complaining to be celebrating one of America’s favorite breakfast treats today. July is national culinary arts month so let’s just go with that. Also in July: Fried Chicken Day (today, the 6th), Blueberry Muffin Day (the 11th), and Junk Food Day (the 21st).

I have a soft spot for doughnuts or is it donuts? However you spell it, I’ll eat it. While I prefer a yeast and fried doughnut, I made a cake doughnut. It’s simply easier and less messy. Besides, I need to use my doughnut pan!

I swear, over the past few months my sweet tooth has re-awoken after 6 years of being dormant. I am now searching for that something sweet after dinner, something I get from my dad! That something sweet can be as small as a handful of M&Ms or as decadent as some ice cream. And speaking of that sweet tooth, chocolate is starting to reign supreme, too. Even when my sweet tooth was pretty vocal, I always gravitated towards those sugary, tart sweets over chocolate. I don’t quite know how to handle this new taste preference, I now seem to always have a bag of chocolate covered raisins in the pantry.

Thanks to the chocolate love, I gravitated heavily towards a fancier doughnut than I’d typically do. Chocolate Snickerdoodle Doughnuts. Because. Cinnamon. And chocolate. What could possibly be bad about that?! I did think chocolate chips inside the doughnut and the chocolate ganache on top of the doughnut was just a touch too rich, so I omitted the chips. They weren’t missed. However, not having them in the batter resulted in a lower yield of doughnuts. But for 2.5 of us, one dozen was plenty!

We enjoyed these doughnuts for Father’s Day breakfast. And the father of my children was definitely getting impatient while I finished glazing and photographing the doughnuts. Firecracker’s insistence on regaining possession of his toddler table for his trains didn’t help speed things along. But everyone waited calmly. And the wait was well worth it.

Chocolate Snickerdoodle Doughnuts  Sew You Think You Can Cook

Chocolate Snickerdoodle Doughnuts

Ingredients for doughnuts:

  • 2 C flour
  • 1 C sugar
  • 1/4 C cocoa powder
  • 2 tsp baking powder
  • 1 tsp cream of tarter
  • 1 tsp salt
  • 1 tsp cinnamon
  • 1/4 tsp nutmeg
  • 2 eggs
  • 1 C buttermilk
  • 3 tbsp melted butter
  • 1 tbsp vanilla extract

Ingredients for toppings:

  • 3 tbsp melted butter
  • 1/2 C sugar
  • 1 tsp cinnamon
  • 1 C semi-sweet chocolate chips
  • 3/4 C heavy cream

Steps:

  1. Preheat oven to 350 degrees F. Grease a doughnut pan.
  2. In a large bowl, whisk together the flour, sugar, cocoa powder, baking powder, cream of tarter, salt, cinnamon, and nutmeg.
  3. In another bowl, whisk together the eggs, buttermilk, butter, and vanilla.
  4. Add the dry ingredients into the wet and mix until combined.
  5. Pour batter into prepared doughnut pan. Bake 10-12 minutes, until a toothpick inserted comes out cleanly. Let doughnuts cool in the pan for 1 minute before transferring to a wire rack to cool.
  6. Make the cinnamon sugar: In a shallow bowl, combine the cinnamon and sugar. Set aside.
  7. Make the ganache: Put chocolate chips and heavy cream in a microwave safe bowl. Microwave in 20 second increments, stirring, until the chocolate is melted. Allow ganache to cool slightly. Set aside.
  8. Brush cooled doughnuts with melted butter. Dip in cinnamon sugar. Top with ganache.

*This recipe is adapted from Melanie at http://melaniemakes.com/blog/2014/03/triple-chocolate-snickerdoodle-donuts.html*

Chocolate Snickerdoodle Doughnuts for #FoodieExtravaganza from Sew You Think You Can Cook

Be sure to check out these other doughnuts:

Gluten-Free Matcha Doughnuts – Three Ways! by Culinary Adventures with Camilla
Raspberry Cookies n Cream Baked Doughnuts by Baking in Pyjamas
Lemon Poppy Seed Donuts by Making Miracles
Baked S’mores Doughnuts by Tara’s Multicultural Table
Strawberry Shortcake Donut Tarts by Fearlessly Creative Mammas
15 Minute Funnel Cake Bites by From Gate to Plate
Cake Mix Donuts by I’m Hungry
Doughnut Trifle by A Day in the Life on the Farm
Watermelon Doughnuts by The Freshman Cook
Baked Cherry Lemon Donuts by Caroline’s Cooking
Orange Glace Donuts by Basic N Delicious
Medhu Vada – Savory Lentil Doughnut by Sneha’s Recipe

If you are a blogger and would like to join our group and blog along with us, come join our Facebook page Foodie Extravaganza. We would love to have you! If you’re a spectator looking for delicious tid-bits check out our Foodie Extravaganza Pinterest Board! Looking for our previous parties? Check them out HERE.

#TourDeManger: Walnut Cake

Eat the Tour De France image

When my blogging buddy Sarah of Curious Cuisiniere informed me she wanted to gather a group of bloggers to celebrate the Tour de France I thought it’d be fun to join in. While I don’t watch or follow the race (sorry, bikers, tennis and soccer trump you in our house), I can appreciate some good food!

The idea behind today’s blogging event is to eat through the race route. The race starts in Mont-Sait-Michel, dips into Spain and Switzerland, and ends in Paris.

My recipe today comes from Southwest France, more specifically, Aquitaine. Aquitaine has a little bit of everything – from seaside to mountains to woodland and farmland. The area is known for its wine, truffles, and walnuts. Northeast Aquitaine, the Dordogne area, is considered to be one of the oldest populaces  in Europe. Pau in Southern Aquitaine is Stage 8 of Le Tour De France.

I decided to make a walnut cake. Those cyclists need some sugar to keep going, right?! I adore this cake, and it couldn’t be any simpler to make. I’ll admit, I was skeptical because it doesn’t have a leavening agent in it. And I was converting metric units to American measurements. Technically… I used 13 extra grams of butter and somewhere between a third and a half cup extra flour, but hey, it worked! The cake didn’t rise (or if it did I couldn’t tell) but that didn’t mean it was dense. This walnut cake was somehow fluffy, sweet, and had texture from the ground nuts. A perfect base for some chocolate.

And it wasn’t at all my mid morning snack this week….

Walnut Cake

Ingredients:

  • 1 stick butter, softened
  • 1 1/2 C powdered sugar, divided use
  • 1 1/2 C halved walnuts
  • 3 eggs
  • pinch of salt
  • 1/2 C flour
  • 1 C semisweet chocolate chips
  • 3/4 C heavy cream

Steps:

  1. Preheat oven to 350 degrees F. Grease an 8″ circle cake pan.
  2. In the bowl of a stand mixer fitted with the paddle attachment, cream together the butter and 3/4 C powdered sugar.
  3. Place the walnuts in a food process and pulse until finely ground, but having some texture. Transfer to a bowl and mix with the remaining 3/4 C powdered sugar.
  4. Add the walnut mixture to the butter and mix until combined. Add the eggs one at a time until fully incorporated. Add a pinch of salt and the flour, mix until combined.
  5. Transfer cake batter to the prepared cake pan. Bake 35-40 minutes, until golden and a toothpick inserted comes out cleanly. Allow cake to cool in the pan.
  6. Put chocolate chips and heavy cream in a microwave safe bowl. Microwave in 20 second increments, stirring, until the chocolate is melted. Allow ganache to cool slightly before pouring over the cake. Garnish with extra walnuts if desired.

*This recipe is adapted from http://southweststory.com/french-south-west-gastronomy*

Walnut Cake for #TourDeManger from Sew You Think You Can Cook

See what the other bloggers have made from the other regions on the race route. Be sure to visit each one to learn more about the regions on the route and to enjoy a taste of the cuisine! Show us how you plan to eat your way though Le Tour de France all month long with the hashtag #TourDeManger !

#FoodieExtravaganza: Midsummer Eve

foodieextravaganza-300

Laura of Baking in Pyjamas challenged us to create a dessert that is Midsummer Eve themed. I’m not going to lie, I had to Google “Midsummer Eve.” All I knew was that the summer solstice, the longest day of the year, falls on June 21st in the Northern Hemisphere. What I didn’t know was that in some countries it’s an official holiday! In Sweden, celebrations involve dancing and singing around a florally decorated maypole. In Scandinavia, people clean their homes and decorate them in flowers. In Denmark, traditional foods include pickled herring and strawberries.

Thankfully, Laura’s instructions were to make a dish that meant “midsummer” to us. To answer her call, I immediately thought ice cream! Though really, any time of year is good for ice cream in my book.

I found myself in possession of a massive amount of mint when the grocery store was sold out of the small packages. I’d only needed a couple of tablespoons to mix into Greek yogurt for some lamb burgers. (A recipe that is still under development here in order to be photograph-able) As such, you’ll be seeing a couple more minty recipes on the blog over the next couple of months.

Mint Gelato for #FoodieExtravaganza from Sew You Think You Can Cook (1)

But back to the recipe at hand. Fresh mint gelato. Egg-free gelato.

We are within walking distance of a very delicious gelato shop and our sweet teeth know it! I think I’ll be making ice cream much more often now so we can enjoy a cup for a fraction of the cost.

I didn’t have any chocolate in the house when I made the gelato but found that the fresh mint really did need another flavor to balance it. I decided to use some of my farmer’s market yield of berries to make a sauce. The brightness of the fruit was exactly what the gelato needed; better than chocolate even! To make the berry sauce I put some fresh (frozen works, too) berries in a small saucepan with a little sugar over medium heat until syrupy then gently mashed them with the back of a spoon to achieve the texture I wanted.

Egg-Free Mint Gelato

Ingredients:

  • 1 C sugar
  • 2 tbsp corn starch
  • 2 C whole milk
  • 2 C heavy cream
  • 6 sprigs fresh mint

Steps:

  1. Whisk together sugar, corn starch, milk, and heavy cream in a sauce pan over medium heat. Stir constantly until the mixture starts to bubble and thicken.
  2. Place a large bowl in an even larger bowl of ice water. Pour gelato base into the bowl to cool. Put the mint in the gelato and let steep for 5 minutes. Remove the mint. Place the gelato base in the refrigerator at least 4 hours to chill completely.
  3. Place gelato in ice cream maker and follow the directions for your ice cream maker.
  4. Serve with either a berry or chocolate sauce.

*This recipe is adapted from Leigh Anne at http://www.yourhomebasedmom.com/fresh-mint-gelato/*

Mint Gelato with Berry Sauce for #FoodieExtravaganza from Sew You Think You Can Cook (2)

Be sure to check out these other midsummer treats:

Blueberry Slab Pie by A Day in the Life on the Farm

Carrot Vanilla Custard by Sneha’s Recipe

Chocolate Fondue with Strawberries by Making Miracles

Dark Berry Gelato by Baking in Pyjamas

Kladdkaka by Culinary Adventures with Camilla

Mango Souffle by G’Gina’s Kitchenette

No Bake Lemon Cheesecake by Fearlessly Creative Mammas

Nordic Walnut Cake with Coffee Icing by Food Lust People Love

Simple Peach Crisp by Cooking with Traci

Swedish Cheesecake with Strawberries by Caroline’s Cooking

If you are a blogger and would like to join our group and blog along with us, come join our Facebook page Foodie Extravaganza. We would love to have you! If you’re a spectator looking for delicious tid-bits check out our Foodie Extravaganza Pinterest Board! Looking for our previous parties? Check them out HERE.

SRC: Double Chocolate Cookies

newsrcbanner

It’s Secret Recipe Club Reveal Day! In the Secret Recipe Club, each participating blogger is assigned a blog from another participating blogger and secretly searches their site for something to recreate. The accompanying blog post then goes live on reveal day! So while I was immersed in my assigned blog, someone else was picking through mine! I’m so excited to be part of this group, to see what on my blog peaks other’s interests and to stumble upon new blogs and new recipes.

It’s actually a miracle I’m even posting with The Secret Recipe Club today! We moved to California from Ohio last month and I felt quite confident that skipping out of April’s SRC reveal day would be the only break necessary to get through the travel.

I had no problem selecting and making my dish for today’s reveal, but I did have a problem blogging it! We got the keys to our new home April 16th, moved in April 18th, and received delivery of our goods on April 19th. I’m supposed to get internet installed today. Hopefully that happens. It’ll be a while before I get a chance to stop by and check out all of the other SRC posts today, but you can see them via the link at the bottom of my post.

Everything I’ve been doing has been via mobile, except for the rare occurrences when I was able to get away from the boys and sit at a coffee shop with wifi. I actually never left the house, if I had to drive, without my computer so I could at least type up blog posts (this one included) in Word so that when I did get a moment of internet bliss I could quickly and efficiently schedule some posts!

We met a few of our neighbors after moving in and one of them generously and thoughtfully brought over a 6 pack of beers from local breweries that he put together. I knew I’d be searching through my assigned blog, Dessert Before Dinner written by Stephanie, for a thank you treat. The Jalapeno Beer Cheese Bread caught my eye, but it was another SRC post. I knew everyone loves cookies so I decided on her White Chocolate Chunk Chocolate Cookies. I put most of the cookies in a large mason jar and tied it with a bow. It’s a good thing I did, too, because I found these cookies to be insanely addictive. I definitely broke my “only two cookies at a time” rule and even sneaked one for breakfast the following morning.

Double Chocolate Cookies for Secret Recipe Club from Sew You Think You Can Cook (1)

This recipe makes 18-20 cookies.

Double Chocolate Cookies

Ingredients:

  • 1 stick butter, softened
  • 1/3 C sugar
  • 1/3 C brown sugar
  • 1 egg
  • 1 tsp vanilla
  • 1 C flour
  • 1/4 C + 2 tbsp cocoa powder
  • 1/2 tsp baking soda
  • 1/4 tsp salt
  • 3/4 C white chocolate chips

Steps:

  1. Preheat oven to 350 degrees F.
  2. In the bowl of a stand mixer fitted with the paddle attachment, cream together the butter and both sugars until fluffy.
  3. Add the egg and vanilla and mix until combined.
  4. In a bowl, whisk together the flour, cocoa powder, baking soda, and salt. Add to the stand mixer and mix until combined. Fold in the white chocolate chips until evenly distributed in the dough.
  5. Drop spoonfuls of the cookie dough onto two baking sheets. Bake 10-13 minutes. Allow cookies to cool 5 minutes on the pan before removing to a cooling rack.

*This recipe is adapted from Stephanie at http://dessert-before-dinner.blogspot.com/2011/07/white-chocolate-chunk-chocolate-cookies.html*

Double Chocolate Cookies for #SecretRecipeClub from Sew You Think You Can Cook (2)

To see the other bloggers who participated in the Secret Recipe Club this month click here:

#FoodieExtravaganza: Coffee Cake

foodieextravaganza-300

Today’s post is coming to you from a hotel room. We have made it to California, but we don’t yet have a place to call home. I’ll share stories about our road trip later this month, so if you’re curious to see how a week long drive went with two under two, stay tuned!

I told myself I wouldn’t be participating in any blogging events in April as I had/have no idea when I’ll have a kitchen again, let alone our belongings. And once we get our things, I’d need to be spending time unpacking boxes and organizing a new home, not losing myself in blog-land.

And then Caroline, of Caroline’s Cooking, chose coffee cake as the theme for Foodie Extravaganza. How could I turn down that theme!? Well, I couldn’t. (The coffee cakes on my blog are some of my most popular posts, all a variation of the Nutella Coffee Cake)  Luckily the theme was declared well enough in advance that I could do some planning. I decided I couldn’t do another flavor combination of the tried-and-true recipe, so I searched my Pinterest account for “coffee cake.” I came down to a couple of contenders and looked at the ingredient lists to see what would be best for emptying out my supplies.

I settled on Coffee Cake Cookies.

I made these cookies when my husband’s family was in town for Treat’s baptism so I doubled the recipe. Doing so utilized all of my flour (I actually had to use two different varieties), shortening, butter, and vanilla bean paste. Happily, the cookies turned out and they absolutely taste like coffee cake, but in a more portable (and therefore dangerous) format. The remainder of my baking supplies went home with my mother-in-law so they wouldn’t have to thrown away! (Actually, my brother-in-law and his fiance took a good bit of our furniture to their new house, and my in-laws graciously offered to store some miscellaneous items for us, too!)

This recipe makes approximately 4 dozen cookies.

Coffee Cake Cookies

Ingredients for topping:

  • 1 stick butter, melted
  • 1 2/3 C flour
  • 1/3 C brown sugar
  • 1/3 C sugar
  • 2 tsp cinnamon
  • 1/2 tsp salt

Ingredients for cookies:

  • 5 3/4 C all purpose flour
  • 1 1/4 C cake flour (you could use all AP flour)
  • 2 tbsp cinnamon
  • 4 tsp baking powder
  • 1 tsp salt
  • 2 1/2 sticks butter, at room temperature
  • 2/3 C vegetable shortening, at room temperature
  • 2 C brown sugar
  • 1 C sugar
  • 4 eggs
  • 2 tbsp vanilla bean paste (I used Nielsen-Massey)

Steps:

  1. Make crumble topping: Mix all ingredients until fully combined. Break apart with fingers to desired texture. Place in the refrigerator.
  2. Preheat oven to 350 degrees F. Line baking sheets with parchment paper.
  3. In a large bowl, whisk together the flours, cinnamon, baking powder, and salt.
  4. In the bowl of a stand mixer fitted with the paddle attachment, cream together the butter and shortening with the sugars. Add the eggs, one at a time. Stir in the vanilla bean paste.
  5. Add the dry ingredients in batches, just to combine.
  6. Form heaping 1/8 C cookies. Press an indent in the center of each cookie. Top with the crumble.
  7. Bake cookies 19-21 minutes, or until set. Allow cookies to cool on the pan 2 minutes before removing to a cooling rack.

*This recipe is adapted from Laura at http://piesandplots.net/coffee-cake-cookies-cookielicious/*

Coffee Cake Cookies for #FoodieExtravaganza from Sew You Think You Can Cook

Be sure to check out these other great coffee cake recipes:

Almond Raspberry Cake by Food Lust People Love

Blueberry vanilla coffee cake by Fearlessly Creative Mammas

Cappuccino Cake by G’Gina’s Kitchenette

Caramel Coconut Coffee Cake by cookinandcraftin

Classic Coffee Cake by Basic N Delicious

Coffee Cake in a Jiffy by Our Good Life

Coffee Cake Muffins by I’m Hungry

German Beer Coffee Cake by Wholistic Woman

Gluten free hazelnut pear cake by Caroline’s Cooking

Kärleksmums (Swedish Coffee Cake) by Tara’s Multicultural Table

Lemon Thyme n Mint Loaf by Baking in Pyjamas

Orange Coffee Cake with Pecan Streuse by A Day in the Life on the Farm

Polish Placek by Cooking With Carlee

Simple Coffee Cake by Sneha’s Recipe

Strawberry Coffee Cake Muffins by Making Miracles

If you are a blogger and would like to join our group and blog along with us, come join our Facebook page Foodie Extravaganza. We would love to have you! If you’re a spectator looking for delicious tid-bits check out our Foodie Extravaganza Pinterest Board! Looking for our previous parties? Check them out HERE.

SRC: Cappuccino Crinkle Cookies

newsrcbanner

It’s Secret Recipe Club Reveal Day! In the Secret Recipe Club, each participating blogger is assigned a blog from another participating blogger and secretly searches their site for something to recreate. The accompanying blog post then goes live on reveal day! So while I was immersed in my assigned blog, someone else was picking through mine! I’m so excited to be part of this group, to see what on my blog peaks other’s interests and to stumble upon new blogs and new recipes.

This month I was assigned the blog Cook with Sara. To say I enjoyed this blog written by a fellow Midwesterner is an understatement. My secret Pinterest board has over 20 recipes on it, from Cherry Bread and Pineapple Sorbet to Creamy Brussels Sprouts Dip and Beef and Asparagus Stir Fry. I couldn’t decide if I wanted breakfast, dinner, a snack, or dessert. Everything looked so good! Not to mention Sara cooks with every day ingredients, making my decision process that much more difficult.

And that’s before I even got through her entire recipe index! While I was perusing Sara’s blog I received a request for cookies. My husband will be graduating with his Masters Degree in Systems Engineering this week! The spouse organization wanted to provide cookies to all of the professors who helped support our husbands. Of course I signed up to help out! But what to bake? I have two separate cookie cookbooks but it seemed like a much better idea to see what Sara had cooking in the blogosphere. I was on the hunt to try and empty out my carton of cocoa powder before the move next week. These Cappuccino Crinkle Cookies were just the ticket! I just had to wait for naptime to bake them and photograph them because there’s no way my toddler needs a chocolate cookie filled with caffeine! But do you know who does need cookies studded with caffeine? Parents and teachers!

This recipe makes approximately 30 cookies.

Cappuccino Crinkle Cookies

Ingredients:

  • 1/3 C butter, at room temperature
  • 1 C brown sugar
  • 2/3 C cocoa powder
  • 1 tbsp espresso powder
  • 1 tsp baking soda
  • 1 tsp cinnamon
  • 2 egg whites
  • 1/3 C buttermilk
  • 1 1/2 C flour
  • 1/4 – 1/2 C sugar, for rolling

Steps:

  1. In the bowl of  a stand mixer fitted with the paddle attachment, bet the butter until smooth. Mix in the brown sugar, cocoa powder, espresso, baking soda, and cinnamon. Beat until combined.
  2. Add in the egg whites and buttermilk until fully incorporated. Add in the flour until the dough comes together.
  3. Wrap the dough in plastic wrap and chill in the fridge for at least 30 minutes.
  4. Preheat oven to 350 degrees F.
  5. Place sugar in a bowl. Drop heaping teaspoons of cookie dough into the sugar. Roll the dough into balls and then roll the balls in the sugar again. Place on an ungreased cookie sheet and bake 8-11 minutes until the edges are firm and the cookies have crackled. Transfer cookies to a cooling rack.

*This recipe is adapted from Sara at http://cookwithsara.blogspot.com/2012/06/cappuccino-crinkles.html*

cappuccino crinkle cookies for Secret Recipe Club from Sew You Think You Can Cook

To see the other bloggers who participated in the Secret Recipe Club this month click here:

#BundtBakers: Tropical Vacation

4ae7b-bundtbakerspostIt’s that time of month for me to share a bundt cake with you alongside #BundtBakers. #BundtBakers is a group of bundt loving bakers who get together once a month to bake bundts with a common ingredient or theme. We take turns hosting each month and choosing the theme or ingredient. This month Christiane of Taking on Magazines is hosting and selected the theme of Tropical Vacation.

What a perfect theme for this time of year! I think we can all use a little slice of sunshine right about now. Spring is almost here but Winter doesn’t want to quite let go just yet. Maybe with a cake inspired by the tropics we can force the cold out for good!

We will be moving in under two weeks and I have been in a “use all the food” frenzy! I had an Orange Supreme Cake Mix in the pantry that my mother-in-law gave me. She wanted me to make a bundt cake from her friend’s daughter’s blog, Southern Plate, which called for that particular cake flavor. (Apparently, it’s not a flavor carried in all stores.) I looked at the recipe for Christy’s Grandmama’s Orange Supreme Cake and headed to the store to check out the nectar varieties available to me. There weren’t any that I could consume so I scratched the idea. Instead, I decided to turn that boxed cake mix into a tropical inspired bundt cake! I replaced the water called for in the recipe with pineapple juice and added some macadamia nuts. (To really go all out with the tropical theme I bet you could use melted coconut oil instead of the vegetable/canola oil!) But because this theme was Tropical Vacation and not just Tropical I felt a pull towards alcohol so I created a rum glaze, using rum extract so it’s still family friendly. I’m definitely happy with the resulting creation, and if you close your eyes you can almost forget you’re not sitting on the beach drinking a cocktail.

An Original Recipe

Tropical Supreme Cake with Rum Cream Cheese Glaze

Ingredients:

  • 1 box (16.5 oz) Orange Supreme Cake Mix
  • 3 eggs
  • 1 C pineapple juice
  • 1/3 C canola (or vegetable) oil
  • 1/4 C chopped macadamia nuts (plus more for garnish)
  • 1 C powdered sugar
  • 4 oz cream cheese, at room temperature
  • 2 tbsp milk
  • 1/4 tsp rum extract

Steps:

  1. Preheat oven to 325 degrees F. Grease a bundt pan.
  2. In a large bowl, combine the cake mix, eggs, juice, and oil. Beat using a hand mixer until batter is smooth. Fold in the nuts.
  3. Pour batter into prepared bundt pan. Bake 35 minutes, or until a knife inserted comes out cleanly.
  4. Allow cake to cool in the pan at least an hour before unmolding. Transfer to a cooling rack to cool completely.
  5. Make the glaze: In a large bowl, beat the cream cheese, powdered sugar, milk, and extract using a hand mixer until smooth. Pour glaze over the cake. Garnish with extra macadamia nuts.

Tropical Supreme Cake with Rum Cream Cheese Glaze for #BundtBakers from Sew You Think You Can Cook

You can see all our of lovely Bundts by following our Pinterest board. Updated links for all of our past events and more information about #BundtBakers, can be found on our home page.

And don’t forget to take a peek at what other talented bakers have baked this month:

Banana Coconut Pineapple Bundt by Food Lust People Love

Banana Pineapple Mini Bundt Cakes by I Love Bundt Cakes

Banana Rum Cake by Jane’s Adventures in Dinner

Bounty Bundt Cake by Baking in Pyjamas

Bundt Cake Tropical by La mejor manera de hacer …

Chocolate Coconut Tres Leche Bundt Cake by The Whisking Bowl

Drømmekage (Danish Dream Cake) Bundt Cake by Brooklyn Homemaker

Golden Tropical Coconut Bundt Cake by Faith, Hope, Love & Luck Survive Despite a Whiskered Accomplice

Key Lime Bundt Cake by Taking On Magazines

Lava Flow Bundt Cake by All That’s Left Are The Crumbs

Lime-Coconut Bundt Cake by Palatable Pastime

Piña Colada Rum Bundt Cake by Making Miracles

Pineapple Upside Down Coconut Cake by Adventures in All Things Food

Speckled Tropical Bundt Cake by I Camp in my Kitchen

Tequila Sunrise Bundt Cake by Los Chatos Chefs

Tres Leche Bundt with Pineapple and Strawberry Whipped Cream by A Day in the Life on the Farm

Tropical Hummingbird Bundt Cake by Tartacadabra

Blogger CLUE: Lemon Loaf

blogger CLUE

Easter is coming early this year (March 27th) and the Blogger Clue crew and I have been on the hunt to provide you with some wonderful Springtime dishes.

This month I was assigned the blog Confessions of a Culinary Diva. Christy describes herself as a “food enthusiast, wine aficionado, Food & Cooking Channel fanatic, and cookbook bibliomaniac, who suffers from an incurable case of wanderlust.” On quick look at her blog and you just know her mini-bio is true – there’s wine everywhere! And countless recipes that take you to another place (France mostly).

While on the hunt for Easter foods I was immediately drawn to her Easter Pie and next year I’ll be sure to try it! The only reason I didn’t stop, drop, and cook it was because I didn’t have Arborio rice and I wasn’t about to buy some while I’m trying to rid my pantry (via cooking) of my current stock before the big move.

I thought about what foods I think remind me of Easter. I don’t serve a ham and my family has always done our own thing. Growing up we would always have a dish traditional to my mom’s family. We would have a dish called Swienconka (pronounced shven-shun-ka). Swienconka is Polish and translates to “blessed food.” My mom’s grandfather was a butcher and he would bring home the leftover meats for this dish – veal, smoked butt, two kinds of Polish sausage, and ham. These meats would be cooked and mixed with hard boiled eggs. The mixture would then marinate in vinegar and fresh and jarred horseradish.

I decided to look for brunch ideas! I almost made Onion Biscuits. And I took a peek at what cocktails could fit an Easter morning: Earl Grey Mimosa and this beautiful Sangria would definitely fit the bill.

And then somehow I stumbled upon a Lemon Loaf (which she presented most beautifully) and I was sold! Lemon always reminds me of spring time and Easter. Probably because my grandmother’s annual pound cake has lemon extract in it. This loaf cake reminded me very much of her recipe, and I almost made a cream cheese frosting to pair with it but instead decided tolemon loaf 4  Sew You Think You Can Cook create a simple glaze of powdered sugar, lemon juice, vanilla extract, and a little milk to pour over the top of the loaf. It definitely amped up the lemon flavor!

This cake was a hit. Firecracker saw it on the counter and had to have some. He earned his half a slice, too, by helping clear off space for me to photograph it!


Lemon Loaf

Ingredients:

  • 1 3/4 C cake flour, sifted
  • 1/2 tsp baking powder
  • 4 eggs
  • 1 1/3 C sugar
  • zest of 2 extra large lemons
  • 1/2 C heavy cream
  • 5 1/2 tbsp melted butter

Steps:

  1. Preheat oven to 350 degrees F. Heavily grease a 9×5″ loaf pan.
  2. In a bowl, whisk the sifted flour, baking powder, and a pinch of salt.
  3. In a large bowl, whisk the egg yolks and sugar until smooth. Stir in the lemon zest. Add the dry ingredients in three batches, mixing until combined after each addition.
  4. Whisk the heavy cream into the cake batter. Add the melted butter and stir until combined.
  5. Pour batter into prepared loaf pan. Bake 50-60 minutes, or until a knife inserted comes out cleanly. Allow cake to cool 10 minutes in the pan before removing to a cooling rack to cool completely.
  6. Option to top with a simple lemon glaze or a cream cheese frosting.

*This recipe is adapted from http://www.treats-sf.com/2012/04/twd-lemon-loaf-cake.html*

Lemon Loaf for #BloggerCLUE from Sew You Think You Can Cook

Here’s a list of the other players of Blogger CLUE this month:

#SRC: Pot o’ Gold Cookies

newsrcbanner

Good morning and welcome to another edition of The Secret Recipe Club. For a little “behind the scenes” information, The Secret Recipe Club (SRC) is divided into four group. Each group posts on a different Monday of the month. I am in Group C and always post on the 3rd Monday of the month. Which meant that during those special months with five Mondays there’d be a week without any fun reveal day! So now, on the 5th Monday of the month there is a themed reveal and it’s a “free for all,” which means that there aren’t any group restrictions. I’m looking forward to getting to know some of the other bloggers in the club.

Who would have thought that February would ever have 5 Mondays in it!? Happy Leap Day, everyone! As it’s the last day of February the Secret Recipe Club is looking into March for inspiration. Leprechauns and Bunnies was the assignment as St. Patrick’s Day has to share its month with Easter  this year.

I don’t think I could have asked for a better assignment this month! Making Memories with your Kids has an incredible index of holiday foods and crafts. Erin is a single mom to two kids who are most definitely making memories together through baking and crafting. Her blog is such a great resource of ideas!

Her sloppy Joe baskets would work for either holiday, really. Erin made them as “Easter baskets” but they could easily be a “pot of gold,” too.

While I don’t care much for St. Patrick’s Day (especially now that I don’t live near Kate anymore) I decided to make her Pot o’ Gold Cookies instead of her Chocolate Peep Sugar Cookies simply because the former were simple and used ingredients I already had. I did take some liberty in forming a few as Easter eggs and decorating with purple sprinkles, but you’ll notice they’re not photographed. They weren’t very pretty; to make them like Easter eggs definitely use white chocolate instead!

Forming Pot O' Gold Cookies with Grandma  Sew You Think You Can Cook

These shortbread cookies were a huge hit! My mother-in-law helped make them and showed Firecracker how to roll the dough into balls. He wasn’t particularly interested and instead preferred to “Hulk smash” the balls. Until he discovered the deliciousness of the dough! It’s egg-free so I had no problems with letting him try it, though once I realized he was eating it I had to clear most off of his table to prevent a sugar rush!

If I hadn’t put these cookies in a bag they wouldn’t have lasted through the evening. They’re addicting! Luckily the “impenetrable” barrier of a resealable bag (and a trip to Graeter’s ice cream) kept them safe so I could share them with friends.

Pot O’ Gold Cookies

Ingredients:

  • 2 sticks butter, at room temperature
  • 1/2 C powdered sugar
  • 1 tsp almond extract
  • 2 1/4 C flour
  • 1/4 tsp salt
  • 1 C milk chocolate chips
  • yellow or gold sprinkles

Steps:

  1. Preheat oven to 400 degrees F.
  2. In the bowl of a stand mixer fitted with the paddle attachment, beat together the butter, sugar, and almond extract. Mix in the flour until it starts to combine. Turn dough out onto a flat surface and knead until smooth and combined.
  3. Roll dough into 1″ balls. Bake on an ungreased cookie sheet for 11 minutes, until the edges are lightly golden. Allow cookies to cool completely on the cookie sheet.
  4. Melt chocolate in a double boiler or the microwave. Spoon chocolate over the cookies and top with sprinkles. Allow chocolate to set before serving.

*This recipe is adapted from Erin at http://makingmemorieswithyourkids.com/2015/03/pot-of-gold-meltaway-cookies/*

Pot O' Gold Cookies for Secret Recipe Club from Sew You Think You Can Cook

I didn’t wait for the chocolate to set before photographing… Firecracker doesn’t like sticky things, he wasn’t quite sure what to do!

Pot O' Gold Cookies, not yet set  Sew You Think You Can Cook

To see the other bloggers who participated in the themed Secret Recipe Club this month click here: