Turkey Lasagna

Fun fact: It’s National Lasagna Day!

It’s quite baffling to realize that I have had this blog for over two years now and have yet to share my lasagna recipe! I played off of it for a fancier version with lasagna roll ups last February.

Lasagna - Sew You Think You Can Cook
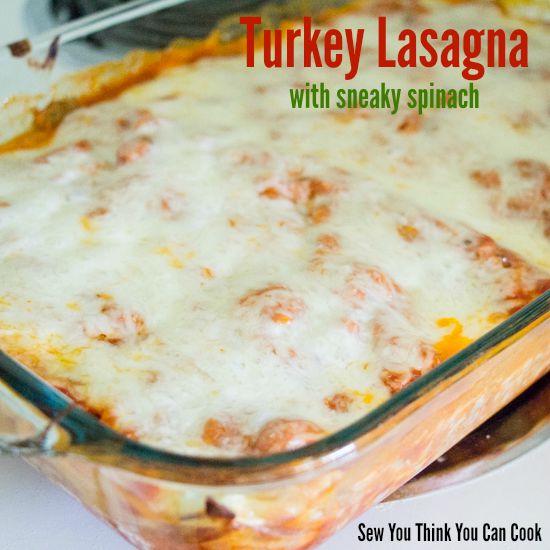
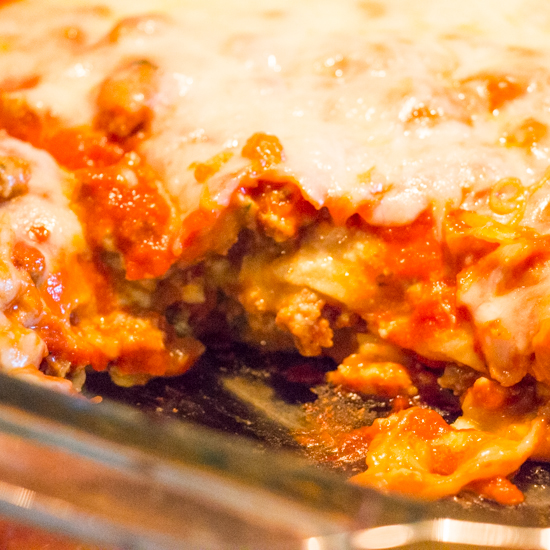
No-boil noodles are the secret to making this dish easy to whip up. They don’t have that wavy shape of traditional lasagna noodles, but they make spreading ricotta on them as simple as spreading butter on toast. I like to sneak in extra veggies, too; bell pepper and onion join the ground turkey and I mix chopped fresh spinach in with the ricotta cheese. A double helping of cheese (mozzarella in every layer with the ricotta) doesn’t hurt anything either!

When I would have to travel for work I liked to prepare a lasagna the night before I left so my husband would have something to eat in my absence. (It’s also a great option to take to someone’s house in the event of a new baby’s arrival!) I most recently made this particular lasagna (read: this [poorly] photographed lasagna) the night before I took the little man to Florida for a friend’s wedding.

IMG_4253 (2)I’m happy to report that even my little man loved my lasagna! I was astounded by how much he devoured. I do think it was my favorite lasagna to date! I have a couple of theories as to why this one tasted better: whole milk ricotta cheese and Parmesan Romano marinara sauce – both of which are Kroger brands.

Turkey Lasagna

Ingredients:

  • 1 tbsp olive oil
  • 1 onion, diced
  • 1/2 bell pepper, diced
  • 1 tsp minced garlic
  • 1 lb ground turkey (you could increase this up to 2 lb if you like a meatier lasagna)
  • 1/2 C chopped baby spinach
  • 1 container (15 oz) whole milk ricotta cheese
  • no boil lasagna noodles
  • 3 C shredded mozzarella cheese
  • 1 jar (24 oz) marinara sauce

Steps:

  1. Preheat oven to 350 degrees F.
  2. In a large skillet over medium-high heat saute onion and bell pepper in olive oil. When onion is translucent add the garlic and cook 60 seconds. Add the turkey to the pan and cook through, breaking up as you go. Seasoning with S+P.
  3. In a bowl, combine the spinach and ricotta. Season to taste with S+P.
  4. Layer the lasagna: Put a thin layer of sauce in the bottom of a casserole dish. Spread some of the ricotta mixture on the noodles and place in the dish (break up noodles as needed to fit your dish – I used a total of 7) ricotta side up. Top with half of the turkey mixture, half of the remaining sauce, and half of the mozzarella. Repeat with a second layer.
  5. Cover with foil and bake 30 minutes. Uncover and cook another 5-10, or until bubbly and golden. (Note: If you prepare the lasagna ahead of time, remove from fridge while oven is preheating and add an extra 5-10 minutes to the covered bake time.) Allow lasagna to cool for 5 minutes before cutting or it will fall apart.

Turkey Lasagna | Sew You Think You Can Cook

#HotSummerEats: Asian Sesame Pasta Salad

HotSummerEatsEven though grilling is quintessential to summer eating, I find that pasta salads are equally synonymous with summer gatherings. Whether it’s a barbecue, a picnic, or a potluck, there’s always a pasta salad handy to round out your plate. A lot of people try to avoid mayonnaise based pasta salads when the weather is warm and turn instead to lighter versions using vinaigrettes and salad dressings.

b8882-tlishT.Lish provided participating bloggers with their three flavors of vinaigrettes: Asian Sesame, Chipotle, and Sweet Garlic. As you can tell from the blog post title, I used the first flavor for a pasta salad. The Chipotle was a fan favorite when we had friends over for wings (and I served up some Garlic Hot Wings along with a couple other flavors). The Sweet Garlic is my personal favorite and have tossed it on haricot vert for a simple side dish.

There are many veggie add-ins that would work with the Asian Sesame vinaigrette. I was really hoping to add baby corn to my salad but my grocery store didn’t have any. Broccoli, snap peas, cucumber, and carrot would also work. You could even turn this pasta salad into an entree by adding some cocktail shrimp!

An Original Recipe

Asian Sesame Pasta Salad

Ingredients:

  • 2 C uncooked rotini pasta
  • 3/4 C frozen shelled edamame, thawed
  • 1/3 C diced red bell pepper
  • segments from 1 1/2 – 2 mandarin oranges
  • 1/2 C Asian Sesame Vinaigrette
  • juice 1/2 – 1 mandarin orange

Steps:

  1. Cook pasta in boiling salted water until al dente.
  2. In a bowl, toss together veggies, mandarins, and cooked pasta.
  3. In a small bowl, whisk together vinaigrette and mandarin orange juice. Season to taste with S+P. Add to pasta salad and toss to combine. Keep cold until ready to serve.

Asian Sesame Pasta Salad for #HotSummerEats from Sew You Think You Can Cook

Today is the last day to enter our giveaway and be sure to check out the other bloggers who posted more summertime recipes today:

Thank you to #HotSummerEats sponsors BenBella Vegan, Caribeque, Casabella, Gourmet Garden, Intensity Academy, Not Ketchup, Out of the Weeds, Pirate Jonny’s, Quirk Books, Spicely Organics, T.Lish , and Voodoo Chef for providing the prizes free of charge. These companies also provided the bloggers with samples and product to use for#HotSummerEats without additional compensation. All opinions are my own.

Carrot Risotto

If you’ve been following me on Instagram you might have noticed a lot of “sneak peak” photographs utilizing some sponsored item. All of those goodies will be shared for #BrunchWeek which starts next Monday. I am so excited!

One of our generous sponsors is Grimmway Farms/Cal-Organic/True Juice Family. A beautiful box of fresh organic produce and juices arrived on my doorstep. The kale and radishes will be utilized next week. The baby carrots have been a perfect healthy afternoon snack – reminding me how much I enjoy carrots! Cal-Organic also sent a bag of Colorshred carrots. The beautiful bag of carrot confetti was used to create a colorful spring time risotto.

We grilled up some chicken to serve alongside this side dish. As a side dish, the recipe below will serve four people. My little man really enjoyed this risotto and even had some of the leftovers for lunch the next day. Look who’s coming around to carrots after all!

Carrot Risotto

Ingredients:

  • 1 tbsp olive oil, divided use
  • 1 tbsp butter, divided use
  • 1 1/2 C shredded carrots
  • 1/2 tsp sugar
  • 1/4 red onion, diced
  • 1 C arborio rice
  • 1/4 C white wine
  • 3 – 4 C chicken or vegetable broth
  • 2 tbsp ricotta cheese
  • 2 tbsp shredded Parmesan cheese
  • 1 1/2 tsp parsley

Steps:

  1. In a dutch oven over medium-high heat melt half of the butter and half of the oil. Add the shredded carrots with 1/4 C water, salt, and the sugar. Cover and cook for five minutes. Uncover and allow to cook until the liquid is evaporated. Remove from pot and set aside.
  2. Bring stock to a simmer in a saucepan over medium heat.
  3. In the dutch oven melt the remaining butter and oil. Add the onions and cook until translucent. Add the arborio rice, stir to coat, and cook about one minute. Deglaze with white wine.
  4. Once the wine is absorbed add the warm stock a ladleful at a time, stirring, waiting for liquid to be absorbed before adding more. Continue cooking this way until the rice is creamy and tender, about 20 minutes.
  5. Stir in the carrots, ricotta, Parmesan, and parsley. Season to taste with S+P. If needed, thin the risotto with additional stock.

*This recipe is adapted from Debi at http://lifecurrents.dw2.net/spring-and-caramelized-carrot-risotto/*

Carrot Risotto | Sew You Think You Can Cook

Disclaimer: I was provided a bag of Colorshred carrots and other produce through #BrunchWeek, however all opinions and statements are my own.

SRC: Gnocchi with Sweet Potato in Garlic Cream Sauce

newsrcbanner

Today is another Secret Recipe Club Reveal Day! In the secret recipe club, each participating blogger is assigned a blog from another participating blogger and secretly searches their site for something to recreate. The accompanying blog post then goes live on reveal day! So while I was immersed in my assigned blog, someone else was picking through mine! I’m so excited to be part of this group, to see what on my blog peaks other’s interests and to stumble upon new blogs and new recipes.

This month I was assigned the blog Food Baby Life written by Susan. Susan blogs all the way from Australia! (No wonder I stumbled upon ingredients I’d never heard of!) Susan has three boys who are growing up in a happy home with some healthy food. Susan has decided to cut most processed foods out of their diet and opts to make as much as she can from scratch and uses alternative sweeteners in place of sugar.

I have to say, I found and made my recipe for today’s reveal within the week of being assigned Susan’s blog. I don’t think I’ve every accomplished a task so quickly. Trust me, with a very busy almost 10-month-old son who is on the move, very curious, and highly interested in eating paper, I’ve been feeling very “scrambled” when it comes to my blog. I’m always frantically typing up posts, replying to comments, and visiting blogs during his short naps. And most nights I find myself crawling into bed after he falls asleep (he has a late “bedtime”).

So, I knew I didn’t want to let my SRC assignment fall into neglect. I was intrigued by Cornmeal and Fruit Loaf, tempted by Oat Pancakes with Strawberries, and inclined to try her Healthy Bread.

I ultimately went with a hearty meatless meal which I served on Good Friday. Stuart and I really like gnocchi but very rarely eat it. I am always a sucker for a creamy sauce. And sweet potato is a favorite of not only my husband, but my little man, too. Mushrooms aren’t my favorite and I tend to pick around them, but my brother was in town for the Easter holiday and he and Stuart enjoy them. (Recent discovery indicates that my son also likes mushrooms.) I figured I couldn’t go wrong with this dish although I had an inkling that I’d be wanting bacon in it. Fun fact: it doesn’t need the bacon, although I’m sure it wouldn’t hurt.

This recipe makes 6 servings and can easily be halved if desired.

Gnocchi with Sweet Potato in Garlic Cream Sauce

Ingredients:

  • 1 large sweet potato, cut into bite sized cubes
  • ~1 tbsp olive oil
  • 2 pkgs (16 oz) gnocchi
  • 2 tbsp butter
  • 1 onion, diced
  • 1 tsp minced garlic
  • 1 pkg (8 oz) mushrooms, chopped
  • 1 3/4 C heavy cream
  • 1/2 C shredded Parmesan

Steps:

  1. Preheat oven to 400 degrees F. Toss sweet potato in olive oil, season with S+P. Place in a single layer on a baking sheet and bake 20 minutes, or until tender.
  2. In a large, high-sided skillet, melt butter over medium-high heat. Saute onions, garlic, and mushrooms until onions are translucent and mushrooms browned. Add the cream and bring to a boil. Reduce heat to a simmer and season to taste with S+P.
  3. Cook gnocchi according to package directions. Drain and add to the sauce along with Parmesan and sweet potatoes.
  4. Serve with extra Parmesan cheese, if desired.

*This recipe is adapted from Susan at http://www.foodbabylife.com/2012/03/meatless-monday-gnocchi-with-roasted.html*

gnocchi with sweet potato in garlic cream sauce | sew you think you can cook

To see the other bloggers who participated in the Secret Recipe Club this month click here:

Blogger CLUE: Spring Green Risotto

blogger CLUE

Today is my first month posting with Blogger CLUE. Much like the game, this blogger society involves secrecy, fun, challenge and cooperation with the other game playing members. The good news about this, however, is that in the end, everyone’s a winner. All of the participating bloggers are assigned a blog to find, pick, and make a recipe. But the twist with this group is that there’s a theme! 

This month I was assigned A Spoonful of Thyme and had the task of finding a recipe utilizing spring vegetables. I was on a personal mission to use asparagus. It’s my favorite spring vegetable, and while we do enjoy it year round, it’s always better in season! I found three contenders: Spring Green RisottoPasta with Proscuitto, Asparagus, and Peas; and Warm Salad with Grilled Asparagus.

I chose the risotto for a few reasons: I already had mascarpone in my fridge, which is very rare, I’ve been wanting to try fennel, and my husband had been asking for risotto for a few weeks. Win – win – win!

We enjoyed this risotto for Easter supper! My 9 month old even enjoyed it! I wasn’t sure how he’d handle the peas but they didn’t phase him. Which makes me very excited. It’s been hard getting him to eat vegetables – other than sweet potato.

I made a couple changes to the recipe: by using what I had I combined chicken stock and vegetable stock to have enough liquid and instead of blanching the asparagus and adding it later, I chopped it up to about the size of peas and added it with the leeks and fennel.

Spring Green Risotto

Ingredients:

  • 5 C stock (chicken, vegetable, or a combination of both)
  • 2 tbsp olive oil
  • 1 tbsp butter
  • 2 leeks, sliced
  • 1 fennel bulb, chopped
  • 1/2 lb asparagus, diced
  • 1 1/2 C arborio rice
  • 2/3 C white wine
  • 1 1/4 C frozen peas, thawed
  • zest of 1 large lemon
  • 2 tbsp lemon juice
  • 1/3 C mascarpone cheese
  • 1/2 C grated parmesan cheese

Steps:

  1. In a pot bring the stock to a simmer.
  2. In a dutch oven, melt butter in olive oil over medium high heat. Saute leeks, fennel, and asparagus for 5 minutes.
  3. Add the rice, stirring to coat in the veggies, cook a minute or two. Deglaze the pan with the white wine. Once the wine has been absorbed add the stock a ladleful at a time. Stir often and add more stock after the previous addition has been absorbed.
  4. At the halfway point, add the peas and lemon zest. Season to taste with S+P.
  5. When rice is creamy remove from heat. (Note: You might not use all of the stock, although I did.)
  6. In a small bowl, whisk together the lemon juice and mascarpone. Stir into the risotto along with the parmesan cheese.

*This recipe is adapted from Kate at http://aspoonfulofthyme.blogspot.com/2010/05/two-fer-one-grilled-herb-shrimp-and.html*

spring green risotto | Sew You Think You Can CookHere’s a list of the other players of Blogger CLUE this month:

recreatedbysrc

#SundaySupper: Retro

I have a confession to make. And it’ll probably show my age, or lack there of. The theme for today’s #SundaySupper is Retro. That means food from the 50’s-70’s. I was stumped. The only thing I knew about retro food was from a challenge on Next Food Network Star one season. The contestents were given a dish considered retro and had to modernize it. And from that the only dish I could recall was Tuna Noodle Casserole. (Oh, I think pork chops and applesauce is one?)

So, that’s what I made. I wasn’t really sure what to expect. I’d never had tuna noodle casserole, at least not that I can remember. The only time I eat canned tuna is as a tuna salad sandwich from a sub shop during Lent. This casserole was a perfect opportunity to try something new Friday night. I was very pleased to not only enjoy it hot out of the oven, but reheated in the microwave! I never, repeat, never eat leftover fish. Leftover shrimp is iffy, too. But when my husband reheated a bowl for lunch and it smelled amazing I had to get myself a serving, too.

And now for a little history behind Tuna Noodle Casserole: This casserole dish became popular in the 50’s due to it’s simplicity, quickness, and low cost of packaged ingredients. This comfort food staple became a potluck standard. (Source: Wikipedia)

A big thank you to Heather of Hezzi-D’s Books and Cooks for hosting this fun event! Be sure to scroll past my recipe to see a list of blast-from-the-past recipes. I am looking forward to seeing the gang’s retro recipes and expand my little culinary world.

This casserole makes six servings.

Tuna Noodle Casserole

Ingredients:

  • 1/2 lb wide egg noodles
  • 2 tbsp vegetable oil
  • 1 yellow onion, diced
  • 3 carrots, diced
  • 2 tbsp flour
  • 2 3/4 C milk
  • 4 oz cream cheese
  • 1 tbsp spicy mustard (I used El Diablo Steakhouse)
  • 1 C frozen peas, thawed
  • 1/2 C shredded Parmesan cheese, divided use
  • 2 cans (5oz) tuna in water, drained and flaked

Steps:

  1. Cook egg noodles according to package directions. Drain and set aside.
  2. Preheat broiler.
  3. Heat oil in a large skillet over medium-high heat. Saute onion and carrot until carrots are almost tender. Sprinkle the flour over the veggies and stir until flour is absorbed and mixture is thick.
  4. Slowly whisk in the milk and cook until thick, stirring constantly. Melt in the cream cheese and 1/4 C of the Paremsan. Add mustard and season to taste with S+P.
  5. Remove from the heat and stir in the noodles and tuna. Place casserole in a lightly greased broiler-safe casserole dish. Top with remaining Parmesan. Place under the broiler for 5 minutes, or until golden and bubbly.

*This recipe is adapted from Cooking Light at http://www.myrecipes.com/recipe/tuna-noodle-casserole-0*

Tuna Noodle Casserole  Sew You Think You Can Cook

Bodacious Breakfasts and Appetizers:

Made in the Shade Main Dishes:

Swell Side Dishes:

Dreamy Desserts:

The Bee’s Knees Beverages:

8387592742_f6164fd5a8_o

Join the #SundaySupper conversation on twitter on Sunday! We tweet throughout the day and share recipes from all over the world. Our weekly chat starts at 7:00 pm ET. Follow the#SundaySupper hashtag and remember to include it in your tweets to join in the chat. To get more great Sunday Supper Recipes, visit our website or check out our Pinterest board.

Would you like to join the Sunday Supper Movement? It’s easy. You can sign up by clicking here: Sunday Supper Movement.

Chicken Chow Mein

Warning: This post contains meat.

I’m so sorry to post a meat dish on Ash Wednesday but tomorrow is the Chinese New Year AND #BundtBakers posting day. So that means my Chinese New Year dish needs to be posted today. Save this post for later because you’re going to want to celebrate with this stir fry recipe.

It seems this post is all about the apologies, but I have one more for you. I did not use bean sprouts. I really wish I could have – I noticed they were missing and the stir fry really needed that crunch they would have provided. I also would have liked to garnish with scallions, too! To still get the onion flavor I added white onion to the stir fry. So why the missing ingredients? There are two reasons. Reason #1: There was a recall on bean sprouts for salmonella. Reason #2: There was a snow storm approaching and the grocery store was missing quite a few ingredients – scallions being one of them.

I would really like to recreate this dish with the missing ingredients (and rephotograph). Even still, we enjoyed every bite of this Chicken Chow Mein – there wasn’t a single morsel leftover.

This recipe makes 2 servings.

Chicken Chow Mein

Ingredients:

  • 1 pkg (6 oz) Chow Mein Stir Fry Noodles
  • 1 large chicken breast, sliced
  • 1 tsp Chinese five-spice powder
  • 1 tsp Sriracha
  • 1 tbsp cornstarch
  • 2 tbsp vegetable oil
  • 1 red bell pepper, thinly sliced
  • 1 small onion, thinly sliced
  • 5 oz bean sprouts
  • 1 scallion, sliced lengthwise
  • 2 tbsp soy sauce
  • 1 tsp sesame oil

Steps:

  1. Cook noodles according to package directions. Rinse under cold water and drizzle with a little seasame oil to prevent sticking.
  2. Season the chicken with the five-spice powder, Sriracha, and a dash of soy sauce. Coat them in cornstarch.
  3. Heat the vegetable oil in a wok or large skillet over medium-high heat. Stir-fry the chicken 3 minutes, or until cooked through. Add in the bell pepper and onion and cook until just al dente. Add the bean sprouts and scallion, cook for 1 minute. Add the cooked chow mein noodles to the stir fry along with the soy sauce and sesame oil. Season to taste with black pepper.

*This recipe is adapted from Ching-He at http://www.cookingchanneltv.com/recipes/ching-he-huang/chicken-chow-mein.html*

Chicken Chow Mein | Sew You Think You Can Cook

Red Wine and Chocolate Cream Sauce

The title of this blog post has already created it’s first impression in your mind. You either thought “that’s just weird” or “yum!” Either way, you’re intrigued. I’ll clear up one assumption off the bat – it’s not sweet.

When I saw this blog post pop up on my WordPress Reader last year it was Carlynn’s photography that had me sold. What caught my attention was her use of chocoalte pasta! I didn’t have, couldn’t find, and wasn’t about to make chocolate linguini so I used the boring normal stuff.

I made this for Valentine’s Day last year and while we were all a touch skeptical we all found we really enjoyed it! But a uninamous vote agreed that it needed some protein. A cocoa or coffee rubbed steak would accompany this pasta pretty nicely.

While I typically halve recipes that claim to serve 6 I made this one as is. We had a lot of pasta leftover. Good thing it reheated well! If you opt to serve this dish as a side then I’d highly suggest halving it – unless you’re feeding an army.

Red Wine and Chocolate Cream Sauce

Ingredients:

  • 2 tbsp butter
  • 1 onion, diced
  • 1/2 C red wine
  • 2 tbsp balsamic vinegar
  • 1 qt beef broth
  • 1 1/2 C heavy cream
  • 1/2 C marscapone cheese
  • 2 oz dark chocolate, chopped
  • 1/2 C Cacao Nibs
  • 1 lb uncooked pasta

Steps:

  1. In a large pot over medium-high heat melt butter. Saute onions until translucent, approximately 5 minutes.
  2. Meanwhile, cook pasta according to package directions. Reserve some if the cooking liquid, if needed.
  3. Deglaze the pan with the red wine and the balsamic vinegar. Simmer until thick. Add the beef broth and simmer until reduced by half, 15-20 minutes.
  4. Whisk in the cream. Melt in the marscapone cheese. Remove from heat and melt in the chocolate. Stir in the cacao nibs. Season to taste with S+P.
  5. Add as much of the sauce sauce to the cooked pasta as desired. Use the reserved pasta water if needed.

*This recipe is adapted from Carlynn at http://jjbegonia.com/2014/02/03/pasta-with-chocolate-and-red-wine-cream-sauce/*

Red Wine and Chocolate Cream Sauce | Sew You Think You Can Cook

Disclaimer: This post contains affiliate links.

Mexican Noodle Soup

Are you ready for some football?? Or maybe just some good commercials?

The Super Bowl is Sunday and as such I have adopted a theme this week on Sew You Think You Can Cook. Soups!

Get it? Super Bowl….SOUP-er bowl… I just couldn’t help it.

I wanted to do this week of soups last year but lack of preparation meant I didn’t have five soups to share. So I did a week of popcorn instead. Honestly, that was probably more fun. But that’s because I’m a junk food junkie and popcorn is my kryptonite. This year, now that we live in Ohio, where it’s actually cold and grey, like all the time, soup makes sense. We’ve enjoyed this collection of soups I’m about to share over the past couple of months.

To kick off the week is a Mexican Monday applicable soup. But wait, it’s not Monday! Yesterday was my Secret Recipe Club reveal day (I will be sharing a soup from Susan’s blog on Friday too!). So let’s just pretend. But don’t pretend too hard, unless you really like Mondays.

I have a funny story to share about this Mexican Noodle Soup. I decided to make this soup during the day, so as to take advantage of some natural lighting. The beauty with soups is that they can be made in advance and instead of tasting like leftovers, they taste better! That was my thought at least. I left the soup on the stove covered over a low heat for a couple of hours, waiting for Stuart to get back from the gym. By the time he finally got home we had a pot of overcooked noodles in a chipotle sauce. These overcooked noodles were delicious! The chipotle tomato soup-turned-sauce was full of zip. A dollop of sour cream helps to mellow the spice from the chipotle. I think we will make this soup again and eat it as a soup, but if you’re wanting a Mexican pasta sauce, simply reduce it – a lot – and serve over properly cooked pasta.

Mexican Noodle Soup

Ingredients:

  • 2 large tomatoes, peeled and seeded
  • 1 onion, chopped
  • 1 – 2 chipotles in adobo, seeded (amount depends on your heat preference)
  • 3 tbsp olive oil, divided use
  • 2 boneless, skinless chicken breast, cut into cubes
  • 3 3/4 C chicken stock
  • 8 oz angel hair pasta
  • sour cream, for serving (optional)
  • avocado, for serving (optional)

Steps:

  1. Put tomatoes, onion, and chipotles in a blender. Puree until smooth. (I suggest starting with one chipotle pepper and tasting the puree before adding the second.)
  2. Heat 2 tbsp olive oil in a large pot over medium-high heat. Cook the chicken 3 minutes, or until cooked through. Remove and set aside.
  3. Add remaining tablespoon of olive oil. Reduce the heat to medium-low. Toast the noodles until lightly golden.
  4. Add in the tomato puree, chicken stock, and cooked chicken. Return heat to medium-high and cook 10 minutes or until pasta is al dente.
  5. Serve with sour cream and avocado.

*This recipe is adapted from The Illustrated Kitchen Bible*

Mexican Noodle Soup | Sew You Think You Can Cook

Disclaimer: This post contains affiliate links. 

Pineapple Fried Rice

The next time you make rice as a side dish to your dinner, I encourage you to make extra. 3 C worth of extra rice to be exact. Or just make this dish from scratch, just plan for extra time to cook the rice. For 3 cups of cooked rice, you’ll need approximately 1 cup of uncooked rice (and two cups of liquid).

Today’s Stir Fry Day Friday is a perfect side dish to accompany fish or chicken. I served it alongside my Brown Sugar Honey Mustard Glazed Salmon.

This fried rice isn’t your typical Chinese take out or Hibachi staple. This rice gets a kick from the ginger and a tropical sweetness from the fresh pineapple.

Pineapple Fried Rice

Ingredients:

  • 2 tbsp canola oil
  • 1 1/2 tsp grated ginger
  • 2 cloves garlic, minced
  • 1 small onion, diced
  • 3 scallions, chopped
  • 1 carrot, diced
  • 1/2 bell pepper, diced
  • 1/4 C peas
  • 1 1/4 C pineapple, cubed
  • 3 C cooked rice
  • 2 1/2 tbsp soy sauce
  • 1/2 tsp white pepper

Steps:

  1. In a wok or large skillet heat oil over medium-high heat. Stir fry the ginger and garlic until fragrant, 30 seconds. Add in the onions and white parts of the scallions. Cook until tender.
  2. Add the carrots, bell pepper, and peas. Cook for 2 minutes. Add the pineapple and cook another minute. Add the rice, soy sauce, and white pepper. Reduce heat to medium and cook two minutes. Add additional salt if desired. Garnish with green parts of the scallions.

*This recipe is adapted from Manali at http://www.cookwithmanali.com/pineapple-fried-rice/*

Pineapple Fried Rice | Sew You Think You Can Cook

recreatedbysrc