#BrunchWeek: Put an Egg on It Mac and Cheese

This post is sponsored in conjunction with #BrunchWeek. I received product samples from sponsor companies to aid in the creation of the #Brunchweek recipes. All opinions are mine alone.

I am so excited to be back with #BrunchWeek this year. I had to sit out last year’s as we didn’t have an address in time. And then we didn’t even have internet access until June!

Shortly before my #BrunchWeek cooking started, I watched Food Network’s The Kitchen breakfast episode. The very first recipe of the show was macaroni and cheese made for breakfast by Katie Lee.

Put an Egg on it Mac and Cheese | Sew You Think You Can Cook

With Cabot Cheese being a sponsor again I knew I had to give this comforting dish a try! I mean, what better way to showcase incredible cheese than in mac and cheese!? The only question was which flavor…

Cabot generously sent us 5 amazing flavors: Hot Habanero, Pepper Jack, Alpine Cheddar, Vermont Sharp, and Seriously Sharp.

With the hopes that my kids would try some pasta, I knew hot habanero and pepperjack were out. At first taste of the Vermont Sharp, I knew I had a winner; this cheese was just screaming to be paired with pasta.

IMG_6813
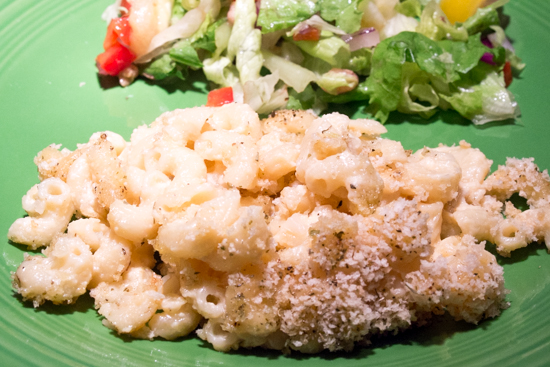
I used breakfast sausage in my mac and cheese to really play up the breakfast side of the dish. But what really makes this the perfect brunch meal are the eggs added to the top of the casserole!

Instead of making one large casserole of mac and cheese, I divided the pasta mixture into two 9″ x 11″ dishes. Before topping it with the eggs and panko, I covered one and stuck it my freezer for a later date.

Put an Egg on it Mac and Cheese

Ingredients:

  • 1 lb elbow macaroni
  • 4 tbsp butter, divided use
  • 1/2 yellow onion, diced
  • 1/2 green bell pepper, diced
  • 1/2 red bell pepper, diced
  • 8 oz breakfast sausage, cooked and crumbled
  • 3 C whole milk
  • 1 block (8 oz) Cabot Vermont Sharp cheese, shredded
  • 4 oz cream cheese
  • 1/2 C panko
  • 8 eggs

Steps:

  1. Cook macaroni in a pot of boiling salted water two minutes shorter than package instructions.
  2. Preheat oven to 350 degrees F. Grease a large casserole dish, or two small casserole dishes.
  3. Melt 2 tbsp butter in a large pot over medium-high heat. Saute onion and bell peppers until tender. Add in the cooked sausage. Stir in the milk and bring to a simmer. Add in the shredded cheese a handful at a time until melted. Add the cream cheese and stir until melted. Stir in in the cooked pasta until evenly distributed.
  4. Pour macaroni and cheese into prepared casserole dishes.
  5. In a small skillet, melt the remaining butter. Toast the panko until golden.
  6. Using the bottom of a measuring cup, create wells in the top of the casserole. (Note: Spray the bottom of the measuring cup with nonstick spray to make it easier!) Crack eggs into those wells. Season eggs with S+P. Top entire casserole with toasted panko.
  7. Bake until egg whites are set and yolks are set to desired “runny-ness,” 12-18 minutes.

*This recipe is adapted from Katie Lee at http://www.foodnetwork.com/recipes/katie-lee/breakfast-mac-and-cheese*

Put an Egg on it Mac and Cheese for #BrunchWeek from Sew You Think You Can Cook

Don’t forget to enter our giveaway and be sure to check out these other great brunch recipes:

BW 2017 logo FINAL

BrunchWeek Beverages:

Homemade Orange Julius from A Day in the Life on the Farm
Kimchi Bloody Mary from kimchi MOM
Mimosa Bar from Love and Confections

BrunchWeek Egg Dishes:

Asparagus & Pancetta Frittata from The Chef Next Door
Breakfast Burritos from Books n’ Cooks
Chilaquiles from The Redhead Baker
Coddled Eggs with Bacon and Cheddar from Family Around the Table
Eggs Benedict Breakfast Tacos from The Spiffy Cookie
Parmesan Polenta Brunch Bowl with Asparagus and Sausage from Cooking with Carlee
Put an Egg on it Mac and Cheese from Sew You Think You Can Cook
Smashed Sweet Potato Rosti with Butter Poached Egg from Nik Snacks
Smoked Eggs over Asparagus from Cindy’s Recipes and Writings
Spinach Baked Eggs with Habanero Cheddar from Sweet Beginnings

BrunchWeek Breads, Grains and Pastries:

Apple Cinnamon Pull Apart Bread from Pink Cake Plate
Apple Crumble Bread from Hezzi-D’s Books and Cooks
Apple, Sausage & Cheddar Oven Pancake from Wholistic Woman
Cheddar Asparagus Breakfast Tarts from It Bakes Me Happy
Cinnamon Roll Oatmeal from Big Bear’s Wife
Cinnamon Roll Pizza from Palatable Pastime
Best Dutch Baby Pancake Recipe from That Skinny Chick Can Bake
English Raisin Scones with Apple Jam from The Crumby Cupcake
Gluten Free Cinnamon Rolls from Gluten Free Crumbley
Strawberry Lemonade Muffins from An Edible Mosaic
Strawberry Rolls with Orange Icing from The Nifty Foodie
Tiramisu French Toast from Brunch-n-Bites
Twisted Star Cinnamon Rolls from Amy’s Cooking Adventures

BrunchWeek Main Dishes:

Biscuits and Gravy Bubble Up from A Kitchen Hoor’s Adventures
Cheesy Bacon Chile Rellenos from Rants From My Crazy Kitchen
Country Fried Steak & Eggs with Habanero Cheddar Gravy from Forking Up
Homemade Chicken Sausage & Egg Stromboli from Hardly a Goddess
Spinach, Artichoke and Asparagus Strata from Cooking in Stilettos
Ultimate Cheddar Grits Bowl from The Barbee Housewife
Veggie Loaded Breakfast Enchiladas from Sarcastic Cooking

BrunchWeek Fruits, Vegetables and Sides:

Apple and Creamy Ricotta Crepes from From Gate to Plate
Apple Cheddar Bites with Honey and Pepper from Feeding Big
Spring Asparagus Salad from Girl Abroad
Sweet Pea Sipper from Culinary Adventures with Camilla
Thai Asparagus Slaw from Jane’s Adventures in Dinner

BrunchWeek Desserts:

Baltimore Peach Cake from Cookaholic Wife
Mandarin Orange Bundt Cake from My Catholic Kitchen

Disclaimer: Thank you to #BrunchWeek Sponsors: Red Star Yeast, Dixie Crystals, Cabot Cheese, Nielsen-Massey, Rainier Fruit, and Michigan Asparagus for providing the prizes free of charge. These companies also provided the bloggers with samples and product to use for #BrunchWeek recipes. All opinions are my own. The #BrunchWeek giveaway is open to U.S. residents, age 18 & up. All entries for the winner will be checked and verified. By entering you give the right to use your name and likeness. The number of entries received determines the odds of winning. Six winners will be selected. The prize packages will be sent directly from the giveaway sponsors. The #BrunchWeek Bloggers are not responsible for the fulfillment or delivery of the prize packages. Bloggers hosting this giveaway and their immediate family members in their household cannot enter or win the giveaway. No purchase necessary. Void where prohibited by law. This promotion is in no way sponsored, endorsed or administered by, or associated with Facebook, Instagram, Pinterest, or any other social channel mentioned in the #Brunchweek posts or entry.

#SundaySupper: Easy Cinco de Mayo Recipes

Mexican food used to be the most frequently made (and blogged about) cuisine in my house. And, while it still is, I haven’t been very creative with it as of late and our “Mexican Mondays” have definitely become a thing of the past. Now we just have Mexican food whenever the refrigerator ingredients dictate it and it’s usually a method for using up leftovers.

That being said, Mexican is usually a safe bet for our kids, too. They {usually} like beans of any kind, are more likely to eat ground meat instead of sliced or shredded, and of course, cheese.

I don’t often think of side dishes when it comes to preparing Mexican food, but today I have for you a very simple Black Bean Cilantro Rice that is prepared in one pot!

Making this dish was the first time I successfully made rice without a rice cooker. I’m tempted to even call it fool-proof!

I served this rice on a Friday during Lent alongside some quick pan fried fish. It would compliment pork quite nicely, too.

IMG_2833After declaring he didn’t like it, Firecracker finally tried some of the rice, and ended up asking for seconds! I was surprised Treat wouldn’t eat it, though he did help me with some food styling.

Thank you to Shelby of Grumpy’s Honeybunch for hosting today’s event. Be sure to scroll past my recipe for more great, easy idea for you Cinco de Mayo fiesta.

Black Bean Cilantro Rice

Ingredients:

  • 1 tbsp olive oil
  • 1/2 C minced red onion
  • 2 cloves garlic, minced
  • 1 C Jasmine rice
  • 1 tsp onion powder
  • 1/2 tsp cumin
  • 1/2 tsp Kosher salt
  • 1 1/2 C vegetable stock
  • 1 can (14 oz) black beans, rinsed and drained
  • 1/2 C fresh cilantro, chopped
  • juice 1-2 limes

Steps:

  1. Heat oil in a large pot over medium heat. Saute onions until translucent, add the garlic and cook another 30 seconds. Add the rice, onion  powder, cumin, and salt. Stir 30 seconds to evenly coat the rice. Add the stock and beans. Bring to a boil, reduce heat to low, cover and simmer 20 minutes. Remove from heat for 10 minutes before stirring in the cilantro and lime juice.

*This recipe is adapted from Kelly at http://www.mountainmamacooks.com/2017/03/one-pot-black-beans-cilantro-lime-rice/*

Black Bean Cilantro Rice for #SundaySupper from Sew You Think You Can Cook

Appetizers

Drinks

Entrees

Tacos

Sides and Sauces

Sweets

Sunday Supper MovementJoin the #SundaySupper conversation on twitter on Sunday! We tweet throughout the day and share recipes from all over the world. Our weekly chat starts at 7:00 pm ET. Follow the #SundaySupper hashtag and remember to include it in your tweets to join in the chat. To get more great Sunday Supper Recipes, visit our website or check out our Pinterest board.

Would you like to join the Sunday Supper Movement? It’s easy. You can sign up by clicking here: Sunday Supper Movement

Wild Rice and Carrots from The Migraine Relief Plan

When the opportunity arose to review The Migraine Relief Plan by Stephanie Weaver I jumped on it. While I’ve been lucky enough, at least in these first 28 years of life, to not be a sufferer of migraines, migraines do run in my family. My grandmother, great uncle, aunt, uncle, and mom have all dealt with varying versions of them. As a young child even my brother would suffer from headaches! Thankfully he’s outgrown them. I hope that means our family history of migraine attacks ends with our generation.

My mom’s headaches seem to be the least severe of the group, but I remember not even being allowed to utter the word “headache” around her, resorting to simply calling them an “H” when I was younger. I don’t know if that’s still the case, but I won’t use the word in her presence to this day. My aunt seems to suffer the most of the bunch and continues to get severe migraine attacks. These migraine attacks would result in days spent in bed and helped contribute to an early retirement. I can’t wait to share this book with her. As a doctor, I know she would appreciate the amount of research Stephanie put into developing the Plan. When I asked if it’d be okay to mention her in this blog post, I discovered that she’s already heard of the book and I look forward to giving her more information about it.

Disclaimer: I received a copy of The Migraine Relief Plan in exchange of my honest review. This post also contains Amazon affiliate links.

The Migraine Relief Plan: An 8-Week Transition to Better Eating, Fewer Headaches, and Optimal Health is an incredible resource for anyone living with migraines. Stephanie is an author, blogger, and certified wellness and health coach. She has a Master of Public Health in Nutrition Education from the University of Illinois. Her recipes have been featured in Cosmopolitan, Bon Appétit, Cooking Light, Parade, and more. She lives in San Diego, CA.

the-migraine-relief-plan-cover_web-res

The book is broken down into 5 parts: Creating the Plan, The Plan, Maintaining the Plan, Creating a long-term lifestyle, and Migraine-friendly recipes and meal plans.

In Part I you’ll read about Stephanie’s story. Part II explains the 8 week Plan. Stephanie’s 8 week plan is a perfect way to completely change your eating habits and lifestyle without “quitting cold turkey.” Even as a non-migraine patient I can look to her plan for ways to improve my own lifestyle. While near every processed grocery item contains “triggers” Stephanie’s well thought out way of eating and cooking is a fantastic guide for cutting out those boxed and packaged foods. (Something we said we were going to do when we moved back in April that still hasn’t happened…) Part III takes you through months 3-6 on the Plan, focusing on adjusting your lifestyle to reduce the onset of migraine attacks. Part IV is all about how to maintain your new lifestyle by slowly, thoughtfully, and carefully introducing potential trigger foods into your diet. Part V contains over 75 recipes to make your journey along the migraine relief plan delicious. Each recipe includes nutrition facts, helpful cook’s note, budget friendly indicator, and diet indicators.

I think the biggest game changer is cooking without salt. I’ve already tried 4 recipes from this book and not once did my husband comment on a lack of salt. Honestly, I was shocked! Stephanie has really succeeded in creating recipes that are full of flavor and healthy.

I made Herbed Cheese Spread (which I used as a pasta sauce for a quick dinner), Firehouse Turkey Chili, and Peachy Pulled Pork. All three were adult and kid approved!

the-migraine-relief-plan

The recipe I’m featuring today is Wild Rice and Carrots. We served this side dish next to simply sautéed fresh tilapia for a great weeknight dinner. I had the leftover rice for lunch the next day. It’s been a while since I’d cooked with carrots and we found them to be delectable! They’re perfectly tender and subtly sweet. Wild rice was fun to work with, too! I think I’d only ever had the grain once before and I’m looking forward to utilizing it more as a side dish option.

rice_carrots3
Recipe photography copyright 2016 by Laura Bashar

Wild Rice and Carrots

Ingredients:

  • 2 C (500 mL) filtered water or unsalted chicken or vegetable stock
  • 1 C (150 g) wild rice, rinsed and drained
  • 1 tbsp organic extra virgin olive oil or unsalted grass-fed butter
  • 2 large carrots, thinly sliced on the diagonal
  • 2 ribs celery, finely minced
  • 1 handful fresh Italian flat-leaf parsley, finely chopped
  • 1/2 tsp freshly ground black pepper

Steps:

  1. In a medium saucepan set over high heat, combine the filtered water and rice. Cover and bring to a boil, then reduce the heat to low and cook for 45 minutes. Turn off the heat and leave the cover on for at least 10 minutes.
  2. In a large skillet set over medium heat, warm the olive oil. Add the carrots and celery and cook, stirring frequently, for 6 to 8 minutes, or until tender. Stir in the rice, parsley, and black pepper. Cook 1 minute more until everything is warmed through.
  3. Serve right away or refrigerate, covered, for up to 5 days.

Vegan/Vegetarian, Dairy-free, Egg-free

Cook’s Note: Wile rice is only grown in North America and may not be available overseas. You could substitute a hearty brown rice instead. I wash the parsley, then roll it up in a clean kitchen towel to help absorb extra moisture. Finely chop just before adding to the recipe.

Budget friendly: Very

Per serving: 6 g protein, 35 g carbohydrates, 4 g fat, 0.5 g saturated fat, 54 mg sodium, 381 mg potassium, 4 g fiber

*This recipe is reprinted with permission from The Migraine Relief Plan, copyright 2016 Stephanie Weaver. Published by Surrey Books, an imprint of Agate Publishing, Inc.*

Wild Rice and Carrots from #TheMigraineReliefPlan from Sew You Think You Can Cook

Because my carrots were smaller than the ones photographed by Laura Bashar, I used 5 little colorful organic carrots instead of 2 large ones. Otherwise, I followed the recipe exactly to very happy reviews. I used water to cook my rice and olive oil for sautéing the veggies.

Beet Pistachio Ravioli

It’s February and that means all things hearts and all things red and pink.

Now I am the first to defiantly declare that I hate pink. But as I mature my mind has opened up a bit to taking an interest in the girly color. I actually own three articles of clothing in the pink family!

But when it comes to pink foods, I’m all for it!

We’re talking beets. Again!

These pasta purses are simple to assemble and would definitely make for quite the showstopper at your Valentine’s dinner this month.

ravioli-purse-assembly

Using wonton or egg roll wrappers makes homemade ravioli a less daunting task. To cook the beets, either roast them in the oven or boil them until tender.

img_8745

Beet Pistachio Ravioli

Ingredients:

  • 2 beets, peeled, chopped, and cooked until tender
  • 1/2 C ricotta cheese
  • 1/2 C parmesan cheese
  • 1/4 C shelled pistachios
  • 3 tbsp mascarpone cheese
  • 1 tsp salt
  • 1/2 tsp pepper
  • 1 pkg (12 oz) wonton wrappers
  • water, for sealing the ravoili
  • melted butter, for serving
  • Meyer lemon olive oil, for serving
  • cooked pancetta or bacon, for serving (optional)
  • fresh mint, for garnish (optional)

Steps:

  1. Place cooked beets, ricotta, parmesan, pistachios, mascarpone, S+P in a food processor and puree until smooth.
  2. Place a small spoonful in the center of a wonton wrapper. Dip finger in a shallow bowl of water and trace the edge of the wrapper. Pinch wonton into a little purse. [see photos above] You can also simply fold the wonton wrapper into triangles.
  3. Cook assembled wontons in a pot of boiling salted water for approximately 4 minutes, until the wonton wrapper is clear and the ravioli float to the top.
  4. Serve ravioli warm with a drizzle of melted butter, Meyer lemon olive oil, S+P. Add some crispy pancetta or bacon for texture and fresh mint for freshness and greenery.

*This recipe is adapted from Erica at http://www.forkknifeandlove.com/easy-beet-pistachio-ravioli-with-lemon-butter-sauce/*

Beet and Pistachio Ravioli | Sew You Think You Can Cook

Creamy Walnut Pasta Sauce

Did everyone end their 2016 battling sickness or is it just us?

Pretty much all of November and December was spent with my boys passing back and forth some sniffles and coughs. My mom caught the head cold when she was here in early December and it clung to her for 3 weeks. And, unfortunately for Treat, it developed into an almost ear infection and some precautionary antibiotics before our holiday travel.

My mother-in-law came to visit a couple of weeks before Christmas. She took a week to spend quality time with her children out in California. My sister-in-law lives in Napa working in the wine industry and we’re down in the Los Angeles area, so she took advantage and planned a multi-city travel itinerary.

Firecracker simply loves it when the grandparents come to visit and has come to expect crafting projects when his Tilly (my MIL) comes to visit. Of course, she didn’t disappoint and had some adorable alphabet themed Christmas crafts to do. Crafts that have inspired me to begin planning some 2017 Christmas crafting already. (I’m just going to leave that there, chuckle at it, and land my feet on the ground knowing that’ll never happen. At least not in advance!) See my Instagram posts for adorable holiday crafting fun.

My mother-in-law was coughing a little bit and her voice was starting to go. Her trip took a turn for the worse and she ended up spending her last day in California sleeping in her hotel room. Upon returning to Alabama, a doctor’s visit revealed she had bronchitis.

At least we managed to stay clear of that!

We then traveled to Florida for Christmas. Our 2nd day there was the start of illnesses. Treat ended up having some projectile vomiting and we weren’t really sure what to chalk it up to, thinking it was just a side-effect of his medicine, mucusy coughs, or teething. But then the next night, I was the one battling what was evidently a stomach bug. That bug continued its way through our family reaching my dad, my brother, Firecracker, and my brother’s mother-in-law, sister-in-law, and nieces. My best friend’s husband had it, too.

My weakened immune system meant that I got that lingering head cold from my mom. Dad did, too.

Needless to say, our holiday vacation was one spent mostly on the couch.

img_5071What does any of that have to do with Creamy Walnut Pasta Sauce?

Not much really. Except that the pasta I used was a package my mother-in-law found while up in Napa. She brought me quite the fun kitchen gift set including holiday towels, colorful pasta, and a chocolate raspberry sauce.

Creamy Walnut Pasta Sauce

Ingredients:

  • 1 C toasted walnuts
  • 1/2 C mascarpone cheese
  • 1/3 C olive oil
  • 1/4 C shredded Parmesan cheese
  • 1/4 C grated Pecorino Romano cheese
  • 8 fresh basil leaves
  • 1 clove garlic
  • 1 lb pasta of choice
  • 1 C reserved pasta cooking water
  • 2 tbsp butter

Steps:

  1. Cook pasta in boiling salted water according to package instructions. Reserve 1 C of the cooking water before draining the pasta. Toss pasta with butter and return to pot to keep warm.
  2. Put toasted walnuts, olive oil, cheese, basil, and garlic in a food processor and pulse until smooth. Season to taste with S+P.
  3. Add sauce to the cooked pasta with 1/2-1 C of the pasta water. Serve with extra grated cheese and red pepper flakes if desired.

*This recipe is adapted from Andrea at http://cookingwithmammac.com/linguine-with-creamy-walnut-sauce/ *

Creamy Walnut Pasta Sauce | Sew You Think You Can Cook | http://sewyouthinkyoucancookk.com

Chicken Marsala Ravioli

Whenever we go to Olive Garden my husband can’t help but order their Stuffed Chicken Marsala. He tries. He says he’s not going to do it – because he always wipes the plate clean – and every time Stuffed Chicken Marsala ends up being brought to our table and placed in front of him.

Not being a mushroom lover, I’ve actually never even tried it!

But when I got the idea for Marsala ravioli – honestly, I can’t even remember where the inspiration hit – I decided to give it a go.

Making the ravioli was another one of those, never-thought-I’d-do-that moments. I’m talking about putting meat in my food processor. Pureed meat has always given me the heebie jeebies (but I do like Liverwurst and pate… I’m odd). It’s one of the main reasons I decided to introduce my babies to food using the baby led weaning method. The filling for the ravioli isn’t pureed to a smooth consistency though, it just needs to be insanely finely minced so it can fit inside the pasta.

Like all of my ravioli recipes, I used wonton wrappers.

I’d assembled enough ravioli to freeze for two more meals! Good thing too because meal number one involved a sauce that wasn’t too great and was horribly photographed. Meal number two had a fantastically delcious sauce that this mushroom lover sopped up but photographs were still pretty bland. Meal number three was perfect and photographed decently – I didn’t forget the fresh parsley for garnishing my bowl of pasta this time!

The ravioli recipe comes from Tyler Florence and the sauce recipe comes from Giada De Laurentiis.

Chicken Marsala Ravioli

Ingredients:

  • 4 tbsp olive oil, divided use
  • 3/4 lb chicken breast, cubed
  • 1 shallot, chopped
  • 1 clove garlic, chopped
  • 1/4 C Marsala wine
  • 4 slices prosciutto, chopped
  • 4 bay leaves
  • fresh parsley, chopped
  • 2 tbsp bread crumbs
  • 2 tbsp grated Parmesan cheese, divided use
  • 1 egg
  • 1/4 C heavy cream
  • 2 packages wonton wrappers

Steps:

  1. Heat olive oil in a nonstick skillet over medium-high heat. Saute chicken until golden on both sides and fully cooked. Add the shallot and garlic and cook a minute.
  2. Deglaze the pan with the wine, bring to a quick bubble and add the prosciutto, bay leaves, and parsley. Allow Marsala to reduce a little and thicken. Stir in the bread crumbs, 1 tbsp Parmesan, and 1 tbsp olive oil.
  3. Remove the bay leaves and transfer filling mixture to a food processor. Add the egg, cream, and the remaining Parmesan and olive oil. Pulse until the filling comes together. Season to taste with S+P. Chill.
  4. Assemble ravioli: place a small spoonful of the filling in the center of a wonton wrapper. Wet the edges and fold into a triangle.
  5. Cook ravioli in boiling salted water 2 minutes, until they float and the wonton is translucent.

*This recipe is adapted from Tyler Florence at http://www.foodnetwork.com/recipes/tyler-florence/chicken-marsala-ravioli-filling-recipe.html*

Marsala Mushroom Sauce

Ingredients:

  • 2 tbsp olive oil, divided use
  • 8 oz cremini mushrooms, sliced
  • 1 shallot, minced
  • 1 1/2 tsp flour
  • 1/3 C Marsala wine
  • 1 1/4 C chicken broth

Steps:

  1. Heat 1 tbsp olive oil in a medium skillet over medium-high heat. Saute the mushrooms for 5 minutes, stirring often. Add the shallot, season with salt, and cook 2 more minutes.
  2. Reduce the heat to medium and whisk in the flour and remaining oil to form a paste. Stir in the wine until smooth. Add the broth and simmer 5-10 minutes.

*This recipe is adapted from Happy Cooking by Giada De Laurentiis*

Chicken Marsala Ravioli | Sew You Think You Can Cook | http://sewyouthinkyoucancook.com

Wing-it Mac & Cheese

5.5 weeks just the kids and me.

1 week on vacation.

1 week celebrating my baby’s first birthday.

That’s a lot of days doing very little cooking. It’s no surprise my scheduled posts have petered out and there wasn’t much to pull from the archives to share.

The moment has finally come to share a poorly photographed original recipe.

I made this Mac & Cheese just shy of one year ago. At that point in my life I had a two week old. Daylight Savings Time had ended and the dark Ohio nights were cold. What’s a better pick-me-up than some macaroni?

I decided to save another dish to wash by making my macaroni in a Dutch oven and putting it directly into the oven instead of transferring it to a casserole dish.

An Original Recipe

Wing-it Mac & Cheese

Ingredients:

  • 1/2 lb elbow noodles
  • 1 tbsp vegetable oil
  • 1/2 sweet onion, chopped
  • 1/2 tsp minced garlic
  • 1/4 tsp ground mustard
  • 1 tbsp flour
  • 2 C whole milk, at room temperature
  • 2 1/4 C shredded cheddar cheese
  • 1/2 C panko breadcrumbs
  • 1/2 tsp Italian seasoning
  • olive oil, for drizzling

Steps:

  1. Preheat oven to 350 degrees F.
  2. Cook pasta in boiling salted water according to package instructions to al dente.
  3. Heat vegetable oil in a Dutch oven over medium high heat. Saute onion until tender. Add minced garlic and saute one minute. Stir in mustard, S+P, and flour.
  4. Whisk in the milk. Bring to a gentle bubble. Add in the cheese a handful at a time, stirring until melted before adding more. Once all the cheese is incorporated, fold in the cooked macaroni noodles.
  5. In a small bowl, whisk the panko and Italian seasoning. Spread over the macaroni. Drizzle with a little olive oil.
  6. Bake 30 minutes. Allow macaroni to rest 5-10 minutes before digging in.

Wing-it Mac & Cheese for a simple weeknight dinner | Sew You Think You Can Cook | http://sewyouthinkyoucancook.com

Fall Quinoa Bowl

You know how smoothie bowls hit the food scene over the past year or so? Well, I have yet to try one myself.

Grain bowls are also a thing. And that I’ve decided to make and put my spin on. Although, technically, quinoa isn’t a grain, it’s a seed, making this protein packed bowl gluten free. You could leave the chicken out to make a vegetarian option. Heck, you could even cook in coconut oil instead of butter and go vegan with it!

Possibilities are really endless when you stop and think about making a quinoa bowl. Quinoa itself doesn’t have too strong of a flavor of its own, much like oats or rice, and can lend itself to many preparations – savory or sweet.

What I loved about this meal was that it was a perfect dinner to serve to my entire family. Everything was both adult and kid friendly. My picky two year old ate around all of the vegetables and chicken and solely ate the quinoa – but hey, there are good nutrients in that little seed and a fair amount of protein. Treat enjoyed all of it.

To present the quinoa bowl. I simply topped the dressed quinoa with the fruit, vegetables, and protein in concentric circles to showcase the incredible colors and flavors of fall. Arranging them in lines would be beautiful, too.

An Original Recipe

Fall Quinoa Bowl

Ingredients:

  • 1 C quinoa
  • 2-3 tbsp butter
  • 1-2 pears, cubed
  • 1/2 large sweet potato, peeled and cubed
  • 1-2 small red beets, peeled and cubed
  • 1 large cooked chicken breast, cubed
  • 3 tbsp Meyer lemon olive oil
  • 1 tbsp raspberry balsamic vinegar
  • 1 tsp Dijon mustard
  • scallion, for garnish

Steps:

  1. Cook quinoa according to package directions.
  2. In a non-stick skillet melt a little bit of butter. Saute pears over medium heat until tender. Remove and set aside.
  3. Add the sweet potatoes and cook until fork tender and lightly golden. Add butter as needed. Remove and set aside.
  4. Cook the beets in the same skillet, adding more butter if needed, until fork tender.
  5. In a small bowl, whisk together the olive oil, vinegar, and mustard. Season to taste with S+P. Toss cooked quinoa in as much dressing as desired.
  6. Top quinoa with the pears, potatoes, beets, and chicken. Top with a little extra dressing and garnish with sliced scallions.

Fall Quinoa Bowl | Sew You Think You Can Cook | http://sewyouthinkyoucancook.com

#SundaySupper: Recipes for World Vegetarian Day

One weekend after church we decided to go for a relaxing walk to get brunch. After enjoying a new (to us) restaurant we explored the area some more.

We typically find ourselves in that part of town for dinner and all of the shops are closed so it was fun to pop into some cute kids boutiques and my new favorite kitchen store!

The store was having a cookbook sale and I became immersed in their table of beautiful books.

I was drawn to The Vibrant Table by Anya Kassoff. It’s a cookbook of vegetarian, vegan, and raw recipes. Not a cuisine I dabble in too often, but when the food photography displays such vibrant dishes I couldn’t put it down!

I’m excited to explore the world of vegetarian and vegan cooking more to add some diversity to our menu and cater to friends of ours.

Speaking of, when our friends welcomed their third child into the family I brought them this beautiful salad. I doubled the recipe for them and brought it over with the dressing kept in a mason jar for when they were ready to enjoy it. I was also sure to leave them with a copy of the recipe.

Naturally, I had to reserve a serving’s worth to photograph it! And then, I had to eat it! This salad is so bright and fresh, and satisfying with all of the protein packed legumes. As I’m not a huge fan of cucumber, I reserved my chunks for Treat to have for lunch the following day – they disappeared!

I will not hesitate to make this salad again.

October 1st is World Vegetarian Day and the month of October is Vegetarian Awareness Month, so the Sunday Supper crew, being led by Susan of The Wimpy Vegetarian, has many different ways to help get more veggies into your diet. Be sure to scroll past my recipe to see them all!

Strawberry Soba Noodle Salad

Ingredients for salad:

  • 1 pkg (9 oz) soba noodles
  • handful snow peas, trimmed
  • handful sugar snap peas, trimmed
  • 1 C frozen peas
  • 1 C frozen shelled edamame
  • 1 carrot, peeled and sliced into matchsticks
  • 1 red bell pepper, sliced into matchsticks
  • 1 cucumber, chopped
  • 12 strawberries, sliced
  • 1/2 bunch cilantro, roughly chopped
  • 2 tbsp toasted sesame seeds

Ingredients for dressing:

  • 1″ fresh ginger, grated
  • 3 tbsp sesame oil
  • 1 1/2 tbsp tamari
  • 1 tbsp olive oil
  • 1 tbsp lime juice
  • 1/2 tbsp agave

Steps:

  1. Bring a large pot of salted water to a boil. Cook all of the peas for 2 minutes and then blanch in ice water. Drain and set aside.
  2. Cook noodles according to package instructions. Rinse under cold water.
  3. In a large bowl combine noodles, peas, strawberries, carrots, bell peppers, cucumber, cilantro, and sesame seeds.
  4. Make dressing: whisk together the ingredients. Pour over salad, tossing to coat. Serve.

*This recipe is adapted from The Vibrant Table*

strawberry-soba-noodle-salad-for-sundaysupper-from-sew-you-think-you-can-cook

Appetizers

Entrees

Sides

Desserts

Sunday Supper MovementJoin the #SundaySupper conversation on twitter on Sunday! We tweet throughout the day and share recipes from all over the world. Our weekly chat starts at 7:00 pm ET. Follow the #SundaySupper hashtag and remember to include it in your tweets to join in the chat. To get more great Sunday Supper Recipes, visit our website or check out ourPinterest board.

Would you like to join the Sunday Supper Movement? It’s easy. You can sign up by clicking here: Sunday Supper Movement.

#SundaySupper: Summer Corn

I have been waiting all year for fresh summer corn! I couldn’t have been more excited to see the theme for today’s #SundaySupper. I can’t wait to check out everyone’s incredible recipes to find new and exciting ways to prepare one of my favorite grains (corn isn’t a vegetable, you know)! Be sure to scroll past my recipe to check out what everyone made. Thanks to Ellen Folkman from Family Around the Table for hosting this weekend.

I do have to say, fresh corn is something that California just doesn’t have right. I have been disappointed in what pops up at the grocery stores. It’s probably the only thing (other than our friends) I miss about Ohio. Sigh. When I go visit my parents at the lake next month they better be prepared for lots of corn dishes made with Wisconsin grown corn on the cob. Now if only I could get it back to Cali.

Our farmers market near our home doesn’t have corn so I planned on driving to the larger one to see what was available. But. My excursion was halted before I got out of the driveway. I’d loaded up the boys and promised a trip to the farmers market and to a friends’ house for a playdate. Neither of those things were able to come to fruition thanks to our garage door.

The garage door broke. It’s had sticking problems since we moved in, but nothing that couldn’t be overcome by pushing the button a couple of extra times. But now, here I was with the car out of the garage and a baby screaming bloody murder. The garage door was neither up nor down and I couldn’t get it to go all the way up so I could return the van to its parking place. Luckily a neighbor was just leaving and he took the time to help me out. We discovered that the cable was completely off the pulley. I grabbed a step stool and he put it back for me. Unfortunately, it still didn’t do the trick. He was able to get the door completely open for me and I put the car back. I then had to do a mental exercise and take anything and everything I would need out of the trunk as I wouldn’t be able to get into it once I muscled the garage door closed. I took out the big double stroller, the beach blanket, and some sand toys.

I had to cancel with our friends. Instead, she kindly offered to pick up whatever I needed from the market and to come over to our house. She brought me some fresh white corn so I could still make my dish for today’s event!

The dish I’d been dreaming about was one in Rachael Ray’s Look + Cook Cookbook. How could I pass up cream, corn, and pasta!? Oh, and there’s bacon involved, too. I made this dinner when we invited over one of my husband’s coworkers and his girlfriend. The pasta was a hit and there wasn’t any leftover. Funnily enough, Firecracker fell asleep in my husband’s arms at the table and Treat fell asleep shortly thereafter, allowing us adults to enjoy the sunset with a cocktail in hand. (We’ve told them they need to come to dinner every day!)

Fresh Corn Fettuccine

Ingredients:

  • 1 lb fettuccine
  • 5 ears corn on the cob, sucked and kernels cut off the cob
  • 1 C heavy cream
  • 5 strips center-cut bacon, diced
  • 2 large shallots, diced
  • 1 bell pepper (I used 2 very small green ones we picked), diced
  • 1/2 C vegetable stock
  • 2 tsp dried thyme
  • 1 tomato, diced
  • hot sauce (to taste)
  • 1/2 – 1 C shredded parmesan cheese
  • 1/2 C fresh flat-leaf parsley, chopped
  • 1/2 C fresh basil, chopped

Steps:

  1. Bring a large pot of salted water to a boil. Cook pasta according to package instructions. Drain and set aside.
  2. Put 1/4 of the corn kernels in a food processor with the cream. Blend until smooth, season with S+P.
  3. In a large skillet, cook bacon over medium-high heat for about 5 minutes. Add the remaining corn, shallots, bell pepper, S+P, cook another 5 minutes until veggies are tender. Stir in the stock, thyme, and corn/cream mixture. Reduce the heat and simmer until slightly thickened. Gently stir in the tomato. Season to taste with hot sauce, S+P.
  4. Toss cooked pasta into the sauce with 1/2 C Parmesan cheese and the parsley. Garnish with basil and extra cheese.

*This recipe is adapted from Rachael Ray’s Look + Cook*

Fresh Corn Fettuccini for #SundaySupper from Sew You Think You Can Cook

Appetizer

Breakfast

Salad

Main Dish

Side Dish

Dessert

Sunday Supper MovementJoin the #SundaySupper conversation on twitter on Sunday! We tweet throughout the day and share recipes from all over the world. Our weekly chat starts at 7:00 pm ET. Follow the #SundaySupper hashtag and remember to include it in your tweets to join in the chat. To get more great Sunday Supper Recipes, visit our website or check out our Pinterest board.

Would you like to join the Sunday Supper Movement? It’s easy. You can sign up by clicking here: Sunday Supper Movement

Disclaimer: This post contains affiliate links.