Poppy-Seed Cake (Makowiec)

Today’s recipe comes from Rose Petal Jam: Recipes and Stories from a Summer in Poland. I received this beautiful cookbook for Christmas last year.

Poppy-Seed Cake | Sew You Think You Can Cook | http://sewyouthinkyoucancook.com

We were invited to a party for the Opening Ceremonies of the Summer Olympics with the request to bring a cultural dish. Unfotunatley, we weren’t able to make it due to a long day at work for my husband.

Yea, remember the Games? Did you forget that happened this year?! Not going to lie, I kinda did, too. But I wasn’t able to watch much of them due to my current time zone combined with those little children of mine.

Anyway.

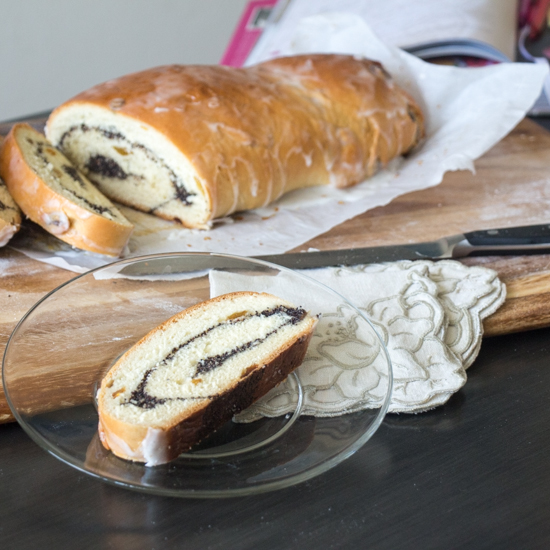
I knew I wanted to bring a Polish dish and decided on trying this Poppy-Seed Cake.

This cake uses a LOT of poppy seeds.

It’s probably a good thing I ended up not sharing this cake at the party because with my luck one of the guys would’ve been randomly drug tested the next day. I was seriously nervous about the poppy seed concentration when I thought my 2 year old was acting a little loopy. If you’re concerned about your intake of poppy seeds, check out this article, which provides a guideline to poppy seed consumption limits.

I had some dilemmas with the recipe, though. And actually, the photographs I’m sharing with you today are from my second attempt. Attempt number 1 is in my freezer, as it’s still quite edible, just far from beautiful.

The recipe called for a pound of poppy seeds. Do you have any idea how many poppy seeds make up a pound!?! I’m still finding stray poppy seeds in the corners of my kitchen!

My food processor couldn’t break down the tiny seeds into a paste, so I recommend getting a spice grinder and working in batches. Because my poppy seed texture wasn’t quite right, I had a lot of extra liquid which caused seepage out of the cake roll.

I had so much left over filling that I decided to simply try again! The second time I (sorta) followed a different method for the cake I found on YouTube.

I would honestly suggest halving (or quartering!) the filling recipe, but I’m leaving it as written.

Poppy-Seed Cake (Makowiec)

Ingredients for the filling:

  • 1 lb poppy seeds
  • 3 C milk
  • 1/2 stick butter, melted
  • 1 C superfine sugar
  • 1 C chopped walnuts
  • 1 C slivered almonds
  • zest of 1/2 lemon
  • 1/2 tsp almond extract
  • 2 egg whites, beaten

Ingredients for the cake:

  • 1 stick butter, softened
  • 2/3 C superfine sugar
  • 2 egg yolks
  • 1 C whole milk, warmed to 105-110 deg F
  • 2 1/4 tsp active dry yeast
  • 4 C bread flour
  • 2/3 C golden raisins
  • 1 egg, beaten
  • Ingredients for the glaze:
  • 3/4 C powdered sugar
  • 1 tsp almond extract
  • milk, as needed

Steps:

  1. Heat poppy seeds and milk in a pot over medium low heat for 10 minutes. Cover and let sit over night.
  2. Drain the seeds, place in a food processor, and pulse until they form a paste. Add the sugar, nuts, zest, and extract, and pulse a few seconds. Remove to a bowl and fold in the egg whites.
  3. Allow yeast to proof in the warm milk, 10 minutes.
  4. In the bowl of a stand mixer fitted with the paddle attachment, cream the butter and sugar. Mix in the egg yolks, stirring until combined. Add the milk and yeast. Add some of the flour and mix. Switch to the dough hook and slowly add the remaining flour and the raisins. Knead until the dough forms around the hook.
  5. Roll out the dough on a floured surface into a large rectangle. Spread the filling over the dough and roll lengthwise. Place cake on a parchment lined, rimmed baking sheet. Cover and let rise an hour.
  6. Preheat oven to 350 degrees F.
  7. Brush cake with the egg. Bake 45 minutes.
  8. Meanwhile, make the glaze: Whisk together the powdered sugar, almond extract, and milk until smooth and runny. Pour over cake while still warm.

Poppy-Seed Cake (Makowiec) | Sew You Think You Can Cook | http://sewyouthinkyoucancook.com

#FoodieExtravaganza: Maple Syrup

foodieextravaganza-300

The Foodie Extravaganza is a monthly party hosted by bloggers who love food! Each month we incorporate one main ingredient or theme into recipes to share with you. We take turns hosting and this month it’s my turn!

December 17th is National Maple Syrup Day and I challenged the crew to bake with, cook with, or make a beverage with maple syrup. (For some international bloggers who can’t find maple syrup, they’ll be joining the fun with honey as a substitute.)

With the hectic holiday season, I managed to forget to make something for this event. Before I scrambled to add extra maple syrup to my grocery list, I scrolled through my camera to see if I had anything that would satisfy my call for this maple syrup extravaganza.

Happily enough, I did! Unhappily enough, the photos made want to curl up into a ball and hide. Alas, that’s just the way it is.

I made this turkey breast in January. (Hey, at least it was January of this year!) In January we were living in Ohio. It was cold. I assume it was snowing. And it most definitely was dark at an unacceptable early hour. Those are the excuses I give for the awkward glare of the glaze. It’s a bummer, too, because as I pulled it out of the oven, my husband (and I remember this vividly) declared that it was almost too pretty to eat and that it belonged on the cover of a magazine.

This Rosemary Maple Glazed Turkey is perfect for your holiday table and pairs nicely with Roasted Pears and Parsnips.

Rosemary Maple Glazed Turkey Breast

Ingredients:

  • 1 turkey breast, 4-6 lb
  • 4 onions, halved
  • 6 cloves garlic, smashed
  • 6 stalk of rosemary
  • 2 C chicken stock
  • 2 C balsamic vinegar
  • 1 C maple syrup

Steps:

  1. Preheat oven to 325 degrees F.
  2. Season the turkey breast with S+P, inside and out. Stuff the cavity with 2 onions, 2 cloves of garlic, and 1 stalk of rosemary.
  3. Arrange the remaining onions, garlic, and 2 stalks of rosemary in the bottom of a roasting pan. Place the prepared turkey on top. Pour the stock into the pan.
  4. Roast turkey for 2 – 2 1/2 hours (or according to turkey instructions) until an internal temperature of 165 degrees F is reached.
  5. Make the glaze: In a small saucepan over medium heat bring vinegar, syrup, and remaining rosemary to a boil. Reduce heat to medium-low and allow to reduce 30 minutes, stirring often.
  6. Brush the glaze over the turkey every 30 minutes. Reserve any remaining glaze and keep warm for serving with the finished turkey.

*This recipe is adapted from Erin at http://www.5dollardinners.com/real-food-holiday/*

Rosemary Maple Glazed Turkey Breast for #FoodieExtravaganza from Sew You Think You Can Cook

And don’t forget to check out all these other maply recipes:

Basbousa – Egyptian Semolina Cake from Sneha of Sneha’s Recipe

Bangin’ Breakfast Potatoes from Rebekah of Making Miracles

Gluten-Free Maple Chestnut Cookies from Caroline of Caroline’s Cooking

Maple Pecan Bars from Nichole of Cookaholic Wife

Maple Sugar Cookies from Sue of Palatable Pastime

Maple Walnut Vinaigrette from Tara of Tara’s Multicultural Table

Momiji Tempura from Camilla of Culinary Adventures with Camilla

Overnight French Toast Casserole from Elaine of Cookin and Craftin

Roasted Maple Glazed Carrots from Wendy of A Day in the Life of the Farm

The Back Forty Cocktail from Stacy of Food Lust People Love

If you are a blogger and would like to join our group and blog along with us, come join our Facebook page Foodie Extravaganza. We would love to have you! If you’re a spectator looking for delicious tid-bits check out our Foodie Extravaganza Pinterest Board! Looking for our previous parties? Check them out HERE.

#SundaySupper: Eggnog Recipes

December is National Eggnog Month. No big surprise there.

I’m not the biggest fan of the drink. I tend to be sensitive to nutmeg – though I am getting much better about it!

I’ve used it in baking twice before. Once in cookies for #FoodieExtravaganza, and once in my #BundtBakers cake that will be debuting later this month. I quite enjoy eggnog as an ingredient. I haven’t tried it in a savory application, yet, and was hoping a Sunday Supper member might have figured out a way, but all the offerings are on the sweet side of the specrum. Be sure to scroll past my recipe to see all the sweet, delicious recipes!

That remaining eggnog in my fridge was begging to be used in pancakes and we went right ahead and did just that! By happy circumstance, today’s #SundaySupper eggnog event was announced shortly after that. Thanks to Christie from A Kitchen Hoor’s Adventure for hosting this festive event.

These eggnog pancakes were a huge hit with my kids. I don’t think I’ve seen Firecracker eat so much in one sitting in quite some time!

Eggnog pancakes with cranberry syrup would make for a perfect Christmas morning breakfast.

Eggnog Pancakes with Cranberry Syrup

Ingredients for pancakes:

  • 2 C flour
  • 1 tbsp baking powder
  • 1/2 tsp salt
  • 1/4 tsp nutmeg
  • 2 eggs
  • 2 C eggnog
  • 1/4 C vegetable oil

Ingredients for syrup:

  • 1 C fresh cranberries
  • 1/2 C real maple syrup
  • 1 tbps butter

Steps:

  1. In a large bowl, whisk together the flour, baking powder, salt, and nutmeg.
  2. In another bowl, whisk together the eggs, eggnog, and oil.
  3. Combine wet ingredients into dry.
  4. On a hot buttered griddle drop 1/4 C of batter into pancakes. When bubbles form and start to pop flip the pancakes and cook until golden on both sides.
  5. Make the syrup: Combine cranberries, syrup, and butter in a small saucepan over medium heat. Cook until cranberries have burst and the syrup thickens. Serve with pancakes.

*This recipe is adapted from Jocelyn at http://www.grandbaby-cakes.com/2014/12/eggnog-pancakes/*

eggnog-pancakes-with-cranberry-syrup-for-sundaysupper-from-sew-you-think-you-can-cook

Baked Goods

Beverages

Breakfast and Breakfast Pastries

Desserts

Sunday Supper MovementJoin the #SundaySupper conversation on twitter on Sunday! We tweet throughout the day and share recipes from all over the world. Our weekly chat starts at 7:00 pm ET. Follow the #SundaySupper hashtag and remember to include it in your tweets to join in the chat. To get more great Sunday Supper Recipes, visit our website or check out our Pinterest board.

Would you like to join the Sunday Supper Movement? It’s easy. You can sign up by clicking here: Sunday Supper Movement

Thursday Thoughts #19

Thursday Thoughts


Please consider this Thursday Thoughts an open letter to help me find my lost ornaments!

The day after Thanksgiving is always decorating day in my home. Decorating for the first time in a new home always brings some challenges. Decorating for the first time with two toddlers to get into things adds extra challenges!

We live in a townhome so there wasn’t any outdoor decor to do, unfortunately. It was also raining all weekend (what?!) so the only outdoor space I do have freedom to decorate, our balcony, still hasn’t been tackled.

We did put up the tree, string it with lights, and waiting patiently for Treat to wake up from a long nap before pulling out the ornaments.

I opened up the box my husband brought up from the garage and handed Firecracker the first ornament of the year – a fun Auburn snowflake – which he happily put on the tree. I handed my husband Treat’s First Christmas Ornament from last year to assist the one year old in hanging.

As I dig further into the box I recognize that these ornaments are all from the Snowman Tree my family surprised me with 3 years ago. This box is not THE ornament box.

5-10 minutes passes and my husband comes back upstairs with a saddened expression. He can’t find the box. And he looked in every single box down there.

With a knot in my stomach and tears falling down my face I traced his footsteps and had to agree with his inventory check. It’s the hardest I’ve cried in a long time.

Ornaments spanning 6.5 years of married life, 2.5 years of parenthood were in that box. But those weren’t the ornaments giving me pain. I’ve already reordered Firecracker’s First Christmas Ornament. The ornaments that plague my dreams were those that had belonged to my grandfather, those that I had made as a child, those that my husband made as a kid.

It’s time now for my children to be the ornament makers and continue to make happy memories for us to relive every year we trim the tree.

img_19151

My husband’s advent calendar that he loved a little boy was also in that box. We were looking forward to starting that tradition with the boys this year. My mother-in-law says she has extras from her mom though, so that heart-string didn’t get completely cut.

The silver lining, if I can find it, is that the cross-stitch stocking my grandfather started for me was not in the ornament box. My grandfather passed away in ’96 and my mom took it upon herself to complete the stocking. A task that took her over ten years, I’d finally received my stocking in 2012.  My husband also had a cross-stitch stocking from his childhood that I believe his mom did. Those two stockings are hanging by our fireplace. When it’s time to pull down the Christmas decorations following our final holiday season in CA, those stockings will not be boxed back up; they’ll be put with the other items we will move ourselves. (It’s a good thing our handmade stocking from my mother-in-law are down in Florida with my parents!)

My last hope is for a bit of Christmas magic. All I can do is cross my fingers and toes that some other family received our box of ornaments by mistake and that maybe they haven’t noticed it until they go to decorate their tree. I hope they contact the moving company and figure out a way to get a hold of us. I’m going to call and see if there’s some sort of Lost & Found at the storage facility where our things were held after arriving in the Los Angeles area. I know it’s a long shot, but had I discovered a box of some other family’s holiday memories I would do everything I could to try and find them.

If you have my box, the ornaments are stored using my DIY storage solution – check it out here! If you just want to get me the few I’m seriously missing I’d be forever thankful. There’s a balding styrofoam Santa with a beard, a cute little blue elf with knitted long orange hat, two Silver Bells from the year 2015, a flat foam gingerbread with pipe cleaner handle, and a laminated fingerprint reindeer.

Update: My mom scrolled through her phone’s photos and found this one from 2012 of our tree. That Santa head in the lower center is the one I really want back!!!

Please help us find our missing ornaments!

#CranberryWeek: Cranberry Oat Smoothie

cranberry-week-logo

Happy Thanksgiving!

This Thanksgiving falls during #CranberryWeek. #CranberryWeek is hosted by Caroline’s Cooking and A Kitchen Hoor’s Adventures. We’ve been sharing cranberry-inspired creations all week long in celebration of national cranberry day. You can search #CranberryWeek to keep up to date and follow the #CranberryWeek Pinterest board for more cranberry inspiration.

With it being Thanksgiving Day I knew my time was up for sharing specific holiday centered recipes. Hopefully you’re spending your day surrounded by loved ones and don’t have any last minute grocery runs today.

That’s why my cranberry submission involves kitchen staples. Well, fresh cranberries aren’t a year round staple, but for this time of year, I’m going to place my bets. You can put those bags of fresh cranberries in your freezer for year round enjoyment of the tart, red berry. In fact, I’m planning on stocking up on my next grocery trip so I can make this smoothie whenever the mood strikes! I made mine with fresh, not frozen, cranberries. If using frozen cranberries, I’d hold off on adding any ice.

Today’s smoothie is a fantastic way to kick off Turkey Day. It’s a healthy and refreshing beverage that will leave you satisfied yet not worn down.

cranberry-oat-smoothie-for-cranberryweek-from-sew-you-think-you-can-cook-2

This recipe will make one smoothie.

An Original Recipe

Cranberry Oat Smoothie

Ingredients:

  • 1 container (6 oz) French vanilla yogurt
  • 1/2 C fresh cranberries
  • 1/2 C ice
  • 1/4 C old fashioned oats
  • 1/4 – 1/2 C milk

Steps:

  1. Place ingredients in a blender and pulse until smooth.

Cranberry Oat Smoothie for #CranberryWeek from Sew You Think You Can Cook

Be sure to check out all the other cranberry recipes being shared today:

Apple-Ginger Cranberry Sauce from Palatable Pastime

Broccoli Salad with Cranberries from Hezzi-D’s Books and Cooks

Cranberry Blondies from Cindy’s Recipes and Writings

Cranberry Caipirinha from Caroline’s Cooking

Cranberry Oat Smoothie from Sew You Think You Can Cook

Graavilõhe from Culinary Adventures with Camilla

Cranberry Walnut Macaron with Orange Buttercream from A Kitchen Hoor’s Adventures

Warm Cranberry Spread from Family Around The Table

#CranberryWeek: Cranberry Glazed Pork Loin

cranberry-week-logo

Welcome to #CranberryWeek, hosted by Caroline’s Cooking and A Kitchen Hoor’s Adventures. We’ll be sharing cranberry-inspired creations all week long in celebration of national cranberry day. Search #CranberryWeek to keep up to date and follow the #CranberryWeek Pinterest board for more cranberry inspiration.

When I made this glazed pork, I was hoping to find a turkey breast to serve with the cornbread dressing I shared yesterday.

Actually, I had a couple ingredient finding hurdles to overcome.

I’ve been in a grocery store loyalty crisis. Now that Treat is too big for the Baby Bjorn (not impossible, but highly uncomfortable), I prefer to shop with him in the cart. That leaves Firecracker to walk beside me. There isn’t enough magnetic force in the world to keep that kid by myside for more than three minutes! That energetic 2 year old is off running up and down the aisles as soon as I let go of his hand. Or, he’s touching every single item at arms level when he is staying near. My patience with him wanes thin and I have to load him up into the basket. As I try to start each grocery trip with a positive attitude, by the time I “give up” I have a cart full of groceries. And to add to the frustration, Treat has a habit of screaming at an insanely high pitch. He’s not upset or crying, just screaming to scream. It’s a happy and excited sound, but one that deafens ears. Naturally, his older brother follows suit and I’m standing in the grocery store pulling out my hair half laughing half crying and all about yelling at my children.

The solution is to find a grocery store with “car carts” so both of my boys can be buckled into a cart. The bonus of a steering wheel definitely helps. Unfortunately, there aren’t many option for that out here in SoCal.

I do a decent amount of shopping at the commissary on base, particularly for yogurt as it’s about half the price of the local grocery stores. Being tax free means that processed foods end up being a tad cheaper, too. Only problem, is that I don’t quite trust their meat and seafood department, and the fresh produce is hit or miss on quality.

For small trips, I love walking to the local Whole Foods, but I’m limited to the space under the stroller. And while the meat quality is fantastic, it’s a bit pricy.

One Monday morning, I decided to try another store about a mile away. Took the kids on a walk and did some recon. Yogurt was the same marked up cost as the other stores. THe produce department was beautiful, and their bulk foods section to die for. Their meat departement looked fine, but was small; there wasn’t a turkey breast in sight (I assume that changed closer to the holiday?). I settled on a beautiful looking pork loin instead.

Another missing ingredient? Apple cider.

I knew one of the grocery stores I like sells it, but did I really want to get in the car for one item? Nope. Instead, I popped into the local coffee shop and ordered a cup of cider to go. Mission accomplished. I’m sure that 12 oz cup cost the same as a half gallon at a grocery store, but you can’t underestimate the price of my time, energy, and sanity!

Cranberry Glazed Pork Loin

Ingredients:

  • 2 tbsp butter, divided use
  • 1/2 shallot, chopped
  • 1 tsp whole juniper berries
  • 1 C fresh cranberries
  • 2/3 C apple cider
  • 2/3 C maple syrup
  • 1/2 C red currant jelly
  • 1/4 tsp Kosher salt
  • pork loin, trimmed

Steps:

  1. Melt 1 tbsp butter in a small saucepan over medium heat. Saute shallot until translucent. Add the juniper berries, and cook one minute. Add cranberries, cider, syrup, jelly, and S+P. Simmer 3-5 minutes, until cranberries burst.
  2. Transfer glaze to a blender and puree until smooth. Return to the saucepan after passing through a sieve.
  3. Bring glaze to a simmer over medium heat and cook until reduced to about 1 1/4 C, 10-15 minutes. Keep warm.
  4. Preheat oven to 375 degrees F.
  5. Melt butter in a large oven safe skillet, sear pork abour 2 minutes on all sides. Brush with glaze and put in oven until an internal temperature of 145 degrees F is reached. Brush with glaze every 10 minutes or so. Cook time will depend on thickness of pork loin.
  6. Be sure to bring any extra glaze back to a boil to prevent contamination before serving alongside pork.

*This glaze recipe is adapted from Martha Stewart at http://www.marthastewart.com/261237/cranberry-glaze*

Cranberry Glazed Pork Loin for #CranberryWeek from Sew You Think You Can Cook

Be sure to check out all the other cranberry recipes being shared today:

Braised Short Ribs with Hoisin-Cranberry Sauce and Asian Coleslaw from Culinary Adventures with Camilla

Cranberry & Cornbread Stuffed Pork Chops from Books n’ Cooks

Cranberry Borscht from Palatable Pastime

Cranberry Glazed Pork Loin from Sew You Think You Can Cook

Cranberry Lemon Curd Tart (No Bake, GF) from Caroline’s Cooking

Cranberry London Broil from Cindy’s Recipes and Writings

Cranberry Mustard from A Kitchen Hoor’s Adventures

Cranberry Vanilla Bean Donuts from Hostess At Heart

Grilled Brie with Cranberries from Full Belly Sisters

Honey Roasted Cranberry Ricotta Crostini from Take Two Tapas

Orange Cranberry Turnovers by The Bitter Side of Sweet

Panko Crusted Chicken with Maple Cranberry Sauce from Family Around The Table

Sweet Heat Cranberry Spread from Cooking With Carlee

#CranberryWeek: Cranberry Cornbread Dressing

cranberry-week-logo

Welcome to #CranberryWeek, hosted by Caroline’s Cooking and A Kitchen Hoor’s Adventures. We’ll be sharing cranberry-inspired creations all week long in celebration of national cranberry day. You can search #CranberryWeek to keep up to date and follow the #CranberryWeek Pinterest board for more cranberry inspiration.

I was really excited when I discovered #CranberryWeek was going to be a blogging event this year. I hope it’s one that will become an annual thing as I simply adore cranberries!

I’ll be posting each day this week and offering a variety of courses. Yesterday, I shared a dessert that is guarenteed to please your holiday guests. Today I’ve got a wonderful side dish to cranberrify your dressing/stuffing.

I’m sharing this cranberry cornbread dressing today becuase should you choose to serve it on Thursday you’ve got to get your ingredients today! The cornbread needs to be baked at least a day in advance, and there’s a loaf of white bread that needs to go stale.

There are a fair amount of moving parts in this dressing, but just about all of them can be prepped ahead of time, making your turkey day workload lighter.

  • Pecans can be toasted and chopped ahead of time (or purchased that way if you can find them)
  • Celery and onion cut in advance, even cooked early on, too!
  • Cornbread and white bread cubed up early

If you get all that prep done, all you need to do is mix everything together and pop it in the oven (or stuff it in your bird). This recipe makes enought for two large casserole dishes – so if you’re stuffing the turkey, you’d have to have a huge cavity! Any extra dressing/stuffing could be baked and frozen for a taste of Thanksgiving another time of the year.

When I made this recipe, I had all intentions to freeze one of the casseroles for Thanksgiving enjoyment. But… my post-1 year-doctor’s-visit child was needing my attention. As I picked him up and turned to stir the veggies at the stove, he reached out and knocked one of the bowls of bread to the ground! The bright side was that I hadn’t added the egg or stock to it, so the mess wasn’t too difficult to clean.

We loved this dressing recipe and I’m remaking it and serving it today at my husband’s office Thanksgiving party.

Cranberry Cornbread Dressing

Ingredients:

  • 2 C pecans, chopped
  • 1/2 stick butter
  • 3 onions, chopped
  • 6 stalks celery, diced
  • 1 9″ skillet cornbread (day old), cubed
  • 1 loaf white bread (stale), cubed
  • 2 C dried cranberries
  • 1 bunch parsley, chopped
  • 1 tbsp dried oregano
  • 1 tbsp Kosher salt
  • 1 tbsp black pepper
  • 2 – 3 eggs, beaten
  • 4 C chicken stock

Steps:

  1. Preheat oven to 350 degrees F. Spread pecans on a rimmed baking sheet. Toast for 10 minutes. Set aside.
  2. Melt butter in a large skillet over medium-high heat. Saute onion and celery, until tender.
  3. Preheat oven to 375 degrees F.
  4. In a very large bowl (or two) toss cornbread, white bread, toasted pecans, cranberries, parsley, oregano, S+P. Add eggs – amount of eggs needed will depend on the moisture level of the bread – and chicken stock.
  5. Transfer dressing to two large greased casserole dishes. Bake, covered, 35 minutes. Bake, uncovered, 20 minutes.

*This recipe is modified from Martha Stewart at http://www.marthastewart.com/317663/cranberry-cornbread-stuffing*

Cranberry Cornbread Dressing for #CranberryWeek from Sew You Think You Can Cook

Be sure to check out all the other cranberry recipes being shared today:

Baked Pork Chops with Cranberry Thyme Sauce from Hostess At Heart

Cranberry Caipirinha from A Kitchen Hoor’s Adventures

Cranberry Chicken Thokku from Culinary Adventures with Camilla

Cranberry Cornbread Dressing from Sew You Think You Can Cook

Cranberry Cornbread Stuffing from Cindy’s Recipes and Writings

Cranberry Oatmeal Sourdough Muffins from Cooking With Carlee

Cranberry-Sage Breakfast Sausage from Palatable Pastime

Jaegerschnitzel with Cranberry-Raspberry Sauce from Caroline’s Cooking

Pumpkin Cranberry Bread from Hezzi-D’s Books and Cooks

#CranberryWeek & SRC: Cranberry Upside Down Cake

newsrcbanner

Today’s  Secret Recipe Club post comes with a little good-news-bad-news.

Do you want the bad news first?

The bad news as that this post is the final Secret Recipe Club reveal day. I’ve spent 2 1/2 years with this wonderful group of people and I’m sorry to see it come to an end. I’ve made great friends, some even in-person! I know there will be other blogging opportunities that will cross paths with a lot of these wonderful bloggers.

Ready for the good news?

Today’s SRC post helps me kick of #CranberryWeek! Because I don’t want to steal the show from honoring my last SRC assigned blogger, I’ll delve into the brains behind #CranberryWeek tomorrow. (Hope you understand Caroline and Christie), but you can search #CranberryWeek to keep up to date and follow the #CranberryWeek Pinterest board for more cranberry inspiration.

cranberry-week-logo

I had no problem finding a recipe that would be the perfect kick-off to #CranberryWeek from my assigned blog this month. Heather of Join Us, Pull Up a Chair happens to love cranberries about as much as I do and my secret Pinterest board had 4 great contenders (and 11 non-cranberry recipes) saved to it! On the cranberry front I debated between Upside Down Cake, Shortbread Cookies, and Muffins. Heather’s Kung Pao Chickpeas and Hot & Sweet Chicken Thighs tempted my savory pallet.

So who is this Heather behind all of those delicious looking recipes? Heather is busy mom of two with a full time job in marketing as well as running an independent sales consultant gig. She started her blog to help organize her recipe hording lifestyle. I can completely relate as the magazine pages tend to pile up in my home, too. Heather grew up helping her mom in the kitchen and has passed on that love of cooking and baking to her kids. She says having her kids in the kitchen helps them be more adventurous in trying new foods – I hope Firecracker will end up being that way, but at age 2 it’s not quite as successful.

The Cranberry Upside Down Cake I settled on was a huge hit. So popular in fact, I made it twice! And it had nothing to do with the fact that I got pulled away from it and didn’t upend it on time and had a non-photography worthy cake. Instead of getting frustrated, I got excited that I’d be getting to make the cake again! The second time, I didn’t allow the kids to derail me and I flipped that cake when the time went off. A successful endeavor for a dessert I brought to the church to support their ministry of feeding the hungry once a week. (But not before stealing just one more piece for myself. I mean, I did need to do a quality check before serving others!)

Cranberry Upside Down Cake

Ingredients:

  • 8 tbsp butter, softened, divided use
  • 1 C sugar, divided use
  • 1/2 tsp ground cinnamon
  • 1/4 tsp ground allspice
  • 1 3/4 – 2 C fresh cranberries
  • 1 egg
  • 1 tsp vanilla extract
  • 1 1/4 C flour
  • 1 1/2 tsp baking powder
  • 1/4 tsp salt
  • 1/2 C milk

Steps:

  1. Preheat oven to 350 degrees F.
  2. Spread 2 tbsp softened butter along the bottom and sides of an 8″ round or 8×8″ square cake pan.
  3. In a small bowl, combine 1/2 C sugar with the cinnamon and allspice. Pour evenly into the prepared cake pan. Arrange the cranberries in an even layer in the cake pan.
  4. In the bowl of a stand mixer fitted with the paddle attachment, beat the remaining butter and sugar until fluffy. Add the egg and vanilla and mix until incorporated.
  5. In a small bowl, whisk together the flour, baking powder, and salt.
  6. Add half of the dry ingredients to the stand mixer, mix until combined. Add the milk, mixing until incorprated. Repeat with the remaining dry ingredients.
  7. Pour batter into the prepared cake pan. Bake 30-35 minutes, until a knife inserted comes out cleanly. Let cake cool on a wire rack for 20 minutes. Run a knife along the edges and carefully flip out onto a plate.

*This recipe is adapted from Heather at https://joinuspullupachair.com/2011/11/20/cranberry-upside-down-cake/*

Cranberry Upside Down Cake for Secret Recipe Club and #CranberryWeek from Sew You Think You Can Cook

To see the other bloggers who participated in the final Secret Recipe Club click here:

But don’t stop your recipe stumbling there! Check out all of these great cranberry recipes to kick of #CranberryWeek:

Cranberry-Apple Sauce from The Chef Next Door

Cranberry Cornbread from Cindy’s Recipes and Writings

Cranberry Maple Delicata Squash Galette from Caroline’s Cooking

Cranberry Orange Baked Brie from Books n’ Cooks

Cranberry Palmiers from The Bitter Side of Sweet

Cranberry Rosemary Cornbread from Life Currents

Cranberry Snack Cake from Cooking With Carlee

Cranberry Upside Down Cake from Sew You Think You Can Cook

Noreaster from Family Around The Table

Pork Shashlyk and Tkemali from Culinary Adventures with Camilla

Roasted Brussels Sprouts and Cranberries from A Day in the Life on the Farm

Slow Cooker Cranberry Brisket from Palatable Pastime

Stuffed Endive with Blue Cheese, Walnuts & Cranberries from Full Belly Sisters

Upside Down Cranberry Cake from Hostess At Heart

Tuesday Tattles: 1st Birthday

Tuesday Tattles

My baby boy is now ONE!

If year one goes by quickly for the first born, it goes even faster with the second child. My Treat has been walking for 2 months now and loves to run and climb. He wants anything his big brother is playing with or eating – and his favorite thing to do is steal chocolate milk.

Today I will share with you the planning (and execution) of his birthday party.

family

I think first birthdays are pretty special. And, for me, I refused to have my son’s party on any day other than THE day. I am extremely grateful to have family willing to travel across the country to help us celebrate. It was even the first time Treat got to spend time with both of his Godparents at the same time!

We’ve got a great group of friends who braved the rain to come to a party at the playground, too!

Spider-Man themed First Birthday | Sew You Think You Can Cook | http://sewyouthinkyoucancook.com

When my son was born the day before Halloween, I knew I’d have to have another appropriately themed super hero party. My options were Spider-Man or Batman. I decided to go with Spider-Man to keep my boys in the same comic universe (nerd alert).

While there is plenty of pre-made party decor for Spider-Man, I decided to keep things simple using a lot of red, white, and a bit of blue.

  • Red table cloths (fun discovery – a wet table makes for great adhesive)
  • White plates
  • Red napkins
  • Blue spoons and forks
  • Silverware holders were simply empty {clean} cans which I wrapped with white card stock and glued on a Spider-Man. My sister-in-law did some incredible spiderweb labeling for me!
  • We had two tables at the playground and I put a cluster of red, white, and blue balloons in the center of each table held in place with Spider-Man balloon weights.
  • The party favor bags were simple red treat bags. I cut out Spider-Man eyes from white sticker paper, tracing their outline in black Sharpie. I put a “Thank You” sticker with each kid’s name on the back.
  • Treat had his smash cake in the Radio Flyer wagon. (Had it not been raining I would have put his name banner on the wagon.) A giant red number 1 balloon, 12″ white, and 12″ blue decorated the wagon.

Treat’s incredible “Happy First Birthday” banner was made for me by a friend. When she discovered that I’d always cut the banners out by hand, she immediately offered her services for all future decorating needs. I took her up on it due to our complicated schedules during September and October. She even glued all the pieces together for me and all I had to do was string them together and hang them up!

And now for the important part of the party: The Food!

  • The main course was a taco platter perfect for feeding 25 people.
  • Keeping with the Mexican food theme, we made a typical layer dip. I adjusted the layers to put tomato on top and piped a sour cream spiderweb on top.
  • The second layer dip was a super food version: sweet potatoes, quinoa, black beans, enchilada sauce, cheese, and sour cream. I put the sour cream layer on top and tried creating a spiderweb with the enchilada sauce. Because I make my own enchilada sauce, the onions made it a bit more difficult than I was hoping and the result wasn’t as pretty as envisioned.
  • I ordered cupcakes and a 5″ round cake from a local grocery store. They were able to make a spiderweb cake for me in red and white. A blue 1 candle and spider ring made the perfect decorations.

A Spider-Man themed 1st birthday | Sew You Think You Can Cook | http://sewyouthinkyoucancook.com

Disclaimer: This post contains affiliate links.

Cauldron Trick or Treat Bag

The Harry Potter themed week continues with a sewing tutorial for a trick-or-treat bag! This bag in the shape of a cauldron is perfect for your little witch or wizard to collect their sweets on Halloween.

A huge thank you goes out to my mother-in-law for coming up with the prototype for our original project!

Firecracker loved getting in on the action, too. That sweet boy of mine always wants to offer his help.

Cauldron Trick-or-Treat Bag Tutorial | Sew You Think You Can Cook | http://sewyouthinkyoucancook.com

Here is the how-to for a cauldron tote bag:

Print out a template for a cauldron from a simple google search to desired size. Trace the template onto black wool felt with chalk. Cut out two cauldrons.

Use a string to measure the cauldron bottom. That value is your length. Cut a piece of black wool felt 3″ wide and the length just measured. (Mine was 28″)

Cauldron Trick-or-Treat Bag Tutorial | Sew You Think You Can Cook | http://sewyouthinkyoucancook.com

Iron on craft-fuse to the rectangular piece of felt, and the bowl portion of the cauldrons.

Cauldron Trick-or-Treat Bag Tutorial | Sew You Think You Can Cook | http://sewyouthinkyoucancook.com

Using a lot of pins, attach the rectangle to one of the cauldrons, so that the black sides face each other. Pin the center and the ends and ease your way until there are pins all around!

Cauldron Trick-or-Treat Bag Tutorial | Sew You Think You Can Cook | http://sewyouthinkyoucancook.com

Sew using a 1/4″ inseam, making sure to reinforce at the ends.

sewing

Repeat with the second side of the cauldron. Turn right-side-out.

Fold the top lip of the cauldron over and sew it down by hand using black thread with a few stitches in 1/3 from each edge. Repeat on the other side.

folding

I downloaded a Harry Potter font and cut out letters from felt and used a hot glue gun to add the words “Potions please”.

To create the handle, I sewed a black shoe string on each side.

Cauldron Trick-or-Treat Bag Tutorial | Sew You Think You Can Cook | http://sewyouthinkyoucancook.com