CIC: Pineapple and Rosemary

CIC-header

I was so happy when the votes were in for this month’s Crazy Ingredient Challenge. It was a close battle but pineapple edged out zucchini.

CIC ingredients
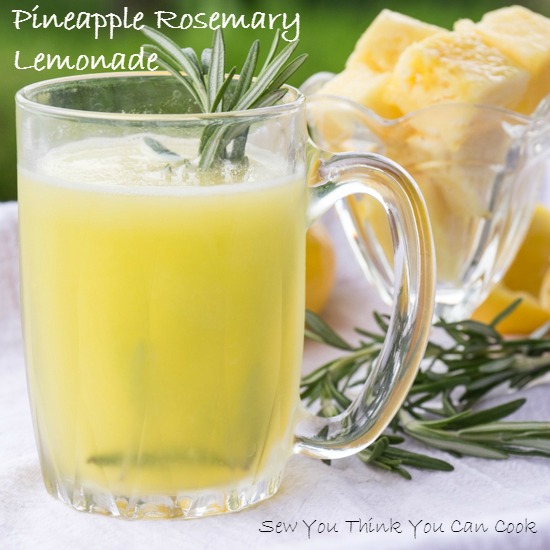
I know I already made a lemonade this year, but can you really have too many flavor options for summer’s perfect beverage!? I decided to make a simple syrup with the rosemary, puree some fresh pineapple, and add in freshly squeezed lemon juice.

I actually didn’t make the simple syrup strong enough which is why you see 2-4 sprigs listed in my ingredients; I used 2 sprigs but would venture to say you could double that amount. To get more rosemary flavor in my lemonade I served fresh sprigs in the glasses, because if you smell the rosemary while you drink it you still get that flavor. I then threw in a few more sprigs in the pitcher in the fridge and after just a few hours the rosemary flavor was there.

An Original Recipe

Pineapple Rosemary Lemonade

Ingredients:

  • 1/2 C sugar
  • 4 C water, divided use
  • 2-4 sprigs fresh rosemary
  • 2 – 2 1/2 C fresh cubed pineapple
  • 1 C fresh lemon juice (from 7-8 lemons)

Steps:

  1. In a small saucepan over medium heat dissolve sugar in 1 C water with the fresh rosemary sprigs. Remove from heat once sugar is dissolved and let cool. Remove rosemary.
  2. Place pineapple in a blender and blend until smooth. Strain the pineapple puree (this takes time). You should get 3/4 C pineapple juice (measure from the liquid line, not the foam line).
  3. Return pineapple juice to the blender along with the simple syrup, lemon juice, and 3 C water. Blend just to combine. Serve cold with additional rosemary sprigs for garnish.

Pineapple Rosemary Lemonade | Sew You Think You Can Cook

To see the other bloggers who participated in this month’s Crazy Ingredient Challenge click on the link below.

Baked Onion Rings and Dr. Pepper Barbecue Sauce

Sunday is Father’s Day and if the dads in your life are anything like mine are and they buy themselves everything they want forget about the tie and make them dinner instead!

Last Father’s Day we were wondering if our little man would be arriving on this special day – he didn’t. I decided to make a meal fit for a Father regardless – baby back ribs with Dr. Pepper barbecue sauce and oven baked onion rings. Yes, I have been sitting on this recipe for a year!

Baked Onion Rings

Ingredients:

  • 2 sweet onions, cut in slices
  • 1 qt buttermilk
  • 4 egg whites
  • 1 C panko
  • 3/4 C cornmeal
  • 2/3 C flour (whole wheat or AP)
  • 3/4 tsp salt
  • 1/2 tsp pepper
  • 1/2 tsp paprika

Steps:

  1. Place onion rings in a casserole dish and cover with buttermilk. Cover and place in the refrigerator for at least 12 hours.
  2. Preheat oven to 425 degrees F. Line two baking sheets with parchment paper.
  3. In a shallow bowl beat egg whites. In another shallow bowl mix together panko, cornmeal, flour, salt, pepper, and paprika.
  4. Shake buttermilk off the onions and coat in the egg whites then the breadcrumb mixture. Place on prepared baking sheets in a single layer. Spray onion rings with cooking spray.
  5. Bake 15 minutes. Flip onion rings and bake another 15 minutes, or until desired crispiness is achieved.

*This recipe is adapted from Sally at http://sallysbakingaddiction.com/2014/01/07/crispy-baked-onion-rings/*

Dr. Pepper Barbecue Sauce

Ingredients:

  • 4 tbsp butter
  • 1 sweet onion, diced
  • 3 cloves garlic, minced
  • 1 can (12 oz) Dr. Pepper
  • 1 C ketchup
  • 1/2 C dark brown sugar
  • 1/2 C apple cider vinegar
  • 1/3 C Worcestershire sauce
  • 3 tbsp tomato paste
  • 2 tsp chili powder
  • 1 tsp Kosher salt
  • 1/2 tsp pepper

Steps:

  1. In a saucepan over medium-high heat melt butter. Saute onions until translucent. Add in garlic and cook another 60 seconds.
  2. Add Dr. Pepper, ketchup, brown sugar, Worcestershire, tomato paste, chili powder, S+P. Whisk. Bring to a boil and reduce to a simmer. Simmer for 30 minutes, or until thickened, stirring occasionally.
  3. Allow sauce to cool slightly and puree with an immersion blender. Cool completely. Store in refrigerator until ready to serve.

*This recipe is adapted from Danelle at http://www.letsdishrecipes.com/2014/05/dr-pepper-barbecue-sauce.html*

ribs and rings

What are you making for Father’s Day? I’m not sure yet what I want to do – please leave me some ideas!

#BundtBakers: Lemons

4ae7b-bundtbakerspostThis month #BundtBakers is celebrating the end of spring by baking bundts with lemons as the theme. I really love this theme as my biggest “issue” with dessert is that it can be too rich and heavy, but the use of lemons (and citrus) makes cake feel light and bright. Perfect for the upcoming summer season. A big thank you to Anne of From My Sweet Heart for hosting this month.

I know I’ve said this before but this cake might be my favorite one. It’s so bright, light, and addicting! The tart lemon glaze I made in lieu of frosting gives it that “one more bite” quality. I decided on a glaze so as to not hide the beautiful design of my awesome star bundt pan! There is one person who wasn’t interested in my cake though – the 11 month old in my house. I thought it’d be a good idea to slowly introduce him to sugar so he doesn’t get sick on his birthday. I’ve given him a couple bites of cookie – which he loved – but this cake didn’t pique his interest at all! We offered it a couple of times and he simply turned his head and pushed the fork away. The kid doesn’t know what he’s missing!

crossfit babyAs much as I would have loved to eat that entire cake by myself I thought it would be smarter to share the love. With people who earned the extra calories! The first Friday of every month my husband’s Crossfit gym invites family members to watch the workout and join in a potluck. We came home with just two pieces of cake left – and had we stayed a little bit longer my plate would’ve been just crumbs.

Lemon Buttermilk Bundt Cake with Tart Lemon Glaze

Ingredients:

  • 1/3 C room temperature vegetable shortening
  • 2/3 C vegetable oil
  • 2 tsp lemon extract
  • 1 tsp vanilla extract
  • 3 eggs
  • zest of 1 lemon
  • 1 1/4 C flour
  • 1 1/2 C cake flour
  • 1 1/2 C sugar
  • 1 1/2 tsp baking powder
  • 1/2 tsp baking soda
  • 1 tsp salt
  • 1 1/2 C buttermilk
  • juice of 1 lemon
  • 3/4 C powdered sugar (you could increase this amount depending on juiciness of lemon and desired tartness of glaze)

Steps:

  1. Preheat oven to 350 degrees F. Heavily grease bundt pan.
  2. In the bowl of a stand mixer fitted with the whisk attachment, whisk together shortening, oil, and both extracts. Add in eggs, one at at time. Mix in the lemon zest.
  3. In a large bowl sift together both flours, sugar, baking powder, baking soda, and salt.
  4. Switch stand mixer attachment from the whisk to the paddle. Add 1/3 of the flour mixture to the stand mixer and mix until combined. Add half of the buttermilk and mix until combined. Repeat with another third of the dry ingredients, the rest of the buttermilk, and finishing with the last of the dry ingredients.
  5. Pour batter into greased bundt pan. Bake 50 – 55 minute, until a cake tester comes out cleanly. Allow cake to cool in the pan.
  6. Make the glaze: Whisk together lemon juice and powdered sugar. Pour over cake before serving.

*The cake recipe is adapted from Barry at http://www.rockrecipes.com/lemon-velvet-cake/*

Lemon Buttermilk Bundt with Tart Lemon Glaze for #BundtBakers from Sew You Think You Can Cook

And don’t forget to take a peek at what other talented bakers have baked this month:

Bee’s Knees Lemon Honey Bundt from Food Lust People Love

Blueberry-Lemon Breakfast Bundt from Cali’s Cuisine

Bundt Cake de Limón from La Mejor Manera de Hacer

Eggless Lemon Bundt Cake from Seduce Your Tastebuds

Extra Lemon Bundt Cake from Los Chatos Chefs

Lavender Lemon Cake from Magnolia Days

Lemon & Lime Cheese Bundt Cake from Un Mordisco Un Pecado

Lemon Apple Upside Down Bundt Cake from Simply Veggies

Lemon Basil Bundt Cake from Tartacadabra

Lemon Bundt Cake from Recipes, Food and Cooking

Lemon Confetti Bundt Cake from Our Good Life

Lemon Curd Bundt Cake with Lemon Glaze from I Love Bundt Cakes

Lemon Honey Bundt Cake from Brunch with Joy

Lemon Marble Bundt Cake from Jenny and Sweets

Lemon Poppy Seed Bundt Cake from Liv for Cake

Lemon Poppy Seeds Bundt Cake from La Cocina de Aisha

Lemon Poppyseed Bundt from A Day in the Life on the Farm

Lemon Rhubarb Bundt Cake from From Gate to Plate

Lemon Ricotta and Poppyseed Bundt Cake from Spice Roots

Lemon Ricotta Bundt Cake from Love and Confections

Lemon-Cranberry Poppyseed Bundt Cake from Take A Bite Out of Boca

Mini Limoncello Bundts from Living the Gourmet

Pink Lemon Pound Cake from Making Miracles

Pink Lemonade Bundt from Jane’s Adventures in Dinner

Rhubarb Pound Cake Bundt with Lemon Glaze from Brooklyn Homemaker

Soft Lemon Rosemary Bread from Passion Kneaded

Spring Strawberry Lemon Bundt Cake from Adventures in All Things Food

Strawberry Lemonade Bundt Cake from Baking and Creating with Avril

Sweet Lemon Bundt with Blackberry Glaze from From My Sweet Heart

All recipes and photographs can be found on our individual blogs, on our Pinterest board, and the #bundtbakers homepage.

The D.C. Zoo + Honey Aebleskiver

Yesterday I mentioned that over Memorial Day weekend we took a road trip to D.C. to visit Tara (of Tara’s Multicultural Table) and her family. We’ve known this wonderful family for almost 10 years! Tara’s husband went to Auburn with my husband and me. It wasn’t until we were both stationed in the FL panhandle together that we became close friends. This year will be the first 4th of July since 2010 when we won’t be together, so we had to fast forward that weekend to Memorial Weekend instead!

family photos

On Saturday we headed into the city to check out the zoo. Did you know that there are a LOT of people in D.C.?!

It was a beautiful, warm day and a lot of the animals were finding shelter away from prying eyes. The first half of the day was spent trying not to run over toes with the strollers and seeing empty habitats. But then all the frustration was forgotten when the tiger was highly active, running around his habitat and jumping in the water. We really felt sorry for him – as the only active animal at the zoo he received a lot of attention from “roaring” and yelling children. His tail was twitching and his gaze kept moving up towards the source of the noise. We were able to get some incredible pictures though and the little man woke up in time to see the tiger. I got the moment I was hoping to have watching him notice the tiger and like it! (War Eagle!)

tigerOn Sunday after a trip to the farmer’s market (documented yesterday) I got to do what I’ve missed most – cooking with a friend. I’ve been watching Evan help Tara in the kitchen via text messages and blog posts and it was so sweet to see him in action. He helped us whisk the eggs, pour the vanilla, and manned the stand mixer. All while my little man was being entertained by alphabetic fridge magnets.

cooking

During #BrunchWeek one of my fellow bloggers posted a recipe for Nutella Aebleskiver. I immediately shared the recipe with Tara because (a) she loves Nutella anything and (b) I thought she had one of those fancy aebleskiver pans. She didn’t… at the time. Within half an hour she’d ordered one, saying it’d been on her Amazon wish list for quite some time. Happy Mother’s Day to her!

aebleskiver pan

We made two different flavors, the suggested Nutella and honey. We decided that I’d photograph and blog the honey and she the Nutella. That was another fun moment for me, getting to use her photography set up! Their house doesn’t let in much light and the window that lets in the most light is upstairs. Right by the window she has a table set up and has made a few different painted boards. She has a butcher’s rack complete with different napkins, placemats, and other specialty cookware. Evan even has his own space out of the way where he can color while Tara takes her wonderful food photography. Tara has much more patience and dedication than I when it comes to photography (I just step outside, weather permitting, and snap up to 5 photos).

honey aebleskiver | sew you think you can cook

For the Aebleskiver recipe, please check out Tara’s post from yesterday.

BBQWe had such a great time going to visit Tara and her family, and getting to meet our Goddaughter, Claire! We’d been needed to get away and a road trip was just what we needed. The drive to Virginia was beautiful, lots of hills, mountains, and greenery. On the way back, in the middle-of-nowhere WV, we stopped for BBQ on the side of the road. It was so good, and it was the little man’s first BBQ – he absolutely loved it and ate about a quarter of my pulled pork.

girls and boys

Disclaimer: This post contains affiliate links.

Brussels Sprout Salad with Caramelized Onions

Over Memorial Weekend we went to D.C. to go visit Tara (of Tara’s Multicultural Table) and her family. There will be more on that trip tomorrow, so stay tuned! On Sunday, we went to a Farmer’s Market. We were so happy to have decided to drive so we could actually buy produce to take home with us the next day!

Dale City Farmer's Market

We took home two cartons of big, beautiful Brussels sprouts, a bunch of red beets, cinnamon peanut butter from Sprelly, sweet potato pasta from Gypsy Hill, and some local honey.

I’ve used the peanut butter in a popcorn recipe that you’ll see in July. I’ve used one beet to make some sweet potato beet baby food and another for a beet potato salad, I’m not sure yet when I’ll share that latter recipe with you. The honey is about to be opened (I just emptied what we had already) and I’m still deciding what to do to highlight the fresh pasta. The Brussels sprouts are showcased in today’s recipe.

I had planned on making this Brussels sprout salad a few days after we got back from our trip but a night of feeling ill postponed the dinner plans for when our family was here for the little man’s baptism. With 5 extra people who also enjoy Brussels sprouts I had to expand my supply with a bag from the grocery store. Separating the leaves of the sprouts to create the “lettuce” for the salad is tedious work, the large Brussels sprouts from the Farmer’s Market were very much appreciated! As was the help I recruited from the moms.

This salad does take some time to make, but it can easily be done in stages. And it is absolutely worth it! We’ve never had Brussels sprouts raw before and tossed in a salad with warm caramelized onions and tart dried cherries is a fresh way to enjoy this vegetable in the spring and summer.

This salad makes 8 servings. I paired it with grilled pork chops and mashed potatoes.

Brussels Sprouts Salad with Caramelized Onions

Ingredients:

  • 4 tbsp butter
  • 2/3 C plus 4 tbsp olive oil, divided use
  • 4 Vidalia onions, sliced
  • 4 tsp brown sugar, divided use
  • 2 lb Brussels sprouts, leaves removed
  • 2 tbsp dried cherries (or more, to taste)
  • 1/2 C apple cider vinegar
  • 2 tsp agave
  • 4 tsp Dijon mustard

Steps:

  1. In a large skillet over medium heat melt butter and 4 tbsp olive oil. Add sliced onions and caramelize for 1 hr. In last few minutes stir in 2 tsp brown sugar and a little bit of salt. (You could also do this in the slow cooker.) Set aside.
  2. Make dressing: Whisk together vinegar, 2 tsp brown sugar, agave, mustard, and 2/3 C olive oil. Season to taste with S+P.
  3. Place Brussels sprout leaves in a microwave safe bowl, cover with plastic wrap, and microwave about 1 minute. Note: This will not cook the sprouts but will warm them slightly. 
  4. Toss warmed Brussels sprouts with dried cherries, caramelized onions, and dressing.

*This recipe is modified from Susan at http://thewimpyvegetarian.com/2014/11/warm-brussels-sprouts-salad-with-caramelized-onions/*

Brussels Sprout Salad | Sew You Think You Can Cook

Mongolian Beef

There used to be the best Chinese take-out place back home called Beijing but they closed up shop within the last five years and my parents haven’t been able to find anything as good.

And neither have I. I would always order the Mongolian Beef. And when Beijing wasn’t available to me after I left home I haven’t been able to find a Mongolian Beef recipe even close – in fact, I’ve not even enjoyed it when I’ve tried other restaurants’ versions! As a result my Chinese take-out order has changed to either Sesame Chicken or Orange Chicken.

I’ve been saving Mongolian Beef recipes on foodgawker for quite some time and with our Stir-Fry-Day Friday menu plan (which hasn’t been as successful as Mexican Monday I hate to admit) I knew it was time to give it a shot.

The Mongolian Beef from Beijing had broccoli in it so I added some broccoli. But I didn’t stop there. I had a little bit of sliced red bell pepper in the fridge and some green beans so I added those in too. Hey, the point of Stir-Fry-Day Friday was to add more veggies into our life!

Another advantage, or so I thought, of doing Stir-Fry-Day Friday was to have veggies and meat that the little man could eat. But I was wary of giving him soy sauce because of the high sodium content, even though we use low-sodium. Soy is also a high allergen, although not one in our family tree.

IMG_3350I finally let him try the Mongolian Beef and he loved it! He wouldn’t eat the bell pepper (which is funny because that was one of the first foods he ate) and the green beans were still pretty crunchy because I like the texture. He loved the beef and even surprised us by grabbing some broccoli on his own.

Mongolian Beef

Ingredients:

  • 1/2 C soy sauce
  • 1/2 C brown sugar
  • 3 garlic cloves, minced (I used 3 tsp Gourmet Garden garlic paste)
  • 2 tsp fresh grated ginger (I used 1 tsp Gourmet Garden lightly dried ginger)
  • 1/2 C plus 2 tsp vegetable oil, divided use
  • 1 lb flank steak, cut into strips across the grain
  • 1/4 C cornstarch
  • optional veggies: frozen broccoli, red bell pepper, fresh green beans

Steps:

  1. In a small saucepan heat soy sauce, brown sugar, garlic, ginger, 2 tsp vegetable oil, and 1/2 C water for 5-10 minutes or until thickened.
  2. In a large bowl, toss steak in cornstarch.
  3. In a large skillet or wok heat 1/2 C vegetable oil over medium-high heat. Add beef and stir fry until browned and cooked through, 2 minutes. Remove to a paper towel lined plate and discard the oil.
  4. If using, saute veggies in the same skillet. Return the beef to the pan along with the sauce from Step 1. Cook until sauce is thickened and coats the beef and veggies. Serve with white rice.

*This recipe is adapted from Chungah at http://damndelicious.net/2013/10/05/pf-changs-mongolian-beef-copycat-recipe/*

Mongolian Beef | Sew You Think You Can Cook

Disclaimer: I received Gourmet Garden product for participating in #HotSummerEats. I have received no additional compensation for this post and the opinions expressed here are my own and the recipe shared in the review of this product was not sponsored.

Blogger CLUE: Apple Chips

blogger CLUE

This month my Blogger CLUE friends and I are going on a picnic! We were tasked with searching our assigned blogs for picnic food. With the beautiful weather, the season is just begging us to bring a blanket and sit outside for hours.

I was assigned the blog A Mama, Baby, & Shar-pei in the Kitchen written by Alice. Alice is a mother to two active girls and one funnily named puppy. She gives a story about her dog’s name (Patella Starscream) and it made me think very much of my husband, too, who would also have loved to name our child after a Transformer.

In searching through Alice’s blog I discovered that we share a love for Harry Potter. She created her own Felix Felicis! (For those of you non-HP nerds, Felix Felicis is a potion that provides the drinker luck for a day. Alice’s version is a cold remedy and I’ll definitely have to try it when cold season comes back around.) I also stumbled up a post about creating Ciabatta in which she likened herself to Hermione Granger. Seriously, Alice and I need to meet but as she lives in England I don’t see that happening.

On my hunt of picnic foods I narrowed it down to Buttermilk Fried Chicken, Pasta Salad, and Apple Chips. As you can tell, I settled on Apple Chips. Apple chips are incredibly easy to make and yet I’ve kept crossing them off my to-do list. For Christmas TWO years ago I’d asked for a mandolin with the intention of making apple chips. Finally the moment has come, thank you Alice and Blogger CLUE for the push! Alice used Granny Smith apples for her chips and while I do prefer that variety I wanted to try and recreate those bagged apple chips I enjoyed as a kid so I grabbed Red Delicious. (I NEVER buy Red Delicious apples, the texture of them is not my favorite and I don’t feel they have that apple crunch and quality that apples should have. But, for apple chips – perfect.)

When I started typing up this post I realized I forgot a step in making the apple chips. How sad is that?! There are only three steps! (Four if you count preheating the oven.) I forgot to spray the chips with cooking spray before seasoning and putting them in the oven so they didn’t hold their crisp. I have another apple though and I’m going to give this snack another try.

Apple Chips

Ingredients:

  • 1 apple (I used Red Delicious)
  • pumpkin pie spice (or other spice/spice blend)
  • cooking spray

Steps:

  1. Preheat oven to 200 degrees F and arrange racks in top third and bottom third of the oven. Line two cookie sheets with parchment paper.
  2. Using a mandolin (or very sharp knife) carefully cut apples to 1/8″ thickness. Remove any seeds.
  3. Place apples in a single layer on the prepared cookie sheets. Spray gently with cooking spray. Sprinkle with pumpkin pie spice.
  4. Bake 2 hours, or until crisp. Gently peel the apples up from the parchment paper and allow to cool on the cookie sheets. Store in an air tight container.

*This recipe is adapted from Alice at http://www.acookingmizer.com/2011/10/20/make-your-own-apple-chips/*

apple chips | sew you think you can cook

Here’s a list of the other players of Blogger CLUE this month:

#HotSummerEats: Asian Sesame Pasta Salad

HotSummerEatsEven though grilling is quintessential to summer eating, I find that pasta salads are equally synonymous with summer gatherings. Whether it’s a barbecue, a picnic, or a potluck, there’s always a pasta salad handy to round out your plate. A lot of people try to avoid mayonnaise based pasta salads when the weather is warm and turn instead to lighter versions using vinaigrettes and salad dressings.

b8882-tlishT.Lish provided participating bloggers with their three flavors of vinaigrettes: Asian Sesame, Chipotle, and Sweet Garlic. As you can tell from the blog post title, I used the first flavor for a pasta salad. The Chipotle was a fan favorite when we had friends over for wings (and I served up some Garlic Hot Wings along with a couple other flavors). The Sweet Garlic is my personal favorite and have tossed it on haricot vert for a simple side dish.

There are many veggie add-ins that would work with the Asian Sesame vinaigrette. I was really hoping to add baby corn to my salad but my grocery store didn’t have any. Broccoli, snap peas, cucumber, and carrot would also work. You could even turn this pasta salad into an entree by adding some cocktail shrimp!

An Original Recipe

Asian Sesame Pasta Salad

Ingredients:

  • 2 C uncooked rotini pasta
  • 3/4 C frozen shelled edamame, thawed
  • 1/3 C diced red bell pepper
  • segments from 1 1/2 – 2 mandarin oranges
  • 1/2 C Asian Sesame Vinaigrette
  • juice 1/2 – 1 mandarin orange

Steps:

  1. Cook pasta in boiling salted water until al dente.
  2. In a bowl, toss together veggies, mandarins, and cooked pasta.
  3. In a small bowl, whisk together vinaigrette and mandarin orange juice. Season to taste with S+P. Add to pasta salad and toss to combine. Keep cold until ready to serve.

Asian Sesame Pasta Salad for #HotSummerEats from Sew You Think You Can Cook

Today is the last day to enter our giveaway and be sure to check out the other bloggers who posted more summertime recipes today:

Thank you to #HotSummerEats sponsors BenBella Vegan, Caribeque, Casabella, Gourmet Garden, Intensity Academy, Not Ketchup, Out of the Weeds, Pirate Jonny’s, Quirk Books, Spicely Organics, T.Lish , and Voodoo Chef for providing the prizes free of charge. These companies also provided the bloggers with samples and product to use for#HotSummerEats without additional compensation. All opinions are my own.

#HotSummerEats: Herby Chicken Burgers

HotSummerEats#HotSummerEats hosted by Camilla of Culinary Adventures with Camilla continues through the weekend! While it’s technically still spring, the weather is warm (or well, it’s supposed to be – Ohio needs to get its act together!) and the pull to get grilling is strong. I couldn’t go through this entire event without heading outside and throwing some burgers on the grill.

I decided to use the blank canvas of chicken to form my patties so I could fill them with lots of flavor thanks to #HotSummerEats sponsor Gourmet Garden. 07f54-gourmet2bgardensI love using their stir-in-pastes and am also falling in love with their lightly dried herb selection. Gourmet Garden herbs are a perfect way to add fresh herbs to dishes – I don’t have an herb garden as I have a thumb as black as it gets and I don’t like spending the money on fresh herbs unless I know I’ll go through the whole bunch because otherwise it ends up being a waste and weeks later I find green mush hiding in my fridge.

Next time you have people over for burgers and dogs offer up this moist and flavorful chicken burger.

An Original Recipe

Herby Chicken Burgers

Ingredients:

Steps:

  1. In a bowl mix chicken, panko, milk, Italian herbs paste, parsley paste, garlic paste, salt, pepper, and chili flakes. When burger mixture is combined divide into four equal sized patties.
  2. Grill over medium heat 7 minutes per side, or until an internal temperature of 165 degrees F is reached.

Herby Chicken Burgers for #HotSummerEats from Sew You Think You Can Cook

Don’t forget to enter our giveaway and be sure to check out the other bloggers who posted more summertime recipes today:

Thank you to #HotSummerEats sponsors BenBella Vegan, Caribeque, Casabella, Gourmet Garden, Intensity Academy, Not Ketchup, Out of the Weeds, Pirate Jonny’s, Quirk Books, Spicely Organics, T.Lish , and Voodoo Chef for providing the prizes free of charge. These companies also provided the bloggers with samples and product to use for#HotSummerEats without additional compensation. All opinions are my own.

#HotSummerEats: Cherry Chipotle Baked Beans

HotSummerEatsWe’ve just crossed the halfway point of #HotSummerEats hosted by Camilla of Culinary Adventures with Camilla. My menu continues with my husband’s favorite recipe of not only the week but of any that I’ve created to date.

I was happy to see that Not Ketchup was sponsoring this event. 64b31-not2bketchupThey generously provided bottles of their dipping sauce during last year’s #10DaysofTailgate during which I made Maize and Blue Chicken Salad. This time I requested a bottle of their Cherry Chipotle dipping sauce with the plan to make baked beans.

I had so much fun creating my Whiskey Bacon Baked Beans that I knew I wanted to try making more flavors. During that first batch of beans I realized just how much 1 lb of beans really is so I decreased the amount but feel free to double my recipe if you’re feeding a crowd. I actually made these beans twice – each time bringing them to a small potluck, and each time getting compliments. I kept this recipe vegetarian for some of my guests but feel free to substitute chicken stock or even add bacon!

An Original Recipe

Cherry Chipotle Baked Beans

Ingredients:

  • 1 C dry great northern beans (soaked and drained according to package directions)
  • 1/2 red bell pepper, diced
  • 1 Vidalia onion, diced
  • 1/4 C Cherry Chipotle Not Ketchup
  • 2 tbsp molasses
  • 1 tsp Kosher salt
  • 1/2 tsp ground mustard
  • 1/4 tsp black pepper
  • pinch cayenne (optional and to taste)
  • 1 1/2 C vegetable broth

Steps:

  1. Place all ingredients in slow cooker. Stir. Cook on LOW 6 – 7 hours until beans are tender and sauce thickened.

Cherry Chipotle Baked Beans for #HotSummerEats from Sew You Think You Can Cook

Don’t forget to enter our giveaway and be sure to check out the other bloggers who posted more summertime recipes today:

 Thank you to #HotSummerEats sponsors BenBella Vegan, Caribeque, Casabella, Gourmet Garden, Intensity Academy, Not Ketchup, Out of the Weeds, Pirate Jonny’s, Quirk Books, Spicely Organics, T.Lish , and Voodoo Chef for providing the prizes free of charge. These companies also provided the bloggers with samples and product to use for#HotSummerEats without additional compensation. All opinions are my own.