Dominican Chimichurri Burgers

Did you enjoy watching the Olympics earlier this month?

I’m sorry to say that I wasn’t able to watch as much of the competition as I’d have liked. Being on the West Coast [for the first time] made watching Prime Time a little difficult as I saw everything on social media posted by my friends and family and NBC in the afternoon before it was finally broadcast out here.

And to add insult to injury, Prime Time happens to be bed time for my boys. I’d hit “record” on the DVR but by the time I sat back in front of the TV I was definitely falling asleep.

What does any of this have to do with the recipe I’m blogging about today?

For the Opening Ceremonies we were invited to an Olympics party. Everyone was to bring a dish representing a different country; the hosts were taking care of America.

I took on both the Dominican Republic and Poland – taking the opportunity to delve into my family’s heritage. (My dad is Dominican and my mom Polish.)

Unfortunately we had to back out the day of the event due to the hectic-ness that had been my husband’s work that week. I’d even had to take two attempts at my Polish dish (which I’ll share during the holidays)!

The dish representing the DR: Chimichurri Burgers! My dad thought I was insane when I told him what I was making. “The DR is not known for their burgers.” A Google search tends to disagree. The “chimi” is quite a popular street food burger.

The chimi, as it’s known, is also now quite popular in my house! As I do with all burgers now, 1/4 of the mixture was formed into meatballs for the boys. The remaining three patties were were devoured! Yes, I had a burger and a half myself. Yes, I want more.

Dominican Chimichurri Burgers

Ingredients for burgers:

  • 1 lb ground beef
  • 3 1/2 tbsp soy sauce, divided use
  • 2 tbsp Worcestershire sauce
  • 3 tsp garlic powder, divided use
  • 2 tsp onion powder
  • 1 tsp Kosher salt
  • 1/2 tsp black pepper
  • 2 tsp olive oil
  • 3 C sliced cabbage
  • 1 tomato, thickly sliced
  • sliced red onion
  • 4 hamburger buns, toasted
  • 1/4 C ketchup
  • 1/4 C mayonnaise

Steps:

  1. In a large bowl, mix ground beef, 1 1/2 tbsp soy sauce, Worcestershire sauce, 1 tsp garlic powder, onion powder, salt and pepper. Divide mixture into 4 patties.
  2. Grill burgers 4 minutes on each side, or to desired doneness.
  3. Heat in a large skillet over medium heat. Saute the cabbage with remaining soy sauce and garlic powder until tender, about 5 minutes. Remove from skillet and set aside.
  4. Add olive oil to the same skillet and sear tomato slices and onion slices for a minute on each side.
  5. In a small bowl, whisk together the ketchup and mayonnaise with a dash of soy sauce.
  6. Assemble burgers: Spread some of the ketchup mixture on the bottom hamburger buns. Top with a burger patty, tomato, onion, cabbage, and more ketchup mixture.

*This recipe is adapted from Erin at http://thecrumbycupcake.com/dominican-chimichurri-burger/*

"The Chimi" is a popular burger from the Dominican Republic, flavored with soy and Worcestershire, topped with sauteed cabbage, onion, and tomato. | Sew You Think You Can Cook | http://sewyouthinkyoucancook.com

#MuffinMonday: Key Lime Pie Muffins (two ways)

fb5cd-muffin2bmonday2bcrop#
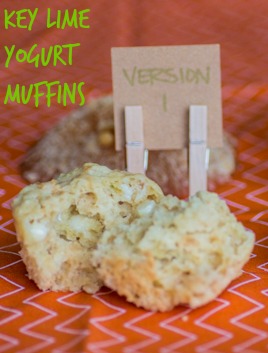
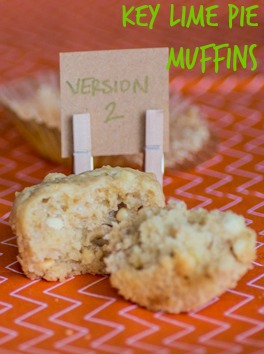
MuffinMonday is a group of muffin loving bakers who get together once a month to bake muffins to brighten their Mondays. There isn’t a theme to #MuffinMonday posts so anything goes, as long as it’s a muffin!

You can see all our of lovely muffins by following our Pinterest board. Updated links for all of our past events and more information about Muffin Monday can be found on our home page.

I had made muffins with Firecracker on the day of last month’s #MuffinMonday reveal and thought to myself, “Wow, I’m on top of it!” I scooted on over to the Facebook page to submit my recipe title and stopped in my tracks. Turned out August’s reveal lands on my birthday!

Just because it’s #MuffinMonday doesn’t mean I have to stop my streak of Key Lime Pie birthday treats! I shared the traditional version of my favorite dessert on my first birthday while writing Sew You Think You Can Cook. I think I’ll have to make it again this year and vastly improve upon those photos! Last year I transformed the dessert into a bundt cake. (The year in between those I was still getting used to being a brand new mom and shared some adorable baby quilts instead of a recipe.)

I was surprised to find that a search for key lime pie muffins yielded very little and most with coconut. I decided to make my own! I couldn’t decide which route to take and made two versions of Key Lime Pie Muffins.

Version 1 uses key lime flavored Greek yogurt and doesn’t have any added sugar. I substituted some of the flour for crushed graham crackers, and, for good measure, added white chocolate chips. This recipe makes 12 muffins.

Key Lime Yogurt Muffins for #MuffinMonday from Sew You Think You Can Cook

Version 2 uses key lime juice and has both white and brown sugars. I again substituted some of the flour for crushed graham crackers and added white chocolate chips. This recipe makes 8-9 muffins.

Key Lime Pie Muffins for #MuffinMonday from Sew You Think You Can Cook

We enjoyed, and ate, both versions happily. The key lime flavor is much more pronounced in Version 2; it did strengthen after a day or two in Version 1. The graham cracker flavor is more pronounced in Version 1. Both muffins were incredibly moist, but Version 2 gets a little bit of a “crunch” thanks to the sugar. It almost goes without saying that Version 1 is healthier, and a muffin you don’t feel guilty about eating two of in one sitting; it did stick to the liners freshly out of the oven, but come day 2 that wasn’t much of an issue.

Key Lime Yogurt Muffins

Ingredients:

  • 1 C flour
  • 3/4 C crushed graham crackers
  • 2 1/2 tsp baking powder
  • 1/2 tsp baking soda
  • 1/2 tsp salt
  • 1 egg
  • 1 container (5.3 oz) key lime Greek yogurt
  • 1/3 C milk
  • 1/4 C vegetable oil
  • 1 lime, zested and juiced
  • 3/4 C white chocolate chips

Steps:

  1. Preheat oven to 350 degrees F. Line a muffin tin with liners.
  2. In a large bowl, whisk together the flour, graham cracker crumbs, baking powder, baking soda, and salt.
  3. In another bowl, whisk together the egg, yogurt, milk, oil, and lime juice and zest.
  4. Add the wet ingredients into the dry and mix until just combined. Fold in the chocolate chips. Divide batter between the 12 muffin cups.
  5. Bake 15 minutes, or until a toothpick inserted comes out cleanly.

*This recipe is modified from http://www.bettycrocker.com/recipes/greek-yogurt-blueberry-muffins/be7753bf-4d1a-4834-be0f-ded299caa589*

Key Lime Pie Muffins

Ingredients:

  • 1 C flour
  • 1/2 C crushed graham crackers
  • 2 tsp baking powder
  • 1/4 tsp salt
  • 1 egg
  • 1/4 C sugar
  • 1/4 C brown sugar
  • 1/4 C vegetable oil
  • 1/3 C buttermilk
  • 3 tbsp key lime juice
  • zest 1 lime
  • 1/2 C white chocolate chips

Steps:

  1. Preheat oven to 350 degrees F. Line a muffin tin with liners.
  2. In a large bowl, whisk together the flour, graham crackers, baking powder, and salt.
  3. In another bowl, beat together the egg, sugar and brown sugar until smooth. Add in the vegetable oil, buttermilk, key lime juice, and lime zest.
  4. Add the wet ingredients into the dry and mix until just combined. Fold in the chocolate chips. Fill the prepared muffin tins 3/4 of the way. Makes 8-9 muffins.
  5. Bake 18-21 minutes, or until a toothpick inserted comes out cleanly.

*This recipe is modified from Sally at http://sallysbakingaddiction.com/2014/02/18/master-muffin-mix/*

Let me know which one you’d prefer to try – or better yet, make them both and then tell me which is your favorite!

Key Lime Pie Muffins for #MuffinMonday from Sew You Think You Can Cook (pin)

And don’t forget to check out these other muffin recipes:

Apple Zucchini Muffins by Palatable Pastime

Blackberry Lemon Thyme Muffins by Food Lust People Love

Doughnut Muffins by Karen’s Kitchen Stories

Lemon Muffins by A Day in the Life on the Farm

Whole Wheat Pear & Pecan Streusel Muffins (aka the Crack Muffins) by Farm Fresh Feasts

Plantain Muffins by Passion Kneaded

Berry Yummy Hummus

When I saw Strawberry Hummus on Facebook I was instantly intrigued. I wasn’t sure if we were talking a sweet dip chock full of garbanzo bean goodness or strawberries used in a savory application. Yes, the latter is possible. I’ve used strawberries with pork, with shrimp, and on pizza before to great success.

I vowed that the strawberry hummus would be made as soon as we’d polished off the regular hummus already in the fridge. And I did just that!

I made some adjustments to the recipe. 1) I’d forgotten to pick up lemons, so I decided to use the Meyer lemon olive oil. 2) I, as typical with an infant in the house, I used agave in place of honey. And 3) I broke open the bottle of raspberry balsamic vinegar for some extra berry flavor!

Firecracker has had a roller coaster relationship with hummus in his extensive 1.5 year solid food eating life. Currently, he loves it. As berries are probably his number one snack of choice I had high hopes for this dip. Unfortunately, putting his two favorite foods together does not yield a perfect snack. In fact, when I pulled out the hummus the following day to give him another taste he declared, “I want the real hummus.” By which he means the store bought plain hummus. I’m afraid he’ll never trust a homemade hummus again! The strawberries helped me achieve the smoothest hummus I’ve made to date, too. Sigh…

Berry Hummus (toddler)  Sew You Think You Can Cook

Treat and I quite enjoyed the hummus though! This unique hummus had an earthy, yet slightly fruity, taste perfect for pita chips, pretzels, and even apple slices. I’m sure cucumber sticks would compliment the dip well, too.

Berry Hummus (baby)  Sew You Think You Can Cook

Berry Yummy Hummus

Ingredients:

  • 8 oz strawberries, hulled
  • 1 can (15 oz) chickpeas, drained and rinsed
  • 1 clove garlic
  • 2 1/2 tbsp tahini
  • 1 tbsp Meyer lemon olive oil
  • 1 tsp agave
  • 1 tsp raspberry balsamic vinegar, plus more for serving
  • 1 tsp fresh basil

Steps:

  1. Place the strawberries in a food processor. Pulse until finely chopped, but not pureed. Remove to a bowl and set aside.
  2. Add the chickpeas, garlic, tahini, olive oil, agave, and balsamic in the food processor. Blend until smooth. Return the strawberries, reserving a couple of tablespoons for garnish, to the food processor along with the basil. Pulse until fully combined.
  3. Serve hummus with a drizzle of extra balsamic vinegar and the remaining strawberries.

*This recipe is modified from Danielle at http://www.fancymadesimple.com/recipes/appetizers/strawberry-hummus/*

Berry Yummy Hummus made with Strawberries and Raspberry Balsamic Vinegar makes for a fun take on Hummus | Sew You Think You Can Cook | sewyouthinkyoucancook.com

Dutch Cream Waffles

No milk? No sugar? Want waffles? No problem!

These waffles can be made with only three, well if you count salt then four, ingredients! Eggs, heavy cream, and flour.

As my mother has pointed out to me on many an occasion, I use a lot of heavy cream in my kitchen, so it’s not uncommon that I’ll have run out of milk before running out of cream and when that happens, these waffles are a life saver. Sorry, Mom, I guess you won’t be making these waffles anytime soon. But, for the rest of you who may use heavy cream in your coffee, or simply have some leftover from another recipe, I highly encourage its use in this breakfast dish!

Four Ingredient Waffles (baby1)  Sew You Think You Can Cook

We’ve made these waffles countless times already, and the photographs shared can attest to how long they’ve been a family favorite; look how little Firecracker is! These photos were taken before Treat was born! 6 days before, to be exact. Back when I thought I knew what wild was. I mean, seriously, he’s actually sitting in a chair and using a fork like a civilized member of society! Now I have two wild and crazy boys who can barely stay in a chair if they’re strapped in and to whom a fork is more a dangerous weapon than a tool used for bring food to one’s mouth.

Four Ingredient Waffles (baby2)  Sew You Think You Can Cook

Dutch Cream Waffles

Ingredients:

  • 3 eggs, separated
  • 1 C heavy cream
  • 1 C flour
  • 1/4 tsp salt

Steps:

  1. Whisk egg yolks until frothy. Add the heavy cream and whisk until combined.
  2. In a large bowl, whisk the flour and salt. Add the wet ingredients to the dry and mix until incorporated.
  3. Place the egg whites in a large bowl and whip with a hand mixer until stiff peaks form. Gently fold the egg whites into the waffle batter until just combined – do not over mix!
  4. Pour 1/3 C of the waffle batter into a greased waffle iron and cook until golden.

*This recipe is adapted from Tiffany at http://www.lecremedelacrumb.com/2015/01/4-ingredient-dutch-cream-waffles.html*

Dutch Cream Waffles: eggs, cream, flour, and salt | Sew You Think You Can Cook | sewyouthinkyoucancook.com

#SundaySupper: Easy Taco Recipes for Taco Tuesday


Warning! This recipe is insanely addicting. It will make you want to go out and buy all of the chorizo you can find. In fact, I did just that. However, at the time of purchase there were only two packages of chorizo left on the shelf. But still! I don’t think I can go to the store without getting a package. All because of these tacos. Truth be told, we made these twice in one week! They’re that good. We’ve told friends about them and have promised to make them next time they come over. I need to double the amount of chorizo from now on so that we’ll actually have leftovers!

The first time I made these tacos I did everything ahead of time. I made the salsa and crema around 4pm. Because Treat took a nap I jumped at the opportunity and cooked the chorizo, too. Not one to squander my slightly less hectic house, I decided to assemble a couple of tacos and have a photo shoot while the light was still good.

It’s hard not to yell at your toddler for standing on his chair while you’re standing on yours to get that aerial shot. You’ll see he has some of that salsa on his beloved Thomas plate. He was mostly interested in picking out all of the black beans, one of his favorite foods.

IMG_9826

We had to take a break from the photo shoot to bring Treat up from his nap. Both boys ended up eating their dinner before Daddy got home from work! At least they both adored the dish enough to still sit with us at the table nibbling while we scarfed down some tacos.

Firecracker also decided to help me with some food styling by dumping a heaping spoonful of salsa onto one of the tacos. (Good thing I was already done!)

IMG_9830

That helpful toddler ensured that his little brother had enough salsa to eat, too. It’s moments like these that melt my heart. They’re such good brothers to each other. The love that Treat has had for his older brother has been obviously visible in his adoring looks since month 1. Firecracker also took to our family’s new addition within a couple of weeks, trying to say his name long before the rest of his vocabulary emerged. I just hope this brotherly love lasts them a lifetime.

IMG_9832

Can you believe that until these tacos I’d actually never had queso fresco!? Even with my series of Mexican Monday, which has been severely lacking lately. I’ve typically been “too cheap” or simply unable to find it. Now, living in Southern California, I had no trouble finding a large variety of Mexican cheeses at the store. The queso fresco reminded me of a saltier version of string cheese, so if you can’t find it, I’d suggest shredded mozzarella.

I had bought some typical taco toppings, lettuce and tomato, and then completely forgot about them! Honestly, these tacos shine without them and the lime and cilantro crema keeps them feeling light and fresh.

Chorizo Tacos with Black Bean & Corn Salsa

Ingredients for tacos:

  • 1-2 lb ground chorizo, casings removed if using links
  • soft shell taco tortillas, we prefer flour but corn would work well, too
  • queso fresco

Ingredients for salsa:

  • 1 can (15 oz) black beans, drained and rinsed
  • 1 can (15 oz) fire roasted corn, drained
  • 1/4 C diced red onion
  • zest 1 lime
  • juice 1 lime
  • 1-2 tbsp agave, to taste
  • fresh cilantro, torn, to taste

Ingredients for crema:

  • 1/4 C sour cream
  • 1/4 C fresh cilantro, chopped
  • zest 1 lime
  • juice 1 lime

Steps:

  1. Cook ground chorizo in a skillet over medium high heat. Drain and set aside.
  2. Make salsa: Combine all salsa ingredients in a large bowl. Season to taste with S+P. Keep in fridge until ready to serve.
  3. Make crema: Whisk together all ingredients in a small bowl. Season to taste with salt. Add water if needed to thin it out.
  4. Assemble tacos with chorizo, salsa, crema, and queso fresco. Option to add other favorite taco toppings: avocado, lettuce, tomato.

*This recipe is modified from Keri at http://fashionablefoods.com/2016/04/25/chorizo-tacos/

Chorizo Tacos with Corn & Black Bean Salsa  Sew You Think You Can Cook (1)

Update October 1, 2017: October 4th is National Taco Day and to celebrate the Sunday Supper Movement has collected about two dozen fun and simple taco recipes to celebrate! Be sure to scroll past my recipe to see the mouth watering collection for yourself!

The taco recipe I’m sharing with you today is in fact an oldie but goodie. These Chorizo Tacos with Black Bean & Corn Salsa were first enjoyed about a year ago (8/21/16 to be exact) and shared here on Sew You Think You Can Cook. I kid you not when I say these have made a very regular appearance on our dinner table since then!

Because chorizo is already seasoned with incredible Mexican flavors, all you need to do is cook it up and drain the fat! The salsa is simply mixing a few ingredients and is a favorite of my kids. The crema is another 3 ingredients. Done!

Breakfast, Dessert, and Alternative Tacos

Lunch and Dinner Tacos


Sunday Supper MovementJoin the #SundaySupper conversation on twitter on Sunday! We tweet throughout the day and share recipes from all over the world. Our weekly chat starts at 7:00 pm ET. Follow the #SundaySupper hashtag and remember to include it in your tweets to join in the chat. To get more great Sunday Supper Recipes, visit our website or check out our Pinterest board. Would you like to join the Sunday Supper Movement? It’s easy. You can sign up by clicking here: Sunday Supper Movement.

#BundtBakers: Apples

4ae7b-bundtbakerspostCan you believe we haven’t had an apple themed #BundtBakers yet?! I can’t. I love using apples in baking, often using applesauce in lieu of oil. My very first post shared with this great group of bakers was my grandmother’s Fresh Apple Bundt Cake. I’ve used apple cider and even filled a bundt cake moat with apples.

#BundtBakers is a group of bundt loving bakers who get together once a month to bake bundts with a common ingredient or theme. We take turns hosting each month and choosing the theme or ingredient. So who do I have to thank this month for picking a perfect theme? My blogging buddy Wendy of A Day in the Life on the Farm!

I thought about the ingredient. Apples. And I thought about one of my favorite afternoon snacks – apples and peanut butter! There are countless peanut butter cakes out there on Pinterest. I decided on this particular peanut butter cake and added some apple-ness to it. I used apple juice instead of coffee in the cake batter and folded in diced apples. For the glaze, I again used apple juice, this time instead of milk. The overall apple flavor is quite subtle, but the bites with apple in them are sublime.

I baked this cake while my husband was on a work trip. The consequence being that it never made it to his office to share with coworkers. I definitely started my mornings that week with a slice of Apple & Peanut Butter Bundt Cake! And I’m not even sorry about it.

Apple & Peanut Butter Bundt Cake for #BundtBakers from Sew You Think You Can Cook (3)


I stored this cake in the fridge, simply to keep it away from the fruit flies that keep frequenting my abode. Turns out a downside to no air conditioning combined with healthy (cake excluding) eating means there’s always a fruit fly or twelve finding their way back in through the screens on the open windows.

I quite enjoyed the cake eaten cold, but my husband preferred it heated in the microwave. Yes, I did save some cake for him. Though he likes to pretend that I didn’t. Not having told him what was hiding underneath the aluminum foil in the fridge. With all his complaining he sure enjoyed his fair share after the boys fell asleep!

Apple & Peanut Butter Bundt Cake

Ingredients:

  • 1 stick butter, melted
  • 1 C sugar-free apple juice
  • 1/2 C creamy peanut butter
  • 1 C sugar
  • 1 C brown sugar
  • 2 eggs
  • 1 tsp vanilla extract
  • 2 C flour
  • 1 tsp baking soda
  • 1 tsp salt
  • 1/2 C buttermilk
  • 1 -2 Granny Smith apples, chopped

Ingredients for glaze:

  • 2 tbsp creamy peanut butter
  • 1 C powdered sugar
  • 3-4 tbsp apple juice

Steps:

  1. Preheat oven to 350 degrees F. Heavily grease a bundt pan.
  2. In the bowl of a stand mixer fitted with the handle attachment, beat together the melted butter, peanut butter, and apple juice until combined. Add in the sugars, eggs, and vanilla. Mix until incorporated. Add the flour, baking soda, salt, and buttermilk until well combined. Fold in the apples.
  3. Pour batter into prepared bundt pan. Bake 50 – 60 minutes, or until a cake tester inserted comes out cleanly. Allow cake to cool before unmolding.
  4. Make the glaze: Using a hand mixer, beat the peanut butter in a large bowl. Once softened, add the powdered sugar and half of the apple juice. Continue adding apple juice 1 tsp at a time until glaze is smooth and reaches desired consistency. Pour glaze over cooled cake. Note: Any leftover glaze goes very nicely with freshly sliced apples!

*This recipe is adapted from Monique at http://divascancook.com/peanut-butter-cake-recipe-peanut-butter-frosting-easy/

Apple & Peanut Butter Bundt Cake for #BundtBakers from Sew You Think You Can Cook (2)

You can see all our of lovely Bundts by following our Pinterest board. Updated links for all of our past events and more information about #BundtBakers, can be found on our home page.

And don’t forget to take a peek at what other talented bakers have baked this month:

Apple Almond Coffee Cake with Honey Glaze by A Day in the Life on the Farm

Apple and Toasted Pecan Bundt Cake with Rum Syrup by Patty’s Cake

Apple Crumble Bundt by Jane’s Adventure in Dinner

Apple French Cruller Bundt Cake by All That’s Left Are The Crumbs

Apple Honey Blossom Bundt by Living the Gourmet

Apple Sharlotka Bundt Cake by Spiceroots

Apple Spice Bundt with Salted Caramel Sauce by kidsandchic

Apple Streusel Bundt Cake by The Freshman Cook

Apple~Cream Cheese Bundt Cake by The Queen of Scones

Chocolate Chip Apple Cake by Making Miracles

Cinnamon Apple Streusel Cake by Tea and Scones

Cinnamon Pecan Applesauce Bundt Cake by Magnolia Days

Clotted Cream & Apple Spice Bundt by Baking in Pyjamas

Double Caramel Apple Bundt by The Crumby Cupcake

Easy Peasy Lemon Squeezy Apple Bundt by Food Lust People Love

Jewish Apple Cake by I love Bundt Cakes

Jewish Praline Pecan Apple Cake by Faith, Hope, Love, & Luck Survive Despite a Whiskered Accomplice

Lighter Jewish Apple Cake by Cookaholic Wife

SRC: Nectarine Caprese Salad

newsrcbanner

It’s Secret Recipe Club Reveal Day! In the Secret Recipe Club, each participating blogger is assigned a blog from another participating blogger and secretly searches their site for something to recreate. The accompanying blog post then goes live on reveal day! So while I was immersed in my assigned blog, someone else was picking through mine! I’m so excited to be part of this group, to see what on my blog peaks other’s interests and to stumble upon new blogs and new recipes.

Tara introduced me to The Secret Recipe Club and ever since I was accepted into this fun blogging group I’ve been waiting for this day to come. The day I’d be assigned her blog, Tara’s Multicultural Table. (Tara was assigned my blog August 2014) When I saw my assignment pop in my email, I was on a walk with my mom and I literally yelled, “Yes!” and threw my arms up in the air. (You can go ahead and ask her! If you know her, that is.)

I have a dedicated Pinterest board to Tara’s blog so there wasn’t any stealthy searching for me to do this month. I’ve even commented on just about every post on her page in support of her incredible blogging career that’s blossomed over the past few years. Tara’s blog is quite different from mine and her dedication to her passion for international cuisine leaves me in awe. I don’t know how she keeps up with it! She is also the mother to two. Her kids love to join her in the kitchen and you can see fabulous photos of family bonding interspersed among stunning food photography.

Tara and I have known each other for 7-8 years, now. Our husbands were in the same ROTC class at Auburn and we were stationed in the FL panhandle together for 4 years. After that we parted ways and are hoping to be stationed together again soon!

Memorial Day 2015 we were able to reunite after almost a year apart at their home in the DC area. I got the opportunity to cook with her once again and witness her photography station. As if the timing couldn’t be perfect, we’ll be joining forces again this weekend when she comes to visit, I can’t wait for her to meet Treat! She is Firecracker’s godmother and we are godparents to Claire. The friendship we created in Florida has only grown while we’ve been separated, talking in one form or another almost daily.

tara&lauren

Okay, enough mushiness. On to the food!

I have made multiple recipes from Tara’s blog already, most posted on Sew You Think You Can Cook. There are even two or three dishes on my camera waiting for the right time to share them with you. I didn’t use those for today’s reveal though.

I gave Stuart a list of 4 things to pick from Tara’s blog: Burnt Honey Ice CreamCarrot Cheddar Crackers, Nectarine Caprese, or Popcorn Tacos. It wasn’t until after handing him the notepad with the choices that I realized we got to try the ice cream first hand during our visit last year (we’re the friends mentioned for the tea she made in her review of the cookbook, too)! The popcorn tacos have been haunting my dreams ever since she posted them and you’ll be seeing them pop up here eventually (pun slightly intended). Same goes for the crackers, I’m always looking for ways to get more veggies in Firecracker’s diet.

Stuart decided on the caprese though, and I am glad he did. While it’s quite a simple option, it’s entirely delicious. Particularly when stone fruits are ripe and readily available in these summer months. I served this salad as a starter to salmon with roasted root veggies – quite the healthy night! I have decided, without question or fail, that I do not like yellow peaches. White peaches however are fantastic. I didn’t know if the same would be true for nectarines so I picked up both varieties. Turns out, I enjoy both varieties of nectarines but would recommend the yellow for this recipe. My knife cuts weren’t exactly restaurant worthy so I decided to layer my salad instead of stack it the way Tara had.

Nectarine Caprese Salad (1)  Sew You Think You Can Cook

Nectarine Caprese Salad

Ingredients:

  • 1/4 C balsamic vinegar
  • 1 tbsp honey
  • 2-3 ripe nectarines, sliced
  • 8 oz fresh mozzarella, sliced
  • fresh basil, julienned

Steps:

  1. In a small saucepan over medium heat, combine the balsamic vinegar and honey. Reduce by about 1/2. Set aside.
  2. Layer mozzarella slices and nectarine slices. Season with salt. Drizzle with balsamic reduction. Garnish with fresh basil.

*This recipe is adapted from Tara at http://tarasmulticulturaltable.com/nectarine-caprese-with-honey-balsamic-reduction/*

Nectarine Caprese Salad for #SecretRecipeClub from Sew You Think You Can Cook

To see the other bloggers who participated in The Secret Recipe Club this month click here:

#SundaySupper: Recipes with Bacon

I often find myself sitting on recipes waiting for the perfect time to share them. I simply leave un-blogged dishes on my camera and look through my pictures when I plan out my schedule. It’s very rare that I’ll have something raring and ready to go for a blogging event before the event is announced. Such is not the case with today’s Sunday Supper! As soon as I saw the theme of Bacon announced I was prepared! Gasp! Feeling prepared is something that comes very infrequently now that I’m mothering two small boys – the youngest of whom just started solo standing and trying desperately to take those first steps and the oldest who is embracing those terrible twos at least three days a week.

I find it fitting that the bacon theme follows closely behind the corn themed Sunday Supper. Was it coincidental or planned? I don’t know, you’d have to ask the masterminds behind Sunday Supper to find out. But did you notice how many glorious corn recipes included bacon? I know mine did! And I’ve paired bacon and corn together before, too in stuffed shells. Double yum. I wonder how many of today’s recipes feature corn! You’ll have to scroll past my recipe to find out. Thanks to Erica of The Crumby Cupcake for hosting this weekend.

The cinnamon rolls I’m sharing today are a play off my favorite recipe that we make every Christmas. Instead of cranberries… bacon! And for the frosting, I used leftover glaze from my 3rd anniversary cupcakes.

Bacon Cinnamon Rolls with Maple Glaze

Ingredients for rolls:

  • 1 C warm water (105-110 deg F)
  • 2 1/4 tsp active dry yeast
  • 3 tbsp butter, at room temperature
  • 1/2 C sugar
  • 1 1/2 tsp salt
  • 1 egg
  • 3 1/2 C flour

Ingredients for filling:

  • 6 slices center cut bacon, chopped and cooked
  • 1/2 stick softened butter
  • 3/4 C brown sugar
  • 1 tbsp cinnamon

Ingredients for glaze:

  • 1 1/2 C powdered sugar
  • 1/2 C milk
  • 1/2 C canola oil
  • 1 tbsp maple syrup
  • 1/2 tsp vanilla extract

Steps:

  1. Stir yeast into the warm water. Let bloom for 5-10 minutes.
  2. Using a stand mixer fitted with the paddle, beat butter, sugar, and salt. Add the egg, beating until combined. Slowly pour in the yeast and water. Beat until combined. Add the flour about one cup at a time, beating until combined after each addition. Once the dough starts to form switch to the dough hook attachment. After all the flour has been added knead the dough for 3 minutes.
  3. Turn dough out onto a floured surface and knead by hand until smooth.
  4. Place dough in a greased bowl, cover, and let rise to double in size (about 30-60 minutes) in a warm place. (In the microwave or turned off oven)
  5. Roll dough out on a floured surface into a rectangle. Spread the dough evenly with the butter. Sprinkle with brown sugar, cinnamon, and cooked bacon. (Reserve some bacon for garnish, if desired.) Roll the dough into a log, lengthwise. Cut the dough into 2″ cinnamon rolls. Place cut side down in a 9×13 casserole dish.
  6. Cover dough with a towel and let rise for 30 minutes before baking. The rolls should have doubled in size again. (Other options: Freeze the rolls and after thawing let rise until doubled in size or place in refrigerator overnight after rising, bring to room temperature before baking.)
  7. Bake at 425 degrees for 10 minutes. Reduce heat to 350 and bake another 7 minutes, until golden brown. Let cool, slightly.
  8. Meanwhile, make glaze. Whisk together all of the ingredients for the frosting. Pour over the cinnamon rolls! Garnish with extra bacon.

Bacon Cinnamon Rolls with Maple Glaze for #SundaySupper from Sew You Think You Can Cook
Bacon in Appetizers

Bacon in Beverages

Bacon for Breakfast

Bacon for Lunch

Bacon for Dinner

Bacon as a Side Dish

Bacon for Dessert

Sunday Supper MovementJoin the #SundaySupper conversation on twitter on Sunday! We tweet throughout the day and share recipes from all over the world. Our weekly chat starts at 7:00 pm ET. Follow the #SundaySupper hashtag and remember to include it in your tweets to join in the chat. To get more great Sunday Supper Recipes, visit our website or check out our Pinterest board.

Would you like to join the Sunday Supper Movement? It’s easy. You can sign up by clicking here: Sunday Supper Movement.


Pork with Caraway and Onion

Here I am, hurriedly trying to take advantage of Treat’s nap and edit and upload photos for today’s post. As I open up my WordPress there isn’t a single draft to be found. I’m a compulsive “saver,” too, so I’m not quite sure how that happened – other than my computer died before I could plug it back in. But even still! Truth be told, I’m surprisingly taking this better than I could be. Here’s to hoping I can recreate my thoughts. Ready. Set. Go!

I can’t believe it’s taken me a good 7 months to finally crack into Rose Petal Jam: Recipes and Stories from a Summer in Poland. When Tara did a review of this spectacular cookbook, I knew I had to have it. Seriously, go read her post and you’ll be scrambling to order yourself a copy, too.

When my parents were here last month I had my mom look through the cookbook. My mom doesn’t mind cooking, but she says she hates deciding on what to cook. In fact, my blog has helped her find some new favorite dinners, and she is my biggest fan. Granted, she’s kind of obligated. Whenever she comes to visit I’ll ask what she wants for dinner and I’m always met with the same “I don’t decide” answer. Even tasked with making a decision from this Polish cookbook she wouldn’t commit to a recipe! She narrowed it down to 2 or 3 and I made the final verdict.

This Pork with Caraway and Onion (Pieczen Wieprzowa z Kminkiem) is the ultimate comfort food. Deliciously tender pork is flavored simply with salt, pepper, and caraway seeds seared and roasted underneath a pile of sweet onions.

IMG_9629

Before I get on to the recipe I have a few notes to make:

  • Pork neck is also called pork collar. I found my roast at a local Korean meat market.
  • I only used about half of the rub.
  • My onions didn’t get as golden as Beata’s, so I decided to caramelize them on the stove top while the meat rested. (Yum!)
  • We served this roast with mashed potatoes and sauerkraut.

Pork with Caraway and Onion (1)  Sew You Think You Can Cook

Pork with Caraway and Onions

Ingredients:

  • 2 lb pork neck or pork collar
  • 2 tbsp caraway seeds
  • 1 tbsp kosher salt
  • 1/2 tbsp black pepper
  • 1 tbsp olive oil
  • 2 onions, chopped
  • 1/2 C water

Steps:

  1. Using a paring knife, cut shallow diagonals on the surface of the pork.
  2. In a small bowl, combine caraway seeds, salt, and pepper. Rub on the pork. Let rest 30 minutes.
  3. Preheat oven to 350 degrees F.
  4. Heat olive oil in a Dutch oven over high heat. Sear the pork on all sides. Top with the onions and add the water. Place in the oven and roast 40-50 minutes, or until a minimum internal temperature of 150 degrees F is reached. Allow pork to rest 5-10 minutes before slicing.

Pork with Caraway and Onions  Sew You Think You Can Cook

Phew! Post scheduled as Treat’s cries come out over the monitor. Perfect timing!

Disclaimer: This post contains affiliate links.

S’more Cereal Bars

When I was sorting out my planner for the month of August I decided to start writing down food holidays, too. Just in case I manage to be on top of it enough to look at my planner early enough in the day to embrace the holidays on my social media platforms.

But when I saw that today is National S’mores Day I didn’t need any further excuse to make something. I had Rice Krispie Treats on my mind and thought it’d be a simply way to celebrate s’mores without the campfire. I decided to let the butter brown before adding the marshmallows, hoping it’d give it a little bit of a smokey quality. I mixed Rice Krispie cereal and Golden Graham cereal, and stirred in some chocolate chips.

My husband and I could hardly wait for the boys to finally go to bed so we could enjoy one of these s’more cereal bars.

I hope you all have a wonderful National S’mores Day!

S’more Cereal Bars

Ingredients:

  • 3 tbsp butter
  • 1 bag (10 oz) marshmallows
  • 4 C golden grahams
  • 2 C rice krispies
  • 1 1/2 C chocolate chips

Steps:

  1. Melt butter in a large pot over medium-low heat. Cook until butter is golden brown.
  2. Add marshmallows, cook until melted and smooth. Remove from heat. Stir in the cereal. Quickly mix in the chocolate chips.
  3. Lightly spray a casserole dish with cooking spray. Spread cereal bars into the prepared pan. Allow to cool before cutting.

S'more Cereal Bars  Sew You Think You Can Cook